
Popular categories
Looking for a yarn?


Comments / Questions (39)
![]() Solène wrote:
Solène wrote:
Bonjour, J’ai termine de réaliser ce modèle en 3,5 mais il semble petit.. je pense à le refaire mais avec des aiguilles plus grosses.. pourriez-vous me conseiller ? En 4 ? En 4,5 ? Merci beaucoup
10.04.2021 - 12:14DROPS Design answered:
Bonjour Solène, votre échantillon était-il juste? il est plus important de bien avoir les 22 m x 30 rangs que la taille des aiguilles utilisées. Retrouvez ici plus d'infos sur l'échantillon. Bon tricot!
12.04.2021 - 12:01
![]() Solène wrote:
Solène wrote:
Bonjour, J’ai fini de tricoter la première partie mais je ne comprends du tout comment tricoter le premier triangle ? Qu’entendez-vous par tricoter les 3 premières malles de M1 puis tourner et tricoter le rang suivant ? Je suis perdue.. merci beaucoup !
07.04.2021 - 17:16DROPS Design answered:
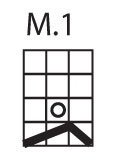
Bonjour Solène, pour former le triangle, on tricote des rangs raccourcis: tricotez les 3 premières m = M.1, tournez et tricotez ces mailles, tournez et tricotez 1 m de plus, tournez etc comme indiqué jusqu'à ce que vous ayez tricoté 30 m ( en rajoutant 1 m env ou les 3 m du M1 suivant). Bon tricot!
08.04.2021 - 07:22
![]() Lili Mets wrote:
Lili Mets wrote:
Koo 1 ring pr, kududes parempidised silmused pr ja pahempidised silmused ph - on siin vb moni trukiviga see ei tundu loogiline olevat voi ei saa ma aru
06.11.2019 - 18:17DROPS Design answered:
Tere! Muster on tõlgitud Norra keelest ja seetõttu tekib vahel sisse vigu. Teksti on nüüd kohendatud. Ehk on arusaadavam. Head kudumist!
07.11.2019 - 13:47
![]() Lili Mets wrote:
Lili Mets wrote:
Koo 1 ring pr, kududes parempidised silmused pr ja pahempidised silmused ph - KUDA SELLEST ARU SAADA , kas trukiviga pole
06.11.2019 - 17:59
![]() Barbara Pörschmann wrote:
Barbara Pörschmann wrote:
Wie man hier die verkürzten Reihen strickt, bzw. im Muster bleibt, ist mir ein Rätsel. Bin schon beim Lesen der 2. Ecke und dem Zusammenstricken ausgestiegen. Ein Video, speziell für diese Mütze wäre toll. Vielen Dank
11.12.2018 - 15:34
![]() Cecilie wrote:
Cecilie wrote:
Jeg er nå i rute to. Der skal man strikke siste maske i vendingen sammen med siste maske i rute en. Jeg har ikke 30 vendinger, så det blir masker til overs fra rute 1. Hva gjør man med disse?
25.11.2017 - 22:36DROPS Design answered:
Hej Cecilie, Det skal der være ifølge opskriften, men hvis du ikke har det må du prøve at fordele dem jævnt. God fornøjelse!
05.12.2017 - 15:14
![]() Marianna Capitani wrote:
Marianna Capitani wrote:
Il cappello è venuto si anche se non è bello come il vostro secondo me ho sbagliato qualcosa
04.11.2015 - 11:29
![]() Marianna Capitani wrote:
Marianna Capitani wrote:
Non ci crederete ...ma a quest'ora sono riuscita a finire il cappello scusate se scrivo sempre
03.11.2015 - 23:36DROPS Design answered:
Buonasera Marianna, siamo felici che sia riuscita a finire il suo lavoro!Buon prossimo lavoro!
04.11.2015 - 20:37
![]() Marianna Capitani wrote:
Marianna Capitani wrote:
Perchè non fate dei video completi con il modello .....hiihhh
03.11.2015 - 18:58
![]() Marianna Capitani wrote:
Marianna Capitani wrote:
Cavoli ho capito i triangoli è la parte sotto della spiegazione perchè non riesco a capire subito non so se ce la farò ora provo a tornare a leggere a vedere quindi devo dividere le mie maglie per 5 triangoli
03.11.2015 - 18:56
|
||||||||||
Nieves#nievesset |
||||||||||
|
|
||||||||||
Knitted DROPS hat in ”Alpaca” and ”Kid-Silk”.
DROPS 122-12 |
||||||||||
|
PATTERN: See diagram M.1. Diagram shows the pattern from RS. KNITTING TIP: When turning mid piece, tighten thread before continuing in order to avoid a hole in transition. -------------------------------------------------------- HAT: Cast on 100 sts on circular needle size 3 mm with 1 strand of each quality (= 2 strands). K 1 round and continue in rib, K2/ P2. When piece measures approx 3 cm inc 1 st in the middle of each P-section by making 1 YO between the 2 P sts. Work 1 round with K over K and P over P, P YO into back of loop to avoid a hole. On next round inc 1 st in each K-section by making 1 YO = 150 sts. Work 1 round with K over K and P over P, K YO into back of loop (= K3/ P3). Change to circular needle size 3.5 mm. Continue in M.1 on all K3, work all P3 as before. Continue like this until piece measures approx 13 cm (finish after row 4 in M.1). Now keep the first 30 sts on needle and slip the remaining sts on a stitch holder. Now work the top of hat in squares with shortened rows on the 30 sts as follows (row 1 = RS) - See KNITTING TIP: SQUARE-1: Work first 3 sts in M.1, turn piece and work return row. Work M.1 + 1 st, turn and work return row. Work M.1 + 2 sts, turn and work return row. Work M.1 + 3 sts, turn and work return row. Work * M.1 + 3 sts + M.1 *, turn and work return row. Work from *-* + 1 st, turn and work return row. Work from *-* + 2 sts, turn and work return row. Work from *-* + 3 sts, turn and work return row. Work ** M.1 + 3 sts + M.1 + 3 sts + M.1 **, turn and work return row. Work from **-** + 1 st, turn and work return row. Work from **-** + 2 sts, turn piece and work return row. Work from **-** + 3 sts, turn piece and work return row. Work *** M.1 + 3 sts + M.1 + 3 sts + M.1 + 3 sts + M.1 ***, turn and work return row. Work from ***-*** + 1 st, turn and work return row. Work from ***-*** + 2 sts, turn and work return row. Work from ***-*** + 3 sts, turn and work return row. Work **** M.1 + 3 sts + M.1 + 3 sts + M.1 + 3 sts + M.1 + 3 sts + M.1 ****, turn and work return row. Work from ****-**** + 1 st, turn and work return row. Work from ****-**** + 2 sts, turn and work return row. Work from ****-**** + 3 sts, turn and work return row. Work 1 row on the 30 sts on needle and leave sts on needle. Slip the next 30 sts from stitch holder back on needle and continue on these sts as follows (row 1 = RS): SQUARE 2: Work first 3 sts in M.1, turn and work return row but P tog the last st with the last st from previous square. Work M.1 + 1 st, turn piece and work return row but P tog the last st with the next st from previous square. Work M.1 + 2 sts, turn and work return row but P tog the last st with the next st from previous square. Work M.1 + 3 sts, turn piece and work return row but P tog the last st with all 3 sts in M.1 from previous square (= P4 tog). Continue in the same way as on square 1, and continue to P tog the last st with st from previous square as described above. Continue like this until you have worked all sts. Work 1 row on the 30 sts on needle and leave sts on needle. Slip the next 30 sts from stitch holder back on needle and continue on these as follows (row 1 = RS): SQUARE 3: Like square 2. SQUARE 4: Like square 2. SQUARE 5: Like square 2, but when all sts from square 4 are knitted cast off the 30 sts on square 5. ASSEMBLY: Sew tog square 1 and square 5. Sew edge to edge with small sts to create an invisible seam. |
||||||||||
Diagram explanations |
||||||||||
|
||||||||||
 |
||||||||||
Have you finished this pattern?Tag your pictures with #dropspattern #nievesset or submit them to the #dropsfan gallery. Do you need help with this pattern?You'll find 10 tutorial videos, a Comments/Questions area and more by visiting the pattern on garnstudio.com. © 1982-2026 DROPS Design A/S. We reserve all rights. This document, including all its sub-sections, has copyrights. Read more about what you can do with our patterns at the bottom of each pattern on our site. |
||||||||||


With over 40 years in knitting and crochet design, DROPS Design offers one of the most extensive collections of free patterns on the internet - translated to 17 languages. As of today we count 324 catalogues and 12290 patterns translated into English (UK/cm). 12290
We work hard to bring you the best knitting and crochet have to offer, inspiration and advice as well as great quality yarns at incredible prices! Would you like to use our patterns for other than personal use? You can read what you are allowed to do in the Copyright text at the bottom of all our patterns. Happy crafting!
Post a comment to pattern DROPS 122-12
We would love to hear what you have to say about this pattern!
If you want to leave a question, please make sure you select the correct category in the form below, to speed up the answering process. Required fields are marked *.