
Popular categories
Looking for a yarn?


Comments / Questions (60)
![]() Chriss wrote:
Chriss wrote:
Hallo! Werden die 20 cm Höhe bei den Vorderteilen bei der Blende abgemessen?
12.04.2026 - 15:06DROPS Design answered:
Liebe Chris, ja diese 20 cm können Sie bei der Blende messen. Viel Spaß beim Stricken!
13.04.2026 - 10:21
![]() Cathy wrote:
Cathy wrote:
I am working this pattern in size 35 1/2. I have my gauge. On the back section, I am having trouble figuring where I should place the increases. Will every 4th row work?
27.11.2025 - 20:35DROPS Design answered:
Dear Cathy, not sure which size it is matching sorry; if you have your own gauge you will have to recalculate with yours and the pattern to find out when/how much to increase. Happy knitting!
28.11.2025 - 08:00
![]() NJ Tochtman wrote:
NJ Tochtman wrote:
Goedemiddag, ik ben bezig met dit patroon. Loop vast op de omschrijving: 5 ribbelst. voorbies + 1 st, dwz 6 st totaal. Als ik dit 4 keer ga herhalen, komen er steeds meer st. in de voorbies, is dat de bedoeling, of lees ik het verkeerd. Graag uw reactie. Mvg NJ.Tochtman
04.09.2025 - 16:04DROPS Design answered:
Dag NJ Tochtman,
De 5 voorbiessteken worden in ribbelsteken gebreid en die ene laatste steek voor de voorbies wordt recht gebreid aan de goede kant. Je meerdert vlak voor deze steek. Er komen dus geen biessteken bij, want dat blijven steeds 5 steken in ribbelsteek.
04.09.2025 - 23:19
![]() Sylvie wrote:
Sylvie wrote:
Bonjour. Je voudrais savoir combien de fois il faut faire les dim/Aug avant les 8 cm. Fois ont continuer par la suite ? Merci pour votre réponse
18.07.2025 - 17:14DROPS Design answered:
Bonjour Sylvie, avant les 8 cm, on va repeter les augmentations/diminutions env. 4 fois. Vous devez repeter le meme a 20 cm de hauteur totale. En meme temps 8-8-9-9-10-10 cm de hauteur totale, augmenter 6 fois 1 m sur le côté comme pour le dos (faire ces augmentations sur un autre rang que celui avec les augmentations/diminutions indiquées ci-dessus). Bon tricot!
19.07.2025 - 20:04
![]() María wrote:
María wrote:
Hola He realizado el lado izquierdo pero al final no me salen los mismos puntos, el patrón indica que al final quedan 23 puntos sin embargo en una talla M si de inicio monto 41 puntos, con los aumentos/disminuciones añado 12, con los aumentos a 1 lado aumento en 6, con las disminuciones del cuello quito 15 puntos en total y con el remate de la sisa otos 4, al finale quedan 40 puntos y debería tener 23, no se identificar que parte estoy haciendo mal.
01.04.2025 - 15:37DROPS Design answered:
Hola María, en la fila 4: disminuyes 2 puntos (deslizar 1 punto como de revés, 2 puntos juntos de derecho, pasar el punto deslizado sobre los puntos trabajados juntos) y aumentas 2 hebras (1 hebra al principio y 1 hebra al final) así que el número de puntos no cambia. Después de la forma de la punta, aumentas 6 puntos en un lado: 41+6 = 47 puntos. Disminuyes 15 puntos en el borde del escote: 47-15 = 32 pts. Cerrar 4 pts = 28 pts. Después, continuar cerrando para la forma de la sisa como se indicaba en la espalda: "dism 1 pt para dar forma a la sisa dentro de 4 pts musgo. Repetir la dism en vtas alternas un total de 5 veces". 28-5 = 23 pts restantes.
06.04.2025 - 22:58
![]() Berdi wrote:
Berdi wrote:
Ik heb 31 steken op het linker voorpand staan, dit moeten er 23 zijn! 45 steken opgezet, 6 steken erbij aan zijkant, 11 + 4 steken eraf voor hals lijn en 5 steken eraf voor armsgat. Heb ik het patroon toch niet goed begrepen?
12.03.2025 - 13:35DROPS Design answered:
Dag Berdi,
Je meerdert 6 steken aan de zijkant, je mindert 11 steken voor de halslijn, je kant 5 steken af voor de halslijn. In totaal minder je dus 22 steken en kom je op 23 steken.
13.04.2025 - 17:55
![]() Pamela White wrote:
Pamela White wrote:
I am knitting the left front. Should I be increasing at both the front and the side every 4 rows until it measures 20 cm? Thank you
09.11.2024 - 20:31DROPS Design answered:
Dear Pamela, yes, to shape the front piece correctly you will decrease at the center of the piece while increase at each side every 4th row until the piece measures 20cm. Remember to increase 1 st 6 times at the side (so, towards the side edge, not the mid front on rows different to the dec/inc rows. Happy knitting!
10.11.2024 - 20:16
![]() Betty Hidalgo Sarmiento wrote:
Betty Hidalgo Sarmiento wrote:
Modelo lindo, de líneas elegantes. Además del modelo, el material empleado le da un plus adicional. Sigo pensando que en algunas ocasiones "MENOS ES MÁS "
20.11.2023 - 15:01
![]() Julia wrote:
Julia wrote:
Hallo, Ich habe ein Problem mit der Vorderseite. Ich habe zu viele Maschen. Ich habe mit 51 angefangen, habe 6 M aufgenommen, 12 M abgenommen, 5 M abgenommen, 6 M angekettet und habe 34 M übrig und sollte bloß 23 haben. Wo bin ich falsch gelaufen?
26.05.2023 - 16:49DROPS Design answered:
Liebe Julia, es ist alles richtig, aber dann sollen Sie noch 11 Maschen für das Armloch (wie beim Rückenteil) abnehmen, so sind es noch 23 Maschen übrig. Viel Spaß beim stricken!
30.05.2023 - 10:15
![]() Vicky Garland wrote:
Vicky Garland wrote:
Thank you so much for sharing this pattern! I have searched the internet time and time again and i cannot find any Anne of Greene Gables free knitting patterns and from the reviews tje one book that is out didnt get very good reviews and only has 8 patterns do thank you so much! Ill be bookmarking your blog!
29.01.2020 - 04:17
|
|
Wooden Ridges#woodenridgesvest |
|
 |
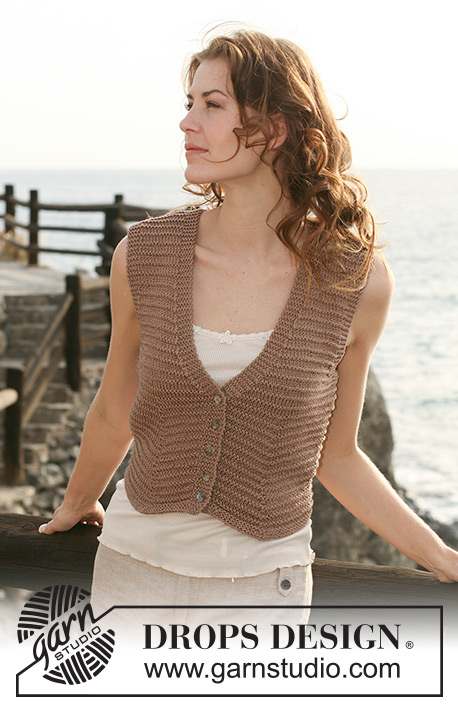 |
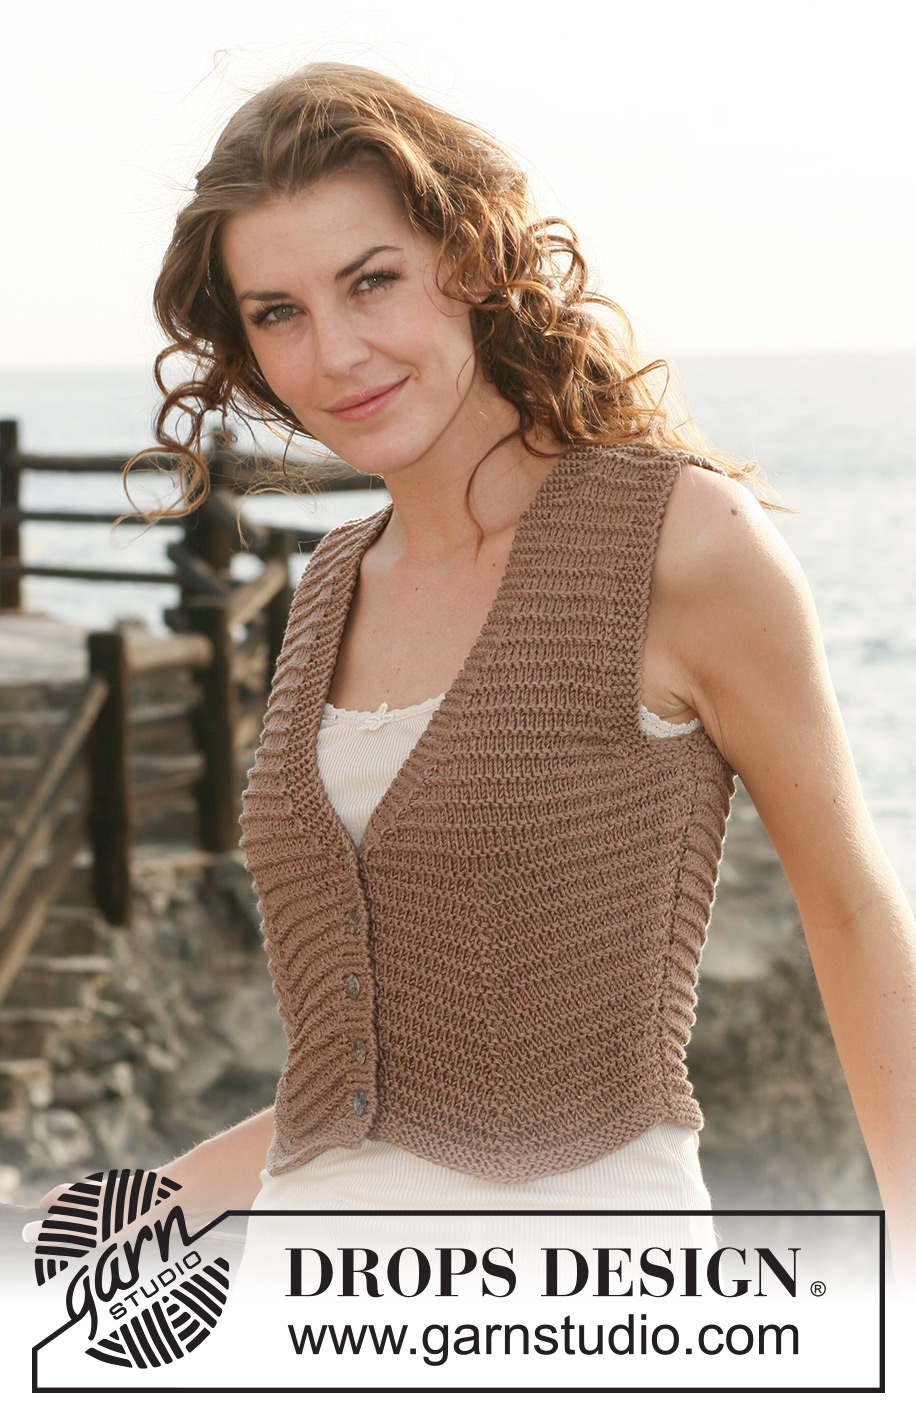
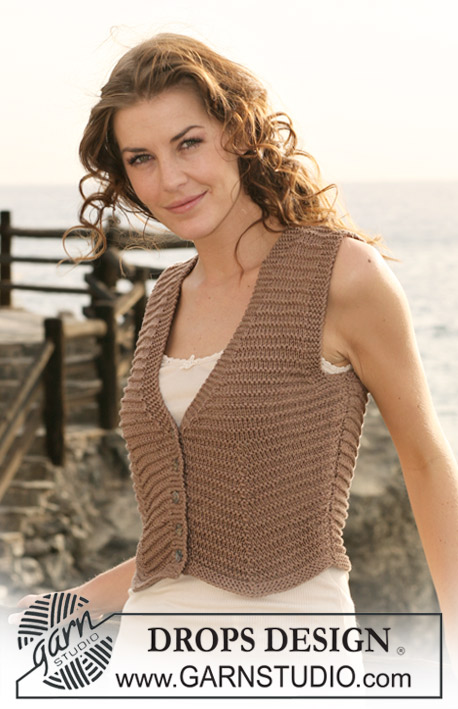
Short DROPS waistcoat in ”Safran” and ”Cotton Viscose”. Size S to XXXL
DROPS 118-39 |
|
|
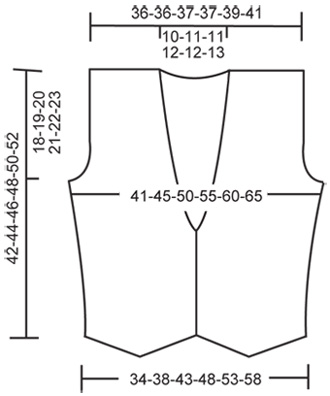
GARTER ST (back and forth on needle): K all rows. PATTERN: Row 1: K from RS. Row 2: P from WS. Row 3: K from RS. Row 4: K from WS. Repeat row 1-4. DECREASING TIP-1 (applies to armhole and neck): Make all dec from RS inside 4 garter sts by armhole and 5 garter sts by neck. Dec as follows AFTER 4/5 sts: slip 1 st as if to K, K1 and psso. Dec as follows BEFORE 4/5 sts: K2 tog. BUTTONHOLES: Make buttonholes on right front band. 1 buttonhole = K tog 3rd and 4th st from mid front and make 1 YO. Make buttonholes when piece measures (for all sizes): 2, 6, 10, 14 and 18 cm. -------------------------------------------------------- -------------------------------------------------------- BACK PIECE: Worked back and forth on needle. Cast on 64-71-80-89-98-107 sts (includes 1 edge st each side) on needle size 4.5 mm with 1 thread of each quality. K 5 rows (first row = WS). Continue in PATTERN – see above! REMEMBER THE KNITTING TENSION! When piece measures 8-8-9-9-10-10 cm inc 1 st each side, and repeat the inc on every 2 cm a total of 6 times = 76-83-92-101-110-119 sts. When piece measures 22-23-24-25-26-27 cm work 4 rows garter st on 7-8-9-10-12-14 sts each side (work remaining sts as before), and now cast off 3-4-5-6-8-10 sts each side for armhole (cast off at the beg of the next 2 rows). Continue in pattern with 4 garter sts each side, AT THE SAME TIME on next row from RS dec 1 st each side to shape the armhole inside the 4 garter sts – SEE DECREASING TIP! Repeat the dec on every other row a total of 3-5-8-11-12-13 times = 64-65-66-67-70-73 sts. Continue in pattern with 4 garter sts each side. When piece measures 39-41-43-45-47-49 cm work 4 rows garter st on the middle 28-29-30-31-32-33 sts (work remaining sts as before), and now cast off the middle 18-19-20-21-22-23 sts for neck and complete each shoulder (= 23-23-23-23-24-25 sts) separately. Continue as before with 5 garter sts towards neck until piece measures 42-44-46-48-50-52 cm, cast off. LEFT FRONT PIECE: Worked back and forth on needle. Cast on 37-41-45-51-55-59 sts (includes 1 edge st at the side and 5 front band sts towards mid front) on needle size 4.5 mm with 1 thread of each quality. Insert a marker in the middle st. READ ALL OF THE FOLLOWING SECTION BEFORE CONTINUING! K 5 rows (first row = WS). AT THE SAME TIME on row 4 (= RS) beg dec in the middle of piece and inc each side - to make the front piece pointed - as follows: Make 1 YO inside 1 edge st at the side, work row to 1 st before st with marker, slip 1 st as if to K, K2 tog, psso, work row until 6 sts (i.e. 5 front band sts + 1 st) remain, make 1 YO, work remaining sts. On next row K YO into back of loop to avoid a hole. Repeat this dec/inc on every 4th row. After the 5 K rows continue in PATTERN with 5 front band sts towards mid front in garter st. AT THE SAME TIME when piece measures 8-8-9-9-10-10 cm inc 1 st 6 times at the side as described for back piece (make sure to make this inc on a row without inc/dec as above). When piece measures 20 cm (for all sizes) stop the inc/dec and continue in pattern with front bands in garter st. AT THE SAME TIME dec for neck as follows: Dec 1 st on the inside of the 5 front band sts – SEE DECREASING TIP - and repeat the dec on every other row a total of 10-11-11-12-12-12 times and then on every 4th row a total of 4-4-4-5-5-5 times. When piece measures 22-23-24-25-26-27 cm (measured at the side as piece will be longer in the middle) work 4 rows garter st on 7-8-9-10-12-14 sts at the side (work remaining sts as before), and now cast off 3-4-5-6-8-10 sts for armhole at the side. Cast off to shape the armhole as described for back piece. When all dec for armhole and neck are complete there are 23-23-23-23-24-25 sts left on shoulder (= 4 garter sts towards armhole, 14-14-14-14-15-16 sts in pattern and 5 garter sts towards neck). Cast off when piece measures 42-44-46-48-50-52 cm (measured at the side). RIGHT FRONT PIECE: Like left front piece, but mirrored. Remember BUTTONHOLES when piece measures 2 cm – see above! ASSEMBLY: Sew shoulder seams. Sew side seams inside 1 edge st. Sew on buttons. |
|
 |
|
Have you finished this pattern?Tag your pictures with #dropspattern #woodenridgesvest or submit them to the #dropsfan gallery. Do you need help with this pattern?You'll find 17 tutorial videos, a Comments/Questions area and more by visiting the pattern on garnstudio.com. © 1982-2026 DROPS Design A/S. We reserve all rights. This document, including all its sub-sections, has copyrights. Read more about what you can do with our patterns at the bottom of each pattern on our site. |
|


With over 40 years in knitting and crochet design, DROPS Design offers one of the most extensive collections of free patterns on the internet - translated to 17 languages. As of today we count 324 catalogues and 12290 patterns translated into English (UK/cm). 12290
We work hard to bring you the best knitting and crochet have to offer, inspiration and advice as well as great quality yarns at incredible prices! Would you like to use our patterns for other than personal use? You can read what you are allowed to do in the Copyright text at the bottom of all our patterns. Happy crafting!
Post a comment to pattern DROPS 118-39
We would love to hear what you have to say about this pattern!
If you want to leave a question, please make sure you select the correct category in the form below, to speed up the answering process. Required fields are marked *.