
Popular categories
Looking for a yarn?


Comments / Questions (7)
![]() Theresa Hitchman wrote:
Theresa Hitchman wrote:
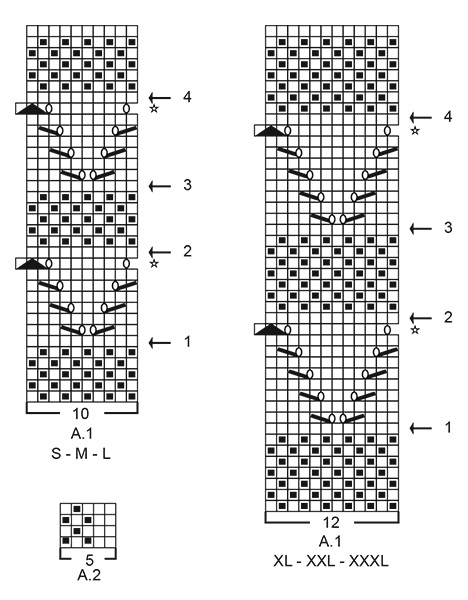
The A1 chart does not have the increasing for increased sts no1,2,3,&4 drawn into the chart so you can't incorporate the extra sts in the A1 pattern. Why is this? Its confusing and wrong?
19.04.2021 - 00:02DROPS Design answered:
Dear Theresa, because the smaller pattern units between the arrows (rows with increases) are kind of independent from each other. If you look closely at the picture, you can see that the V's od the lace pattern are not directly above each other. Happy Knitting!
19.04.2021 - 00:32
![]() Nicole Vena wrote:
Nicole Vena wrote:
I also am confused on the star rows. How would that be written out, are those yarn overs?
22.03.2020 - 18:49DROPS Design answered:
Dear Nicole, we are sorry, but there is no written out pattern for this piece. However it is well worth the effort to learn how to make sense of diagrams, as they not only show you the very next step, but also that how the other stitches and rows relate to each other. we do have a lesson on how to read crochet patterns here, and don't forget, you can always ask for help either in person or over the phone in teh store where you bought your DROPS yarn from. Happy Knitting!
22.03.2020 - 20:03
![]() Nicole Vena wrote:
Nicole Vena wrote:
Do we start the rows in the back where we joined or at the new marker in the front for the yoke?
22.03.2020 - 03:01DROPS Design answered:
Dear Mrs Vena, start the round on mid back as before, the marker on mid front is just to measure from. Happy knitting!
23.03.2020 - 09:54
![]() Sandrine GREKOV wrote:
Sandrine GREKOV wrote:
Au rang 6 (flèche 1) je dois faire 40 aug (taille M). Au rang suivant lorsque le jeté de l'augmentation se trouve à l'emplacement de la maille entre les 2 YO, si je la tricote torse pour éviter un trou je n'ai pas une maille endroit normale, j'ai plutôt une sorte de maille ''twistée''. Comment faire pour que toutes les mailles soient identiques que ce soit des jetés tricotés torses ou des mailles régulières endroit ? Merci.
03.03.2020 - 04:15DROPS Design answered:
Bonjour Mme Grekov, vous pouvez décaler les jetés concernés quelques mailles avant ou après le rang ajouré, ainsi la maille endroit entre les 2 jetés ne sera pas une augmentation du tour précédent. Bon tricot!
03.03.2020 - 09:58
![]() Azam wrote:
Azam wrote:
سلام .من ۱۰ ساله که سایت شما را دنبال میکنم خیلی مدلهای زیبای گذاشتید .چون به زبانهای دیگر آشنایی ندارم نمیتونم از قسمتهای آموزشی آن استفاده کنم .چرا به زبان فارسی آموزش نمی دهید ..ممنون می شوم که توجه بفرمایید
28.01.2020 - 16:25
![]() Christine wrote:
Christine wrote:
Hi, On row 7 of A1 am I supposed to - K2, K2tog, 1yarn over, k1, 1yarn over, S1K1 pass ss over, K3. This will leave 2gaps instead of 1 at the top of the lace points. Help please.
03.10.2019 - 11:09DROPS Design answered:
Dear Christine, in A.1 size S, M, L, on row 7 you work *K2, K2 tog, YO, K1, YO, slip 1, K1, psso, K3* and repeat from *-*, ie you will have 5 stitches (= 3 sts from previous repeat + 2 sts from next repeat) between the decrease, yo, decrease in the middle of each lace pattern. Happy knitting!
03.10.2019 - 11:36
![]() Ellis wrote:
Ellis wrote:
Ne 315 +ne316 same pattern but apart this time, together a twinset.
09.06.2019 - 20:44
|
||||||||||||||||||||||
Frambuesa Sweater#frambuesasweater |
||||||||||||||||||||||
 |
 |
|||||||||||||||||||||
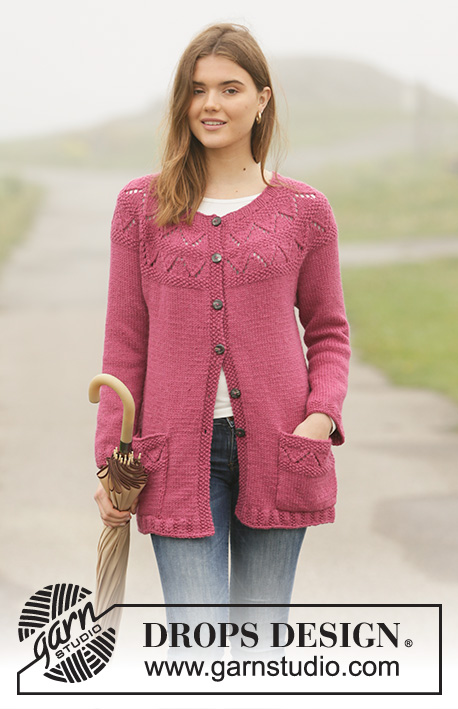
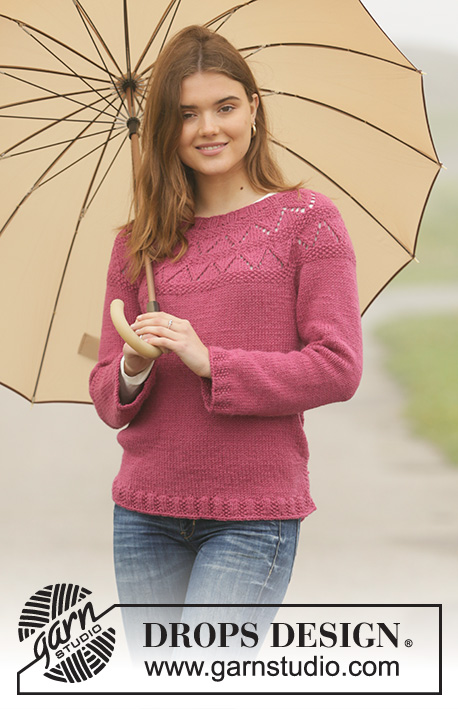
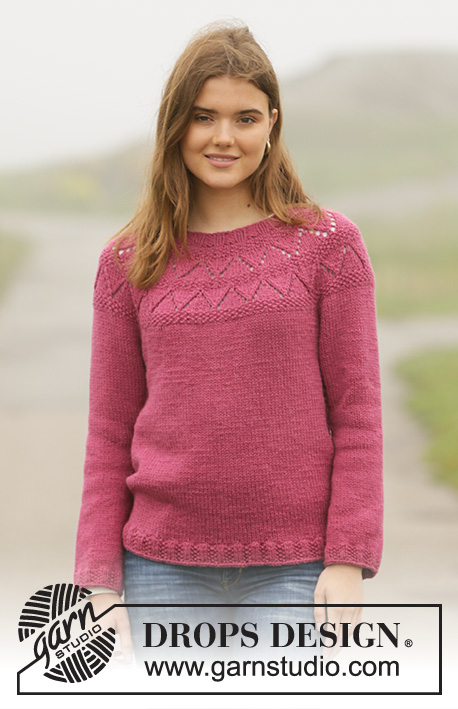
Knitted jumper in DROPS Nepal. The piece is worked top down with lace pattern and moss stitch on the yoke. Sizes S - XXXL.
DROPS 206-16 |
||||||||||||||||||||||
|
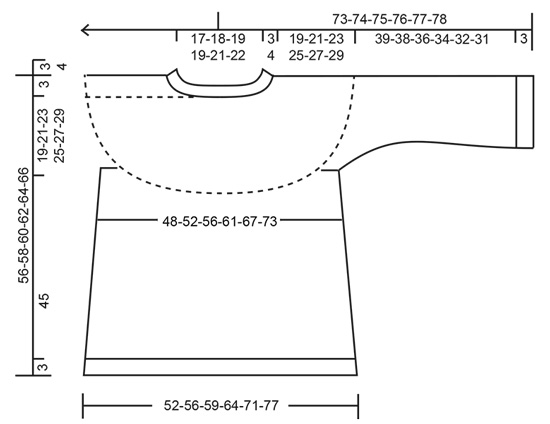
------------------------------------------------------- EXPLANATIONS FOR THE PATTERN: ------------------------------------------------------- PATTERN: See diagrams A.1 and A.2. Choose diagram for your size. INCREASE TIP-1 (evenly spaced): To work out how to increase evenly, count the total number of stitches on the needle (e.g. 72 stitches) and divide by the number of increases to be made (e.g. 28) = 2.6. In this example, increase by making 1 yarn over after alternately each 2nd and 3rd stitch. On the next round work the yarn overs twisted to avoid holes. INCREASE TIP-2 (for sides of body and mid under sleeves): Start 2 stitches before the marker thread, make 1 yarn over, knit 4 (marker thread sits between these 4 stitches) make 1 yarn over (= 2 stitches increased at each marker thread). On the next round knit the yarn overs twisted to avoid holes. Then work the new stitches in stocking stitch. RAGLAN: When the yoke is finished you work a small raglan before dividing for body and sleeves. Increase 1 stitch on each side of the 4 markers in each transition between front and back pieces and sleeves as described below (8 stitches increased on round). Start 1 stitch before marker thread, 1 yarn over, knit 2 (marker sits between these 2 stitches), 1 yarn over (= 2 stitches increased). On the next round work the yarn overs twisted to avoid holes. Then work the new stitches in stocking stitch. DECREASE TIP (for mid under sleeves): Start 3 stitches before the marker thread, knit 2 together, knit 2 (marker thread sits between these 2 stitches), slip 1 stitch as if to knit, knit 1 and pass the slipped stitch over the knitted stitch (= 2 stitches decreased). CASTING-OFF TIP: To avoid the cast-off edge being tight you can cast off with a larger size needle; or make 1 yarn over after approx. each 8th stitch at the same time as casting off (yarn overs cast off as normal stitches). ------------------------------------------------------- START THE PIECE HERE: ------------------------------------------------------- JUMPER – SHORT OVERVIEW OF THE PIECE: The neck and yoke are worked in the round with circular needle, top down. The yoke is divided for body and sleeves and the body continued in the round with circular needle. The sleeves are worked in the round with double pointed needles/short circular needle, top down. NECK: Cast on 72-76-80-80-84-88 stitches with short circular needle size 4.5 mm and Nepal. Knit 1 round then work rib in the round (= knit 2 / purl 2) for 3-3-3-4-4-4 cm. When the rib is finished knit 1 round where you increase 28-34-30-40-48-44 stitches evenly spaced - read INCREASE TIP-1 = 100-110-110-120-132-132 stitches. Insert 1 marker in the middle of the round (= mid-front); the yoke is measured from here! Knit 1 round (yarn overs knitted twisted). Then work the yoke as described below. YOKE: Change to circular needle size 5.5mm and work A.1 in the round (= 10-11-11-10-11-11 repeats of 10-10-10-12-12-12 stitches). Continue this pattern, but on each round marked with a star in A.1, displace the beginning of the round by 1 stitch to the left; i.e. slip the first stitch onto the right needle without working it, then work A.1. The slipped stitch will be worked on the last repeat of A.1. On the next round knit all stitches, then begin the round as usual. REMEMBER THE KNITTING TENSION! AT THE SAME TIME on each round marked with an arrow in A.1 increase stitches evenly spaced as described below – remember INCREASE TIP-1. Arrow-1: Increase 40-40-40-48-48-48 stitches evenly spaced = 140-150-150-168-180-180 stitches. Arrow-2: Increase 40-40-40-48-48-48 stitches evenly spaced = 180-190-190-216-228-228 stitches. Arrow-3: Increase 30-30-30-36-36-36 stitches evenly spaced = 210-220-220-252-264-264 stitches. Arrow-4: Increase 4-6-6-10-2-14 stitches evenly spaced = 214-226-226-262-266-278 stitches. When A.1 has been completed in height the piece measures approx. 16-16-16-20-20-20 cm from the marker on the neck. If the piece is shorter than this, continue working stocking stitch in the round to the correct length. Now work stocking stitch AT THE SAME TIME as you increase to a small raglan as described below. RAGLAN: Insert 4 markers in the piece without working the stitches. The first marker is inserted after the first 33-34-34-40-42-45 stitches (= ½ back piece), 2nd marker after the next 40-44-44-50-48-48 stitches (= sleeve), 3rd marker after the next 67-69-69-81-85-91 stitches (= front piece) and 4th marker after the next 40-44-44-50-48-48 stitches (= sleeve). There are 34-35-35-41-43-46 stitches left on the back piece after the last marker. On the next round increase to RAGLAN on each side of the 4 markers – read description above (= 8 stitches increased). Increase like this every 2nd round a total of 2-4-6-4-6-8 times = 230-258-274-294-314-342 stitches. Continue with stocking stitch and without further increases until the piece measures 19-21-23-25-27-29 cm from the marker on the neck. Now divide the yoke for body and sleeves by working the next round as follows: Work 35-38-40-44-48-53 stitches in stocking stitch (= ½ back piece), place the next 44-52-56-58-60-64 stitches on 1 thread for sleeve, cast on 6-6-8-8-10-10 new stitches on the needle (= in side under sleeve), work the next 71-77-81-89-97-107 stitches as before (= front piece), place the next 44-52-56-58-60-64 stitches on 1 thread for sleeve, cast on 6-6-8-8-10-10 new stitches on the needle (= in side under sleeve) and work the remaining 36-39-41-45-49-54 stitches in stocking stitch (= ½ back piece). Body and sleeves are finished separately. THE PIECE IS NOW MEASURED FROM HERE! BODY: = 154-166-178-194-214-234 stitches. Insert 1 marker thread in the middle of the 6-6-8-8-10-10 stitches under each sleeve; allow them to follow your work onwards as they will be used when increasing in the sides. Work stocking stitch in the round. When the piece measures 3 cm from the division in all sizes, increase 1 stitch on each side of both marker threads - read INCREASE TIP-2 (= 4 stitches increased). Increase like this every 10 cm a total of 3 times in each side = 166-178-190-206-226-246 stitches. Continue working until the piece measures 31 cm from the division in all sizes (there is approx. 3 cm left to finished length; you can try the jumper on and work to desired length). Knit 1 round where you increase 34-37-35-39-44-49 stitches evenly spaced = 200-215-225-245-270-295 stitches; this is done to avoid the bottom edge being tight. Change to circular needle size 4.5 mm and work A.2 in the round for 3 cm. Cast off with knit – read CASTING-OFF TIP! The jumper measures approx. 56-58-60-62-64-66 cm from the shoulder down. SLEEVE: Place the 44-52-56-58-60-64 stitches from the thread on the one side of the piece on short circular needle/double pointed needles size 5.5 mm and knit up 1 stitch in each of the 6-6-8-8-10-10 stitches cast on under the sleeve = 50-58-64-66-70-74 stitches. Insert a marker thread in the middle of the 6-6-8-8-10-10 stitches under the sleeve. Allow the thread to follow your work onwards; it will be used when decreasing and increasing mid under sleeve. Start at the marker thread and work stocking stitch in the round. When the sleeve measures 3-2-2-2-3-3 cm from the division decrease 2 stitches mid under sleeve – read DECREASE TIP. Decrease like this every 3-2-1½-1½-1-1 cm a total of 4-7-9-9-10-11 times = 42-44-46-48-50-52 stitches. When the sleeve measures 16-16-16-15-15-15 cm from the division increase 2 stitches mid under sleeve – read INCREASE TIP-2. Increase like this every 6-7-5-6-3-3½ cm a total of 4-3-4-3-5-4 times = 50-50-54-54-60-60 stitches. Continue working until the sleeve measures 39-38-36-34-32-31 cm from the division (there is approx. 3 cm left to finished length; you can try the jumper on and work to desired length). NOTE: Shorter measurements in larger sizes due to wider neck and longer yoke. Knit 1 round where you increase 0-0-1-1-0-0 stitches = 50-50-55-55-60-60 stitches. Change to double pointed needles/short circular needle size 4.5 mm and work A.2 in the round for 3 cm. Cast off with knit – remember CASTING-OFF TIP! The sleeve measures approx. 42-41-39-37-35-34 cm from the division. Work the other sleeve in the same way. |
||||||||||||||||||||||
Diagram explanations |
||||||||||||||||||||||
|
||||||||||||||||||||||
 |
||||||||||||||||||||||
 |
||||||||||||||||||||||
Have you finished this pattern?Tag your pictures with #dropspattern #frambuesasweater or submit them to the #dropsfan gallery. Do you need help with this pattern?You'll find 26 tutorial videos, a Comments/Questions area and more by visiting the pattern on garnstudio.com. © 1982-2026 DROPS Design A/S. We reserve all rights. This document, including all its sub-sections, has copyrights. Read more about what you can do with our patterns at the bottom of each pattern on our site. |
||||||||||||||||||||||


With over 40 years in knitting and crochet design, DROPS Design offers one of the most extensive collections of free patterns on the internet - translated to 17 languages. As of today we count 324 catalogues and 12290 patterns translated into English (UK/cm). 12290
We work hard to bring you the best knitting and crochet have to offer, inspiration and advice as well as great quality yarns at incredible prices! Would you like to use our patterns for other than personal use? You can read what you are allowed to do in the Copyright text at the bottom of all our patterns. Happy crafting!
Post a comment to pattern DROPS 206-16
We would love to hear what you have to say about this pattern!
If you want to leave a question, please make sure you select the correct category in the form below, to speed up the answering process. Required fields are marked *.