
Popular categories
Looking for a yarn?


Comments / Questions (26)
![]() Asyli wrote:
Asyli wrote:
Je propose "butterfly" en raison de sa forme
22.10.2023 - 12:26
![]() Molly Boydell wrote:
Molly Boydell wrote:
Hej Jeg forstår ikke, hvordan jeg starter med at strikke rygstykket, når nu strikkesnoren er ved venstre forstykke. Vh. Molly
05.06.2022 - 23:22DROPS Design answered:
Hej Molly, da er du nødt til at klippe tråden og starte ved rygstykket. God fornøjelse!
08.06.2022 - 07:53
![]() Samantha wrote:
Samantha wrote:
Buongiorno, Da autodidatta ho una domanda, sono bloccata sul lavorare separatamente avanti e dietro, come faccio? Che faccio delle maglie delle altre parti che non lavoro che rimangono sul ferro? Grazie mille!
01.05.2022 - 10:37DROPS Design answered:
Buongiorno Samantha, può lasciare le altre magli su un filo di scarto, verranno lavorate successivamente. Buon lavoro!
01.05.2022 - 23:26
![]() Silvana Ceschi wrote:
Silvana Ceschi wrote:
Lo chiamerei "cuore"... ❤️
10.06.2021 - 12:33
![]() Eva W wrote:
Eva W wrote:
Jag förstår fortfarande inte. Ska man öka i slutet på mönstervarvet eller i slutet på nästa aviga varv - då blir ju arbetet assymetriskt?!
10.05.2017 - 17:50DROPS Design answered:
Du lägger upp de nya maskorna precis som det står i beskrivningen, dvs. de nya maskorna läggs alltid upp på 2 på varandra följande varv.
11.05.2017 - 14:14
![]() Eva W wrote:
Eva W wrote:
Första Ökningen på fjärde varvet ska göras i slutet på rätsidan dvs på varvet som stickas avigt, nästa ökning ska göras på det aviga mönstervarvet? Men det står ju att ökningen alltid görs på rätsidan? Förstår inte. Om ökningen ska göras i slutet på nästa räta varv som stickas avigt kan det ju inte bli riktigt?!
10.05.2017 - 10:24DROPS Design answered:
Hej! Ökningstipset gäller endast ökningarna i sidan. Då man lägger upp nya maskor bör detta göras i slutet på ett varv, så att man inte behöver klippa tråden.
10.05.2017 - 14:19
![]() Katja wrote:
Katja wrote:
Die Aufnahmen sollen jeweils links bzw. rechts der Markierungsfäden gemacht werden. Erst jeweils links, 3cm später jeweils rechts. Mich wundert das: Wird dann das Strickstück nicht asymmetrisch? Müsste man nicht erst an den Vorder- und dann an den Rückenteilen aufnehmen oder umgekehrt? Oder habe ich einen Denkfehler? Vielen Dank!
29.07.2015 - 19:06
![]() Barbara wrote:
Barbara wrote:
Ich bin verwirrt, die Videoanleitung zum Brombeermuster ist anders als die Musterbeschreibung zum Modell hier. Ausserdem steht nirgends, ob Randmaschen gestrickt werden müssen. Bitte um Antwort, danke!
02.02.2013 - 21:19DROPS Design answered:
Hallo Barbara, der Unterschied ist nur, wie die 3 M li zusammengestrickt werden, das können Sie auf beide Arten machen. die Randmasche wird immer re gestrickt.
07.02.2013 - 09:06
![]() Claudia wrote:
Claudia wrote:
Wie geht denn das Blendenmuster? Ich finde das nirgends beschrieben!
28.10.2012 - 22:26DROPS Design answered:
Hallo Claudia, vielen Dank für den Hinweis. Leider wurde das beim Übersetzen vergessen. Die Blendenmaschen sind kraus rechts, ich habe es in der Anleitung ergänzt
29.10.2012 - 16:12Martine wrote:
Tres joli,
24.02.2010 - 09:58
|
||||||||||
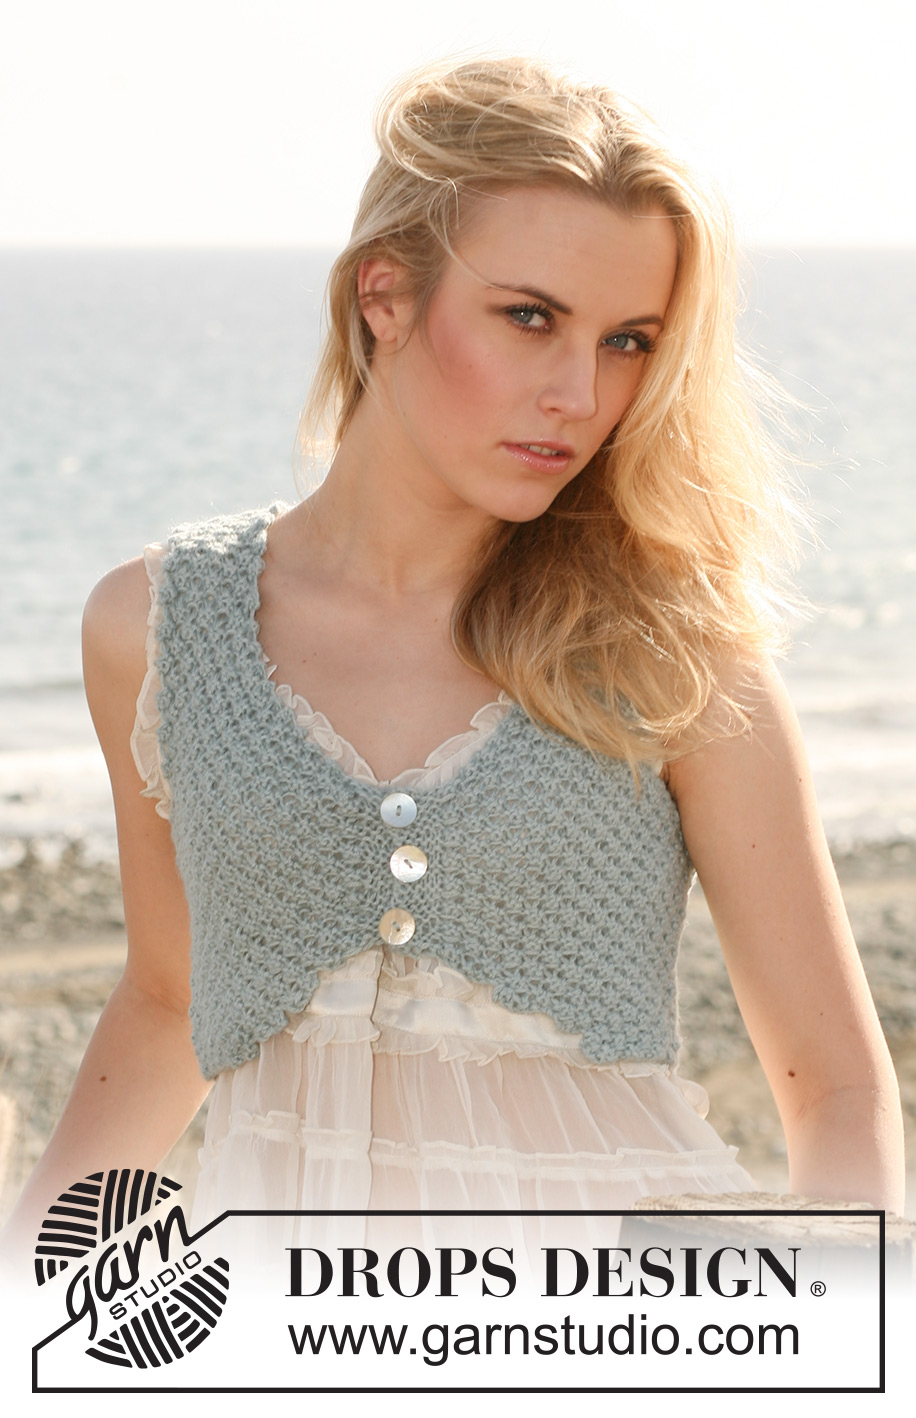
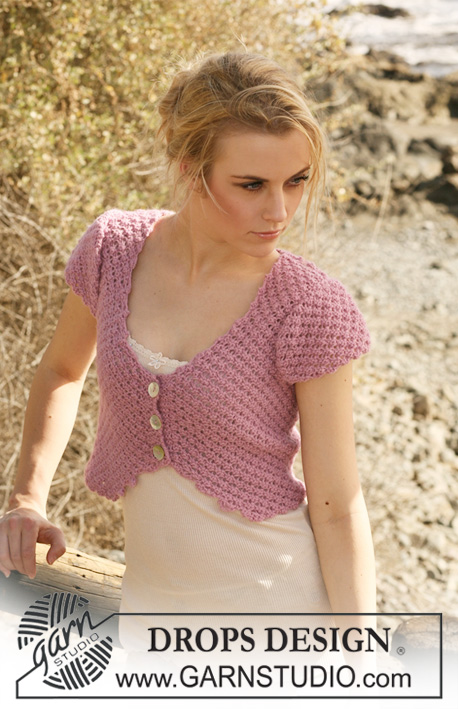
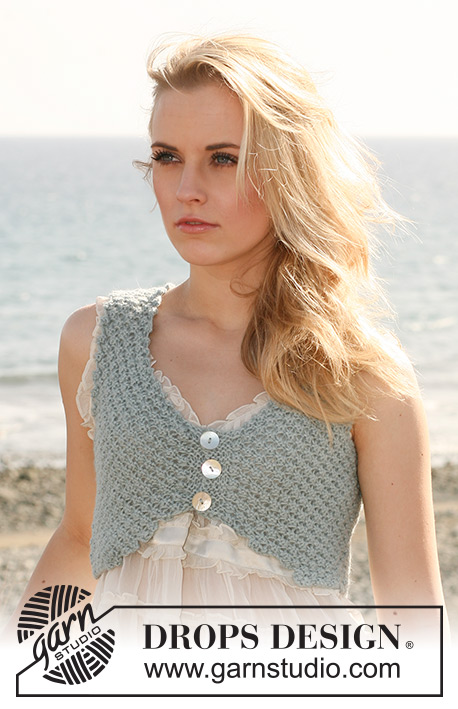
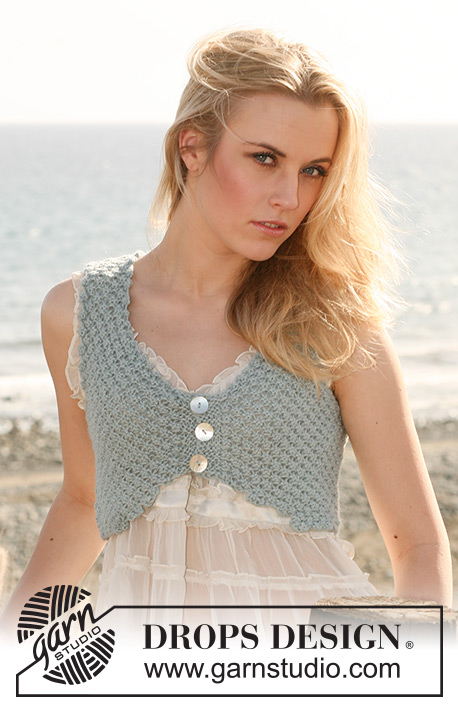
Seaside Calm Vest#seasidecalmvest |
||||||||||
 |
 |
|||||||||
Short DROPS waistcoat in 2 threads ”Alpaca” with berry pattern. Size S - XXXL
DROPS 120-26 |
||||||||||
|
BERRY PATTERN: See diagram M.1 - Diagram shows the pattern from RS (FIRST ROW = WS). GARTER ST (back and forth on needle): K all rows. INCREASING TIP (applies to side inc): Make all inc from RS. Inc 4 sts by working 5 sts in 1 st as follows: P1, 1 YO, P1, 1 YO, P1. On next row work sts into M.1 DECREASING TIP: Make all dec from RS (i.e. on P-rows). Dec as follows at BEG of row: P5, pass first st over the last 4 sts, pass next st over the last 3 sts, pass next st over the last 2 sts, and pass next st over the last st = 1 st left. Dec as follows at the END of row: P5 tog. BUTTONHOLES: Make buttonholes on right front band. 1 BUTTONHOLE = K tog 3rd and 4th st from mid front and make 1 YO. Make buttonholes when front band measures: SIZE S: 2, 7 and 11 cm. SIZE M: 2, 6.5 and 12 cm. SIZE L: 2, 8 and 13 cm. SIZE XL: 2, 7.5 and 14 cm. SIZE XXL: 2, 9 and 15 cm. SIZE XXXL: 2, 8.5 and 16 cm. -------------------------------------------------------- -------------------------------------------------------- BODY PIECE: Worked back and forth on circular needle from mid front. Cast on 108-124-140-156-184-204 sts on circular needle size 4.5 mm with 2 threads Alpaca. Insert a marker 20-24-28-32-40-44 sts in from each side (= 68-76-84-92-104-116 sts between markers on back piece). READ ALL OF THE FOLLOWING SECTION BEFORE CONTINUING! P 1 row from RS, and continue in BERRY PATTERN - see above – at the same time on 4th row cast on 4 new sts at the end of row (= towards mid front), on next row work the inc sts into M.1, then cast on 4 new sts at the end of this row (= towards mid front the other side), on next row work inc sts into M.1. * Work 2 rows without inc, then cast on 4 new sts at the end of the next 2 rows *, repeat from *-* a total of 2 times. Work 2 rows without inc, then cast on 5 new sts at the end of the next 2 rows for front bands = 142-158-174-190-218-238 sts in total. Continue in M.1 with 5 front band sts in garter st each side towards mid front. REMEMBER THE KNITTING TENSION! SIDE INC: at the same time when piece measures approx 7 cm (adjust so that next row is from RS) inc 4 sts to the left of both markers – SEE INCREASING TIP! When piece measures approx 10-10-10-11-11-11 cm inc 4 sts to the right of both markers, when piece measures approx 13-13-13-15-15-15 cm inc 4 sts to the left of both markers and when piece measures approx 16-16-16-19-19-19 cm inc 4 sts to the right of both markers = 174-190-206-222-250-270 sts. Remove markers. BUTTONHOLES: At the same time when front band measures 2 cm (piece measures approx 8 cm from cast on row) make BUTTONHOLES on right front band – see above! When piece measures 18-19-20-21-22-23 cm work next rows as follows (from RS): 5 garter sts, P 36-40-44-48-56-60 sts, cast off 8 sts for armhole, P 76-84-92-100-112-124 sts, cast off 8 sts for armhole, P 36-40-44-48-56-60 sts and 5 garter sts. Now complete front and back pieces separately. BACK PIECE: = 76-84-92-100-112-124 sts. Continue in M.1, AT THE SAME TIME dec 4 sts each side on next row from RS – SEE DECREASING TIP, and repeat the dec on every 4th row a total of 2-2-3-4-5-6 times = 60-68-68-68-72-76 sts. When piece measures 34-36-38-40-42-44 cm cast off the middle 28-28-28-28-32-36 sts for neck and complete each shoulder (= 16-20-20-20-20-20 sts) separately. Cast off when piece measures 36-38-40-42-44-46 cm. LEFT FRONT PIECE: = 41-45-49-53-61-65 sts. Continue in M.1. Dec for armhole at the side as described for back piece, AT THE SAME TIME on first row from mid front cast off the 5 front band sts. On next row from RS dec 4 sts towards neck – SEE DECREASING TIP, and repeat the dec on every 4th row a total of 3-3-3-3-4-4 times = 16-20-20-20-20-20 sts left on shoulder. Continue until piece measures 36-38-40-42-44-46 cm, cast off. RIGHT FRONT PIECE: Like left front piece, but mirrored. ASSEMBLY: Sew shoulder seams. Sew on buttons. |
||||||||||
Diagram explanations |
||||||||||
|
||||||||||
 |
||||||||||
Have you finished this pattern?Tag your pictures with #dropspattern #seasidecalmvest or submit them to the #dropsfan gallery. Do you need help with this pattern?You'll find 14 tutorial videos, a Comments/Questions area and more by visiting the pattern on garnstudio.com. © 1982-2026 DROPS Design A/S. We reserve all rights. This document, including all its sub-sections, has copyrights. Read more about what you can do with our patterns at the bottom of each pattern on our site. |
||||||||||


With over 40 years in knitting and crochet design, DROPS Design offers one of the most extensive collections of free patterns on the internet - translated to 17 languages. As of today we count 324 catalogues and 12290 patterns translated into English (UK/cm). 12290
We work hard to bring you the best knitting and crochet have to offer, inspiration and advice as well as great quality yarns at incredible prices! Would you like to use our patterns for other than personal use? You can read what you are allowed to do in the Copyright text at the bottom of all our patterns. Happy crafting!
Post a comment to pattern DROPS 120-26
We would love to hear what you have to say about this pattern!
If you want to leave a question, please make sure you select the correct category in the form below, to speed up the answering process. Required fields are marked *.