
Leder du efter et garn?


Kommentarer / Spørgsmål (238)
![]() Andrea skrev:
Andrea skrev:
Hallo, eine Frage: Wenn ich mit den verkürzten Reihen fertig bin, muss ich dann direkt wieder über alle 124M (Gr.xxl) stricken, oder nach dem selben Schema wie beim verkürzen die Reihen wieder verlängern? LG
23.02.2026 - 16:37DROPS Design svarede:
Liebe Andrea, Sie beginnen erneut mit den verkürzten Reihen (die ersten 2 Runden stricken Sie über alle Maschen) , um den Kreis weiter zu erweitern. Viel Spaß beim Stricken!
24.02.2026 - 09:02
![]() Lotta skrev:
Lotta skrev:
Äh glöm min fråga, repar upp & använder ett för mig mer begripligt mönster.
27.11.2025 - 17:23
![]() Lotta skrev:
Lotta skrev:
Hej igen! Storlek XL/XXL totalt antal maskor 124 st och märktråden sitter på maska 73. Just nu är stickningen bananformad, maska 73 sitter närmare innercirkeln och fattar att det är från den jag ska mäta. Men hur ska jag mäta, mot vad? Ska fortsätta med att minska med 8 maskor för första gången. Vi hörs!
25.11.2025 - 16:04DROPS Design svarede:
Hei Lotta. Da har vi "glemt" ditt spørsmål og ønsker deg lykke til på ditt neste prosjekt :) mvh DROPS Design
01.12.2025 - 11:27
![]() Lotta skrev:
Lotta skrev:
Begriper inte hur jag ska mäta från märktråden för ärmhål!? Skickar gärna en bild men det går ju inte i detta formulär. Kontakta gärna mig via e-post. Tack på förhand!
24.11.2025 - 18:29DROPS Design svarede:
Hej Lotta, skriv hvilken størrelse du strikker. Skriv hvor mange masker og cm du har og skriv den sætning du ikke forstår, så skal vi prøve at hjælpe dig her :)
25.11.2025 - 13:58
![]() Lisa skrev:
Lisa skrev:
Hi, Just trying to clarify; on the second row, do I leave 2 stitches on needle and turn, work 14 stitches then turn and work 16 stitches? Then repeat row 1 and do I leave 4 stitches unworked or just 2 again?
11.11.2025 - 19:16
![]() Lisa skrev:
Lisa skrev:
Pattern instructions far too difficult. I love the jacket and I love a challenge but this? What happened to row 1 all the way through to last row with specific instructions such as ask or dec or s1k1. Etc? I give up😞
27.07.2025 - 20:09
![]() Lisa skrev:
Lisa skrev:
So, am I leaving the the uncorked stitches on the needle or just not knitting them?
27.07.2025 - 19:38DROPS Design svarede:
Dear Lisa, work the first 2 rows over all 112 stitches. In the 3rd row work only over the first 16 sts of the row. Now, start working the next row over all stitches but turn when you have worked 110 stitches. Work the next row back over all stitches, but turn when you have worked 108; so you work 2 less stitches on each side. Repeat rows 3 and 4 exactly as before. Continue working 2 less stitches on each side on the "long" rows 9 more times, then 4 less stitches 9 times and 8 less stitches 5 times. The stitches are simply left unworked until we "start at the beginning" the short rows technique. Happy knitting!
27.07.2025 - 20:36
![]() Lisa skrev:
Lisa skrev:
Where do I start the pattern? At the top of page or where it says circle? Also, what does it mean under the short row section to start again from beginning over all stitches? How many sections is this piece? I’m reading cast on 112 sts. Twice and under short row section start over from beginning? So, cast on another 112sts?
27.07.2025 - 19:06DROPS Design svarede:
Dear Lisa, yes, the written instructions start at "Circle"; all of the instructions above are tips for when you are crochetting. In the short rows you work by turning the piece (but not decreasing) in order to get the correct circle shape. After reaching the remaining 18-16-20-20 outermost sts of circle, you will now work over all stitches again (not the pattern from the beginning); they were not decreased, just left behind. You work a single circle: you cast on 112 stitches, over which you will work the chart and short rows. Then you work the armholes, and continue working the other half-circle on the other side. Then you work the sleeves. Happy knitting!
27.07.2025 - 19:25
![]() Lisa skrev:
Lisa skrev:
Is there a row by row instruction for this pattern (ie, row 1, row 2 etc)? I find this really confusing
27.07.2025 - 15:44DROPS Design svarede:
Dear Lisa, this is the only version of the pattern available, with both charts and written instructions. If you have any doubts as you read and work the pattern you can write us a comment here and we will try to answer all of your questions as clearly as possible. Happy knitting!
27.07.2025 - 18:59
![]() Patricia Alexandra Caruso Reis skrev:
Patricia Alexandra Caruso Reis skrev:
Caros, os diagramas M1 já não estão nítidos. Existe alguma nova versão desses diagramas que possam ser melhor vistos? Está tudo opaco, talvez pelo tempo. Grata
07.06.2024 - 03:36DROPS Design svarede:
Bom dia, Vamos comunicar à equipa de web design. Obrigado!
07.06.2024 - 09:17
|
||||||||||||||||
Blue Moon |
||||||||||||||||
 |
 |
|||||||||||||||
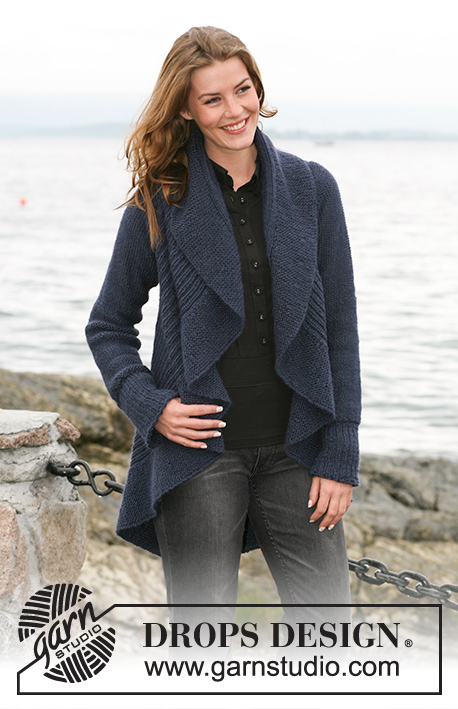
Strikket cirkeljakke i DROPS Silke Alpaca eller Air med strukturmønster. Str S til XXXL.
DROPS 102-6 |
||||||||||||||||
|
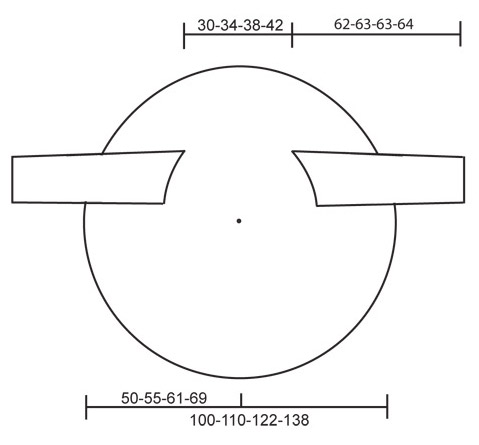
Mønster: Se diag M.1. Diag viser mønsteret set fra retsiden. OBS! Hver str har eget diag. Vendinger: Der strikkes vendinger for at få cirkel-form på arb. Vendingerne strikkes således: 1./ 2.p: Strik 102-112-124-140 m, vend arb og strik tilbage. 3./ 4.p: Strik frem og tilbage over de 18-16-20-20 første m på p (disse m = yderst på cirklen) – læs Strikketips 1 nedenfor. Gentag 1. til 4.p, men hver gang 1./2.p strikkes skal maskeantallet som strikkes mindskes med 2 masker før arb vendes - gentag dette totalt 10-10-12-12 gange, derefter skal maskeantallet som strikkes mindskes med 4 masker før arb vendes - gentag dette totalt 6-9-8-12 gange og derefter skal maskeantallet som strikkes mindskes med 8 masker før arb vendes - gentag dette totalt 5-5-6-6 gange. Herefter er de 18-16-20-20 yderste m på cirklen tilbage. Start forfra over alle m igen – læs Strikketips 2 nedenfor. Strikketips 1: Når arb vendes tages første maske løst af p og tråden strammes før der strikkes videre. Dette gøres for at undgå hul i vendingerne. Dette gælder ikke de 20-20-24-24 m inderst i cirklen - når arb vendes her strikkes alle m normalt. Strikketips 2: På den p som strikkes over alle m, strikkes de inderste 20-20-24-24 m i cirklen vrang (set fra retsiden). Derefter fortsættes der som før efter M.1. Måletips: Alle mål på cirklen gøres når tøjet ligger helt fladt. Mål ikke tværs over! Målene følger buen til den 63.-69.-73.-81.m. Cirkel: Arb strikkes frem og tilbage på rundp for at få plads til alle m. Slå 102-112-124-140 m op på rundp 4,5 med Silke-Alpaca/Air. Sæt 1 mærketråd efter 63-69-73-81 m, alle mål gøres fra denne mærketråd. Strik M.1 (se diag for din str) fra højre mod venstre (dvs fra yderst mod inderst i cirklen)1.p = retsiden. Samtidig med M.1 strikkes der Vendinger – se forkl over – for at få cirkelfacong. Når arb måler 37-40-49-57 cm fra mærketråden - læs Måletips – strikkes der ærmegab. Ærmegab: Sæt de yderste 63-69-73-81 m over på en hjælpep 4,5 (rundp for at få plads til alle m). Videre lukkes de næste 2 m af (= ærmegab). Sæt 1 mærketråd imellem de 2 m som blev lukket af. De resterende m beholdes på p. De 2 dele (m før og m efter ærmegabet) skal nu strikkes videre hver for sig, men de strikkes samtidig på hver sin p med hver sit garnnøgle. Dette gøres for at vendingene skal blive rigtige på begge sider af ærmegabet. Fortsæt med mønster og vendinger som tidligere. Når ærmegabet måler 18-21-23-25 cm slåes der 2 nye m op over ærmegabet (dvs imellem de 2 dele). Videre sættes alle m tilbage på samme p igen = 102-112-124-140 m. Sæt 1 mærketråd efter 63-69-73-81 m. Arb måles videre herfra. Strik videre med M.1 og vendinger over alle m. Fortsæt således til arb måler ca 15-17-19-21 cm, der skal nu være ½ cirkel. Fortsæt til arb måler ca 30-34-38-42 cm fra mærketråden – læs Måletips. Nu laves der et ærmegab til på samme måde. Når alle m er sat tilbage på samme p igen sættes der 1 mærketråd efter 63-69-73-81 m. Arb måles videre herfra. Fortsæt med M.1 og vendinger til arb måler ca 37-40-49-57 cm fra mærketråden (afpas evt efter 1 hel rapport med vendinger). Luk løst af. Ærmer: Arb strikkes frem og tilbage på rundp. Slå 56-59-65-68 m op (inkl 1 kantm i hver side) på rundp 4,5 med Silke-Alpaca/Air. Strik 1 p vrang fra vrangen. Fortsæt med Rib 2 r/ 1 vr med 1 kantm i hver side. Når Ribben måler 13-13-14-14 cm strikkes der 1 p ret fra vrangen samtidig med at der tages 10-11-13-14 m ind jævnt fordelt = 46-48-52-54 m. Fortsæt i glatstrik med vrangen ud til færdig mål. Når arb måler 16 cm tages der 1 m ud i hver side på hver 9.-4½.-3½.-3.cm totalt 5-9-11-13 gange = 56-66-74-80 m. Når arb måler 56 cm lukkes der af til ærmekuppel i hver side på hver 2.p: 4 m 1-2-2-2 gange. Videre lukkes der 2 m af i hver side til arb måler ca 61-62-62-63 cm. Derefter lukkes 4 m af 1 gang i hver side. Arb måler ca 62-63-63-64 cm. Luk de resterende m af. Montering: Sy cirklen sammen yderst i opslåningskanten og aflukningskanten. Sy ærmerne i så underærmesømmen træffer midt på mærketråden som sidder nederst i ærmegabet og midten af ærmekuppelen træffer mærketråden som sidder øverst i ærmegabet. Sy underærmesømmen. |
||||||||||||||||
Diagram forklaring |
||||||||||||||||
|
||||||||||||||||
 |
||||||||||||||||
 |
||||||||||||||||
Har du lavet denne opskrift?Så tagger du dine billeder med #dropspattern eller send dem til #dropsfan galleriet. Behøver du hjælp med opskriften?Du finder 15 instruktionsvideoer, kommentarer/spørgsmål og mere i opskriften på www.garnstudio.com © 1982-2026 DROPS Design A/S. Alle rettigheder er reserveret. Dette dokument med tilhørende underdokumenter har copyright. Læs mere om hvad du kan gøre med vore opskrifter, nedert i alle vore opskrifter på hjemmesiden. |
||||||||||||||||


Med over 40 år i strikke- og hæklebranchen tilbyder DROPS Design en af de mest omfattende kollektioner med gratis opskrifter på internettet - oversat til 17 sprog. Dags dato har vi 324 kataloger og 12290 opskrifter på Dansk.
Vi arbejder hårdt for at kunne tilbyde Dig det bedste man kan få af strik og hækling, inspiration og gode råd men også kvalitetsgarn til fantastiske priser! Vil du bruge vore opskrifter til andet end for privat brug? Du kan læse om hvilke regler som gælder under teksten Copyright nederst på siden i alle vore opskrifter. God fornøjelse!
Kommentere opskrift DROPS 102-6
Vi vil gerne høre din mening om denne model!
Hvis du ønsker at stille et spørgsmål, så husk at vælge rigtig kategori i menuen under - det vil give dig hurtigere svar. Obligatoriske felter er markeret med *.