
Populaarsed kategooriad
Otsid lõnga?


Kommentaarid / Küsimused (93)
![]() Rasna kirjutas:
Rasna kirjutas:
I\'m confused as to how work the shoulders straps in this pattern. May I please ask for further explanation?
12.05.2026 - 05:05DROPS Design vastas:
Hi Rasna, You have 2 sets of stitches on each side of the front piece. Place 1 set on a stitch holder and work across the other set, back and forth as described in the text, to the correct length for your size (the length stated includes the front piece + strap). Then cast off. Work the second strap in the same way. The straps are sewn to the back piece later. Regards, Drops Team.
12.05.2026 - 06:30
![]() Linda kirjutas:
Linda kirjutas:
Det står i oppskriften at en skal strikke to riller over et vist antall masker på midten, men når en skal strikke forstykke og bakstykke for seg selv, skal en fortsette med de rillene på midten?
18.12.2025 - 21:34DROPS Design vastas:
Hei Linda. Det strikkes 2 riller over de midterste maskene i hver side (under ermene), om du ser på bildet (der modellen løfter armen), ser du rillene. mvh DROPS Design
22.12.2025 - 09:38
![]() Audrey kirjutas:
Audrey kirjutas:
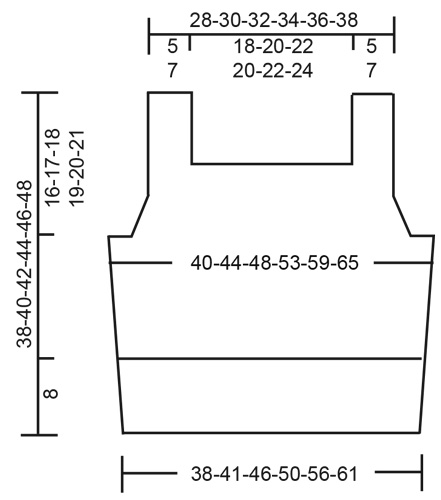
Where does the pattern indicate the finished size measurements? I read they are at the bottom of the pattern but I do not see them there.
20.11.2025 - 08:16DROPS Design vastas:
Dear Audrey, you will find all finished measurements for each size in the chart at the bottom of the page; read more about chart, measurements and sizes here. Happy knitting!
20.11.2025 - 10:27
![]() Annika kirjutas:
Annika kirjutas:
Fin!
24.06.2025 - 13:12
![]() Libby kirjutas:
Libby kirjutas:
I’m currently knitting the straps and the only length stated is for the entire piece - do you have a suggested strap length by itself? I feel like if the rest of the front piece varied from the pattern then I can no longer judge when to stop the straps (especially when only knitting one side first)
26.05.2025 - 12:41DROPS Design vastas:
Dear Libby, we only have here the total length of piece, so that you can measure from where you stopped towards the measurement for your size to get the height of the strap. You can also count for your size the number of rows required for decreasing + the 3 cm ribbing - remove this from the total length to get the approximate length for straps. Happy knitting!
26.05.2025 - 14:26
![]() Hanna kirjutas:
Hanna kirjutas:
Hi I just have a question about the back part of the piece. If I am decreasing every 4th row, and decreasing the same amount as in the front, won't the back piece be twice as long? Is that supposed to be the case? This does not appear to be the case in the diagram, so I am a little confused.
22.05.2025 - 12:57DROPS Design vastas:
Dear Hanna, correct, back piece will be higher than front piece as you will decrease the same number of times than on front piece but on every 4th row instead of on every 2nd row. Happy knitting!
22.05.2025 - 15:49
![]() Luna kirjutas:
Luna kirjutas:
So, when I start working back and forth. Should I have 4 sts (for the garter stitch edge) then SKPO, knit til the last 6 sts where 4 sts is for the garter stitch and then K2tog? Is this the correct way to decrease? Or should it be K2tog then the last 4 sts for the garter edge.
18.05.2025 - 20:47DROPS Design vastas:
Hi Luna, The 4 garter stitches are the first 4 stitches and the last 4 stitches on each row. You decrease as you say, after the first 4 stitches at the beginning of the row, then before the last 4 stitches at the end of the row. Regards, Drops Team.
19.05.2025 - 06:57
![]() Luna kirjutas:
Luna kirjutas:
Please explain when do I start to cast off. So, I have a marker for both sides. Should I start to cast off after each marker? I have one marker as from BOR and the other which marks the side.
18.05.2025 - 20:04DROPS Design vastas:
Dear Luna, you mean for armholes? From the beginning of the row cast off the first 3, 5, 8 or 10 sts (see size), work the next stitches as stated until 3,5,8 or 10 sts remain before next marker then cast off the next 6,10,16 or 20 sts, work until 3,5,8or 10 sts remain before end of the round and cast off these stitches, cut the yarn and pull it through the last stitch. Now work the 62-90 sts on front piece back and forth (back piece will be worked afterwards). Happy knitting!
19.05.2025 - 08:44
![]() Anna Eriksson kirjutas:
Anna Eriksson kirjutas:
Jag har svårt att förstå vilken storlek jag ska sticka. Brukar vara s och ibland m, hur räknar jag ut lättast vilken storlek jag ska sticka? Är det bystmåttet som avses i diagrammet (där jag antar att halva måttet står)?
06.05.2025 - 06:46DROPS Design vastas:
Hei Anna. Se på målene som er oppgitt på målskissen til toppen, finn frem en topp du allerede har og liker passformen på og sammenlign med målene i målskissen med din topp for å finne den størrelsen du ønsker å strikke etter. Målene 40-44-48-53-59-65 er brystmålene på toppen, og ja, det er halve målet. mvh DROPS Design
12.05.2025 - 08:53
![]() Ali kirjutas:
Ali kirjutas:
Hello I would like some advice/help on the front piece: Work 2 edge stitches in garter stitch, * knit 2, purl 2 *, work from *-* 1-1-1-2-2-2 times in total, knit 2 and 2 stitches in garter stitch, then cast off the next 34-38-42-38-42-46 stitches for neck (cast off with knit over knit and purl over purl) So I have to work 2 in garter stitch then do I knit a few more or directly cast off the 34 stitches (for size S)? And is there a special technique for casting off purl and knit?
25.03.2025 - 23:11DROPS Design vastas:
Hi Ali, You cast off the correct number of stitches straight away after the 2 garter stitches. Here is a video showing how to cast off in rib: https://www.garnstudio.com/video.php?id=228&lang=en Happy knitting!
26.03.2025 - 06:55
|
|
Spiced Breeze#spicedbreezetop |
|
 |
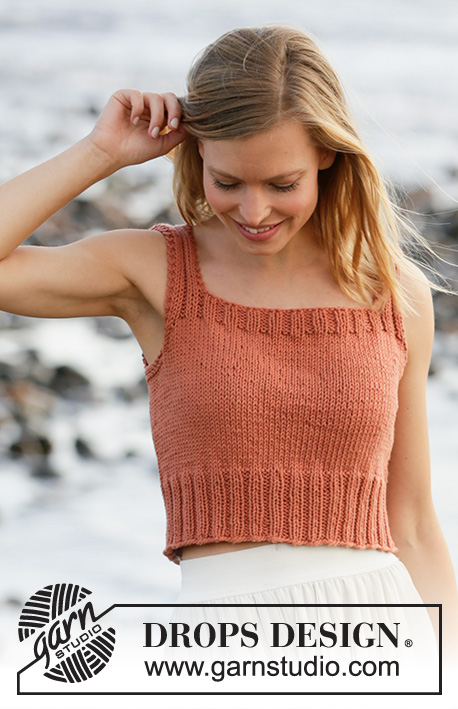 |
DROPS Paris lõngast kootud parempidises koes topp suurustele S kuni XXXL
DROPS 211-15 |
|
|
NÕUANDED: ---------------------------------------------------------- RIPSKUDE (ringselt kududes): Koo 1 ring parempidi silmuseid, 1 ring pahempidi silmuseid. 1 ripsivall = 2 ringi ripskoes. RIPSKUDE (edasi-tagasi kududes): Koo kõik silmused parempidi igal real. 1 ripsivall = koo 2 rida ripskoes. KAHANDAMISE NIPP (käeaukudes): Kahanda käeaugu jaoks 2 ripskoes ääresilmuse kõrval. Kõik kahandused tehakse töö paremal pool. Kahanda PÄRAST 2 ääresilmust: koo 2 parempidi ületõstmisega kokku (1 silmus kudumata parempidi võttega, koo 1 parempidi, tõsta kudumata silmus üle kootud silmuse) (= 1 silmus kahandatud). Kahanda ENNE 2 ääresilmust: alusta 2 silmust enne 2 ääresilmust: koo 2 parempidi kokku (= 1 silmus kahandatud). ---------------------------------------------------------- ALUSTA SIIT: ---------------------------------------------------------- TOPP – KOKKUVÕTE: Kootakse ringselt ringvarrastega, alt üles kuni käeaukudeni. Siis kootakse esi- ja seljaosa eraldi edasi-tagasi. Siis õmmeldakse õlad kokku. KEHAOSA: Loo 136-148-164-180-200-220 silmust 4,5 mm ringvarrastele Paris lõngaga. Koo 1 ring parempidi. Koo ringselt soonikut 2 parempidi/2 pahempidi 8 cm. Paigalda 1 silmusemärkija ringi algusesse ja teine silmusemärkija pärast 68-74-82-90-100-110 silmust (= küljed). Võta 5 mm sukavardad ja koo ringselt parempidises koes. JÄLGI KOETIHEDUST! Kui töö pikkus on 21-22-23-24-25-26 cm, koo 2 ripsivalli (4 rida) RIPSKOES - loe ülevalt, keskmisel 10-10-14-14-20-24 silmusel mõlemal küljel (silmusemärkija on nende 10-10-14-14-20-24 silmuse keskel), koo ülejäänud silmused parempidises koes). Pärast 2 ripsivalli koo silmuseid maha käeaukude jaoks järgmiselt: koo maha 3-3-5-5-8-10 silmust, koo 62-68-72-80-84-90 silmust parempidises koes, koo maha 6-6-10-10-16-20 silmust (silmusemärkija on nende 6-6-10-10-16-20 silmuse keskel), koo 62-68-72-80-84-90 silmust parempidises koes, koo maha ülejäänud 3-3-5-5-8-10 silmust. Katkesta lõng. Nüüd koo esi- ja seljaosa eraldi edasi-tagasi. ESIOSA: = 62-68-72-80-84-90 silmust. Alusta töö pahemal pool ja koo parempidises koes edasi-tagasi, tehes 2 ääresilmust ripskoes mõlemal küljel. SAMAL AJAL kahanda esimesel töö parempoolsel real 1 silmus mõlemal küljel käeaukude jaoks – loe KAHANDAMISE NIPPI. Kahanda nii igal teisel real (st igal töö parempoolsel real) kokku 4-5-5-7-7-8 korda mõlemal küljel = 54-58-62-66-70-74 silmust jääb. Pärast viimast kahandust koo 1 rida pahempidi töö pahemal pool, tehes 2 ääresilmust ripskoes mõlemal küljel. Võta 4,5 mm ringvardad ja koo töö paremal pool järgmiselt: koo 2 ääresilmust ripskoes, koo soonikut 2 parempidi/2 pahempidi, kuni jääb 4 silmust reale, koo 2 parempidi ja 2 ääresilmust ripskoes. Koo niimoodi soonikut 3 cm. Järgmisel töö parempoolsel real koo maha kaelaaugu jaoks järgmiselt: koo 2 ääresilmust ripskoes, koo soonikut * 2 parempidi, 2 pahempidi *, korda * kuni * kokku 1-1-1-2-2-2 korda, koo 2 parempidi, 2 silmust ripskoes; siis koo maha järgmised 34-38-42-38-42-46 silmust kaelaaugu jaoks (koo maha, tehes parempidi silmused parempidi ja pahempidi silmused pahempidi), koo 2 silmust ripskoes, * 2 parempidi, 2 pahempidi *, korda * kuni * kokku 1-1-1-2-2-2 korda, koo 2 parempidi, tee 2 ääresilmust ripskoes. Õlapaela jaoks jääb mõlemale õlale nüüd 10-10-10-14-14-14 silmust. Lõpeta õlad eraldi. ÕLAPAEL: = 10-10-10-14-14-14 silmust. Koo soonikut edasi-tagasi nagu enne, tehes 2 ääresilmust ripskoes mõlemal küljel, kuni töö kõrgus 38-40-42-44-46-48 cm loomise reast (või soovitud pikkusega). Koo silmused maha. Tee teine õlg samamoodi. SELJAOSA: = 62-68-72-80-84-90 silmust. Alusta töö pahemal pool ja koo parempidises koes edasi-tagasi, tehes 2 ääresilmust ripskoes mõlemal küljel. SAMAL AJAL kahanda esimesel töö parempoolsel real 1 silmus mõlemal küljel käeaukude jaoks – loe KAHANDAMISE NIPPI. Kahanda nii igal neljandal real (mitte igal töö parempoolsel real nagu esiosal) kokku 4-5-5-7-7-8 korda mõlemal küljel = 54-58-62-66-70-74 silmust jääb. Pärast viimast kahandust koo 1 rida pahempidi töö pahemal pool, tehes 2 ääresilmust ripskoes mõlemal küljel. Võta 4,5 mm ringvardad ja koo töö paremal pool järgmiselt: koo 2 ääresilmust ripskoes, koo soonikut 2 parempidi/2 pahempidi, kuni jääb 4 silmust reale, koo 2 parempidi ja 2 ääresilmust ripskoes. Koo niimoodi soonikut 3 cm. Järgmisel töö parempoolsel real koo maha kaelaaugu jaoks järgmiselt: koo 2 ääresilmust ripskoes, koo soonikut * 2 parempidi, 2 pahempidi *, korda * kuni * kokku 1-1-1-2-2-2 korda, koo 2 parempidi, 2 silmust ripskoes; siis koo maha järgmised 34-38-42-38-42-46 silmust kaelaaugu jaoks (koo maha, tehes parempidi silmused parempidi ja pahempidi silmused pahempidi), koo 2 silmust ripskoes, * 2 parempidi, 2 pahempidi *, korda * kuni * kokku 1-1-1-2-2-2 korda, koo 2 parempidi, tee 2 ääresilmust ripskoes. Õlapaela jaoks jääb mõlemale õlale nüüd 10-10-10-14-14-14 silmust. Koo õlapaelad nagu esiosal. VIIMISTLUS: Õmble kokku õlaõmblused. |
|
 |
|
Kas oled teinud seda mustrit?Lisa oma piltidele viide #dropspattern #spicedbreezetop või saada link projektile meie #dropsfan galeriisse. Vajad abi selle mustriga?Garnstudio.com kodulehel on 21 õppevideot, küsimuste/vastuste osa ja muudki. © 1982-2026 DROPS Design A/S. Kõik õigused kaitstud. See dokument, ning selle alajaotused on kaitsud autoriõigustega. Loe rohkem, mida meie mustritega võib teha, iga mustrilehe alt meie kodulehel. |
|


Tegeledes üle 40 aasta kudumise ja heegeldamise disainidega, pakub DROPS Design ühte suurimat tasuta mustrite kollektsiooni internetis - tõlgituna 17 keelde. Tänaseks on meil 325 kataloogi ja 12298 mustrit - millest 9439 on tõlgitud Eesti keelde.
Me anname endast parima, et tuua teieni kõike mida kudumine ja heegeldamine võib pakkuda - inspiratsiooni, nõuandeid ning ka kvaliteetseid lõngu parima hinnaga! Soovid kasutada mustreid muukski, kui ainult oma tarbeks? Loe infot meie Copyright osas iga lehekülje all. Rõõmsat loomist!
Jäta kommentaar mustrile DROPS 211-15
Ootame kommentaare selle mustri kohta!
Kui soovid midagi küsida, siis kiiremaks vastuse saamiseks veendu, et valid õige kategooria alloleval formil. Vajaliku väljad *.