
Populaarsed kategooriad
Otsid lõnga?


Kommentaarid / Küsimused (48)
![]() María Fernanda Yáñez kirjutas:
María Fernanda Yáñez kirjutas:
Hola! Para la talla M, los 95 puntos de A2 no encajan con el sentido de los 7 puntos centrales de A3 (para que encajen tendría que tener 43 puntos a un lado y 45 en el otro). Hago el comentario para saber si es que hay un error en el patrón. Gracias por la respuesta.
15.03.2022 - 05:30
![]() Irene Simeone kirjutas:
Irene Simeone kirjutas:
Buongiorno, un'altra domanda. Quando si deve iniziare il diagramma A.3, le istruzioni dicono di iniziare dalla riga indicata dalla freccia su un ferro sul rovescio del lavoro. Questo significa che le 7 maglie centrali devono essere lavorati così: 1 dir, 5 rov, 1 dir? Grazie ancora. Irene
03.03.2022 - 15:43DROPS Design vastas:
Buonasera Irene, dal rovescio del lavoro deve lavorare come indicato nella legenda e cioè 1 maglia rovescio, 5 maglie diritto e 1 maglia rovescio. Buon lavoro!
05.03.2022 - 22:09
![]() Irene Simeone kirjutas:
Irene Simeone kirjutas:
Buongiorno, sto seguendo le istruzioni ma sono un po' confusa :( il davanti del lavoro è quello in cui si vedono le coste oppure quello in cui ci sono una specie di nodini? spero riusciate a capire cosa intendo. Grazie mille! Irene
03.03.2022 - 15:24DROPS Design vastas:
Buonasera Irene, il davanti del lavoro è quello in cui inizia a lavorare a coste sul dietro. Buon lavoro!
04.03.2022 - 17:46
![]() Stella kirjutas:
Stella kirjutas:
When it says to work 4 rows over 10 garter stitches, does is mean 4 rows with the 10 garter stitches or the 10 garter stitches with 4 rows of A2 over it?
03.01.2022 - 21:52DROPS Design vastas:
Dear Stella, this means you work the next 4 rows with the 10 sts in garter stitch instead of pattern and the remaining stitches as before. Happy knitting!
04.01.2022 - 07:26
![]() Angela Beaty kirjutas:
Angela Beaty kirjutas:
In the Back Piece section, work from arrow in A.3 over the middle 7 stitches on row, Is this actually in the middle of the 96 stitches? So you skip the first 4 rows and just do the arrow row? Then work A.3 over the first 48 stitches do you start from the bottom of the diagram or from the arrow?
19.08.2021 - 10:21DROPS Design vastas:
Dear Angela, when you work from the arrow, yes, you're working over the middle 7 stitches of the 96 stitches and you skip the first 4 rows and start from the arrow row. In the rest of the stitches, you work A.2. After finishing A.3, in the next row, there is a split for the opening. The rows under the arrow are actually from A.2 and are there just to give a context or to make it continuous visually.
30.08.2021 - 19:26
![]() Katzilicious kirjutas:
Katzilicious kirjutas:
I'm still confused, can you explain "work from arrow in A.3 over the middle 7 stitches on row - adjust so that this row marked with arrow is worked from wrong side. On first row from right side after A.3 work over the first 44-48-52-57-63-70 stitches on row and slip the remaining 44-48-52-57-63-70 stitches on 1 stitch holder"? So how do I read the chart? From the right bottom? And when i work from arrow A.3 do i start with RS or WS? Thank you
18.05.2021 - 12:06DROPS Design vastas:
Dear Katzilicious, you read the diagram from right to left and from bottom up, from the right side. Here you have a lesson on how to read a diagram: https://www.garnstudio.com/lesson.php?id=68&cid=19 A.3 begins from the wrong side. Work 5 rows of A.3, which is in the center of the front or the back. The next step is to separate this part into two. You work one part with the V-neck and then you work the second part from the stitch holder. Happy knitting!
07.08.2021 - 11:30
![]() Jessica kirjutas:
Jessica kirjutas:
Hi again! Thanks for the help, it clears things up, but I’m still not sure what I should be doing when I switch to the A.3 chart. It says the row marked by the arrow should be worked from the WS, but to do that, I’d have to work the row below from the RS, meaning I’d be doing a row of knitting. But the A.2 pattern states that for RS rows I should P1 K1. I’m not sure how these two charts fit together. Any help would be great.
07.05.2021 - 13:32
![]() Jessica kirjutas:
Jessica kirjutas:
Hi! I’m a little confused about what to do once I’ve done the first 8 rows in A.1. I’m finishing on the WS so starting A.2 on the RS with a P1 K1 and 3 garter stitches at each end, then on the WS purling all stitches, but from previous comments that doesn’t seem to be the correct pattern, and after I got to switching to A.3, doing the row indicated by the arrow on the WS indicates that the previous RS row should be all knitted, not P1 K1 as I have done. Any help would be appreciated.
07.05.2021 - 11:22DROPS Design vastas:
Dear Jessica, the garter stitches in A.2 (= P from RS, P from WS) should be worked over the P stitches in A.1, so that you will work A.2 from RS: 3 sts in garter st, K1, (P1, K1) repeat from (to) and finish with 3 sts in garter stitch and from WS: K3, P to the last 3 sts, P3. Happy knitting!
07.05.2021 - 13:00
![]() Katzilicious kirjutas:
Katzilicious kirjutas:
I'm confuse about worked A.1 until it had been vertically worked and work A.2 over A.1 can you please explain? Thank you
06.05.2021 - 07:39DROPS Design vastas:
Dear Katzilicious, work first the 8 rows in A.1 as explained: (from RS = 3 sts in garter stitch, knit 1, repeat A.1 (read from the right towards the left= P1, K1), 3 sts in garter st / from WS: 3 sts in garter st, A.1 (read from the left towards the right = P1, K1), P1, 3 sts in garter st). Then work: 3 sts in garter st, knit 1, repeat A.2 (= 1 st in garter st, 1 st in stocking st), and finish with 3 sts in garter st, from WS: 3 sts in garter st, repeat A.1 (=1 st in stocking st = P, 1 st in garter st = K), P1, 3 sts in garter st. Hope this help. Happy knitting!
06.05.2021 - 07:45
![]() Diana kirjutas:
Diana kirjutas:
I prefer written instructions as opposed to charts. Is there anyone who has written out the instructions? Also, there are no instructions on how many inches or rows we need to knit for each diagram. I am a long time knitter but find almost all of the patterns here quite confusing with no written instructions or actual row/inches for each size. I understand the patterns are translated from Norwegian and it is not an easy task to ensure everything is explained in detail.
29.03.2021 - 22:35DROPS Design vastas:
Dear Diana, we use charts insted of written out instructions not only because they are available in many languages, but also because we believe that with charts one can see not only the very next step, but one can see teh larger picture, as how stitches and rows relate to each other en large. We also have a lesson about how to read diagrams here, and one can always ask for help in the store where they bought their DROPS yarn from (over the phone or in person). We have many knitters who actually prefer diagrams to written instructions. Happy Knitting!
30.03.2021 - 11:50
|
|||||||||||||
Mazo#mazotop |
|||||||||||||
 |
 |
||||||||||||
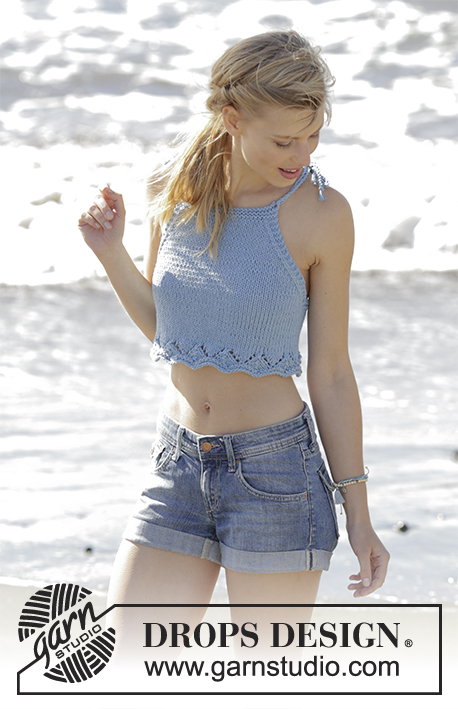
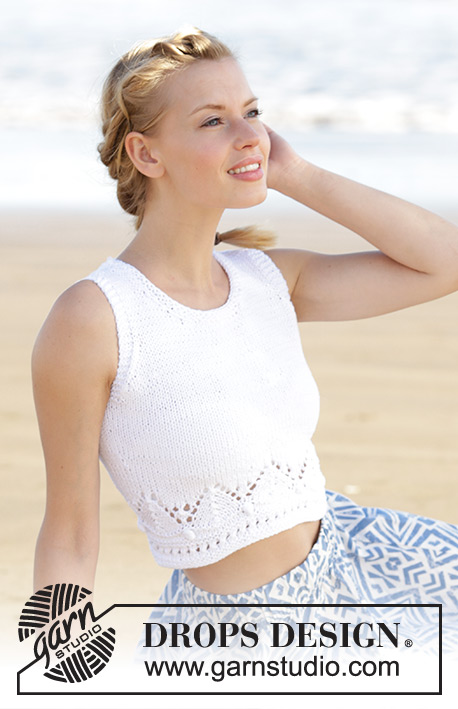
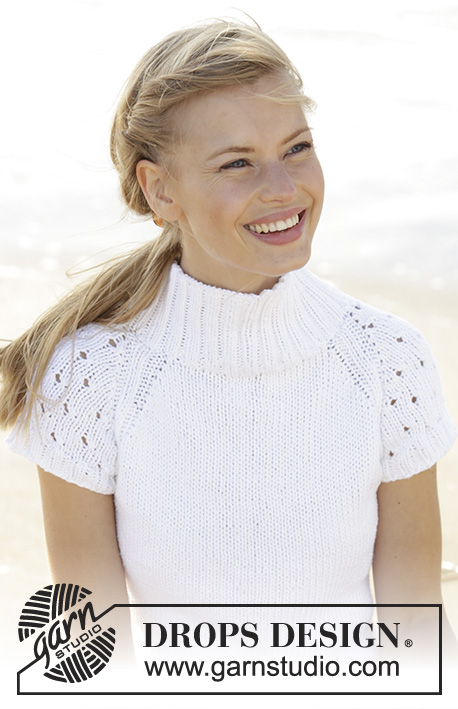
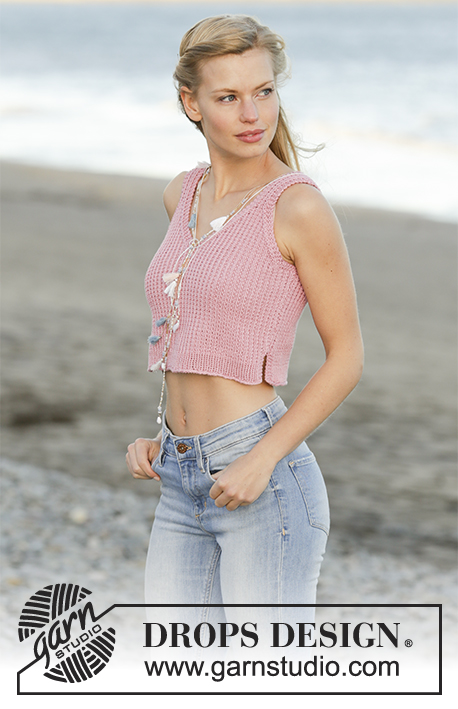
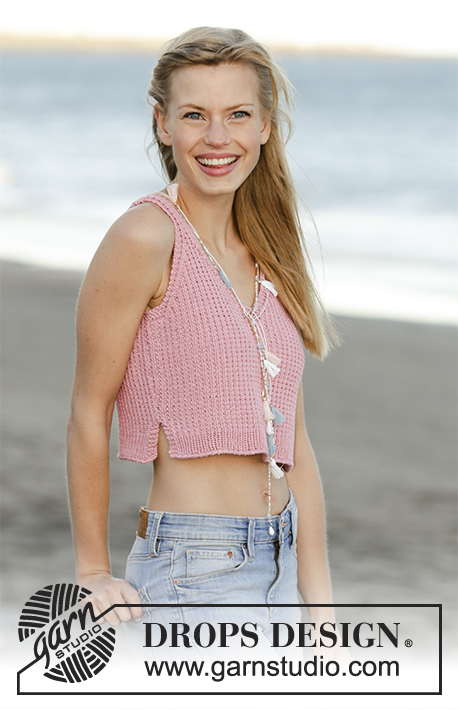
DROPS Muskat lõngast alt üles kootud V-kaelusega, tekstuurse mustriga ja lõhikutega topp suurustele S – XXXL
DROPS 178-66 |
|||||||||||||
|
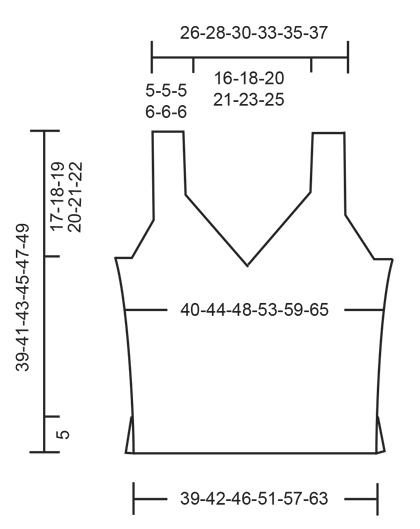
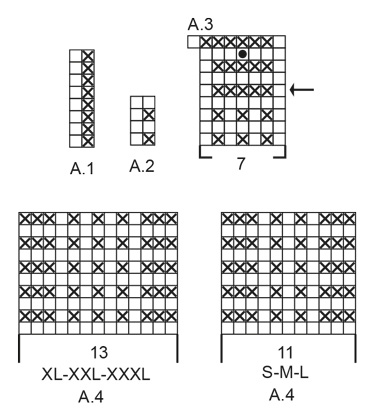
RIPSKUDE (edasi-tagasi kududes) Koo kõik silmused parempidi igal real. 1 ripsivall = koo 2 rida parempidi silmuseid. MUSTER Vaata skeeme A.1 kuni A.4. Muster on vaadatuna töö paremalt poolt ja näitab iga rida. Vali suurusele sobiv skeem. KASVATAMISE NIPP Kasvata 1 silmus, tehes õhksilmuse. Järgmisel real koo õhksilmused keerdsilmustena, et ei jääks auke. NB! Koo uued silmused mustrisse skeemil A.2. KAHANDAMISE NIPP Kahanda 1 silmus 3 ripskoes ääresilmuse kõrval. Kõik kahandused tehakse töö paremal pool. Kahanda pärast 3 silmust ripskoes: tõsta 1 silmus kudumata parempidi võttega, 1 parempidi, tõsta kudumata silmus üle kootud silmuse. Kahanda enne 3 silmust ripskoes: alusta 2 silmust enne 3 ääresilmust ja koo 2 parempidi kokku. ---------------------------------------------------------- TOPP Kootakse edasi-tagasi kahes osas, pärast õmmeldakse kokku. SELJAOSA Loo 81-89-97-107-119-133 silmust 4 mm ringvarrastele Muskat lõngaga. Koo 1 rida pahempidi töö pahemal pool. Koo soonikut järgmiselt (1. rida = töö parem pool): koo 3 silmust RIPSKOES - vaata ülevalt, koo 1 parempidi silmus, korda skeemi A.1 (= 2 silmust), kuni jääb 3 silmust reale, koo 3 ääresilmust ripskoes. Koo niimoodi mustrit edasi-tagasi, kuni skeem A.1 on tehtud vertikaalselt. Siis koo skeemi A.2 (= 2 silmust) skeemi A.1 kohale. JÄLGI KOETIHEDUST! Kui töö pikkus on 5 cm, loo 1 uus silmus järgmise 2 rea lõpus (ääresilmused - märgib lõhikute lõppu) = 83-91-99-109-121-135 silmust. Koo mustrit järgmiselt: tee 1 ääresilmus ripskoes, 1 parempidi silmus, koo skeemi A.2 kuni jääb 1 silmus, koo 1 ääresilmus ripskoes. Kui töö pikkus on 7 cm, kasvata 1 silmus ripskoes ääresilmuse kõrvale mõlemal küljel – loe KASVATAMISE NIPPI. Korda kasvatamist, kui töö pikkus on 10 cm = 87-95-103-113-125-139 silmust. Kui töö pikkus on 19-20-21-22-23-24 cm, koo rea keskmisel 7 silmusel noolega märgitud rida skeemil A.3 – säti nii, et see oleks töö pahemal pool. Pärast skeemi A.3 koo esimesel töö parempoolsel real ainult esimesed 44-48-52-57-63-70 silmust, ja tõsta ülejäänud 44-48-52-57-63-70 silmust abilõngale. SELJAOSA PAREM KÜLG = 44-48-52-57-63-70 silmust. LOE JÄRGNEV LÄBI ENNE JÄTKAMIST! Kahanda kaelaaugu ja käeaugu jaoks üheaegselt järgmiselt: koo skeemi A.2 nagu enne, tehes 3 ääresilmust ripskoes kaela pool ja 1 silmus ripskoes külje pool. KAELAKAAREL: alusta kahandamist kaelaaugu jaoks esimesel töö parempoolsel real. Kahanda 1 silmus 3 ripskoes ääresilmuse kõrval – loe KAHANDAMISE NIPPI. Kahanda nii igal teisel real (st. igal töö parempoolsel real) 16-18-20-22-24-26 korda kokku. KÄEAUGUS: kui töö pikkus on 21-22-23-24-25-26 cm, koo ripskoes äärmised 10-10-12-11-11-14 silmust külje pool (kaasaarvatud 1 ääresilmus ripskoes). Kui on tehtud 4 rida ripskoes (= 2 ripsivalli) neil silmustel, koo maha esimesed 7-7-9-8-8-11 rea alguses käeaugu jaoks. Koo järgmised 3 silmust ripskoes (= ääris käeaugus). Kahanda 1 silmus 3 ripskoes ääresilmuse kõrval. Kahanda nii igal teisel real (st. igal töö parempoolsel real) 10-12-12-14-18-20 korda kokku. Kui kõik kahandused ja mahakudumised kaelakaarel ja käeaukude jaoks on tehtud, jääb 11-11-11-13-13-13 silmust õlapaela jaoks. Jätka mustriga nagu enne, tehes 3 ääresilmust ripskoes mõlemal küljel. Koo õlapael nagu näidatud skeemil A.4 – vali suurusele sobiv skeem. Kui töö pikkus on 39-41-43-45-47-49 cm, koo silmused maha. SELJAOSA VASAK KÜLG Tõsta 44-48-52-57-63-70 silmust abilõngalt teisel küljel tagasi 4 mm ringvardale ja koo samamoodi nagu parem külg, aga peegelpildis - NB! Koo silmused maha käeaugu jaoks töö pahempoolse rea alguses (mitte töö paremal pool). Tee ülejäänud kahandamised töö paremal pool. ESIOSA Loo ja koo nagu seljaosa. VIIMISTLUS Õmble kaks õlapaela kokku silmamise teel, et õmblus ei jääks paksuks. Õmble küljeõmblus 1 ripskoes ääresilmuse kõrvalt alla kuni lõhikuni. Korda teisel küljel. Katkesta ja kinnita lõng. |
|||||||||||||
Skeemi seletused |
|||||||||||||
|
|||||||||||||
 |
|||||||||||||
 |
|||||||||||||
Kas oled teinud seda mustrit?Lisa oma piltidele viide #dropspattern #mazotop või saada link projektile meie #dropsfan galeriisse. Vajad abi selle mustriga?Garnstudio.com kodulehel on 23 õppevideot, küsimuste/vastuste osa ja muudki. © 1982-2026 DROPS Design A/S. Kõik õigused kaitstud. See dokument, ning selle alajaotused on kaitsud autoriõigustega. Loe rohkem, mida meie mustritega võib teha, iga mustrilehe alt meie kodulehel. |
|||||||||||||


Tegeledes üle 40 aasta kudumise ja heegeldamise disainidega, pakub DROPS Design ühte suurimat tasuta mustrite kollektsiooni internetis - tõlgituna 17 keelde. Tänaseks on meil 324 kataloogi ja 12290 mustrit - millest 9431 on tõlgitud Eesti keelde.
Me anname endast parima, et tuua teieni kõike mida kudumine ja heegeldamine võib pakkuda - inspiratsiooni, nõuandeid ning ka kvaliteetseid lõngu parima hinnaga! Soovid kasutada mustreid muukski, kui ainult oma tarbeks? Loe infot meie Copyright osas iga lehekülje all. Rõõmsat loomist!
Jäta kommentaar mustrile DROPS 178-66
Ootame kommentaare selle mustri kohta!
Kui soovid midagi küsida, siis kiiremaks vastuse saamiseks veendu, et valid õige kategooria alloleval formil. Vajaliku väljad *.