
Populaarsed kategooriad
Otsid lõnga?


Kommentaarid / Küsimused (48)
![]() Monika Klein kirjutas:
Monika Klein kirjutas:
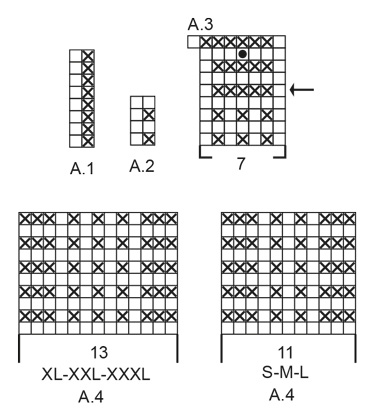
Hallo, A3: beginnt mit Pfeil als Rückreihe. Demzufolge nächste Reihe als Hinreihe wird rechts gestrickt. A3 endet also mit einer Rückreihe. Ist das richtig? Und wo tauchen die ersten Reihen von A3 auf? Nächste Frage: denn in A2 sind die Reihe 3, 5 usw. Rückreihen und werden links gestrickt?
04.11.2025 - 20:12DROPS Design vastas:
Liebe Monika, Sie haben das richtig verstanden. A.2 stricken Sie einfach wie zuvor weiter (1 M re, 1 M li in Hin-R, li in Rück-R), nur die 7 Maschen in der Mitte des Rückenteils stricken Sie ab der Rück-R im Muster A.3, mit A.3 bereiten Sie die Teilung des Rückenteils (und des Vorderteils, es wird ja ebenso gestrickt) vor. Anders ausgedrückt bedeutet A.3: 1 Masche glatt rechts, 5 Maschen kraus rechts, 1 Masche glatt rechts. In der vorletzten Reihe (= Hin-R) nehmen Sie dann 1 Masche in A.3 zu. Die ersten Reihen von A.3 werden nicht gestrickt und haben weiter keine Bedeutung.
04.11.2025 - 22:35
![]() Helle Pedersen kirjutas:
Helle Pedersen kirjutas:
Hej! Jeg strikker toppen i str L. Jeg forstår ikke diagrammet A3. Jeg skal som jeg forstår det strikke fra pilen på vrangpinden. Dernæst bliver min næste respons i følge diagrammet en hel retpind, hvilket “ødelægger” mønstret. Der mangler et billede af ryggen på toppen. Vh. Helle
01.05.2025 - 10:51DROPS Design vastas:
Hej Helle, A.3 skal kun strikkes over de midterste masker som skal blive til retstrik (ret fra retsiden og ret fra vrangen :)
06.05.2025 - 14:31
![]() Sara Andrea kirjutas:
Sara Andrea kirjutas:
Hei! Jeg skal strikke A2. Den andre raden på A2 er på vrangen, skal jeg strikke denne rett eller vrang? Skal strukturen på rad en være, rett og vrang og rad to, vrang på rettsiden?
04.04.2024 - 18:09DROPS Design vastas:
Hei Sara Andrea, Når du strikker på vrangsiden, er hvite ruter strikket vrang og ruter med kryss strikket rett. Diagrammene leses fra venstre til høyre når man strikker på vrangsiden. God fornøyelse!
05.04.2024 - 06:57
![]() Jyotsna Naik kirjutas:
Jyotsna Naik kirjutas:
What I should be doing when I switch to the A.3 chart. It says the row marked by the arrow should be worked from the WS, but to do that, I’d have to work the row below from the RS, meaning I’d be doing a row of knitting. But the A.2 pattern states that for RS rows I should P1 K1. I’m not sure how these two charts fit together. Any help would be great.
02.01.2024 - 17:56DROPS Design vastas:
Dear Jyotsna, after reaching the correct measurements, you need to work as shown in A.3 over the middle 7 stitches only (5 stitches in garter stitch and 1 stitch in stocking stitch on each side). The row from the wrong side will be: purl all stitches except the 5 stitches in garter stitch. Then, on the row from the RS, work in rib (p1,k1) until you reach the 7 A.3 stitches, and then, k1,k5,k1. Happy knitting!
07.01.2024 - 17:56
![]() ROSA KIAN kirjutas:
ROSA KIAN kirjutas:
I figured out my previous question, but I am confused on the decreases for neck and armhole. It said to do it at the same time. for the neck stars decreasing 1 sts TOG, and then said when measure 21 cm start the 2 ridges of A.2 before decreasing the 7 sts for the armhole, so the decreases don't start at the same time. can you help me please
25.04.2023 - 15:02DROPS Design vastas:
Dear Mrs Kian, the decreases for neck and armhole will be worked at the same time, but correct you first start decreasing for neck, then at the same time you will shape armhole (= work garter stitch, then cast off sts towards armhole then decrease for armhole). Happy knitting!
26.04.2023 - 08:33
![]() ROSA KIAN kirjutas:
ROSA KIAN kirjutas:
Please in A2 there are 2 ridge, the first one; 1 purl, 1 knit..., the second one, all purl , this is going to be the wrong side right? so when you got in A3, start from the wrong side, this mean the row that is all purl?
24.04.2023 - 22:32DROPS Design vastas:
Hi Rosa, A.2 pattern is a textured pattern, not ridges (which would be knitted from both sides). You begin A.2 from the right side and finish from the wrong side after 4 rows. Then you begin A.3 from the right side, bottom row with K1, P1. Happy knitting!
25.04.2023 - 08:07
![]() Francisca kirjutas:
Francisca kirjutas:
Hola, al iniciar 3 puntos musgo, 1 d, y a1 , en el centro queda 1 punto reves , y al querer hacerlo coincidir con el punto que se agrega en a3 queda finalmente 1 derecho sobre 1 reves. Para que coincida es necesario iniciar 3 puntos musgo e inmediatamente 1 reves, de esa manera se logra el diagrama . He intentado iniciarlo como explica pero no coincide el punto del medio Saludos
17.11.2022 - 04:40DROPS Design vastas:
Hola Francisca, comienzas con 1d para que el elástico quede simétrico (comienza y termina con 1d). Por lo tanto, no es necesario que quede alineado el punto central.
20.11.2022 - 23:12
![]() Kelly kirjutas:
Kelly kirjutas:
'When piece measures 5 cm, cast on 1 new stitch at the end of the next 2 rows (marks where vents end) = 83-91-99-109-121-135 stitches. Work pattern as follows: 1 edge stitch in garter stitch, knit 1, A.2 until 1 stitch remains, 1 edge stitch in garter stitch.' I'm very confused after the increase. I followed the pattern, but it doesn't match up with the previous row with the 3 Gartner stitches. I'm getting Gartner, knit, purl, knit, 'knit'. What am I doing wrong?
05.07.2022 - 16:13DROPS Design vastas:
Dear Kelly, you previously started with 3 sts garter stitch, K1, then A.1 (P1, K1) - from RS; after the new st cast on work: 1 st in garter st (new stitch), K1 (the first of the 3 garter sts), A.2 (= P1, K1 on first row) -= the 3 sts previously worked in garter stitch, then continue with A.2 over A.1 (= P1, K1 on first row in A.2 over A.1 = P1, K1) - and same at the end of the row. Can this help? Happy knitting!
06.07.2022 - 09:02
![]() Annamaria kirjutas:
Annamaria kirjutas:
Buongiorno Non ho capito quando faccio il primo aumento 83 maglie Non mi corrispondono le maglie 1/1grazie mille buona giornata
05.07.2022 - 09:58DROPS Design vastas:
Buongiorno Annamaria, il primo aumento porta solo 2 maglie di vivagno a maglia legaccio (una per lato) che non impattano sul motivo. Buon lavoro!
06.07.2022 - 08:52
![]() Chantal kirjutas:
Chantal kirjutas:
Bonjour Il me semble bizarre que le rang avec flèche de A3 soit tricoté sur l'envers puisque le rang précédent (tricoté selon A2) est sur l'envers. A2 : sur l'endroit, j'alterne mailles endroit et envers. sur l'envers je tricote toutes les mailles à l'envers. Est-ce une erreur ? ou je n'ai pas bien compris ?
09.06.2022 - 10:02DROPS Design vastas:
Bonjour Chantal, effectivement, une note a été envoyée à nos stylistes, j'ajusterai A.3 comme il faut pour retomber juste (= pour que les 1ers rangs de A.3 sous la flèche correspondent à A.2), en attendant un retour. Merci d'avance, bonne continuation!
09.06.2022 - 13:23
|
|||||||||||||
Mazo#mazotop |
|||||||||||||
 |
 |
||||||||||||
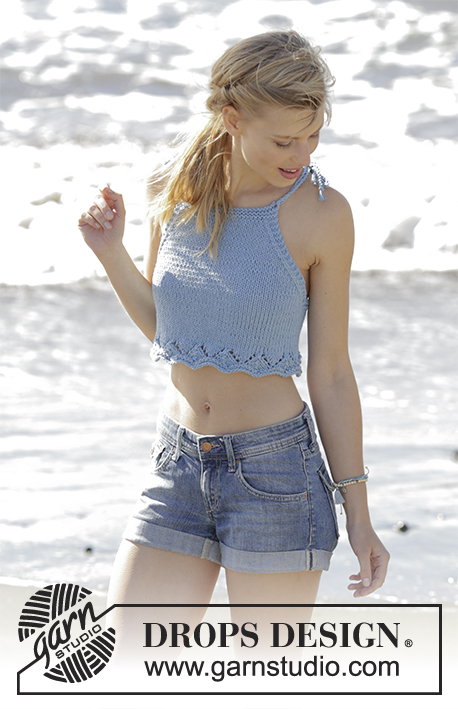
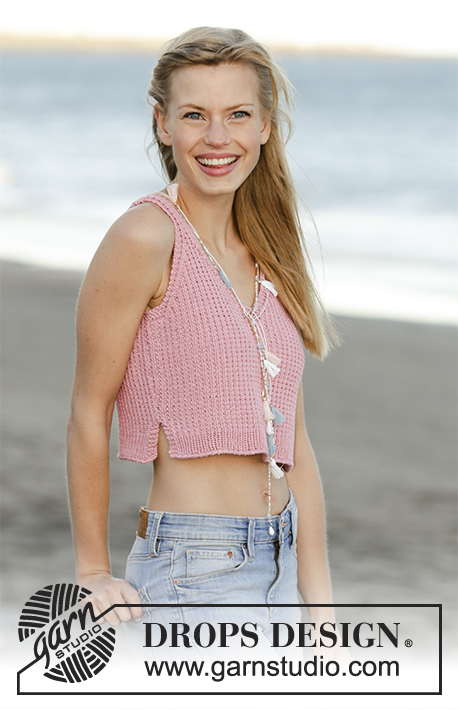
DROPS Muskat lõngast alt üles kootud V-kaelusega, tekstuurse mustriga ja lõhikutega topp suurustele S – XXXL
DROPS 178-66 |
|||||||||||||
|
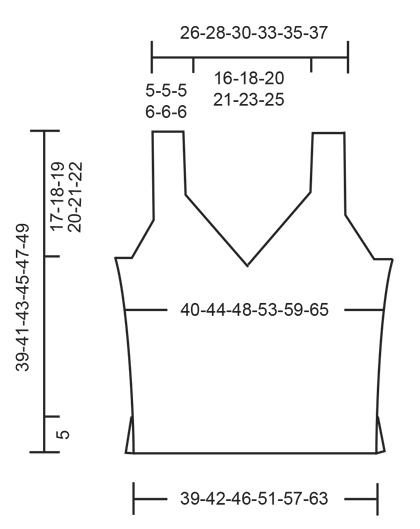
RIPSKUDE (edasi-tagasi kududes) Koo kõik silmused parempidi igal real. 1 ripsivall = koo 2 rida parempidi silmuseid. MUSTER Vaata skeeme A.1 kuni A.4. Muster on vaadatuna töö paremalt poolt ja näitab iga rida. Vali suurusele sobiv skeem. KASVATAMISE NIPP Kasvata 1 silmus, tehes õhksilmuse. Järgmisel real koo õhksilmused keerdsilmustena, et ei jääks auke. NB! Koo uued silmused mustrisse skeemil A.2. KAHANDAMISE NIPP Kahanda 1 silmus 3 ripskoes ääresilmuse kõrval. Kõik kahandused tehakse töö paremal pool. Kahanda pärast 3 silmust ripskoes: tõsta 1 silmus kudumata parempidi võttega, 1 parempidi, tõsta kudumata silmus üle kootud silmuse. Kahanda enne 3 silmust ripskoes: alusta 2 silmust enne 3 ääresilmust ja koo 2 parempidi kokku. ---------------------------------------------------------- TOPP Kootakse edasi-tagasi kahes osas, pärast õmmeldakse kokku. SELJAOSA Loo 81-89-97-107-119-133 silmust 4 mm ringvarrastele Muskat lõngaga. Koo 1 rida pahempidi töö pahemal pool. Koo soonikut järgmiselt (1. rida = töö parem pool): koo 3 silmust RIPSKOES - vaata ülevalt, koo 1 parempidi silmus, korda skeemi A.1 (= 2 silmust), kuni jääb 3 silmust reale, koo 3 ääresilmust ripskoes. Koo niimoodi mustrit edasi-tagasi, kuni skeem A.1 on tehtud vertikaalselt. Siis koo skeemi A.2 (= 2 silmust) skeemi A.1 kohale. JÄLGI KOETIHEDUST! Kui töö pikkus on 5 cm, loo 1 uus silmus järgmise 2 rea lõpus (ääresilmused - märgib lõhikute lõppu) = 83-91-99-109-121-135 silmust. Koo mustrit järgmiselt: tee 1 ääresilmus ripskoes, 1 parempidi silmus, koo skeemi A.2 kuni jääb 1 silmus, koo 1 ääresilmus ripskoes. Kui töö pikkus on 7 cm, kasvata 1 silmus ripskoes ääresilmuse kõrvale mõlemal küljel – loe KASVATAMISE NIPPI. Korda kasvatamist, kui töö pikkus on 10 cm = 87-95-103-113-125-139 silmust. Kui töö pikkus on 19-20-21-22-23-24 cm, koo rea keskmisel 7 silmusel noolega märgitud rida skeemil A.3 – säti nii, et see oleks töö pahemal pool. Pärast skeemi A.3 koo esimesel töö parempoolsel real ainult esimesed 44-48-52-57-63-70 silmust, ja tõsta ülejäänud 44-48-52-57-63-70 silmust abilõngale. SELJAOSA PAREM KÜLG = 44-48-52-57-63-70 silmust. LOE JÄRGNEV LÄBI ENNE JÄTKAMIST! Kahanda kaelaaugu ja käeaugu jaoks üheaegselt järgmiselt: koo skeemi A.2 nagu enne, tehes 3 ääresilmust ripskoes kaela pool ja 1 silmus ripskoes külje pool. KAELAKAAREL: alusta kahandamist kaelaaugu jaoks esimesel töö parempoolsel real. Kahanda 1 silmus 3 ripskoes ääresilmuse kõrval – loe KAHANDAMISE NIPPI. Kahanda nii igal teisel real (st. igal töö parempoolsel real) 16-18-20-22-24-26 korda kokku. KÄEAUGUS: kui töö pikkus on 21-22-23-24-25-26 cm, koo ripskoes äärmised 10-10-12-11-11-14 silmust külje pool (kaasaarvatud 1 ääresilmus ripskoes). Kui on tehtud 4 rida ripskoes (= 2 ripsivalli) neil silmustel, koo maha esimesed 7-7-9-8-8-11 rea alguses käeaugu jaoks. Koo järgmised 3 silmust ripskoes (= ääris käeaugus). Kahanda 1 silmus 3 ripskoes ääresilmuse kõrval. Kahanda nii igal teisel real (st. igal töö parempoolsel real) 10-12-12-14-18-20 korda kokku. Kui kõik kahandused ja mahakudumised kaelakaarel ja käeaukude jaoks on tehtud, jääb 11-11-11-13-13-13 silmust õlapaela jaoks. Jätka mustriga nagu enne, tehes 3 ääresilmust ripskoes mõlemal küljel. Koo õlapael nagu näidatud skeemil A.4 – vali suurusele sobiv skeem. Kui töö pikkus on 39-41-43-45-47-49 cm, koo silmused maha. SELJAOSA VASAK KÜLG Tõsta 44-48-52-57-63-70 silmust abilõngalt teisel küljel tagasi 4 mm ringvardale ja koo samamoodi nagu parem külg, aga peegelpildis - NB! Koo silmused maha käeaugu jaoks töö pahempoolse rea alguses (mitte töö paremal pool). Tee ülejäänud kahandamised töö paremal pool. ESIOSA Loo ja koo nagu seljaosa. VIIMISTLUS Õmble kaks õlapaela kokku silmamise teel, et õmblus ei jääks paksuks. Õmble küljeõmblus 1 ripskoes ääresilmuse kõrvalt alla kuni lõhikuni. Korda teisel küljel. Katkesta ja kinnita lõng. |
|||||||||||||
Skeemi seletused |
|||||||||||||
|
|||||||||||||
 |
|||||||||||||
 |
|||||||||||||
Kas oled teinud seda mustrit?Lisa oma piltidele viide #dropspattern #mazotop või saada link projektile meie #dropsfan galeriisse. Vajad abi selle mustriga?Garnstudio.com kodulehel on 23 õppevideot, küsimuste/vastuste osa ja muudki. © 1982-2026 DROPS Design A/S. Kõik õigused kaitstud. See dokument, ning selle alajaotused on kaitsud autoriõigustega. Loe rohkem, mida meie mustritega võib teha, iga mustrilehe alt meie kodulehel. |
|||||||||||||


Tegeledes üle 40 aasta kudumise ja heegeldamise disainidega, pakub DROPS Design ühte suurimat tasuta mustrite kollektsiooni internetis - tõlgituna 17 keelde. Tänaseks on meil 324 kataloogi ja 12290 mustrit - millest 9431 on tõlgitud Eesti keelde.
Me anname endast parima, et tuua teieni kõike mida kudumine ja heegeldamine võib pakkuda - inspiratsiooni, nõuandeid ning ka kvaliteetseid lõngu parima hinnaga! Soovid kasutada mustreid muukski, kui ainult oma tarbeks? Loe infot meie Copyright osas iga lehekülje all. Rõõmsat loomist!
Jäta kommentaar mustrile DROPS 178-66
Ootame kommentaare selle mustri kohta!
Kui soovid midagi küsida, siis kiiremaks vastuse saamiseks veendu, et valid õige kategooria alloleval formil. Vajaliku väljad *.