
Populaarsed kategooriad
Otsid lõnga?


Kommentaarid / Küsimused (47)
![]() Nemtanu Anisoara kirjutas:
Nemtanu Anisoara kirjutas:
Si puo tradure in italiano?
09.03.2026 - 15:27
![]() Sabine kirjutas:
Sabine kirjutas:
Wer das Tuch auch in Big Merino (Garngruppe C) stricken möchte: meines wiegt 349 gr, ich habe 144 gr für den Zopf und 205 gr für den Hauptteil des Schals benötigt. Viel Spaß, es lohnt sich! :-)
28.09.2025 - 15:41
![]() Sabine kirjutas:
Sabine kirjutas:
Ein wunderschönes Tuch, das ich, um es etwas dünner zu haben, mit Drops Big Merino (Garngruppe C) gestrickt habe mit einer 6,5er Nadel und zweifarbig, so dass sich der Zopfrand noch mehr hervorhebt. Bei einer Länge von 85cm habe ich, damit sich die Spitze des Tuchs bei dieser dünneren Wolle nicht einrollt 5 verkürzte Reihen gestrickt (statt 3). Beim nächsten Mal stricke ich es wieder mit Garngruppe C mit einer 7 - 8er Nadel und mit 16 Maschen für den Zopf - freue mich schon!
28.09.2025 - 15:25
![]() Carol Maitland kirjutas:
Carol Maitland kirjutas:
Hi I was just answered my question by the Drops Team but my question was not really answered.I understand the increase in the first row,it’s the 4 row increase I do not understand.Where do I do this increase on the 4th row and where do I do the decrease on the 4th row, Thks again Carol.
12.09.2025 - 14:16DROPS Design vastas:
Dear Carol, you have one 4-row increase section explained in the pattern. In this section, in ROW 1 you increase 1 stitch, by working 2 stitches in the first stitch after the marker. Then you work ROWS 2-4 with knit and A.1. Now you repeat these 4 rows, increasing always in the ROW 1 repeat, in the stitch right after the marker. That is, you increase not in ROW 4 but in every 4th row (out of rows 1-4 you increase in one of them, row 1). The decreases follow the same format, where you decrease 2 stitches after the marker every time that you repeat ROW 1 of the decreases. Happy knitting!
15.09.2025 - 01:39
![]() Carol Maitland kirjutas:
Carol Maitland kirjutas:
Hi I sent a question yesterday,about where to add the extra stitch in the 4 th row.Has not been answered.
10.09.2025 - 18:01DROPS Design vastas:
Dear Carol, please see our answer above. Happy knitting!
15.09.2025 - 01:40
![]() Carol Maitland kirjutas:
Carol Maitland kirjutas:
Hi itsays on the shawl to increase every 4th row,where do I do this and when I decrease where do I do that. Thks Carol.c
09.09.2025 - 21:05DROPS Design vastas:
Hi Carol, After the first 14 rows, you work 4 new rows which are then repeated onwards increasing 1 stitch in the first stitch after the marker-thread on the first of these 4 rows. The decreases begin after the short rows, and again 1 stitch is decreased straight after the marker-thread on the first of the 4 rows which are repeated onwards. Regards, Drops Team.
12.09.2025 - 11:03
![]() Carol Maitland kirjutas:
Carol Maitland kirjutas:
Then it says repeat 1st to 4th row,so every 4th row I add a stitch,where at the beginning. sorry my keyboard keys were stuck,thks Carol Maitland
15.08.2025 - 19:56DROPS Design vastas:
Dear Mrs Maitland, work as previously explained under rows 1-4: you will increase 1 stitch just after A.1 on first row = you will increase 1 stitch on every 4th row. Happy knitting!
18.08.2025 - 08:15
![]() Carol Maitland kirjutas:
Carol Maitland kirjutas:
Hi I currently working on this pattern,have some questions. Row 2 on second part says knit until marker then A1 over the next 12 stitches,does this mean I purl them because the pattern says to purl from the wrong side. Row 3,is this the cable row.so I put 6 cable stitches at back and knit the next 6 then do the cable stitches,but have noticed that the beginning of my working yarn is at the cable end.Do I carry it at the back before knitting the 6 stitches on the cable needle.
15.08.2025 - 19:52DROPS Design vastas:
Dear Mrs Maitland, from wrong side you will purl the stitches of A.1, on 3rd row start diagram - see in this video how to work this diagram and how to work the cable at the beginning of the row. Happy knitting!
18.08.2025 - 08:13
![]() Renate Huber kirjutas:
Renate Huber kirjutas:
Sehr schön gefällt mir ausgezeichnet
03.09.2024 - 15:54
![]() Monique kirjutas:
Monique kirjutas:
Une fois le produit fini, avec la même laine et j'ai obtenu un châle beaucoup trop long par rapport à sa largeur. Il faut peut être faire des augmentations plus rapides pour avoir un châle plus large.
09.03.2023 - 09:08
|
|||||||
Winter Cozy#wintercozyset |
|||||||
 |
 |
||||||
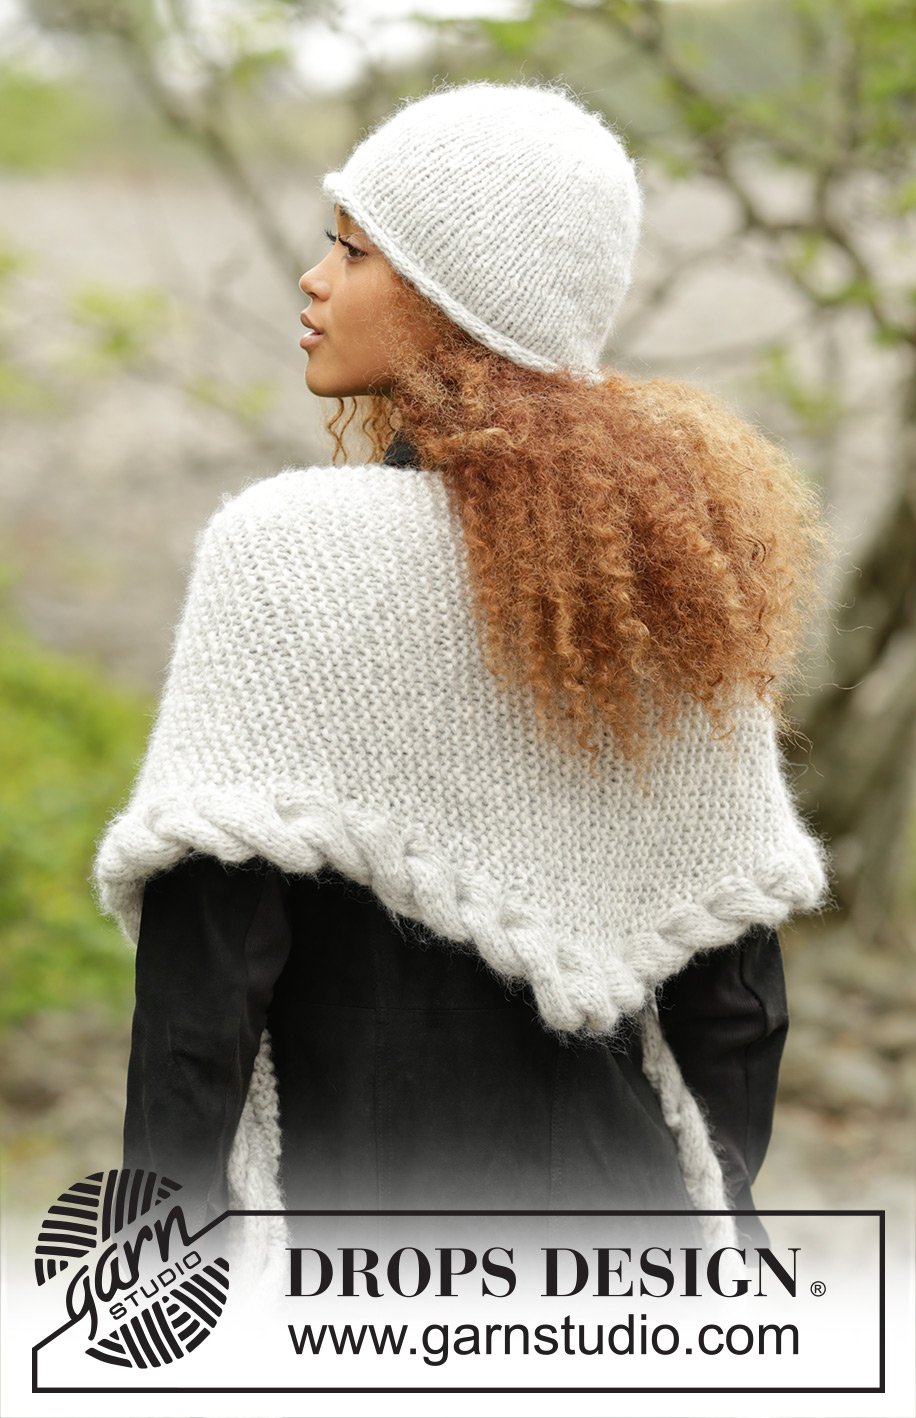
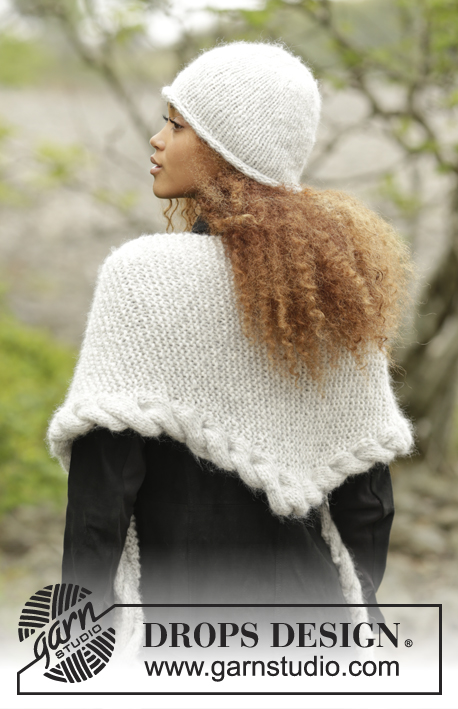
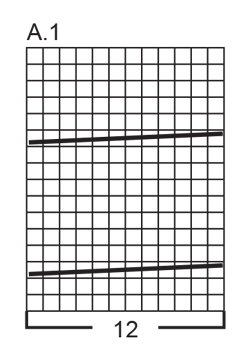
Komplekt: DROPS Cloud või Air lõngast kootud müts ning ripskoes ja palmikuga õlasall
DROPS 172-10 |
|||||||
|
MÜTS KAHANDAMISE NIPP Tõsta 1 s kudumata parempidi, 1 pr, tõsta kudumata silmus üle. --------------------------- MÜTS Loo 7 mm varrastele 56-60 s Cloud või kahekordse Air lõngaga. Koo 4 ringi parempidises koes (= rulliv äär). Järgmine ring: koo * 1 pr, 1 ph *, korda * kuni * tervel ringil. Koo 1 ring tehes pr silmuse parempidise kohale ja ph silmuse ph kohale. Edasi jätka lõpuni parempidises koes. JÄLGI KOETIHEDUST! Kui töö pikkus on 21-22 cm, paigalda 8-10 silmusemärkijat (SM) iga 7-6 s järel. Järgmisel ringil kahanda 1 s pärast iga SM-i - vaata kahandamise nippi! (= 8-10 s kahandatud). Kahanda nii igal teisel ringil kokku 3 korda ja siis igal ringil kokku 2 korda. Järgmisel ringil koo kõik silmused kahekaupa keerdsilmustena kokku = 8-5 s vardal. Katkesta lõng ja tõmba läbi allesjäänud silmuste, pinguta ja kinnita. Töö pikkus on u. 26-27 cm ülevalt alla (k.a. rulliv äär). __________________________________________ ÕLARÄTT- SALL KUDUMISE NIPP Õlasall kootakse ripskoes, tehes alumisse serva palmiku. Koo palmik äärmisel 12 s. Ära koo palmikule ääresilmuseid (st. koo äärmised silmused skeemi A.1 järgi nagu tavalised parempidises koes silmused töö PP pool ja töö PH pool), siis jääb palmik ilusti keerduma. MUSTER Vaata skeemi A.1. Muster on vaadatuna töö paremalt poolt (töö PP) ja näitab iga rida. MÕÕTMISE NIPP Mõõda õlasalli pikkust mööda sirget serva. --------------------------------- ÕLARÄTT Kootakse ristipidi, st. otsast otsani. Loo 8 mm ringvarrastele 3 silmust Cloud või kohekordse Air lõngaga ja koo järgmiselt: 1. RIDA (= töö PP pool): koo kõik silmused parempidi. 2. RIDA (= töö PH pool): 2 pr, 1 pr läbi silmuse eesmise ja ka tagumise aasa (1 s kasvatatud) = 4 s real. 3. RIDA (= töö PP pool): 1 pr, 1 õs, 3 pr = 5 s. 4. RIDA (= töö PH pool): 3 pr, koo õs keerdsilmusena ph, 1 ph. 5. RIDA (= töö PP pool): 2 pr, 1 õs, 3 pr = 6 s. 6. RIDA (= töö PH pool): 3 pr, koo õs keerdsilmusena ph, 2 ph. 7. RIDA (= töö PP pool): 3 pr, 1 õs, 3 pr = 7 s. 8. RIDA (= töö PH pool): 3 pr, koo õs keerdsilmusena ph, 3 ph. 9. RIDA (= töö PP pool): 4 pr, 1 õs, 3 pr = 8 s. 10. RIDA (= töö PH pool): 3 pr, koo õs keerdsilmusena ph, 4 ph. 11. RIDA (= töö PP pool): 5 pr, 1 õs, 3 pr = 9 s. 12. RIDA (= töö PH pool): 3 pr, koo õs keerdsilmusena ph, 5 ph. 13. RIDA (= töö PP pool): 1 pr läbi silmuse eesmise ja ka tagumise aasa igal järgmisel 6 s, paigalda 1 SM, 3 pr = 15 s. 14. RIDA (= töö PH pool): 3 pr, SM, 12 ph. Jätka kudumist, kasvatades järgmiselt - loe KUDUMISE NIPPI ja JÄLGI KOETIHEDUST! 1. RIDA (= töö PP pool): koo mustrit vastavalt skeemile A.1 esimesel 12 s, koo 2 s ühte silmusesse pärast SM-i, koo ülejäänud rida pr (= 1 s kasvatatud). 2. RIDA (= töö PH pool): koo pr kuni SM-ni, koo skeemi A.1 viimasel 12 s. 3. RIDA (= töö PP pool): koo skeemi A.1 esimesel 12 s, SM, koo ülejäänud rida pr. 4. RIDA (= töö PH pool): koo pr kuni SM-ni, koo skeemi A.1 viimasel 12 s. Korda 1.- 4. rida (st. kasvata 1 s igal 4. real), kuni real on 56 s. Töö pikkus on u. 81 cm - loe mõõtmise nippi! Nüüd koo lühendatud ridu, et palmik ei jääks tipus kiskuma. Koo * 2 rida edasi-tagasi skeemi A.1 12 silmusel, koo 2 rida edasi-tagasi kõigil silmustel real nagu enne, aga ära kasvata *, korda * kuni * kokku 3 korda, siis koo 2 rida edasi-tagasi skeemi A.1 12 silmusel uuesti. Siis koo ja kahanda nii: 1. RIDA (= töö PP pool): koo mustrit vastavalt skeemile A.1 esimesel 12 s, koo 2 pr kokku pärast SM-i, koo ülejäänud rida pr (= 1 s kahandatud). 2. RIDA (= töö PH pool): koo pr kuni SM-ni, koo skeemi A.1 viimasel 12 s. 3. RIDA (= töö PP pool): koo skeemi A.1 esimesel 12 s, SM, koo ülejäänud rida pr. 4. RIDA (= töö PH pool): koo pr kuni SM-ni, koo skeemi A.1 viimasel 12 s. Korda 1.- 4. rida (st. kahanda 1 s igal 4. real), kuni jääb 15 s reale (töö pikkus on u. 159 cm). Edasi koo järgmiselt: 1. RIDA (= töö PP pool): koo kõik skeemi A.1 silmused kahekaupa pr kokku, SM, 3 pr = 9 s jääb vardale. 2. RIDA (= töö PH pool): 3 pr, 6 ph. 3. RIDA (= töö PP pool): 4 pr, 2 pr kokku, 3 pr = 8 s. 4. RIDA (= töö PH pool): 3 pr, 5 ph. 5. RIDA (= töö PP pool): 3 pr, 2 pr kokku, 3 pr = 7 s. 6. RIDA (= töö PH pool): 3 pr, 4 ph. 7. RIDA (= töö PP pool): 2 pr, 2 pr kokku, 3 pr = 6 s. 8. RIDA (= töö PH pool): 3 pr, 3 ph. 9. RIDA (= töö PP pool): 1 pr, 2 pr kokku, 3 pr = 5 s. 10. RIDA (= töö PH pool): 3 pr, 2 ph. 11. RIDA (= töö PP pool): 2 pr kokku, 3 pr = 4 s. 12. RIDA (= töö PH pool): 4 pr. 13. RIDA (= töö PP pool): 2 pr kokku, 2 pr. 14. RIDA (= töö PH pool): koo silmused pr maha. |
|||||||
Skeemi seletused |
|||||||
|
|||||||
 |
|||||||
Kas oled teinud seda mustrit?Lisa oma piltidele viide #dropspattern #wintercozyset või saada link projektile meie #dropsfan galeriisse. Vajad abi selle mustriga?Garnstudio.com kodulehel on 25 õppevideot, küsimuste/vastuste osa ja muudki. © 1982-2026 DROPS Design A/S. Kõik õigused kaitstud. See dokument, ning selle alajaotused on kaitsud autoriõigustega. Loe rohkem, mida meie mustritega võib teha, iga mustrilehe alt meie kodulehel. |
|||||||


Tegeledes üle 40 aasta kudumise ja heegeldamise disainidega, pakub DROPS Design ühte suurimat tasuta mustrite kollektsiooni internetis - tõlgituna 17 keelde. Tänaseks on meil 324 kataloogi ja 12290 mustrit - millest 9431 on tõlgitud Eesti keelde.
Me anname endast parima, et tuua teieni kõike mida kudumine ja heegeldamine võib pakkuda - inspiratsiooni, nõuandeid ning ka kvaliteetseid lõngu parima hinnaga! Soovid kasutada mustreid muukski, kui ainult oma tarbeks? Loe infot meie Copyright osas iga lehekülje all. Rõõmsat loomist!
Jäta kommentaar mustrile DROPS 172-10
Ootame kommentaare selle mustri kohta!
Kui soovid midagi küsida, siis kiiremaks vastuse saamiseks veendu, et valid õige kategooria alloleval formil. Vajaliku väljad *.