
Populaarsed kategooriad
Otsid lõnga?


Kommentaarid / Küsimused (238)
![]() Andrea kirjutas:
Andrea kirjutas:
Hallo, eine Frage: Wenn ich mit den verkürzten Reihen fertig bin, muss ich dann direkt wieder über alle 124M (Gr.xxl) stricken, oder nach dem selben Schema wie beim verkürzen die Reihen wieder verlängern? LG
23.02.2026 - 16:37DROPS Design vastas:
Liebe Andrea, Sie beginnen erneut mit den verkürzten Reihen (die ersten 2 Runden stricken Sie über alle Maschen) , um den Kreis weiter zu erweitern. Viel Spaß beim Stricken!
24.02.2026 - 09:02
![]() Lotta kirjutas:
Lotta kirjutas:
Äh glöm min fråga, repar upp & använder ett för mig mer begripligt mönster.
27.11.2025 - 17:23
![]() Lotta kirjutas:
Lotta kirjutas:
Hej igen! Storlek XL/XXL totalt antal maskor 124 st och märktråden sitter på maska 73. Just nu är stickningen bananformad, maska 73 sitter närmare innercirkeln och fattar att det är från den jag ska mäta. Men hur ska jag mäta, mot vad? Ska fortsätta med att minska med 8 maskor för första gången. Vi hörs!
25.11.2025 - 16:04DROPS Design vastas:
Hei Lotta. Da har vi "glemt" ditt spørsmål og ønsker deg lykke til på ditt neste prosjekt :) mvh DROPS Design
01.12.2025 - 11:27
![]() Lotta kirjutas:
Lotta kirjutas:
Begriper inte hur jag ska mäta från märktråden för ärmhål!? Skickar gärna en bild men det går ju inte i detta formulär. Kontakta gärna mig via e-post. Tack på förhand!
24.11.2025 - 18:29DROPS Design vastas:
Hej Lotta, skriv hvilken størrelse du strikker. Skriv hvor mange masker og cm du har og skriv den sætning du ikke forstår, så skal vi prøve at hjælpe dig her :)
25.11.2025 - 13:58
![]() Lisa kirjutas:
Lisa kirjutas:
Hi, Just trying to clarify; on the second row, do I leave 2 stitches on needle and turn, work 14 stitches then turn and work 16 stitches? Then repeat row 1 and do I leave 4 stitches unworked or just 2 again?
11.11.2025 - 19:16
![]() Lisa kirjutas:
Lisa kirjutas:
Pattern instructions far too difficult. I love the jacket and I love a challenge but this? What happened to row 1 all the way through to last row with specific instructions such as ask or dec or s1k1. Etc? I give up😞
27.07.2025 - 20:09
![]() Lisa kirjutas:
Lisa kirjutas:
So, am I leaving the the uncorked stitches on the needle or just not knitting them?
27.07.2025 - 19:38DROPS Design vastas:
Dear Lisa, work the first 2 rows over all 112 stitches. In the 3rd row work only over the first 16 sts of the row. Now, start working the next row over all stitches but turn when you have worked 110 stitches. Work the next row back over all stitches, but turn when you have worked 108; so you work 2 less stitches on each side. Repeat rows 3 and 4 exactly as before. Continue working 2 less stitches on each side on the "long" rows 9 more times, then 4 less stitches 9 times and 8 less stitches 5 times. The stitches are simply left unworked until we "start at the beginning" the short rows technique. Happy knitting!
27.07.2025 - 20:36
![]() Lisa kirjutas:
Lisa kirjutas:
Where do I start the pattern? At the top of page or where it says circle? Also, what does it mean under the short row section to start again from beginning over all stitches? How many sections is this piece? I’m reading cast on 112 sts. Twice and under short row section start over from beginning? So, cast on another 112sts?
27.07.2025 - 19:06DROPS Design vastas:
Dear Lisa, yes, the written instructions start at "Circle"; all of the instructions above are tips for when you are crochetting. In the short rows you work by turning the piece (but not decreasing) in order to get the correct circle shape. After reaching the remaining 18-16-20-20 outermost sts of circle, you will now work over all stitches again (not the pattern from the beginning); they were not decreased, just left behind. You work a single circle: you cast on 112 stitches, over which you will work the chart and short rows. Then you work the armholes, and continue working the other half-circle on the other side. Then you work the sleeves. Happy knitting!
27.07.2025 - 19:25
![]() Lisa kirjutas:
Lisa kirjutas:
Is there a row by row instruction for this pattern (ie, row 1, row 2 etc)? I find this really confusing
27.07.2025 - 15:44DROPS Design vastas:
Dear Lisa, this is the only version of the pattern available, with both charts and written instructions. If you have any doubts as you read and work the pattern you can write us a comment here and we will try to answer all of your questions as clearly as possible. Happy knitting!
27.07.2025 - 18:59
![]() Patricia Alexandra Caruso Reis kirjutas:
Patricia Alexandra Caruso Reis kirjutas:
Caros, os diagramas M1 já não estão nítidos. Existe alguma nova versão desses diagramas que possam ser melhor vistos? Está tudo opaco, talvez pelo tempo. Grata
07.06.2024 - 03:36DROPS Design vastas:
Bom dia, Vamos comunicar à equipa de web design. Obrigado!
07.06.2024 - 09:17
|
||||||||||||||||
Blue Moon |
||||||||||||||||
 |
 |
|||||||||||||||
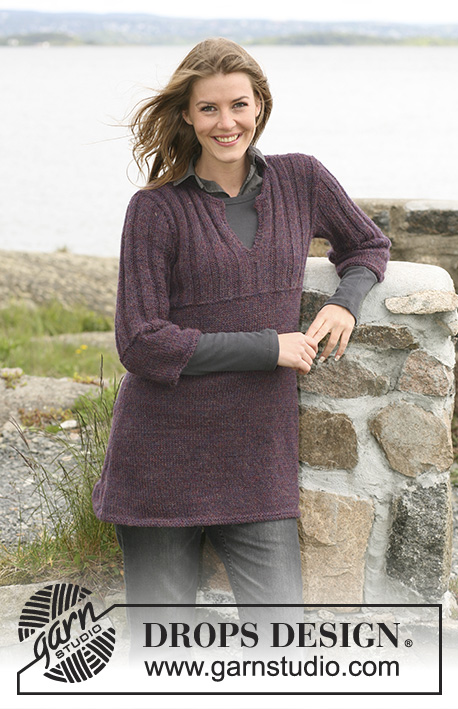
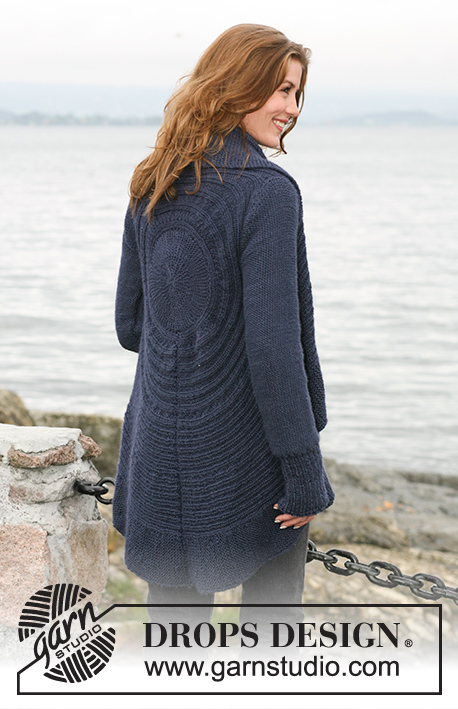
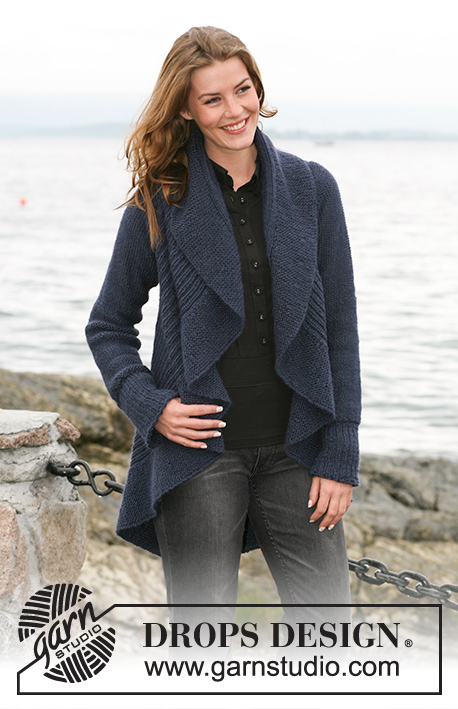
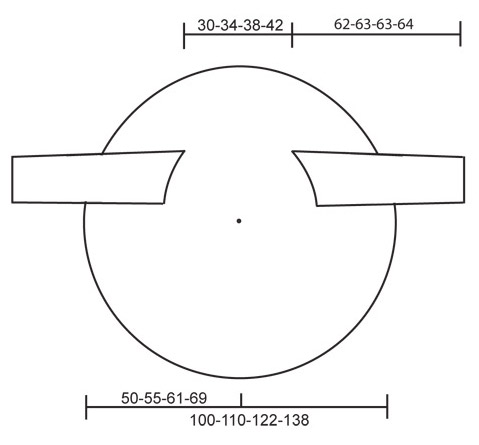
DROPSi tekstuurse mustriga lühendatud ridadega jakk lõngast Silke-Alpaca või Air . Suurused: S kuni XXXL
DROPS 102-6 |
||||||||||||||||
|
MUSTER Vaata skeemi M.1. Skeem on antud vaadatuna töö PP. NB! Igal suurusel on oma skeem. LÜHENDATUD READ Koo lühendatud ridu ringi kujundamiseks järgmiselt: 1. ja 2. RIDA: koo 102-112-124-140 silmust, pööra ja koo tagasirida. 3. ja 4. RIDA: koo edasi-tagasi esimesed 18-16-20-20 silmust (ringi äär) – loe KUDUMISE NIPPI 1. Korda esimest nelja rida, tehes esimesel ja teisel real iga kord 2 silmust vähem enne pööramist – korda kokku 10-10-12-12 korda, edasi 4 silmust vähem enne pööramist – korda seda 6-9-8-12 korda ja siis 8 silmust vähem enne pööramist – korda 5-5-6-6 korda. Allesjäänud silmused on 18-16-20-20 ringi ääresilmust. Alusta algusest uuesti kõikide silmustega. – vaata KUDUMISE NIPPI 2. KUDUMISE NIPP 1 Tööd pöörates tõsta esimene silmus kudumata ja pinguta lõng, et ei tekiks auku. See ei kehti ringi sisemisele 20-20-24-24 silmusele – tagasireal koo kõik silmused nagu tavaliselt. KUDUMISE NIPP 2 Real, kus kood kõik silmused, koo 20-20-24-24 kõige sisemist silmust pahempidi (vaadatuna töö PP). Edasi koo nagu enne skeemi M.1 mustriga. MÕÕTMISE NIPP Kõik ringi mõõtmised on tehtud, kui töö on siledalt tasapinnal. Ära mõõda risti üle! Mõõda mööda kaart 63-69-73-81-se silmuse juurest. ------------------------------------------------------------------ RING Koo edasi-tagasi ringvarrastel. Loo 102-112-124-140 silmust. Paigalda 1 SM pärast 63-69-73-81 silmust, EDASI MÕÕDA SIIT! Koo skeemi M.1 muster (vaata skeemi oma suuruse jaoks) paremalt vasakule (st. väljaspoolt ringi sissepoole), esimene rida = PP. SAMAL AJAL, kui kood skeemi M.1, koo LÜHENDATUD READ – vaata ülevalt – ringi kujundamiseks. Kui on kootud 37-40-49-57 cm mõõdetud SM-st – loe mõõtmise nippi – koo käeaugud. KÄEAUK Tõsta välimised 63-69-73-81 silmust lisaringvardale. Koo maha järgmised 2 silmust (= käeauk). Paigalda 1 SM mahakootud silmuste vahele. Jäta ülejäänud silmused vardale. Koo 2 osa eraldi (silmused enne ja pärast käeauke) , aga koo need SAMAL AJAL, eraldi varrastel ja eraldi lõngatokiga. See on selleks, et lühendatud read jookseksid õigesti mõlemal pool käeauku. Koo mustrit ja lühendatud ridu nagu enne. Kui käeaugu kõrgus on 18-21-23-25 cm, loo 2 uut silmust käeaugu kohale (st. kahe osa vahele) ning tõsta kõik silmused tagasi ühele vardale = 102-112-124-140 silmust. Koo jälle ühes tükis. Aseta 1 SM pärast 63-69-73-81 silmust. EDASI MÕÕDA SIIT! Nüüd koo skeemi M.1 muster ja lühendatud read kõikidel silmustel. Jätka sedasi, kuni töö kõrgus on umbes 15-17-19-21 cm SM-st, nüüd peaks olema kootud pool ringi. Jätka, kuni töö kõrgus on umbes 30-34-38-42 cm SM-st – loe MÕÕTMISE NIPPI. Nüüd tee käeauk samamoodi nagu enne. Kui kõik silmused on jälle tagasi ühel vardal, paigalda 1 SM pärast 63-69-73-81 silmust. EDASI MÕÕDA SIIT! Jätka skeemi M.1 mustriga ja lühendatud ridadega, kuni töö kõrgus on umbes 37-40-49-57 cm SM-st (jälgi, et oleks tehtud 1 terve lühendatud ridade mustrikordus). Koo LÕDVALT maha. VARRUKAD Koo tükk edasi-tagasi ringvarrastel. Loo 56-59-65-68 silmust (ka. 1 ääresilmus mõlemal serval). Koo 1 rida pahempidi, töö VP. Koo soonikut 2 pr/1 ph ja mõlema serva 1 ääresilmus. Kui soonik on 13-13-14-14 cm, koo 1 rida pr, töö VP, SAMAL AJAL kahanda võrdsete vahedega 10-11-13-14 silmust = 46-48-52-54 silmust. Jätka parempidises koes, töö VP välja poole, kuni lõpliku valmimiseni. Kui töö kõrgus on 16 cm, kasvata 1 silmus mõlemal serval iga 9-4,5-3,5-3 cm järel kokku 5-9-11-13 korda = 56-66-74-80 silmust. Kui töö kõrgus on 56 cm, koo maha varruka õlaosa kujundamiseks mõlemal serval iga teise rea alguses: 4 silmust 1-2-2-2 kord. Jätka, kududes maha 2 silmust mõlemal serval, kuni varruka kõrgus on umbes 61-62-62-63 cm. Edasi koo maha 4 silmust 1 kord mõlemal serval. Varruka pikkus on umbes 62-63-63-64 cm. Koo maha ülejäänud silmused. ÜHENDAMINE Õmble ring kokku mööda ülesloomise ja mahakudumise serva. Ühenda varrukad nii, et varruka alumise osa keskkoht oleks kohakuti käeaugu alumise SM-ga ja varruka ülemine keskkoht oleks kohakuti käeaugu ülemise SM-ga. Õmble varrukaõmblused. |
||||||||||||||||
Skeemi seletused |
||||||||||||||||
|
||||||||||||||||
 |
||||||||||||||||
 |
||||||||||||||||
Kas oled teinud seda mustrit?Lisa oma piltidele viide #dropspattern või saada link projektile meie #dropsfan galeriisse. Vajad abi selle mustriga?Garnstudio.com kodulehel on 15 õppevideot, küsimuste/vastuste osa ja muudki. © 1982-2026 DROPS Design A/S. Kõik õigused kaitstud. See dokument, ning selle alajaotused on kaitsud autoriõigustega. Loe rohkem, mida meie mustritega võib teha, iga mustrilehe alt meie kodulehel. |
||||||||||||||||


Tegeledes üle 40 aasta kudumise ja heegeldamise disainidega, pakub DROPS Design ühte suurimat tasuta mustrite kollektsiooni internetis - tõlgituna 17 keelde. Tänaseks on meil 324 kataloogi ja 12291 mustrit - millest 9432 on tõlgitud Eesti keelde.
Me anname endast parima, et tuua teieni kõike mida kudumine ja heegeldamine võib pakkuda - inspiratsiooni, nõuandeid ning ka kvaliteetseid lõngu parima hinnaga! Soovid kasutada mustreid muukski, kui ainult oma tarbeks? Loe infot meie Copyright osas iga lehekülje all. Rõõmsat loomist!
Jäta kommentaar mustrile DROPS 102-6
Ootame kommentaare selle mustri kohta!
Kui soovid midagi küsida, siis kiiremaks vastuse saamiseks veendu, et valid õige kategooria alloleval formil. Vajaliku väljad *.