
Populaarsed kategooriad
Otsid lõnga?


Kommentaarid / Küsimused (124)
![]() Mette Bodin kirjutas:
Mette Bodin kirjutas:
Strikker str L. I diagram A.2 efter pind 8 har jeg 208 masker. Pind 9 ender med 12 masker ved udt 7 m og 5 m. 12 masker går ikke op i 208 masker, men giver 17,33 mønsterstrik. her er noget jeg slet ikke forstår-
16.04.2025 - 16:33DROPS Design vastas:
Hei Mette. Om du setter maskemarkører mellom hvert diagram har du en bedre oversikt. Du strikker 9. rad over 8. rad hele omgangen rundt og det økes med 4 masker per gang du strikker A.2. Så når omgangen er ferdig strikket a 26 rapporter av A.2 x 4 økte masker = 104 masker + 208 masker = 312 masker, som står i oppskriften. Du må ikke tenkte at pinne 9 ender med 12 masker, du må tenkte at du strikker 9. pinne over 8 masker og når 9. pinne er ferdig /10. pinne skal strikkes er det 12 masker. mvh DROPS Design
28.04.2025 - 12:03
![]() Jan kirjutas:
Jan kirjutas:
I’m a sock knitter but now venturing into knitwear. Knitting size M A1… I’ve knitted around row 1 and done the yarn over increases, on the next round the pattern says to ‘twist’ the yarn over to avoid a large hole. Not sure how you twist that stitch as it falls between two purl stitches.
14.04.2025 - 22:20DROPS Design vastas:
Hi Jan, The yarn overs are twisted by working through the back loop. Happy Easter!
16.04.2025 - 12:13
![]() Anne-Karin Lihaug Grimstad kirjutas:
Anne-Karin Lihaug Grimstad kirjutas:
Hvorfor har jeg 100 m mer enn jeg skal ha når A2 er ferdig
27.03.2025 - 11:16DROPS Design vastas:
Hej Anne-Karin, følger du diagrammet for din størrelse? Hvilken størrelse strikker du? Hvor mange masker har du når du starter diagrammet?
27.03.2025 - 14:09
![]() Kirsten Schou kirjutas:
Kirsten Schou kirjutas:
Hvordan laver jeg starten på trøjen, hvor den starter med 3vrang 1 ret 3vrang og så er der et hul og1ret hvad skal jeg strikke i "hullet" venlig hilsen Kirsten Schou
18.03.2025 - 15:44DROPS Design vastas:
Hei Kristen. Du strikker de maskene du ser i diagrammet. Der det er "hull" er det ingen masker. Om du ser på 3. rad (A.2) og masken med stjerne ikonet, så økes det med 6 masker og da fylles "hullet". Se gjerne på hjelpevideoen til blusen: Hvordan strikkes diagram A.2 til DROPS 222-32 og DROPS 223-2 – Del 1 og Hvordan strikkes diagram A.2 til DROPS 222-32 og DROPS 223-2 – Del 2. DU finner videoene til høyre eller under bildene. mvh DROPS Design
24.03.2025 - 10:06
![]() Gullevi Ljungström kirjutas:
Gullevi Ljungström kirjutas:
Var laddar jag ner mönstret
11.03.2025 - 11:21DROPS Design vastas:
Hej Gullevi, det ligger her, det er bare at scrolle lidt længere ned :)
14.03.2025 - 12:08
![]() Ute Mehnert kirjutas:
Ute Mehnert kirjutas:
Ich verstehe das Diagramm A2 nicht, bezüglich der 8 Maschen, wobei der Rapport 11 Maschen beträgt. Ich bitte um Hilfe Lg Ute
21.02.2025 - 17:40DROPS Design vastas:
Liebe Frau Mehnert, vielleicht können diese beide Videos helfen? Wir zeigen, wie man das Diagram A.2 strickt: Runde 1-9 und Runde 10-28. Viel Spaß beim Stricken!
24.02.2025 - 07:37
![]() Hazel Wilson kirjutas:
Hazel Wilson kirjutas:
I don't see any free patterns! It goes to a link that does not show any pattern.
24.08.2024 - 21:40DROPS Design vastas:
Dear Hazel, all of our patterns are free! You can find this one right here in this page; remember to select pattern right under the title of the model to see the full pattern instructions. When you select "FREE PATTERNS" at the top of the page, it should display several pattern types to choose from. Happy knitting!
25.08.2024 - 23:04
![]() Pollie kirjutas:
Pollie kirjutas:
Ik begrijp niet goed welke scheiding er wordt bedoelt bij het lijf, er staat 3 cm na de scheiding, is dat de scheiding waar 12 steken zijn opgezet en dan die markeerdraad?
04.08.2024 - 15:57
![]() NS kirjutas:
NS kirjutas:
Further to Randi Rycroft’s question and your answer, Shouldn’t Row 1 of A1 be Purl, knit,purl, yarn over, knit? So then you have 5 stitches, not four? So 10 stitches, not 8 when A1 is done x 27 repeats? I’m confused.
06.06.2024 - 16:55DROPS Design vastas:
Dear NS, you will work each A.1 over 4 sts (P,K,P,K) but on the very first row you already increase one stitch, so that you have 5 sts in each A.1 at the end of the first row, so in 4th size you have 216 sts and work first row (27 times 4 sts increasing 1 stitch in each of the 27 repeats), so you had 108 sts and have increased 27 sts on the first round = 135 sts and 5 sts in each repeat. Happy knitting!
07.06.2024 - 07:34
![]() Chantal Darchis kirjutas:
Chantal Darchis kirjutas:
Je viens de commencer ce modèle je suis au diagramme A2 L et je ne tombe pas bien pourriez vous me donner la correction je vous remercie
02.06.2024 - 16:51
|
|||||||||||||||||||||||||
Swing by Spring Top#swingbyspringtop |
|||||||||||||||||||||||||
 |
 |
||||||||||||||||||||||||
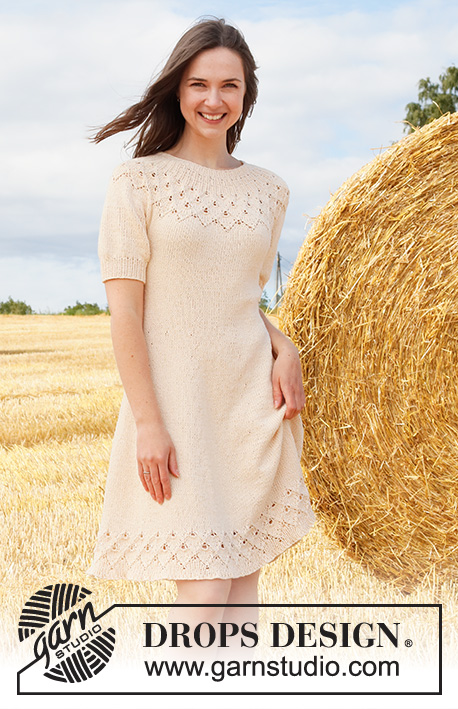
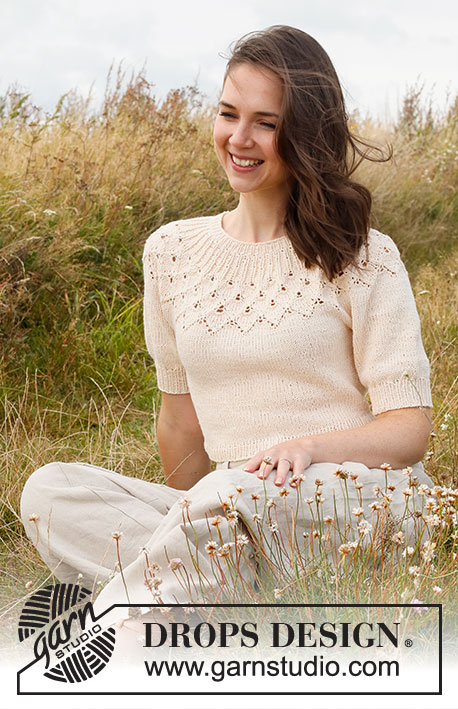
DROPS Belle Lõngast ülevalt alla kootud lehemustriga ümara passega ja lühikeste varrukatega pitsmustriga džemper suurustele S kuni XXXL
DROPS 222-32 |
|||||||||||||||||||||||||
|
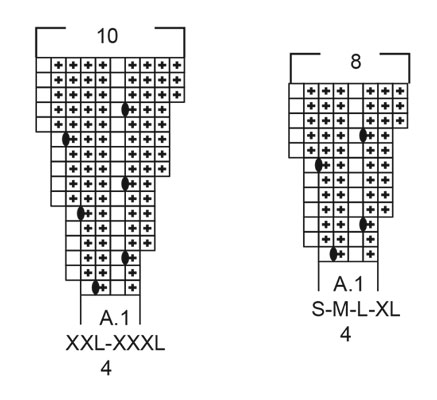
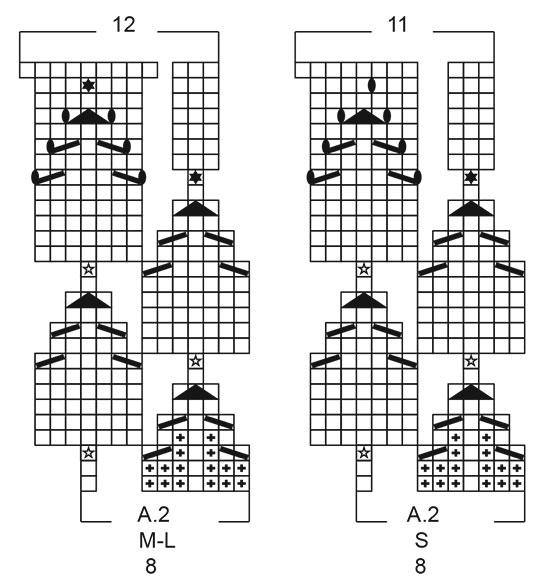
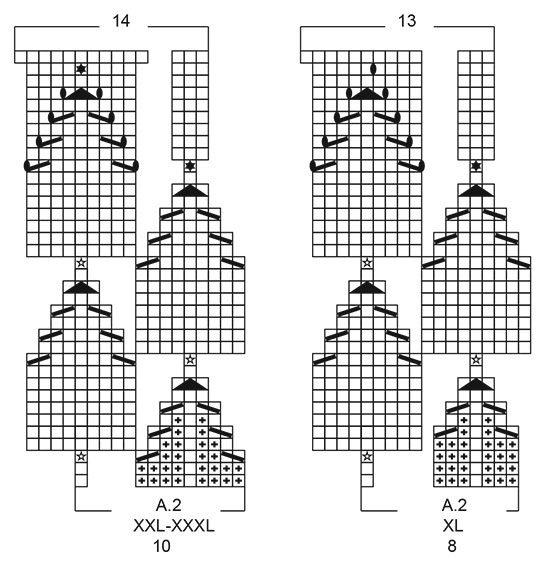
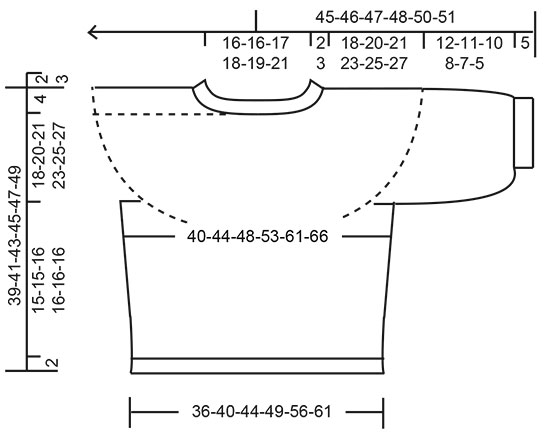
NÕUANDED: ------------------------------------------------------- MUSTER: Vaata skeeme A.1 ja A.2 – vali suurusele sobiv skeem. KAHANDAMISE NIPP (kehaosa külgedel): Kahanda 1 silmus mõlemal pool silmusemärkijat järgmiselt: koo kuni jääb 3 silmust enne silmusemärkijat, koo 2 parempidi kokku, 2 parempidi (silmusemärkija on nende 2 silmuse vahel), koo 2 parempidi ületõstmisega kokku (tõsta 1 silmus kudumata parempidi võttega, 1 parempidi, tõsta kudumata silmus üle). MAHAKUDUMISE NIPP: Et mahakudumise äär jääks venivam, võta suuremad vardad. Kui serv ei ole ikka piisavalt veniv, tee 1 õhksilmus umbes pärast iga 4. silmust ja koo maha nagu tavaline silmus, nii tuleb äär venivam. ------------------------------------------------------- ALUSTA SIIT: ------------------------------------------------------- DŽEMPER – KOKKUVÕTE: Kaelus ja passe kootakse ringselt ringvarrastega ülevalt alla, alustades seljaosa keskelt, siis jagatakse töö kehaosaks ja varrukateks. Kehaosa kootakse ringselt ülevalt alla ringvarrastega, varrukad kootakse ringselt ülevalt alla suka-/ringvarrastega. KAELUS: Loo 100-100-104-108-112-120 silmust 3 mm ringvarrastele Belle lõngaga. Koo 1 ring parempidi. Siis koo soonikut 1 parempidi/1 pahempidi kuni sooniku kõrgus on 2-2-3-3-3-3 cm. Paigalda 1 silmusemärkija ringi algusesse (= seljaosa keskkoht), EDASPIDI MÕÕDA SIIT! PASSE: Võta 4 mm ringvardad. Nüüd koo ringselt skeemi A.1 (= 25-25-26-27-28-30 mustrikordust 4 silmusega). Kui skeem A.1 on tehtud vertikaalselt, on vardal 200-200-208-216-280-300 silmust. Töö pikkus on 4-4-4-4-6-6 cm silmusemärkijast. Koo ringselt skeemi A.2 (= 25-25-26-27-28-30 mustrikordust 8-8-8-8-10-10 silmusega). JÄLGI KOETIHEDUST! Kui skeem A.2 on tehtud vertikaalselt, on vardal 275-300-312-351-392-420 silmust. Töö pikkus on umbes 14-14-14-17-19-19 cm silmusemärkijast (st. 16-16-17-20-22-22 cm loomise äärest). Koo parempidises koes, kuni töö pikkus on 18-20-21-23-25-27 cm reamärkijast. Nüüd jaga töö kehaosaks ja varrukateks. Järgmine ring: koo 38-42-44-50-58-63 silmust (= pool seljaosa), tõsta järgmised 62-66-68-76-80-84 silmust abilõngale (= varrukas), loo 8-8-12-12-12-12 uut silmust (= külg varruka all), koo järgmised 75-84-88-99-116-126 silmust (= esiosa), tõsta järgmised 62-66-68-76-80-84 silmust abilõngale (= varrukas), loo 8-8-12-12-12-12 uut silmust (= külg varruka all), koo ülejäänud 38-42-44-50-58-63 silmust (= pool seljaosa). Jätka kehaosa ja varrukaid eraldi. EDASPIDI MÕÕDA SIIT! KEHAOSA: = 167-184-200-223-256-276 silmust. Paigalda 1 silmusemärkija mõlemale küljele, 8-8-12-12-12-12 uue silmuse keskele (= küljed). Nüüd on esiosal 83-92-100-111-128-138 silmust ja seljaosal 84-92-100-112-128-138 silmust, tõsta silmusemärkijaid töökäigus kõrgemale, nende kõrval pärast kahandatakse. Koo ringselt parempidises koes. Kui töö kõrgus on 3 cm jagamise kohast, kahanda 1 silmus mõlemal pool mõlemat silmusemärkijat mõlemal küljel – loe KAHANDAMISE NIPPI = 4 silmust kahandatud. Kahanda nii iga 2 cm järel kokku 4-4-4-4-5-5 korda = 151-168-184-207-236-256 silmust. Koo ringselt parempidises koes, kuni töö pikkus on 15-15-16-16-16-16 cm jagamise kohast või soovitud pikkusega, umbes 2 cm jääb veel teha. Koo 1 ring parempidi, samal ajal kasvata 23-26-28-31-36-38 silmust ühtlaste vahedega = 174-194-212-238-272-294 silmust. Võta 3 mm ringvardad. Koo ringselt soonikut 1 parempidi/1 pahempidi 2 cm. Koo silmused lõdvalt maha soonikkoes – loe MAHAKUDUMISE NIPPI. Kampsuni pikkus on umbes 39-41-43-45-47-49 cm, mõõtes õlast alla. VARRUKAD: Tõsta 62-66-68-76-80-84 silmust abilõngalt ühel küljel 4 mm sukavarrastele/lühikestele ringvarrastele ning korja lisaks 1 silmus igast 8-8-12-12-12-12 silmusest kaenlaaugus = 70-74-80-88-92-96 silmust. Koo ringselt parempidises koes, kuni töö pikkus on 12-11-10-8-7-5 cm jagamise kohast (umbes 5 cm jääb veel teha valmimiseni (proovi selga ja koo vajaliku pikkuseni). Nüüd koo 1 ring parempidi silmuseid, SAMAL AJAL kahanda 16-16-14-14-14-14 silmust ühtlaste vahedega ringil = 54-58-66-74-78-82 silmust. Võta 3 mm sukavardad. Koo ringselt soonikut 1 parempidi/1 pahempidi 5 cm. Koo silmused lõdvalt maha soonikkoes – loe MAHAKUDUMISE NIPPI. Varruka pikkus on umbes 17-16-15-13-12-10 cm jagamise kohast kaenla all. Tee teine varrukas samamoodi. |
|||||||||||||||||||||||||
Skeemi seletused |
|||||||||||||||||||||||||
|
|||||||||||||||||||||||||
 |
|||||||||||||||||||||||||
 |
|||||||||||||||||||||||||
 |
|||||||||||||||||||||||||
 |
|||||||||||||||||||||||||
Kas oled teinud seda mustrit?Lisa oma piltidele viide #dropspattern #swingbyspringtop või saada link projektile meie #dropsfan galeriisse. Vajad abi selle mustriga?Garnstudio.com kodulehel on 28 õppevideot, küsimuste/vastuste osa ja muudki. © 1982-2026 DROPS Design A/S. Kõik õigused kaitstud. See dokument, ning selle alajaotused on kaitsud autoriõigustega. Loe rohkem, mida meie mustritega võib teha, iga mustrilehe alt meie kodulehel. |
|||||||||||||||||||||||||


Tegeledes üle 40 aasta kudumise ja heegeldamise disainidega, pakub DROPS Design ühte suurimat tasuta mustrite kollektsiooni internetis - tõlgituna 17 keelde. Tänaseks on meil 324 kataloogi ja 12290 mustrit - millest 9431 on tõlgitud Eesti keelde.
Me anname endast parima, et tuua teieni kõike mida kudumine ja heegeldamine võib pakkuda - inspiratsiooni, nõuandeid ning ka kvaliteetseid lõngu parima hinnaga! Soovid kasutada mustreid muukski, kui ainult oma tarbeks? Loe infot meie Copyright osas iga lehekülje all. Rõõmsat loomist!
Jäta kommentaar mustrile DROPS 222-32
Ootame kommentaare selle mustri kohta!
Kui soovid midagi küsida, siis kiiremaks vastuse saamiseks veendu, et valid õige kategooria alloleval formil. Vajaliku väljad *.