
Categorias populares
Procura um fio?


Comentários / Perguntas (71)
![]() Eva escreveu:
Eva escreveu:
Hello! How large is the waist of different sizes? I can't find the measurements in the pattern.
23.04.2022 - 14:36DROPS Design respondeu:
Dear Eva, the waist measurements are in the chart below the pattern instructions, in cm. They are: 35-39-43-49-54-60. Happy knitting!
23.04.2022 - 16:34
![]() Debbie escreveu:
Debbie escreveu:
Drops enchanted evening . Hi I am now at section where I have put the sleeve stitches on waste yarn . Why would I cut the thread after knitting the last 45 stitches of back ? Wouldn’t I knit to the middle of the 8 stitches under the arm and that would be the new beginning of the round ? Also is it necessary to use thread marker or can I use regular stitch markers for the 4 markers where thread would be ? In addition to the 2 side markers in contrasting color so I would know difference?
24.11.2021 - 20:23DROPS Design respondeu:
Dear Debbie, you cut the thread at the end of yoke so that you can start again with pattern from on of both sides; you can use markers if you like to, most important is to place anything to mark these places to increase on the right places - and good idea to use different colours for both kind of markers. Happy knitting!
25.11.2021 - 08:51
![]() Debbie escreveu:
Debbie escreveu:
Drops enchanted evening . Yes ! That helps . Yay , I finally figured it out . Next question is on the first increase round . How many stitches should I have on needles after this round? Knot over 3, make 1, k, m1. \\r\\nShould that be an increase of 54 stitches ? 27x2? Thank you so much for your help .
17.11.2021 - 13:24DROPS Design respondeu:
Dear Debbie, yes correct :) On the 10th round in A.1 you will increase 2 sts = there will be 8 sts in every A.1 x 27 repeats = 216 sts (162 sts + 54 sts increased). And in the next to last row inA.1 you increase 2 more sts = 10 sts x 27 = 270 sts (again 54 sts increased + 216). Happy knitting!
17.11.2021 - 16:44
![]() Debbie escreveu:
Debbie escreveu:
Drops enchanted evening . So perhaps I am following chart incorrect . From what you say now: for first round would it be all knit ? Since it’s 6 knits ? Next round would be knot over 3 , k3- repeat to end of round ? Next round 3 rounds are knit , next round is repeat of k3, knot over 3 etc? By the top of the chart that would be 25 rounds and then would I start at bottom again and do 2 more rounds to make 27? Otherwise I don’t know what 27 reps mean ? Sorry to be such a bother .
16.11.2021 - 18:10DROPS Design respondeu:
Dear Debbie, that's exactly how to read the diagram A.1 and how to work it. When it says to repeat A.1 a total of 27 times, it means to work: row 1: K6 x 27 (= 6*27= 162 sts); Round 2: (Knot, K3) x 27 = still 162 sts and 27 knots etc... After these 25 rows are done, work now A.2 (there were 10 sts at the end of each A.1, work now A.2 lined up over each A.1: the knots in A.2 will be lined up over the knots in A.1. And you will still repeat A.2 a total of 27 times in the round. Can this help somewhat more?
17.11.2021 - 07:35
![]() Debbie escreveu:
Debbie escreveu:
Drops enchanted evening . Yes that does help. I believe I’m following chart correct . My original question was : following the 5th repetition of the chart and starting the 6th repetition , should the row match up exactly? K6, knot over 3, k3 etc... ? I found it odd to be back at same starting point of the chart over top of the 5th repetition. Also , I feel my knots look more Spread out than in the picture . I am just going to follow the chart without knots the 27 reps til 270 stitches-size L
16.11.2021 - 14:17DROPS Design respondeu:
Dear Debbie, I'm still not sure to understand what you mean here with "repetition", diagram will be worked the same way all the round, ie repeat row 1 to the end of the round, then repeat row 2 to the end of the round (= 1 knot x 27 repeats in L) etc.. If you mean 5th knot in height (= 18th row in diagram) then work (from right to left: *1 knot, K5* and repeat from *-* all the round). Can this help?
16.11.2021 - 16:26
![]() Debbie escreveu:
Debbie escreveu:
Drops enchanted evening . Sorry , perhaps I’m not following chart properly . I am following from bottom right to left . Next row again from left to right . Ex . Start with K 6 , Make knot over next 3,stitches , knit 24, make knot over next 3, k24, knot over next 3 stitches , make 1, k1, M1, K8 etc following up. By repetition I meant the 5th and 6th reps in repeating the chart 27 times . Following the chart , the beginning of the round continues to change. Am I following incorrectly?
16.11.2021 - 04:50DROPS Design respondeu:
Dear Debbie, since diagram is worked in the round, you will always read it from the right towards the left, ie the knot on 2nd row will be worked over the first 3 sts, then knit 3. Can this help?
16.11.2021 - 09:13
![]() Debbie escreveu:
Debbie escreveu:
Drops enchanted evening . Sorry I still am confused by the knots . I am being very careful to count and place knots in correct spaces. But does it make sense. That on the 6th repetition and starting the row That below it is exact same stitches ? Sorry if I’m not explaining clearly. I may just follow the chart without making knots at all . I’ve unripped too many times now .
12.11.2021 - 21:46DROPS Design respondeu:
Dear Debbie, I'm sorry, I'm not sure what you call here "repetition", do you mean the 6th knot in height? Then you have 8 sts in every repetition of A.1 and work: K3, increase 1 stitch (last symbol), 1 knot over the next 3 sts, increase 1 st (= 8 sts worked and increased to 10 sts). Can this help?
15.11.2021 - 07:15
![]() Debbie escreveu:
Debbie escreveu:
Drops enchanted evening . Just to clarify , do you mean yes the 4th and 5th row of the chart repeat each other (lined up over precious repeat ) or have I miscounted somewhere ? It’s pretty hard to do those make one stitches over the previous row if it is correct that these rows align. Thank you
12.11.2021 - 14:06DROPS Design respondeu:
Dear Debbie, knots should be lined up just as shown in diagram, ie the 4th in height (= 14th row in A.1 smaller sizes) over the 2nd ( = 6th row in same diagram), the 3rd (= 10th row in same diagram) over the 1st (2nd row same diagram), just follow the stitches as shown in diagram to locate the knots over the correct sts. Hope this will help. Happy knitting!
12.11.2021 - 14:19
![]() Debbie escreveu:
Debbie escreveu:
Still in regards to drop enchanted evening dress . I’m following chart for the knots . Does it make sense that on the 5th time the pattern matches up to row below and I’m creating knots over the previous row knots ? Or have I miscounted somewhere ? I have 182 stitches after 4 rounds . I’m ready to give up the knots and just knit with the increases .
12.11.2021 - 05:47DROPS Design respondeu:
Dear Debbie, yest that's right, the knots are lined up - look at the last picture, it might help you to check with your work. Happy knitting!
12.11.2021 - 07:52
![]() Debbie escreveu:
Debbie escreveu:
The chart instructions It says “work A1 chart in the round 27 repetitions of 6 stitches. The bottom of chart starts with 6 inches and after about 8 boxes high x 6 stitches there is a increase so next section has 8 boxes in the row . Fir the next 8 or so rows of boxes going up and then increases to 10. My question is do I follow the whole chart with increases for the 27 times or just the 6 stitches section ? Wish I could put a picture . The pattern is Drops Enchanted evening dress .
10.11.2021 - 00:25DROPS Design respondeu:
Dear Debby, you repeat the pattern "unit" or pattern repeat 27 times, beginning with the 6 stitch, then repeat the 8 stitch repeat, etc. so your piece will be increased evenly. Happy Stitching!
10.11.2021 - 06:09
|
||||||||||
Enchanted Evening#enchantedeveningdress |
||||||||||
 |
 |
|||||||||
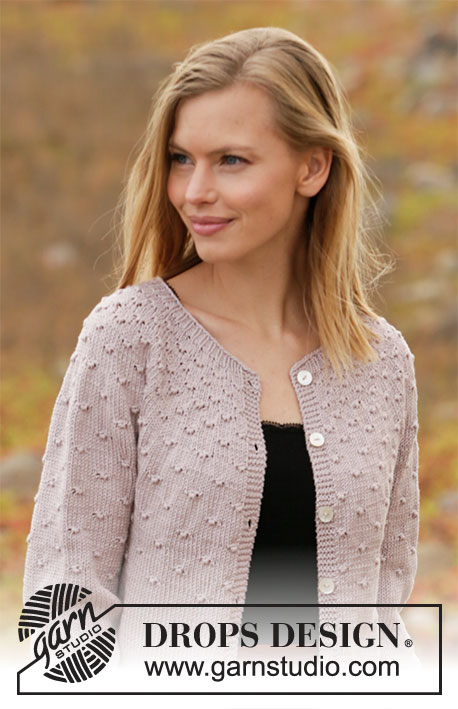
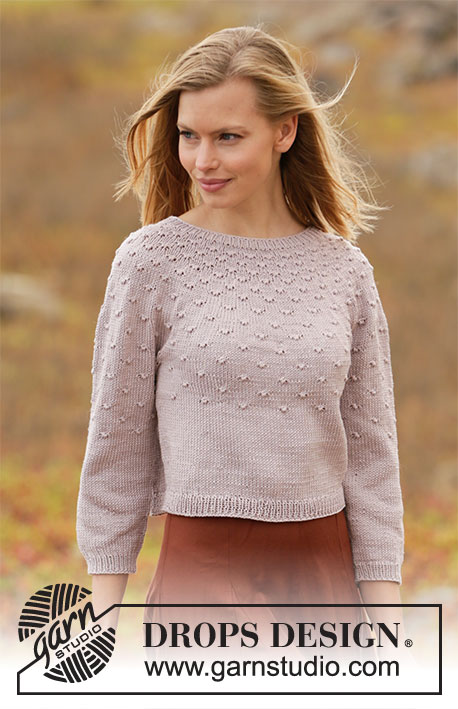
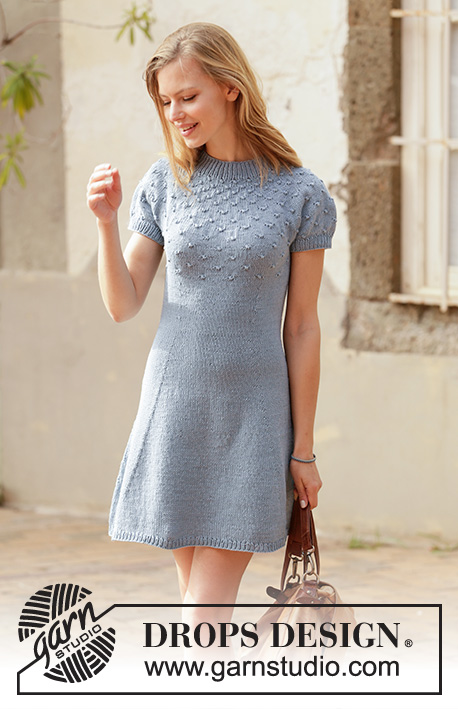
Vestido tricotado de cima para baixo em DROPS Muskat, com encaixe arredondado, ponto de nós e mangas curtas. Do S ao XXXL
DROPS 211-1 |
||||||||||
|
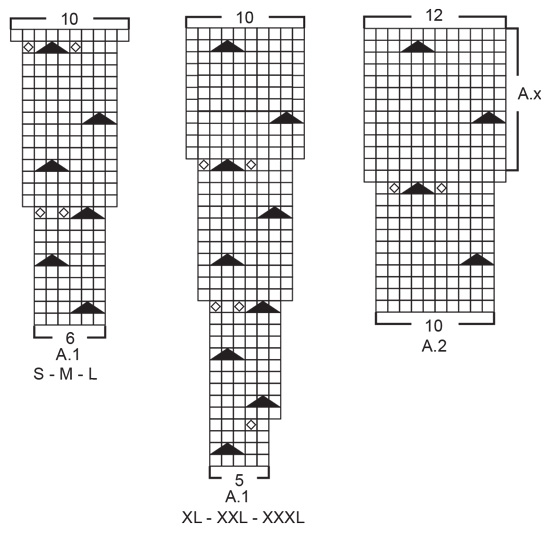
---------------------------------------------------------- TÉCNICAS USADAS: ---------------------------------------------------------- PONTO FANTASIA: Ver os diagramas A.1 e A.2. Ver diagrama A.1 indicado para cada tamanho. AUMENTOS/DIMINUIÇÕES (a intervalos regulares): Para calcular quando aumentar/diminuir a intervalos regulares, contar o número total de malhas (por ex. 120 malhas), e dividi-lo pelo número de aumentos/ de diminuições a fazer (por ex. 18) = 6.7. Para aumentar neste exemplo, vai-se fazer 1 laçada depois de alternadamente cerca de cada 6.ª e 7.ª malha. Na carreira seguinte, tricotar as laçadas torcidas em meia para evitar buracos. Para diminuir neste exemplo, tricotar juntamente em meia aproximadamente e alternadamente cada 5.ª e 6.ª malha e cada 6.ª e 7.ª malha. AUMENTOS-1 (tamanhos, parte de baixo do vestido): Aumentar 1 malha depois do 1.º e do 3.º fio marcador e antes do 2.º e do 4.º fio marcador como explicado abaixo. AUMENTAR DA SEGUINTE MANEIRA DEPOIS DO FIO MARCADOR: Tricotar 1 malha meia passando o fio à volta da 1.ª malha da agulha esquerda (ou seja na malha da carreira precedente). AUMENTAR DA SEGUINTE MANEIRA ANTES DO FIO MARCADOR: Tricotar até ao fio marcador, tricotar 1 malha meia passando o fio à volta da malha da agulha direita (ou seja na malha da carreira precedente). AUMENTOS-2 (lados vestido): Aumentar antes e depois do marcador como explicado sob AUMENTOS-1, mas aumentar alternadamente antes e depois do marcador. Ou seja aumentar apenas 1 vez em cada um dos lados do vestido a cada 1½ cm e alternadamente antes e depois do marcador (e não de cada lado dos marcadores). DIMINUIÇÕES (cintura, parte de baixo do vestido): As primeiras diminuições serão feitas ao mesmo tempo que o ponto fantasia. Ajustar a altura para diminuir numa carreira sem nós e notar que haverá menos malhas em ponto meia entre 2 nós depois de uma diminuição. Diminuir 1 malha depois do 1.º e do 3.º fio marcador e antes do 2.º e do 4.º fio marcador como explicado abaixo. DIMINUIR DA SEGUINTE MANEIRA DEPOIS DO FIO MARCADOR: Deslizar 1 malha em meia, 1 malha meia, passar a malha deslizada por cima da malha tricotada DIMINUIR DA SEGUINTE MANEIRA ANTES DO FIO MARCADOR: Tricotar até restarem 2 malhas antes do fio marcador, tricotar 2 malhas juntamente em meia. DICA PARA ARREMATAR: Para evitar que as malhas arrematadas fiquem demasiado apertadas, pode-se arrematar com uma agulha um tamanho acima, ou então fazer 1 laçada depois de cerca de cada 8.ª malha quando arrematar as malhas (arrematar as laçadas como se fossem malhas normais). ---------------------------------------------------------- A PEÇA COMEÇA AQUI: ---------------------------------------------------------- VESTIDO – SUMÁRIO DA PEÇA: A gola e o encaixe tricotam-se de cima para baixo, em redondo na agulha circular a partir do meio das costas. Dividir o encaixe para a parte de baixo do vestido e a orla das mangas. Terminar a parte de baixo do vestido em redondo na agulha circular, de cima para baixo. Tricotar a orla das mangas em redondo nas agulhas de pontas duplas, de cima para baixo. GOLA: Montar 120-124-130-134-138-140 malhas com a pequena agulha circular 3 mm em Muskat e tricotar 1 volta meia. Continuar em canelado (= 1 malha meia/1 malha liga) durante 4 cm. Tricotar 1 volta meia aumentando ao mesmo tempo 18-26-32-16-22-35 malhas a intervalos regulares – ver AUMENTOS/DIMINUIÇÕES = 138-150-162-150-160-175 malhas. Tricotar 1 volta meia, tricotar as laçadas torcidas em meia. Colocar 1 marcador a meio da carreira (= meio da frente). Medir a partir deste marcador! Tricotar então o encaixe como explicado abaixo. ENCAIXE: Continuar com a agulha circular 4 mm e tricotar A.1 em redondo (= 23-25-27-30-32-35 motivos de 6-6-6-5-5-5 malhas). Continuar desta maneira aumentando como indicado em A.1. MANTER A MESMA TENSÃO DA INDICADA PARA A AMOSTRA! Quando A.1 tiver sido tricotado, temos 230-250-270-300-320-350 malhas. Tricotar então A.2 em redondo (= 23-25-27-30-32-35 motivos de 10 malhas). Continuar desta maneira aumentando como indicado em A.2. Depois do último aumento de A.2, temos 276-300-324-360-384-420 malhas. Tricotar até a peça medir 17-19-21-23-25-27 cm a partir do marcador da gola – NOTA: Tricotar A.2 até à altura correcta, em certos tamanhos, vai ter de se repetir A.x em altura (continuar o ponto fantasia para que fique correctamente alinhado). Dividir, então, o encaixe para a parte de baixo do vestido e as mangas, ou seja, tricotar a carreira seguinte da seguinte maneira a partir do meio das costas: Tricotar 38-42-45-51-56-62 malhas como antes (= ½ costas), colocar as 62-66-72-78-80-86 malhas seguintes em espera num alfinete de malhas para a orla da manga, montar 6-6-8-8-10-10 malhas (lado, sob a manga), tricotar 76-84-90-102-112-124 malhas como antes (= frente), colocar as 62-66-72-78-80-86 malhas seguintes em espera num alfinete de malhas para a orla da manga, montar 6-6-8-8-10-10 malhas (lado, sob a manga) e tricotar as 38-42-45-51-56-62 últimas malhas como antes (= ½ costas). Cortar o fio. Terminar a parte de baixo do vestido e a orla das mangas separadamente. MEDIR A PARTIR DAQUI! PARTE DE BAIXO DO VESTIDO: = 164-180-196-220-244-268 malhas. Colocar 1 marcador de cada lado do vestido, a meio das 6-6-8-8-10-10 malhas montadas sob cada manga. Colocar a mais 4 fios marcadores da seguinte maneira: Contar 21-24-27-32-37-42 malhas a partir do marcador de um lado da peça, colocar o 1.º fio marcador antes do marcador seguinte, contar 40-42-44-46-48-50 malhas, colocar o 2.º fio marcador antes da malha seguinte, contar 42-48-54-64-74-84 malhas (o marcador do lado fica a meio destas malhas), colocar o 3.º fio marcador antes da malha seguinte, contar 40-42-44-46-48-50 malhas, colocar o 4.º fio marcador antes da malha seguinte, restam 21-24-27-32-37-42 malhas depois do último fio marcador. Fazer seguir os fios marcadores à medida que for tricotando; irão servir mais tarde para as diminuições e os aumentos. Continuar, então, A.x diminuindo AO MESMO TEMPO dos lados do vestido como explicado abaixo: Começando a carreira no marcador de um lado da peça, tricotar A.x em redondo, mas tendo o cuidado de continuar na carreira apropriada do diagrama depois da divisão e colocar os nós por cima dos nós do encaixe e tricotar em ponto meia as 6-6-8-8-10-10 malhas montadas sob cada manga. Quando a peça medir 6 cm a partir da separação para todos os tamanhos, arrematar A.x ajustando a altura para depois de 1 carreira de nós. Continuar em ponto meia em todas as malhas. AO MESMO TEMPO, quando a peça medir cerca de 3 cm a partir da separação para todos os tamanhos, diminuir 1 malha depois do 1.º e do 3.º fio marcador e antes do 2.º e do 4.º fio marcador – ver DIMINUIÇÕES (= diminui-se 4 malhas). Diminuir desta maneira 4 vezes ao todo a cada 2½ cm = 148-164-180-204-228-252 malhas. Quando a peça medir 16 cm a partir da separação para todos os tamanhos, aumentar 1 malha depois do 1.º e do 3.º fio marcador e antes do 2.º e do 4.º fio marcador – ver AUMENTOS-1. Aumentar mais 1 malha a cada um dos marcadores de cada lado da peça – ver AUMENTOS-2 (= aumenta-se 6 malhas por carreira de aumentos). Aumentar desta maneira 21 vezes a cada 2 cm para todos os tamanhos = 274-290-306-330-354-378 malhas. Tricotar sem aumentar até a peça medir cerca de 61-62-63-64-65-66 cm a partir da separação (restam cerca de 2 cm antes do fim – experimentar o vestido e tricotar até ao comprimento desejado). Tricotar 1 volta meia aumentando ao mesmo tempo 20-22-24-26-26-28 malhas a intervalos regulares = 294-312-330-356-380-406 malhas (aumenta-se um pouco para evitar que o canelado aperte o vestido). Continuar com a agulha circular 3 mm em canelado 1 malha meia/1 malha liga durante 2 cm. Arrematar as malhas como elas se apresentam - Ver DICA PARA ARREMATAR. O vestido mede cerca de 85-88-91-94-97-100 cm de altura total a partir do ombro. ORLA DAS MANGAS: Retomar as 62-66-72-78-80-86 malhas do alfinete de malhas de um lado da peça para as agulhas de pontas duplas 4 mm e levantar mais 1 malha em cada uma das 6-6-8-8-10-10 malhas montadas sob a manga = 68-72-80-86-90-96 malhas. Começando a carreira a meio das 6-6-8-8-10-10 malhas montadas sob a manga, tricotar 3 carreiras em ponto meia, diminuindo AO MESMO TEMPO, na última carreira, 4-4-4-4-2-2 malhas a intervalos regulares - não esquecer AUMENTOS/DIMINUIÇÕES = 64-68-76-82-88-94 malhas. Continuar com as agulhas de pontas duplas 3 mm em canelado 1 malha meia/1 malha liga durante 3 cm. Arrematar as malhas como elas se apresentam - não esquecer DICA PARA ARREMATAR! A orla da manga mede cerca de 4 cm a partir da separação. Tricotar a orla da outra manga da mesma maneira. |
||||||||||
Explicações do diagrama |
||||||||||
|
||||||||||
 |
||||||||||
 |
||||||||||
Terminou este projecto?Então, identifique as suas fotos com as tags #dropspattern #enchantedeveningdress ou mostre-as na galeria #dropsfan. Precisa de ajuda para este modelo?Encontrará 28 turotiais em vídeo, uma rubrica Comentários/Perguntas e muito mais ao visitar a página do modelo em www.garnstudio.com © 1982-2026 DROPS Design A/S. Todos os direitos reservados. Este documento, incluuindo as suas su-secções, tem copyrights. Saia mais o que pode fazer com os nossos modelos no fim de cada uma das páginas do nosso site. |
||||||||||


Com mais de 40 anos no design de modelos de tricô e de croché, a DROPS Design oferece uma das mais vastas colecções demodelos gratuitos na Internet - traduzidos em 17 línguas. Neste dia de hoje, temos 324 catálogos e 12290 modelos - dos quais 12271 estão traduzidos em português.
Trabalhamos com muito empenho para lhe proporcionar o melhor que o tricô e o croché têm para oferecer, para lhe fornecer inspiração e conselhos bem como fios da mais elevada qualidade a preços incríveis! Gostaria de usar os nossos modelos para outros fins que não uso pessoal? Pode ler o que lhe é permitido fazer no Copyright texto que se encontra na parte de baixo de todos os nossos modelos. Bom tricô! Bom croché!
Deixe um comentário acerca do modelo DROPS 211-1
Gostaríamos muito de saber o que tem a dizer-nos acerca deste modelo!
Se deixar uma pergunta acerca do modelo, certifique-se de que escolhe a categoria adequada no formulário abaixo para acelerar o processo relativo à resposta. Os campos obrigatórios estão assinalados com um *.