
Categorias populares
Procura um fio?


Comentários / Perguntas (16)
![]() Sharon escreveu:
Sharon escreveu:
Hi! Good morning. I have the sleeves of this sweater so am almost done. Polaris is a thick yarn which make this sweater very heavy. It will be however very warm. Can I wash this on the wool program. It is impossible to wash this by hand per ball band instruction. Just knitting the sleeves make my shoulder hurts. Love this sweater though and do not want to damage it, but I must wash it som how. Thanks for all your help and responses to my many questions. Sharon
29.08.2023 - 09:21DROPS Design respondeu:
Hi Sharon, The recommendation for this yarn is hand-washing at max 30 degrees. You could try a cool machine wash, if hand washing is difficult. Always dry the garment flat and shape it while it is still wet. Good luck!
30.08.2023 - 06:52
![]() Sharon Hunt escreveu:
Sharon Hunt escreveu:
Hi Working on the sleeves. Just checking to make sure that the increases on the sleeves are done every 4th row. Is my calculation correct? Thanks for your help. S
11.08.2023 - 18:45DROPS Design respondeu:
Dear Mrs Hunt, when working sleeves you will only decrease - read decrease tip - alternately at the beg and at the end of the row on every other row: first decrease at the end of the row, then on next row from RS decrease at the beg of the row and repeat these 2 decreases as many time as required in your size, so that the decrease will be worked on every 4th row at the beg/end of the row. Happy knitting!
14.08.2023 - 08:31
![]() Sharon Hunt escreveu:
Sharon Hunt escreveu:
Hi and good day. Thanks 🙏 for answering my previous question. I tried on my sweater and must admit that I like my sweaters longer. Is this doable without it affecting the overall sweater? How many more balls should I purchase. Thank you for your response . Sharon.
17.07.2023 - 18:38DROPS Design respondeu:
Hi Sharon, of course you can do it. Do not forget to increase 1 stitch after each marker thread every few centimetres. You will need at least 2 more balls of yarn but it depends on the total lenght of your sweater. Happy knitting!
17.07.2023 - 22:07
![]() Sharon Hunt escreveu:
Sharon Hunt escreveu:
Hi! Can I work the sleeves in the round? Can I work k2 tog on the right side and ssk on the left side. I hate sewing . Sharon
16.07.2023 - 08:20DROPS Design respondeu:
Dear Sharon, yes, you could work them in the round. And yes, you could for ssk on the left side, just make sure that no holes are left in the sleeves. Happy knitting!
17.07.2023 - 11:55
![]() Sharon Hunt-Edwards escreveu:
Sharon Hunt-Edwards escreveu:
Hi Started the Cedar sweater and I have completed the first round of the chart A1 and A2 for Size XXL. I have 2 stitches left at the end of round one. Have I done something wrong her as I expected that there would be 4 stitches to complete the round. Please explain this and let me know what I should do to correct this. Thank you.
07.07.2023 - 20:00DROPS Design respondeu:
Dear Sharon, you have 42 initial stitches. Work A.1 and A.2 10 times (= 40 stitches) and A.1 once more (= 2 stitches). You will have 42 stitches and 10 increases. Happy knitting!
10.07.2023 - 16:32
![]() Sharon Hunt escreveu:
Sharon Hunt escreveu:
Hi! Got cold feet after my question about this sweater. I have the yarn so I have no choice. I was looking at the schematics and it seem if I make the size 52 I would get a finished size 60. Not what I want, however if I choose size 47 I would have a finished size of 51. Close enough? Am not sure about this and need some help not to redesign the sweater, but to avoid making a sweater that is way too big. Thanks for your help.
09.03.2023 - 18:51DROPS Design respondeu:
Dear Mrs Hunt, make first sure you have the correct tension so that you will have the finished measurements as in the chart, then take a similar garment you have and like the size and compare them to the ones in the chart, if you are between 2 sizes, choose the smaller one for a tighter fit and the larger one for a looser fit. read more here. Happy knitting!
10.03.2023 - 09:26
![]() Gabi escreveu:
Gabi escreveu:
Hallo, die Polaris wird als Filzwolle bezeichnet. Wie kann ich den Pullover waschen?
13.09.2022 - 18:52DROPS Design respondeu:
Liebe Gabi, DROPS Polaris waschen Sie wie an der Banderolle bzw Farbekarte erklärt; mehr über Pflegehinweise lesen Sie hier. Viel Spaß beim stricken!
14.09.2022 - 09:01
![]() Sharon Hunt escreveu:
Sharon Hunt escreveu:
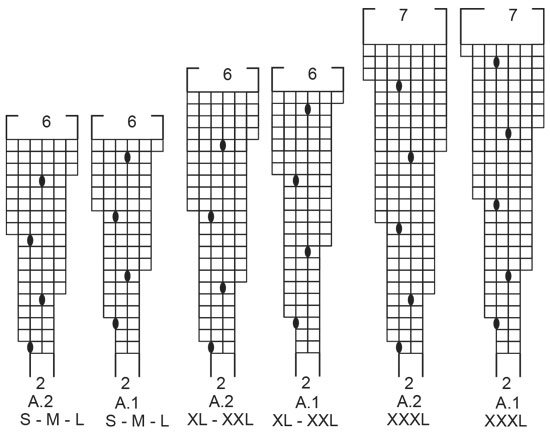
Hi! Am preparing to make this sweater and I have a question. I am making size (xxl) which gives a finished size 52. My question so far relates to the diagram. Reading from left to write I would start A2 then A1, or should I start reading right to left in that case I would Start with A1 as stated in the pattern. What does the number 6 at the top indicates? Thanks for your response. Sharon
02.08.2022 - 12:09DROPS Design respondeu:
Dear Mrs Hunt, the jumper is worked top down and the diagrams are read bottom up; this means you will read every round from the right towards the left and repeat (A.1, A.2) all the round. Each diagram (A.1 and A.2) starts with 2 sts and finish with 6 sts (you increase 4 sts in each diagram). Can this help? Happy knitting!
02.08.2022 - 13:06
![]() Sharon escreveu:
Sharon escreveu:
Would i cast on 136 sts to make a size 52? I hsve never made a sweater top down so there will be a few questions.
20.01.2022 - 12:04DROPS Design respondeu:
Dear Sharon, in size S you will cast on 34 sts for neck edge; look at this lesson, it shows how to work a jumper top down (this one is worked with a circular yoke but the lesson may help you to understand how to work here from top down) and maybe also this lesson for the diagrams. Happy knitting!
20.01.2022 - 17:00
![]() Bianca escreveu:
Bianca escreveu:
P.S. I found your tutorial on how to read knitting diagrams but I could not find a video tutorial. If you have one, I'd appreciate you post the link.
01.12.2019 - 08:00
|
|||||||
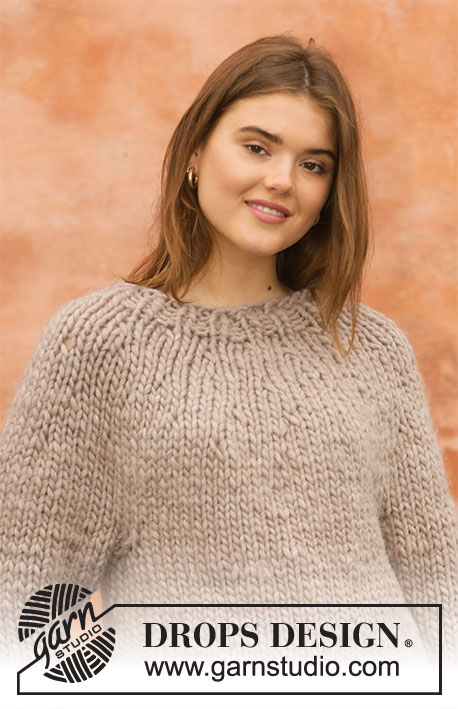
Cedar Wood#cedarwoodsweater |
|||||||
 |
 |
||||||
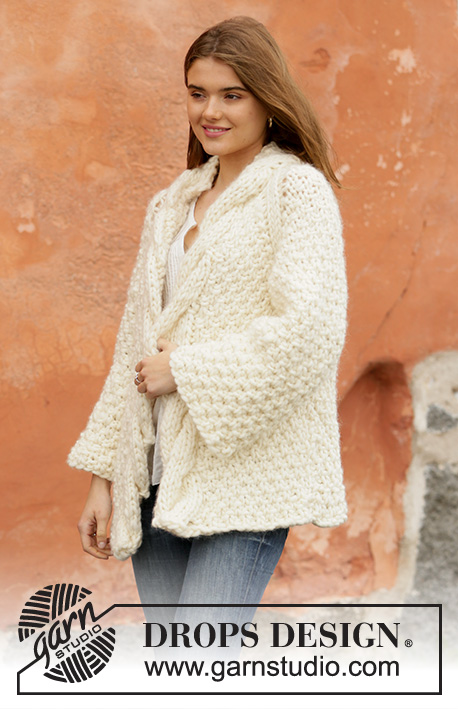
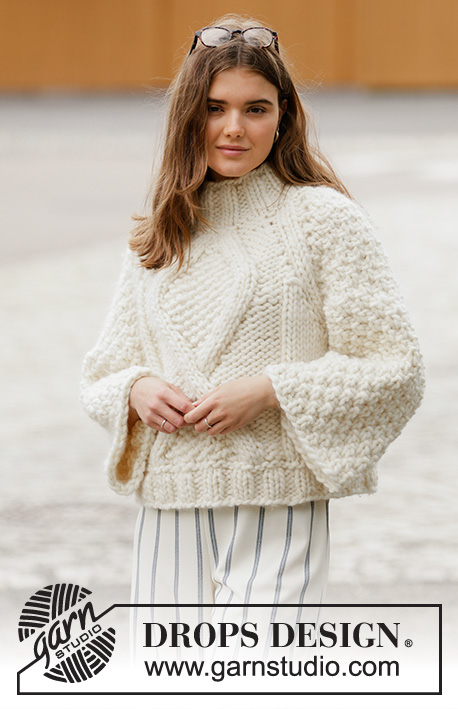
Pulôver tricotado de cima para baixo, com encaixe arredondado, em DROPS Polaris. Do S ao XXXL.
DROPS 206-39 |
|||||||
|
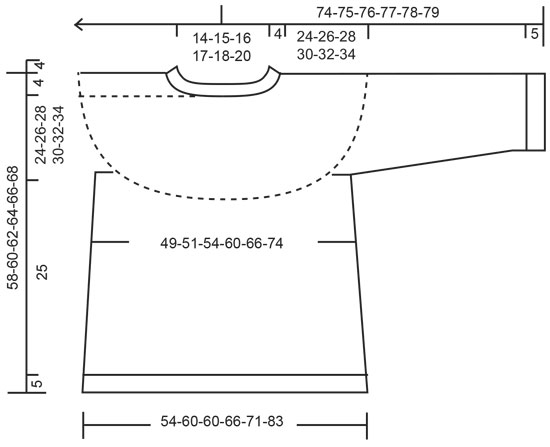
------------------------------------------------------- TÉCNICAS USADAS: ------------------------------------------------------- PONTO FANTASIA: Ver os diagramas A.1 e A.2. Ver diagrama indicado para cada tamanho. DICA: NOTA: NOTA: a nossa gama não inclui agulhas circulares mais curtas do que com 60 cm no tamanho 15 mm. A circunferência da peça é inferior a 60 cm. Pode-se tricotar com agulhas de pontas duplas ou em MAGIC LOOP – ver acima -, até malhas suficientes terem sido aumentadas para usar a agulha circular 60 cm ou 80 cm normalmente. MAGIC LOOP: Se se tricota em redondo com uma agulha circular demasiado comprida para a circunferência da peça, pode-se fazer da seguinte maneira (a agulha circular deve ter um cabo suficientemente comprido e flexível). Empurrar as malhas para o meio do cabo. Dividir as malhas ao meio e passar o cabo entre as malhas. Empurrar as malhas para a ponta da agulha de cada lado da peça; ter cuidado para não torcer as malhas. O fio do novelo está na agulha de trás e começa-se a tricotar na agulha da frente. Tricotar as malhas na agulha da frente com a agulha de trás. Quando as malhas da agulha da frente foram tricotadas, virar e empurrar as malhas para a agulha vazia e tricotar o outro lado da mesma maneira. Continuar desta maneira em redondo, tendo o cuidado de puxar a agulha do lado onde fica o fio. AUMENTOS (costas & frente): Para aumentar 1 malha, fazer 1 laçada. Na carreira seguinte, tricotar a laçada torcida em meia para evitar um buraco. DIMINUIÇÕES (mangas): NOTA: diminui-se alternadamente à esquerda e à direita da seguinte maneira: Diminuir alternadamente no princípio e no fim de uma carreira de diminuições. Diminuir pelo direito: tricotar 2 malhas juntamente em meia. Diminuir pelo avesso: tricotar 2 malhas juntamente em liga. ------------------------------------------------------- A PEÇA COMEÇA AQUI: ------------------------------------------------------- PULÔVER – SUMÁRIO DA PEÇA: Tricota-se de cima para baixo, em redondo com as agulhas de pontas duplas/a agulha circular. As mangas tricotam-se em idas e voltas na agulha circular. GOLA: Montar 34-36-38-40-42-44 malhas com as agulhas de pontas duplas/a pequena agulha circular 12 – ver DICA -, em Polaris e tricotar 1 volta meia. Tricotar então em canelado (= 1 malha meia / 1 malha liga) durante 4 cm. Continuar com a agulha circular 15 mm e colocar 1 marcador. MEDIR A PARTIR DO MARCADOR! ENCAIXE: Tricotar, então, consoante cada tamanho da seguinte maneira: Tamanhos S, L e XXL: Tricotar * A.1, A.2 *, repetir de * a * 8-9-10 vezes ao todo em largura e terminar com A.1. MANTER A MESMA TENSÃO DA INDICADA PARA A AMOSTRA! Tamanhos M, XL e XXXL: Tricotar * A.1, A.2 *, repetir de * a * 9-10-11 vezes ao todo até ao fim da carreira. MANTER A MESMA TENSÃO DA INDICADA PARA A AMOSTRA! TODOS OS TAMANHOS: Quando A.1 e A.2 estão terminados em altura, temos 102-108-114-120-126-154 malhas. Tricotar 1 volta meia aumentando 0-4-2-8-10-2 malhas a intervalos regulares = 102-112-116-128-136-156 malhas. Continuar em ponto meia até a peça medir 24-26-28-30-32-34 cm a partir do marcador. Tricotar a carreira seguinte da seguinte maneira: Tricotar as 15-16-17-19-20-23 primeiras malhas (= metade das costas), colocar as 21-24-24-26-28-32 malhas seguintes em espera num fio para a manga e montar 4-4-4-4-6-6 malhas (= lado, sob a manga), tricotar as 30-32-34-38-40-46 malhas seguintes (= frente), colocar as 21-24-24-26-28-32 malhas seguintes em espera num fio para a manga e montar 4-4-4-4-6-6 malhas (= lado, sob a manga), tricotar as 15-16-17-19-20-23 malhas seguintes (= metade das costas). Terminar as costas/a frente e as mangas separadamente. MEDIR A PEÇA A PARTIR DAQUI!. COSTAS & FRENTE: = 68-72-76-84-92-104 malhas. Colocar 1 fio marcador de cada lado da peça, a meio das 4-4-4-4-6-6 novas malhas montadas sob cada manga. Fazer seguir os fios marcadores à medida que for tricotando; servem para marcar os aumentos dos lados. Continuar em redondo em ponto meia. Quando a peça medir 5 cm a partir da separação, aumentar 1 malha antes dos dois fios marcadores – ver AUMENTOS (= aumenta-se 2 malhas). Aumentar então da seguinte maneira: Quando a peça medir 8 cm, aumentar 1 malha depois de cada fio marcador. Quando a peça medir 11 cm, aumentar 1 malha antes de cada fio marcador. Quando a peça medir 14 cm, aumentar 1 malha depois de cada fio marcador. Nos tamanhos M e XXXL continuar a aumentar desta maneira: Quando a peça medir 17 cm, aumentar 1 malha antes de cada fio marcador. Quando a peça medir 20 cm, aumentar 1 malha depois de cada fio marcador. TODOS OS TAMANHOS: Quando todos os aumentos estiverem feitos, temos 76-84-84-92-100-116 malhas. Continuar em redondo em ponto meia até a peça medir 25 cm a partir da separação. Tricotar então em canelado (= 1 malha meia / 1 malha liga) durante 5 cm. Arrematar frouxamente as malhas como elas se apresentam. O pulôver mede cerca de 58-60-62-64-66-68 cm de altura total a partir do ombro. MANGAS: Tricotam-se em idas e voltas na agulha circular com uma costura. Retomar as 21-24-24-26-28-32 malhas em espera num dos lados da peça com a agulha circular 15 mm e montar 2-2-2-2-3-3 das novas malhas de cada lado da peça = 25-28-28-30-34-38 malhas. Tricotar em ponto meia em idas e voltas, diminuindo ao mesmo tempo, na carreira seguinte pelo direito, 1-0-0-0-0-0 malha (diminui-se apenas no tamanho S) tricotando juntamente em meia as 2 malhas do rebordo = 24-28-28-30-34-38 malhas. Quando a peça medir 4-4-2-4-4-2 cm, diminuir 1 malha pelo direito - ver DIMINUIÇÕES. Diminuir alternadamente à esquerda e à direita 8-12-12-14-14-18 vezes ao todo a cada 2-2-2-1-1-1 carreiras (= 4-6-6-7-7-9 vezes de cada lado da peça) = 16-16-16-16-20-20 malhas. Continuar até a peça medir 34-33-32-30-28-26 cm a partir da separação. (NOTA: Mais curto nos tamanhos grandes porque os ombros são mais largos). Continuar com a agulha circular 12 mm em canelado (= 1 malha meia / 1 malha liga) durante 5 cm. Arrematar frouxamente as malhas como elas se apresentam. Tricotar a outra manga da mesma maneira. MONTAGEM: Costurar a manga na alça mais exterior das malhas para que a costura fique lisa. Fechar a abertura sob as mangas com uma costura. |
|||||||
Explicações do diagrama |
|||||||
|
|||||||
 |
|||||||
 |
|||||||
Terminou este projecto?Então, identifique as suas fotos com as tags #dropspattern #cedarwoodsweater ou mostre-as na galeria #dropsfan. Precisa de ajuda para este modelo?Encontrará 26 turotiais em vídeo, uma rubrica Comentários/Perguntas e muito mais ao visitar a página do modelo em www.garnstudio.com © 1982-2026 DROPS Design A/S. Todos os direitos reservados. Este documento, incluuindo as suas su-secções, tem copyrights. Saia mais o que pode fazer com os nossos modelos no fim de cada uma das páginas do nosso site. |
|||||||


Com mais de 40 anos no design de modelos de tricô e de croché, a DROPS Design oferece uma das mais vastas colecções demodelos gratuitos na Internet - traduzidos em 17 línguas. Neste dia de hoje, temos 324 catálogos e 12290 modelos - dos quais 12271 estão traduzidos em português.
Trabalhamos com muito empenho para lhe proporcionar o melhor que o tricô e o croché têm para oferecer, para lhe fornecer inspiração e conselhos bem como fios da mais elevada qualidade a preços incríveis! Gostaria de usar os nossos modelos para outros fins que não uso pessoal? Pode ler o que lhe é permitido fazer no Copyright texto que se encontra na parte de baixo de todos os nossos modelos. Bom tricô! Bom croché!
Deixe um comentário acerca do modelo DROPS 206-39
Gostaríamos muito de saber o que tem a dizer-nos acerca deste modelo!
Se deixar uma pergunta acerca do modelo, certifique-se de que escolhe a categoria adequada no formulário abaixo para acelerar o processo relativo à resposta. Os campos obrigatórios estão assinalados com um *.