
Categorias populares
Procura um fio?


Comentários / Perguntas (36)
![]() Consuelo escreveu:
Consuelo escreveu:
Buongiorno, sarebbe fattibile questo modello in cotone? Se si, quale suggerite?
10.12.2019 - 17:37DROPS Design respondeu:
Buongiorno Consuelo. Può usare il Paris (gruppo filato C come Big Merino) oppure il Safran, usato doppio. Per ogni ulteriore consiglio sulla scelta del filato e sulle quantità da ordinare, può rivolgersi al suo rivenditore Drops di fiducia. Buon lavoro!
16.12.2019 - 11:22
![]() Patti Urso escreveu:
Patti Urso escreveu:
There is another Mermaid Shell that I printed of this pattern that has double crochet for some symbols in the diagram where the other says treble crochet I am nearly completing the yoke with the double crochets and now I just discovered that it seems that the instructions had an error. Please confirm if the pattern I am following is not correct. Thank you.
29.11.2019 - 10:00DROPS Design respondeu:
- see answer below - remember crochet terminology is different in US and in Uk English. Happy crocheting!
29.11.2019 - 10:33
![]() Patti Urso escreveu:
Patti Urso escreveu:
This pattern was also found with treble crochet in the diagram which one is correct?
29.11.2019 - 09:47DROPS Design respondeu:
Dear Mrs Urso, make sure you are following the required English terminology, editing language if necessary by clicking on the scroll down menu under the foto. Happy crocheting!
29.11.2019 - 10:32
![]() Patti Urso escreveu:
Patti Urso escreveu:
Regarding your explanation “ after you have increased to 192-210-228 stitches, you have now enough stitches to repeat A.2B (= 6 stitches) a total of 32-35-38 times in width (= 32-35-38 repeats of A.2B in the round). “ does this mean that I repeat the entire A.2B from the beginning? Or just continue on the next row indicated in the chart?
26.11.2019 - 17:48DROPS Design respondeu:
Dear Mrs Urso, just continue A.2B as before, ie work next row in diagram and continue diagram to the end (until it has been worked 1 time in height), but now you will repeat the diagram more times in width. Happy crocheting!
27.11.2019 - 07:44
![]() Patti Urso escreveu:
Patti Urso escreveu:
What does this statement mean? Then repeat A.2B 32-35-38 times in width.
26.11.2019 - 09:38DROPS Design respondeu:
Dear Mrs Urso, after you have increased to 192-210-228 stitches, you have now enough stitches to repeat A.2B (= 6 stitches) a total of 32-35-38 times in width (= 32-35-38 repeats of A.2B in the round). Happy crocheting!
26.11.2019 - 09:46
![]() Patti Urso escreveu:
Patti Urso escreveu:
Please explain further what “Then repeat A.2B 32-35-38 times in width.”
26.11.2019 - 09:24
![]() Huet Nicole escreveu:
Huet Nicole escreveu:
Je reviens vers vous car je ne comprends pas A2A au total en largeur. A2A représente 10 motifs. Si c’est en largeur dois je crocheter le 1er et juste après le second car moi j’ai raisonné avant de vous écrire crocheter un tour de 1 er motif et enchaîner un tour du 2ème motif etc . De plus quand vous écrivez 16 fois et ensuite 24 fois vous rajoutez 8 tours? Je suis perdue!!!!
16.08.2019 - 18:23DROPS Design respondeu:
Bonjour Mme Huet, je ne suis pas sûre de bien comprendre les 10 motifs dont vous parlez. A.2A se crochète sur 6 mailles et 10 rangs. Vous crochetez d'abord le 1er rang de A.2A sur toutes les mailles, puis le 2ème rang et ainsi de suite. c'est ainsi qu'on lit des diagrammes crochet. Bon crochet!
19.08.2019 - 08:49
![]() Huet escreveu:
Huet escreveu:
Merci de votre réponse je n’avais absolument rien compris!!!! Je recommence tout!!!
16.08.2019 - 11:13
![]() Huet Nicole escreveu:
Huet Nicole escreveu:
Bonjour quand vous écrivez 16 fois au total en largeur cela veut dire 16 tours?, ou 24 fois je n’arrive pas à comprendre merci de vos éclaircissements
15.08.2019 - 18:03DROPS Design respondeu:
Bonjour Mme Huet, quand on indique "répéter de *à* 15 fois au total, on doit crocheter la partie entre les * un total de 15, on aura donc 15 "motifs" + les mailles indiquées au début du tour avant la partie entre les * + celles indiquées à la fin du tour après la partie entre les *. Au début par ex, on doit avoir 96 brides + les 3 ml du début du tour et on pourra donc répéter 16 fois A.2 (= 16 x 6 m = 96 m). Bon crochet!
16.08.2019 - 08:56
![]() Eve escreveu:
Eve escreveu:
Hello, I follow your page for many years (10 years +). I liked your crochet templates in the PAST. For a few years you have unfortunately changed the description totally. I do not know what it should, the internationally valid symbols for e.g. need no extra symbols, your charts are "very special" puzzling and I have never seen anywhere -and I have a large collection of Patterns from around the world. Totally impractical, mega awkward and just annoying. Please take the old symbols again
25.06.2019 - 13:32DROPS Design respondeu:
Dear Eve, thanks for your loyalty, should you need any assistance reading crochet diagrams, you will find here some more explanations. Remember your DROPS store will always be able to assist you - even per mail or telephone - for any further individual help. Happy crocheting!
25.06.2019 - 15:50
|
||||||||||||||||||||||||||||||||||
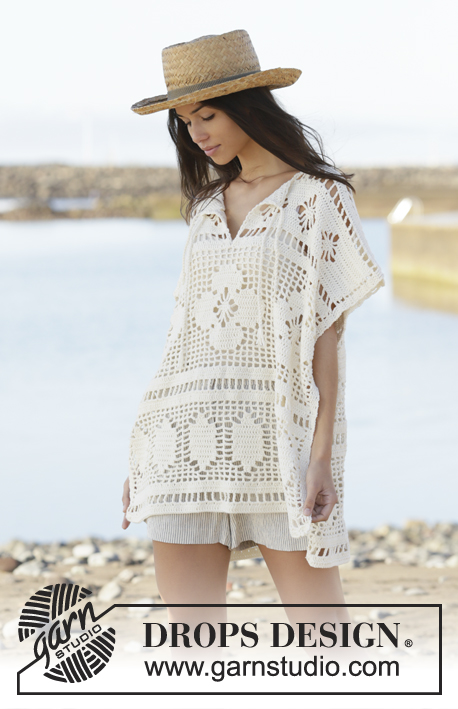
Mermaid Shell#mermaidshellponcho |
||||||||||||||||||||||||||||||||||
 |
 |
|||||||||||||||||||||||||||||||||
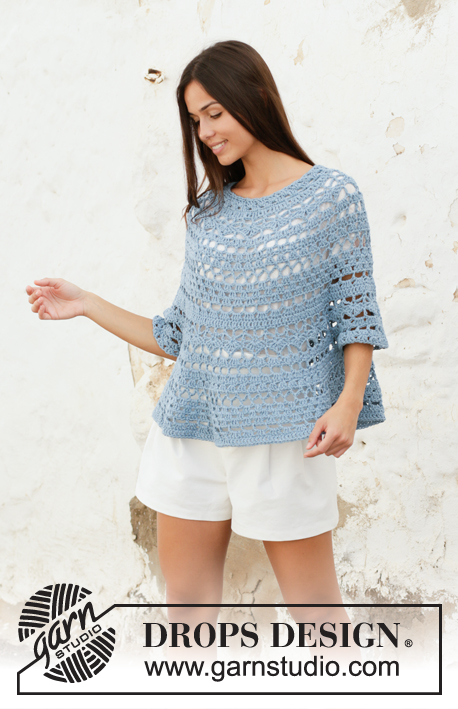
Pulôver poncho crochetado de cima para baixo, com ponto rendado, em DROPS Big Merino. Do S ao XXXL
DROPS 199-35 |
||||||||||||||||||||||||||||||||||
|
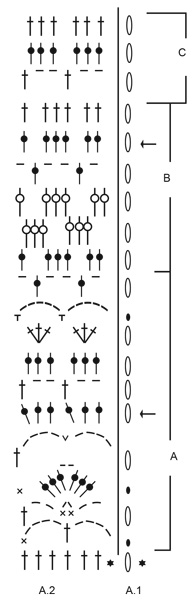
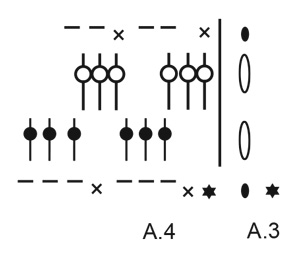
---------------------------------------------------------- TÉCNICAS USADAS: ---------------------------------------------------------- PONTO FANTASIA: Ver diagramas A.1 a A.4. DICA CROCHÉ: O diagrama A.1 mostra como começar e terminar as carreiras, e faz-se além de de A.2. O diagrama A.3 mostra como começar e terminar as carreiras, e faz-se além de de A.4. AUMENTOS (a intervalos regulares): Para calcular quando aumentar a intervalos regulares, contar o número total de pontos (por ex. 96 pontos) e dividi-lo pelo número de aumentos a fazer (por ex. 48) = 2. Ou seja, para aumentar neste exemplo, crochetar 2 pontos altos em cada 2.º ponto alto. ---------------------------------------------------------- A PEÇA COMEÇA AQUI: ---------------------------------------------------------- PULÔVER PONCHO – SUMÁRIO DA PEÇA: Crocheta-se em redondo de cima para baixo. As mangas crochetam-se em redondo, de cima para baixo. Terminar com a orla do decote, em redondo. ENCAIXE: Crochetar 112-119-126 pontos corrente com a agulha de croché 5 mm em Big Merino e fechar em redondo com 1 ponto baixíssimo no 1.º ponto corrente. Crochetar 3 pontos corrente, 1 ponto alto em cada um dos 6 primeiros pontos corrente, *saltar 1 ponto corrente, crochetar 1 ponto alto em cada um dos 6 pontos corrente seguintes*, repetir de * a * 15-16-17 vezes ao todo, terminar com 1 ponto baixíssimo no 3.º ponto corrente do princípio da carreira = 96-102-108 pontos altos + 3 pontos corrente. Crochetar então da seguinte maneira: Ver DICA CROCHÉ -, repetir 16-17-18 vezes A.2A ao todo em largura – na carreira com uma flecha, aumentar 48-54-60 pontos altos a intervalos regulares – ver AUMENTOS = 144-156-168 pontos altos. MANTER A MESMA TENSÃO DA INDICADA PARA A AMOSTRA! Temos, então, pontos suficientes para repetir 24-26-28 vezes A.2A em largura. Quando A.2A está terminado, crochetar A.2B por cima de A.2A – na carreira com uma flecha, aumentar 48-54-60 pontos altos a intervalos regulares = 192-210-228 pontos altos. Temos, então, pontos suficientes para repetir 32-35-38 vezes A.2B em largura. Quando A.2B está terminado, crochetar as 6 primeiras carreiras de A.2A por cima de A.2B – na carreira com uma flecha, aumentar 48-54-60 pontos altos a intervalos regulares = 240-264-288 pontos altos. Temos, então, pontos suficientes para repetir 40-44-48 vezes A.2A em largura. Continuar desta maneira até à 6.ª carreira de A.2A (= a carreira depois da flecha) = 80-88-96 aros. A peça mede cerca de 32 cm PARA TODOS OS TAMANHOS. Colocar 4 marcadores da seguinte maneira (sem crochetar): Colocar o primeiro marcador depois dos 13-15-16 primeiros aros (= metade das costas), colocar o segundo marcador depois dos 14-14-16 aros seguintes (= manga), o terceiro marcador depois dos 26-30-32 aros seguintes (= frente), e o quarto marcador depois dos 14-14-16 aros seguintes (= manga), restam 13-15-16 aros depois do último marcador (= metade das costas). Terminar , então, as costas/a frente e as mangas separadamente entre os marcadores. MEDIR A PEÇA A PARTIR DAQUI! COSTAS & FRENTE: = 52-60-64 aros. Continuar A.2A por cima destes pontos e, AO MESMO TEMPO, na primeira carreira, aumentar 24 pontos altos a intervalos regulares (Temos, então, pontos suficientes para repetir 30-34-36 vezes A.2A em largura) = 180-204-216 pontos altos. Quando A.2A está terminado, crochetar A.2B por cima de A.2A – na carreira com a flecha, aumentar 36-42-48 pontos altos a intervalos regulares = 216-246-264 pontos altos (Temos, então, pontos suficientes para repetir 36-41-44 vezes A.2B em largura). Quando A.2B está terminado, crochetar 0-1-2 vezes A.2C ao todo em altura por cima de A.2B. Cortar e entretecer o fio. A peça mede cerca de 14-18-22 cm a partir da separação. MANGAS: = 14-14-16 aros. Começando ao meio sob a manga, crochetar da seguinte maneira: Não esquecer DICA CROCHÉ, crochetar A.2A a partir da 7.ª carreira (= 7-7-8 vezes em largura), e crochetar até à 8.ª carreira. Repetir então mais 0-0-1 vez as carreiras 6 a 8. Cortar e entretecer o fio. A manga mede cerca de 3-3-7 cm a partir da separação. Crochetar a outra manga da mesma maneira. ORLA DO DECOTE: Crochetar à volta do decote da seguinte maneira – NOTA: Crochetar nos pontos corrente com um ponto alto, não nos pontos corrente saltados: começando a meio das costas, unir com 1 ponto baixíssimo num ponto alto, 1 ponto corrente, 1 ponto baixo no ponto alto seguinte, 3 pontos corrente, saltar 3-1-3 pontos altos, 1 ponto baixo no ponto alto seguinte, *3 pontos corrente, saltar 3 pontos altos, 1 ponto baixo no ponto alto seguinte*, repetir de * a * 22-24-25 vezes ao todo, 3 pontos corrente, saltar 3 pontos altos e terminar com 1 ponto baixíssimo no 1.º ponto corrente do princípio da carreira = 24-26-27 aros. Crochetar então A.4 em redondo – não esquecer DICA CROCHÉ. Quando A.4 está terminado, arrematar. |
||||||||||||||||||||||||||||||||||
Explicações do diagrama |
||||||||||||||||||||||||||||||||||
|
||||||||||||||||||||||||||||||||||
 |
||||||||||||||||||||||||||||||||||
 |
||||||||||||||||||||||||||||||||||
 |
||||||||||||||||||||||||||||||||||
Terminou este projecto?Então, identifique as suas fotos com as tags #dropspattern #mermaidshellponcho ou mostre-as na galeria #dropsfan. Precisa de ajuda para este modelo?Encontrará 11 turotiais em vídeo, uma rubrica Comentários/Perguntas e muito mais ao visitar a página do modelo em www.garnstudio.com © 1982-2026 DROPS Design A/S. Todos os direitos reservados. Este documento, incluuindo as suas su-secções, tem copyrights. Saia mais o que pode fazer com os nossos modelos no fim de cada uma das páginas do nosso site. |
||||||||||||||||||||||||||||||||||


Com mais de 40 anos no design de modelos de tricô e de croché, a DROPS Design oferece uma das mais vastas colecções demodelos gratuitos na Internet - traduzidos em 17 línguas. Neste dia de hoje, temos 324 catálogos e 12290 modelos - dos quais 12271 estão traduzidos em português.
Trabalhamos com muito empenho para lhe proporcionar o melhor que o tricô e o croché têm para oferecer, para lhe fornecer inspiração e conselhos bem como fios da mais elevada qualidade a preços incríveis! Gostaria de usar os nossos modelos para outros fins que não uso pessoal? Pode ler o que lhe é permitido fazer no Copyright texto que se encontra na parte de baixo de todos os nossos modelos. Bom tricô! Bom croché!
Deixe um comentário acerca do modelo DROPS 199-35
Gostaríamos muito de saber o que tem a dizer-nos acerca deste modelo!
Se deixar uma pergunta acerca do modelo, certifique-se de que escolhe a categoria adequada no formulário abaixo para acelerar o processo relativo à resposta. Os campos obrigatórios estão assinalados com um *.