
Categorias populares
Procura um fio?


Comentários / Perguntas (93)
![]() Emiliep escreveu:
Emiliep escreveu:
Je veux dire que je pense que le diagramme est faux car à partir du 10 ème rang on a plus que 6 rangs à faire en A1a alors qu'il y a 7 lignes d'ajourés au centre pour arriver à 9 arceaux ?
20.05.2018 - 22:14DROPS Design respondeu:
Bonjour Emiliep, au dernier rang de A.1a, on crochète le 17ème symbole (carré dans la légende, mais rectangle dans le diagramme). Bon crochet!
22.05.2018 - 08:48
![]() Emiliep escreveu:
Emiliep escreveu:
Je dis ça car à compter du rang 10 il reste 6 rang à faire pour 10 motifs centraux ?
20.05.2018 - 21:54
![]() Emiliep escreveu:
Emiliep escreveu:
Bonjour, le diagramme est A1b est faux, non ? il comporte une ligne de plus que le A1a sur les motifs centraux ?
20.05.2018 - 21:46DROPS Design respondeu:
Bonjour Emiliep, je compte bien 16 rangs pour A.1b et autant pour A.1a. Bon crochet!
22.05.2018 - 08:46Nourhan Osama escreveu:
Continue A.3 in the round (repeat the 9 rounds vertically) until square measures 68-70-72-74-76-78 cm in the part of jacket , do you mean about vertically that i work in 2 corner back and forth OR in the 4 corner like before ?thanks and sorry for more question
15.05.2018 - 07:55DROPS Design respondeu:
Dear Mrs Osama, you continue working A.3, ie you repeat the 9 rows in A.3 (= in height) over all sts in the round until square measures 68-70-72-74-76-78 cm x 68-70-72-74-76-78 cm. Happy crocheting!
15.05.2018 - 09:41Nourhan Osama escreveu:
I am sorry , but i don't understand about the measures ,, like the first in Jacket ( When entire diagram A.2a and A.2b have been worked, square measures approx. 36 x 36 cm / 14 1/4" x 14 1/4''.) what this numbers /14 1/4" * 14 1/4" is refers to ?
14.05.2018 - 06:33DROPS Design respondeu:
Hi Nourham, The first measurement (36 x 36) is in centimetres, the second measurement (14 1/4 x 14 1/4) is in inches. Happy crocheting!
14.05.2018 - 08:09Nourhan Osama escreveu:
In round 17 you begin with a rectangle 4 chain stitches but i don't see it in the picture of jacket you are done,, can i dispensing this rectangle ??
07.05.2018 - 10:21DROPS Design respondeu:
Dear Mrs Osama, this is the 17th symbol under diagram text (which looks like a square there), ie: round begins with 4 chain stitches and finishes with 1 slip stitch in 4th chain stitch at beginning of round Fasten off. Begin next round around chain space between the last treble group worked - fasten yarn with 1 slip stitch in chain space. Happy crocheting!
07.05.2018 - 10:48
![]() Mary Houlihan escreveu:
Mary Houlihan escreveu:
Would you say this pattern is only for the ‘experienced’ crocheter?
05.05.2018 - 02:22DROPS Design respondeu:
Dear Mary, I would say this is for the intermediate. As it appears to be complicated, and there are a number of stitches and stitch combinations to follow, and you have to be able to read the chart. However the chart you help you visually what stitch / stitch combination goes where, and the most complicated stitch is a triple trble, and two trebles worked together. There are turtorials to help you (links on the left, just below the picture, and do not forget, you can always ask for help on person in the store you bought your DROPS yarn from. Happy Crafting!
06.05.2018 - 08:57
![]() Evelyne escreveu:
Evelyne escreveu:
Bonjour j'essaie desperement de faire ce modèle et pour une novice comme moi je ne parviens pas à comprendre le diagramme existe t'il des explications plus détaillées? Merci pour votre réponse
03.05.2018 - 16:10DROPS Design respondeu:
Bonjour Evelyne, n 'hésitez pas à poser vos questions ici, ou, pour toute aide complémentaire individuelle, merci de contacter le magasin où vous avez acheté votre fil. Bon tricot!
04.05.2018 - 08:27
![]() Sue Towler escreveu:
Sue Towler escreveu:
Hi,I\'m really confused with your chart. I have 16 stitches after round 3, but your symbol says I should have 14? Also, why is there a space between the treble stitches on round 4? You have 3 then a big gap before making 11 more. It doesn\\\'t look like the crochet charts I\\\'m used to.
02.05.2018 - 18:28DROPS Design respondeu:
Dear Mrs Towler, at the end of row 3 you should have *5 ch, 11 tr in the ch-space and 3 tr in 4-ch-space* x 4. (= 4 repeats of A.1) + the 3 ch from beg of round. There are some gaps in the chart due to the placement of symbols, simply follow symbols in diagram as they appear. For any individual assistance reading diagrams, you are welcome to contact the store where you bought your yarn. Happy crocheting!
03.05.2018 - 09:05Nourhan Osama escreveu:
My queastion about the step between 5th and 6th round .....in th 5th round in figure A.1b i will make 3 chains 12 times between every single crochet in stitches ,, but do i make 3 chain then slip stitch it or make single crochet ? and Then i finish it,,and go above the 5 chain stitches do i make slip stitches in it also or make 5 chain st ?
28.04.2018 - 22:28DROPS Design respondeu:
Dear Mrs Osama, on round 5 you repeat only 11 times (1 sc, 3 ch), then work 1 sc in last ch-space and work now 5 ch and repeat round from beg: (1 sc, 3 ch) x 11, 1 sc in last ch-space, 5 ch. At the end of round, after the last 5 ch, work 1 sl st in 1st ch from beg of round, then work sl st to the first ch-space (as at the beg of round 4). Happy crocheting!
30.04.2018 - 10:24
|
|||||||||||||||||||||||||||||||||||||||||||||||||||||||||||||||||||||||||||||||||||||
Butterfly Queen#butterflyqueenjacket |
|||||||||||||||||||||||||||||||||||||||||||||||||||||||||||||||||||||||||||||||||||||
 |
 |
||||||||||||||||||||||||||||||||||||||||||||||||||||||||||||||||||||||||||||||||||||
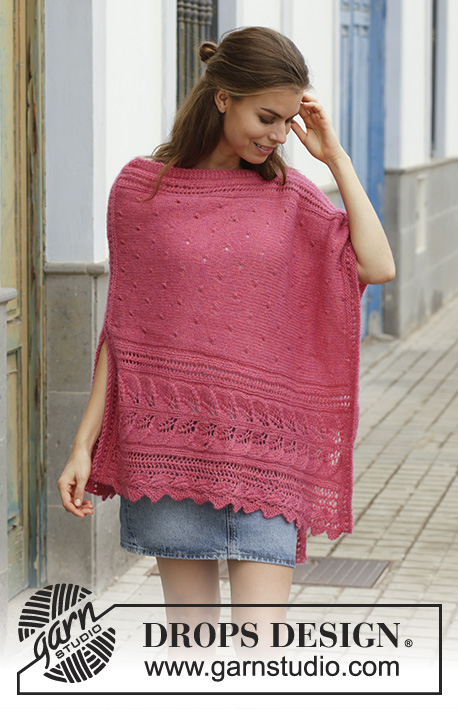
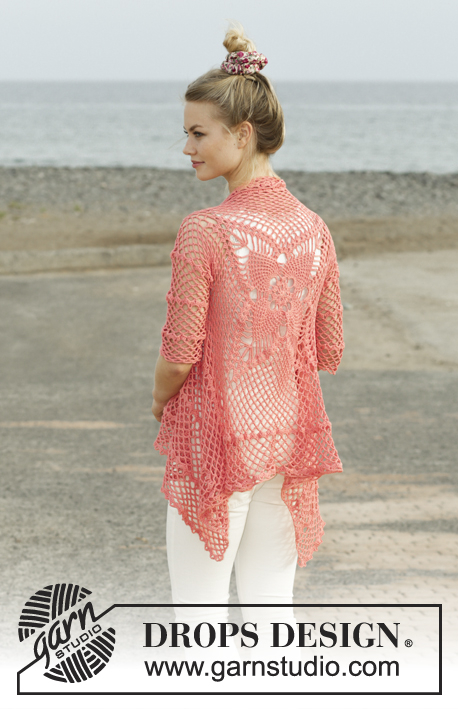
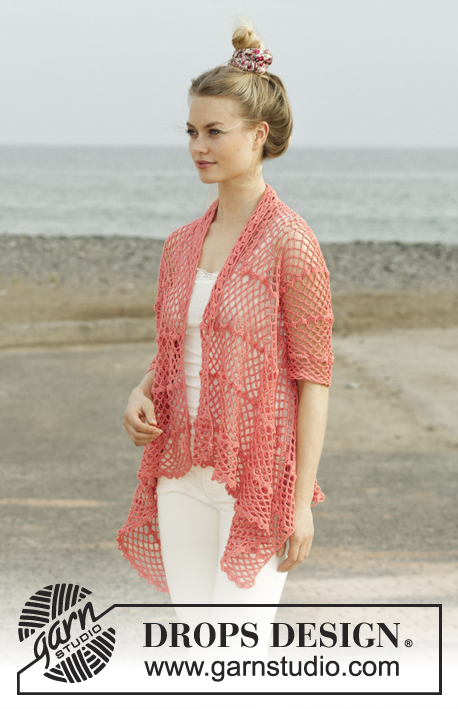
Casaco crochetado em forma de quadrado, com ponto rendado, em DROPS Flora. Do S ao XXXL
DROPS 186-11 |
|||||||||||||||||||||||||||||||||||||||||||||||||||||||||||||||||||||||||||||||||||||
|
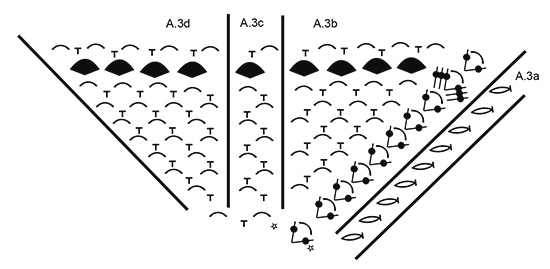
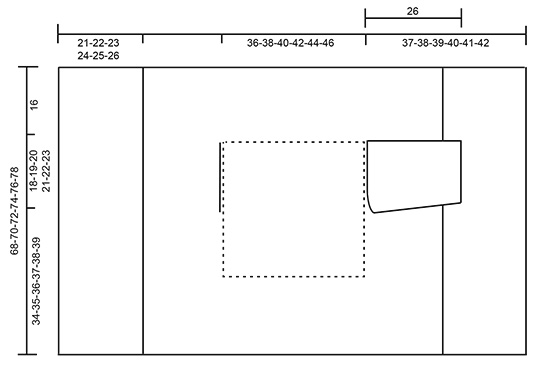
---------------------------------------------------------- TÉCNICAS USADAS PONTO FANTASIA: Ver diagramas A.1 a A.4. DICA CROCHÉ (A.4): Substituir o 1.º ponto baixo do princípio da carreira por 1 ponto corrente. Substituir o 1.º ponto alto triplo do princípio da carreira por 5 pontos corrente. DIMINUIÇÕES (meio sob as mangas): Crochetar 5 pontos corrente, saltar 1 ponto baixo + 1 aro, crochetar 1 ponto baixo à volta do aro seguinte + 1 aro (= diminuiu-se 1 motivo), continuar como antes até restar 1 aro + 1 ponto baixo da carreira precedente, saltar estes pontos e terminar com 1 ponto alto duplo no 1.º ponto corrente do princípio da carreira precedente (= diminuiu-se 1 motivo). ---------------------------------------------------------- CASACO: Crocheta-se em redondo, a partir do meio da parte de trás, em forma de quadrado. Crochetar então as frentes separadamente, em idas e voltas. As mangas crochetam-se em idas e voltas a partir das cavas, com uma costura. Crochetar 4 pontos corrente com a agulha de croché 3.5 mm em Flora e fechar em redondo com 1 ponto baixíssimo no 1.º ponto corrente. Crochetar então em redondo, seguindo o diagrama 4 vezes A.1b ao todo em toda a carreira - O diagrama A.1a mostra como começar e terminar as carreiras e faz-se além de de A.1b. MANTER A MESMA TENSÃO DA INDICADA PARA A AMOSTRA! Quando os diagramas A.1a e A.1b estão feitos, cortar o fio e começar a carreira seguinte à volta do aro do último grupo de pontos altos com 1 ponto baixíssimo nesse aro. Crochetar , então, em redondo, seguindo o diagrama A.2 da seguinte maneira: *A.2b, repetir 6 vezes A.2c em largura ao todo, A.2d*, repetir de * a * 4 vezes ao todo em toda a carreira – O diagrama A.2a mostra como começar e terminar as carreiras e faz-se além de de A.2b/c/d. Quando A.2a e A.2b tiverem sido crochetados 1 vez em altura, o quadrado mede cerca de 36 x 36 cm. Temos , então, um aro (1 ponto alto + 6 pontos corrente + 1 ponto alto) em cada um das 4 cantos e 14 aros ao longo de cada um dos lados do quadrado. LER A CONTINUAÇÃO ANTES DE CONTINUAR! Continuar da seguinte maneira: * Crochetar A.3b à volta do aro do canto, repetir A.3c até restar 1 aro antes do canto, crochetar A.3d à volta do aro seguinte*, repetir de * a * 4 vezes ao todo em toda a carreira – O diagrama A.3a mostra como começar e terminar as carreiras e faz-se além de de A.3b/c/d. AO MESMO TEMPO, quando a peça medir cerca de 36-38-40-42-44-46 cm x 36-38-40-42-44-46 cm, formar as cavas da seguinte maneira: Crochetar A.3 como antes até ao 1.º canto, crochetar à volta do aro como antes, crochetar , então, pontos corrente até ao meio da lado seguinte (ou seja, entre o 1.º e o 2.º canto) da seguinte maneira: Crochetar 1 ponto corrente para cada ponto corrente/ponto baixo saltado. Continuar então como antes até ao meio da lado, entre o 3.º e o 4.º canto. Crochetar, então, pontos corrente até ao 4.º canto da seguinte maneira: 1 ponto corrente para cada ponto corrente/ponto baixo saltadp, crochetar à volta do aro do canto e terminar a carreira como antes. Na carreira seguinte, crochetar A.3 como antes por cima de todos os pontos novamente (ou seja, ajustar o motivo por cima das cavas para que esta carreira fique bem). Continuar A.3 em redondo (repetir as 9 carreiras em altura) até o quadrado medir 68-70-72-74-76-78 cm x 68-70-72-74-76-78 cm (ou seja, cerca de 16 cm a partir das cavas PARA TODOS OS TAMANHOS) – Ajustar a altura para arrematar depois de uma carreira de grupos de pontos altos. Cortar o fio e colocar 1 marcador (entre o 1.º e o 2.º canto). FRENTES: Crochetar, então, em idas e voltas entre o 1.º e o 2.º canto. NOTA! Crochetar as frentes sem aumentar. Ver DICA CROCHÉ! Crochetar A.4a à volta do canto, repetir A.4b até restar 1 aro antes do canto, crochetar A.4c à volta desse aro e à volta do canto. Continuar como indicado no diagrama e repetir A.4 em altura até a carreira com os grupos de pontos altos ter sido crochetada 2 vezes ao todo em altura, depois, repetir apenas as carreiras de aros até a peça medir cerca de 19-20-21-22-23-24 cm a partir do marcador, crochetar então 1 vez a carreira de grupos de pontos altos para todos os tamanhos. A peça mede 21-22-23-24-25-26 cm a partir do marcador. Arrematar. Crochetar a outra frente da mesma maneira (ou seja, crochetar em idas e voltas entre o 3.º e o 4.º canto). MANGAS: Crochetam-se de cima para baixo, diretamente a partir das cavas, em idas e voltas, com uma costura no fim. Começando a meio sob a manga, crochetar da seguinte maneira: Não esquecer DICA CROCHÉ! A.4a à volta do 1.º aro, repetir 15-16-17-18-19-20 vezes A.4b em largura ao todo (Ajustar a altura para distribuir A.4b a intervalos regulares ao longo da cava, ou seja, crochetar quer 2 aros à volta do mesmo aro, quer saltar 1 aro), crochetar A.4c à volta dos 2 últimos aros. Continuar A.4 em idas e voltas – AO MESMO TEMPO, quando a peça medir 4 cm (Ajustar a altura para crochetar a carreira seguinte em pontos corrente/pontos baixos) diminuir 1 motivo de cada lado da peça – ver DIMINUIÇÕES. Diminuir desta maneira 3-3-3-4-4-4 vezes ao todo a cada 8-8-8-6-6-6 cm cerca de = 12-13-14-15-16-17 aros de 6 pontos depois da última diminuição. Continuar até a peça medir cerca de 28 cm PARA TODOS OS TAMANHOS - arrematar depois de uma carreira de aros. Arrematar. Crochetar a outra manga da mesma maneira do outro lado. MONTAGEM: Fazer a costura sob as mangas, na alça mais exterior dos pontos tendo cuidado para que não franza a peça. |
|||||||||||||||||||||||||||||||||||||||||||||||||||||||||||||||||||||||||||||||||||||
Explicações do diagrama |
|||||||||||||||||||||||||||||||||||||||||||||||||||||||||||||||||||||||||||||||||||||
|
|||||||||||||||||||||||||||||||||||||||||||||||||||||||||||||||||||||||||||||||||||||
 |
|||||||||||||||||||||||||||||||||||||||||||||||||||||||||||||||||||||||||||||||||||||
 |
|||||||||||||||||||||||||||||||||||||||||||||||||||||||||||||||||||||||||||||||||||||
 |
|||||||||||||||||||||||||||||||||||||||||||||||||||||||||||||||||||||||||||||||||||||
 |
|||||||||||||||||||||||||||||||||||||||||||||||||||||||||||||||||||||||||||||||||||||
Terminou este projecto?Então, identifique as suas fotos com as tags #dropspattern #butterflyqueenjacket ou mostre-as na galeria #dropsfan. Precisa de ajuda para este modelo?Encontrará 12 turotiais em vídeo, uma rubrica Comentários/Perguntas e muito mais ao visitar a página do modelo em www.garnstudio.com © 1982-2026 DROPS Design A/S. Todos os direitos reservados. Este documento, incluuindo as suas su-secções, tem copyrights. Saia mais o que pode fazer com os nossos modelos no fim de cada uma das páginas do nosso site. |
|||||||||||||||||||||||||||||||||||||||||||||||||||||||||||||||||||||||||||||||||||||


Com mais de 40 anos no design de modelos de tricô e de croché, a DROPS Design oferece uma das mais vastas colecções demodelos gratuitos na Internet - traduzidos em 17 línguas. Neste dia de hoje, temos 325 catálogos e 12298 modelos - dos quais 12279 estão traduzidos em português.
Trabalhamos com muito empenho para lhe proporcionar o melhor que o tricô e o croché têm para oferecer, para lhe fornecer inspiração e conselhos bem como fios da mais elevada qualidade a preços incríveis! Gostaria de usar os nossos modelos para outros fins que não uso pessoal? Pode ler o que lhe é permitido fazer no Copyright texto que se encontra na parte de baixo de todos os nossos modelos. Bom tricô! Bom croché!
Deixe um comentário acerca do modelo DROPS 186-11
Gostaríamos muito de saber o que tem a dizer-nos acerca deste modelo!
Se deixar uma pergunta acerca do modelo, certifique-se de que escolhe a categoria adequada no formulário abaixo para acelerar o processo relativo à resposta. Os campos obrigatórios estão assinalados com um *.