
Categorias populares
Procura um fio?


Comentários / Perguntas (57)
![]() Michelle escreveu:
Michelle escreveu:
Bonjour. Ce modèle m interesse... j aimerais savoir si dans le dos vu qu il n y a pas de photo du dos. il y a de la dentelle ou est ce du jersey? merci 😁😁
25.09.2020 - 13:13DROPS Design respondeu:
Bonjour Michelle, le point fantaisie ajouré est le même dans le dos que devant. Bon tricot!
25.09.2020 - 14:38
![]() Richard escreveu:
Richard escreveu:
HELP! I am in need of 3 x 50g balls of 'Drops Cotton Merino' - Colour 17- Dye Lot 52848. Any help or suggestions, gratefully received. Also, If I make a hat using Cotton Merino, but the pattern calls for 'Fingering Merino' will it make much difference?? Thank you. Richard.
27.01.2020 - 13:12DROPS Design respondeu:
Dear Richard, please contact your DROPS store (and more stores if necessary) or even our DROPS Workshop - CottonMerino is a 8 ply/Dk/Worsted yarn - see shadecard - see here all patterns you can use for Cotton Merino. Happy knitting!
27.01.2020 - 14:24
![]() Richard escreveu:
Richard escreveu:
Sorry, the last comment should read with "I placed the marker to the side (on my RIGHT)!" Thanks.
24.01.2020 - 15:28
![]() Richard escreveu:
Richard escreveu:
Hi, Thanks for your replies & I've mastered the difficult start - as you say, with double-pointed needles. The raglan decreasing is another matter. As I look at the sleeve (to my left), I have placed a marker on the stitch nearest to the side. I have then placed another marker on the 1st stitch of the side (which is to my left). Now, you say to start 3 stitches before this marker- yes? Where to I start on the sleeve decrease, please.
24.01.2020 - 15:25DROPS Design respondeu:
Dear Richard, you should have 1 marker between each piece; so if you look at the sleeve, there is 1 marker at the end of body (either back or front piece) = before the first stitch on sleeve and 1 marker at the end of sleeve, after the last stitch on sleeve = before the first stitch on front/back piece. Start 3 sts before the first of these 2 markers, K2 tog, = 1 stitch remain before marker, work this stitch + the next st (= first after marker) and dec = there are 2 sts decreased at the marker and K2 between the dec (with marker in the middle of these K2). Repeat at each marker. Happy knitting!
24.01.2020 - 16:04
![]() Richard escreveu:
Richard escreveu:
Hi, once more. I've placed markers at the sleeves & sides & now trying to knit the raglan decreases! I understand the pattern for instructions for the sides, but starting 3 stitches before the marker (does this include the marker), I end up, after the decrease, taking the first stitch of the sleeve. Your assistance once again would be very much appreciated. Thank you. Richard.
24.01.2020 - 12:29DROPS Design respondeu:
Dear Richard, there should be 1 stitch on each side of marker on each piece between the raglan decreases, ie you will work at each transition: K2 tog (1 dec), K2 (= Knit the stitch before marker + the stitch after marker), slip 1 as if to K, K1, psso. So starting at the transition between back and one sleeve, you will start (and end) round with K1, Hope it helps, Happy knitting!
24.01.2020 - 14:23
![]() Richard escreveu:
Richard escreveu:
Good morning. I have completed the body & both sleeves. But now that I have joined them on one needle, I find that when trying to knit the sleeves, the stitches are stretched (almost impossible to do)! I've had to use double-pointed needles to help me out! I don't remember having this trouble when I made the first one of this pattern (in size medium). Please can you help. Thanks. Richard.
24.01.2020 - 10:15DROPS Design respondeu:
Dear Richard, that's right, the first few rounds at the beginning of yoke can be somewhat tricky, you can use the double pointed needles or circular needles if you like to, after few rounds, all stitches will have enough place on the circular needle to work them on the round. Happy knitting!
24.01.2020 - 14:08
![]() Richard escreveu:
Richard escreveu:
Thank you for the reply to my question. I sent a sketch via email, showing how I was knitting the round. So, from what you are saying, I have to knit A1 (1st row), (only for the complete round)! Then for the next round, I have to knit A1 (2nd row), for the complete round! Then 3rd row, 4th row & so on.... This makes sense. Please can you confirm this for me.. Thanks a million. Richard.
13.01.2020 - 20:17DROPS Design respondeu:
Dear Richard, that's how you should work the diagrams (row 1 in A.1 on all diagrams, then row 2 in A.1 on all diagrams and so on). Happy knitting!
14.01.2020 - 07:50
![]() Richard escreveu:
Richard escreveu:
Good morning, again. Continuing from the two Ridge rows, I began the round, as per your instructions. But, I find that the *A1* pattern, repeats 3 times (2 with odd row numbers, 1 even row number. in the first half, up to 124 stitches. But for the continuing *A1* pattern, there is only 1 odd number row! But, there are 2 even row numbers! Is this so? Please. Richard. I have made a drawing which explains better. If I may upload it.
13.01.2020 - 11:03DROPS Design respondeu:
Dear Richard, not sure I'm getting this properly, when working A.1 in the round, you should work same round in each diagram all the round = round 1 A.1 when working round 1 on yoke, then work round 2 in A.1 and so on. What do I misunderstand?
13.01.2020 - 11:34
![]() Richard escreveu:
Richard escreveu:
Sadly, (Hi again). I'm still struggling after completing the two ridges! It is written that I knit 20, purl 3 (23 stitches), then *A1 (22 stitches, purl 6! (A1 = 10 rows @22 stitches) = 220 stitches. But adding the first 23 stitches to the 220 stitches = 243 stitches? Yet it is written, that I then purl 6! Doing this gives a total of 249 stitches! What am I doing wrong please? Forgive me, I am nearly 78 years old. Have a good day.
09.01.2020 - 12:22DROPS Design respondeu:
Dear Richard, you should work the 248 sts in size L as follows: knit 20, purl 3, *A.1 (= 22 sts), purl 6*, repeat from *-* a total of 2 times (= 28 sts x 2= 56 sts), A.1 (= 22 sts), purl 3, knit 40 , purl 3, repeat from *-* (= 56 sts), A.1 (= 22 sts), purl 3, knit 20 = 20+3 + 56+22 + 3+40+3 + 56+22 +3+20=248 sts. Try to add markers between each section, it can help you to check the number of stitches. Happy knitting!
09.01.2020 - 14:07
![]() Richard escreveu:
Richard escreveu:
Hi (once again). This should be the last for awhile. I understand the A1 block now, working from the bottom up! But, please tell me: Do I follow the pattern from left to right or right to left?? I ask this, because, I am reading the block from right to left! I don't believe it makes much difference (but, there again, you are the Expert). Thank you. Richard.
07.01.2020 - 22:07DROPS Design respondeu:
Dear Richard, diagrams are read bottom up starting from the right corner to the left, ie you will read every row in diagrams from the right towards the left (since you are working in the round) - read more about diagrams here (link is now working). Happy knitting!
08.01.2020 - 09:04
|
|||||||||||||||||||
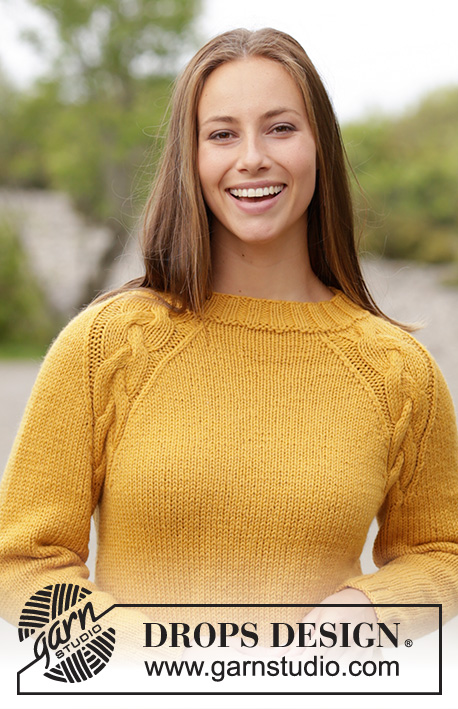
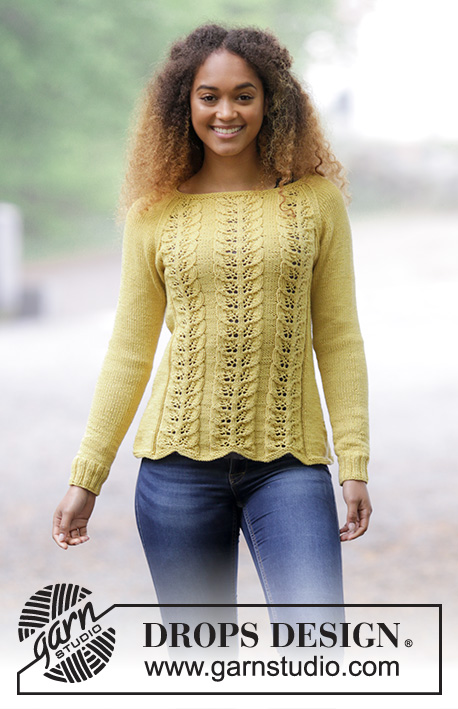
Lemon Parfait#lemonparfaitsweater |
|||||||||||||||||||
 |
 |
||||||||||||||||||
Pulôver raglan com ponto de folhas. Do S ao XXXL. Tricota-se em DROPS Cotton Merino.
DROPS 180-1 |
|||||||||||||||||||
|
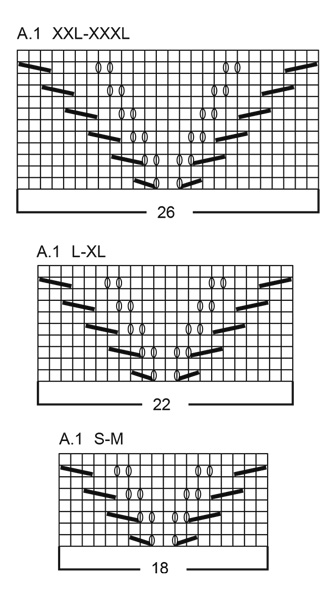
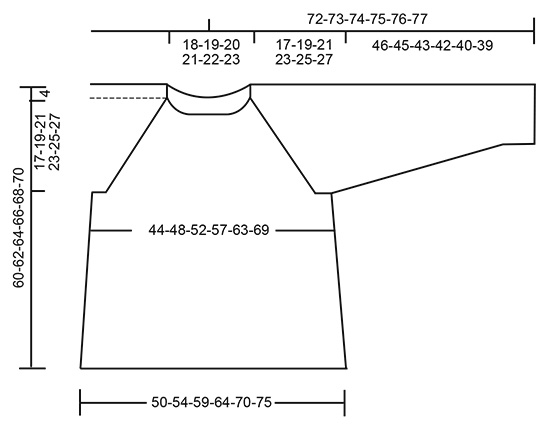
---------------------------------------------------------- TÉCNICAS USADAS: PONTO JARRETEIRA (em redondo): 1 barra jarreteira = 2 carreiras. Tricotar 1 volta meia e 1 volta liga. PONTO FANTASIA: Ver diagrama A.1. Ver diagrama indicado para cada tamanho. DIMINUIÇÕES (lados): Começando 3 malhas antes do fio marcador no lado, tricotar 2 malhas juntamente em meia, 2 malhas meia (o fio marcador fica entre estas 2 malhas), deslizar 1 malha em meia, 1 malha meia, passar a malha deslizada por cima da malha tricotada. AUMENTOS: Aumentar desta maneira a meio sob a manga – começando 1 malha antes do fio marcador: Fazer 1 laçada, tricotar 2 malhas meia (o fio marcador fica entre estas 2 malhas), 1 laçada. Na carreira seguinte, tricotar as laçadas torcidas em meia para evitar buracos. RAGLAN: Vai-se diminuir 2 malhas a cada transição entre as costas/a frente e as mangas. Começando 3 malhas antes do fio marcador: Tricotar 2 malhas juntamente em meia, 2 malhas meia (o fio marcador fica entre estas 2 malhas), deslizar 1 malha em meia, 1 malha meia, passar a malha deslizada por cima da malha tricotada. DICA TRICÔ: Se sua tensão não corresponder em altura e o tricô estiver apertado, o encaixe será demasiado curto e as cavas demasiado estreitas. Pode-se ajustar a altura tricotando uma carreira suplementar sem diminuições a intervalos regulares entre as diminuições. ---------------------------------------------------------- COSTAS & FRENTE: Tricotam-se em redondo na agulha circular, de cima para baixo. Montar 212-228-248-268-292-316 malhas com a agulha circular 4 mm em Cotton Merino. Tricotar 2 BARRAS JARRETEIRA – ver acima. Continuar da seguinte maneira: 17-21-20-25-25-31 malhas meia, 3 malhas liga, *A.1 (= 18-18-22-22-26-26 malhas), 6 malhas liga*, repetir de * a * 2 vezes ao todo, A.1, 3 malhas liga, 34-42-40-50-50-62, 3 malhas liga, *A.1, 6 malhas liga*, repetir de * a * 2 vezes ao todo, A.1, 3 malhas liga, 17-21-20-25-25-31 malha meia. Colocar 1 fio marcador no princípio da carreira e 1 depois de 106-114-124-134-146-158 malhas = lados. Continuar desta maneira. MANTER A MESMA TENSÃO DA INDICADA PARA A AMOSTRA! Quando a peça medir 8 cm, diminuir 1 malha de cada lado dos fios marcadores dos lados (= diminui-se 4 malhas) – VER DIMINUIÇÕES! Diminuir 7 vezes ao todo a cada 4½ cm para todos os tamanhos = 184-200-220-240-264-288 malhas. Quando a peça medir 39-39-39-39-39-39 cm, arrematar 8-8-10-10-12-14 malhas de cada lado da peça (= 4-4-5-5-6-7 malhas de cada lado dos fios marcadores). Temos, então, 84-92-100-110-120-130 malhas para as costas e para a frente. Colocar em espera e tricotar as mangas. MANGAS: Tricotam-se em redondo com as agulhas de pontas duplas. Continuar com a pequena agulha circular quando malhas suficientes tiverem sido aumentadas. Montar 48-52-56-56-60-64 malhas com as agulhas de pontas duplas 3,5 mm em Cotton Merino. Tricotar 1 volta meia, depois, em canelado 2 malhas meia/ 2 malhas liga. Quando a peça medir 6 cm, continuar com as agulhas de pontas duplas 4 mm e tricotar 1 volta meia diminuindo 4-6-8-6-8-10 malhas a intervalos regulares = 44-46-48-50-52-54 malhas. Colocar 1 marcador no princípio da carreira (= meio sob a manga). Continuar em ponto meia. Quando a peça medir 10-7-7-10-7-7 cm aumentar 2 malhas a meio sob a manga – VER AUMENTOS. Aumentar 12-15-18-19-20-21 vezes ao todo a cada 3-2½-2-1½-1½-1½ cm = 68-76-84-88-92-96 malhas. Quando a peça medir 46-45-43-42-40-39 cm (mais curto nos tamanhos grandes porque o encaixe é mais comprido), arrematar as 8-8-10-10-12-14 malhas a meio sob a manga = 60-68-74-78-80-82 malhas. Colocar em espera e tricotar a outra manga. ENCAIXE: Colocar as mangas na mesma agulha circular que as costas e a frente, por cima das malhas arrematadas para as cavas = 288-320-348-376-400-424 malhas. Colocar um fio marcador a cada transição entre as costas, a frente e as mangas (= 4 fios marcadores). Continuar como antes e diminuir para o RAGLAN – ver acima. Diminuir 5-5-6-6-6-7 vezes a cada 4 carreiras, depois, 14-16-18-21-23-24 vezes a cada 2 carreiras = 19-21-24-27-29-31 vezes ao todo - as malhas de A.1 que não se enquadram no diagrama quando fizer as diminuições devem ser tricotadas em ponto meia. Quando todas as diminuições estiverem feitas, restam 136-152-156-160-168-176 malhas. Tricotar 2 barras jarreteira em todas as malhas, mas, na primeira carreira, tricotar juntamente em meia, 2 a 2, as 22-26-26-24-22-20 malhas de cada manga, e diminuir mais 18-28-26-28-34-40 malhas a intervalos regulares = 96-98-104-108-112-116 malhas. Arrematar com tricotar em meia. MONTAGEM: Fechar a abertura sob as mangas com uma costura. |
|||||||||||||||||||
Explicações do diagrama |
|||||||||||||||||||
|
|||||||||||||||||||
 |
|||||||||||||||||||
 |
|||||||||||||||||||
Terminou este projecto?Então, identifique as suas fotos com as tags #dropspattern #lemonparfaitsweater ou mostre-as na galeria #dropsfan. Precisa de ajuda para este modelo?Encontrará 27 turotiais em vídeo, uma rubrica Comentários/Perguntas e muito mais ao visitar a página do modelo em www.garnstudio.com © 1982-2026 DROPS Design A/S. Todos os direitos reservados. Este documento, incluuindo as suas su-secções, tem copyrights. Saia mais o que pode fazer com os nossos modelos no fim de cada uma das páginas do nosso site. |
|||||||||||||||||||


Com mais de 40 anos no design de modelos de tricô e de croché, a DROPS Design oferece uma das mais vastas colecções demodelos gratuitos na Internet - traduzidos em 17 línguas. Neste dia de hoje, temos 324 catálogos e 12291 modelos - dos quais 12272 estão traduzidos em português.
Trabalhamos com muito empenho para lhe proporcionar o melhor que o tricô e o croché têm para oferecer, para lhe fornecer inspiração e conselhos bem como fios da mais elevada qualidade a preços incríveis! Gostaria de usar os nossos modelos para outros fins que não uso pessoal? Pode ler o que lhe é permitido fazer no Copyright texto que se encontra na parte de baixo de todos os nossos modelos. Bom tricô! Bom croché!
Deixe um comentário acerca do modelo DROPS 180-1
Gostaríamos muito de saber o que tem a dizer-nos acerca deste modelo!
Se deixar uma pergunta acerca do modelo, certifique-se de que escolhe a categoria adequada no formulário abaixo para acelerar o processo relativo à resposta. Os campos obrigatórios estão assinalados com um *.