
Categorias populares
Procura um fio?


Comentários / Perguntas (99)
![]() Yannick escreveu:
Yannick escreveu:
Bonjour (modèle petronella top - laine muskat) je ne comprends pas comment faire les augmentations du raglan en même temps que le motif A1 merci de m'expliquer - en effet je fais un jeté une maille endroit - une maille endroit et un jeté pour le motif A1 de la manche - comment puis-je alors faire une augmentation pour le raglan ?
24.08.2017 - 09:47DROPS Design respondeu:
Bonjour Yannick, vous n'allez pas augmenter pour le devant/le dos et les manches en même temps, par ex en taille S, on augmente 12x tous les 2 tours et 7x tous les 4 tours pour le devant/le dos mais 18x tous les 2 tours et 4 x tous les 4 tours pour les manches. Ainsi, les 12 premières augmentations seront sur chaque pièce (= manches + dos/devant), mais par la suite, vous augmenterez soit uniquement sur les manches (4 augm par tour), soit partout (8 augm par tour). Comment augmenter mailles pour le reglan tandis que l’on fait le schemat A.1 sur les manches, consulter la partie apres les fournitures entitulee REGLAN. Bon tricot!
24.08.2017 - 09:58Genevieve escreveu:
Hi. I've read some of the questions and answers and have figured out the pattern and increases. 😉
16.08.2017 - 04:06Genevieve escreveu:
And for chart A.2, for the 2nd row of k2together followed by 1 yarn over, for the increase round, I've started with marker thread, k1, yarn over followed by k2together, yarn over (8 times) and left with 1 stitch. Which means after the pattern yo, I yarn over again followed by k1 marker thread?
14.08.2017 - 07:24Genevieve escreveu:
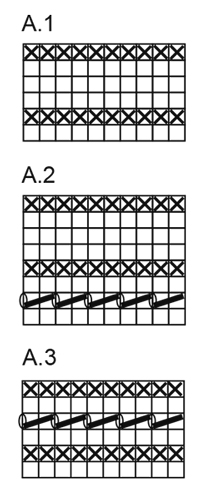
I don't quite get the instruction for chart A.1 and A.2. I'm knitting for S size and I need to do the increase for sleeves 23 times. I worked chart A.1 1 time in height is 6 rows and chart A.2 in height is 8 rows. After that do I just knit all around till I reached the 23rd increases? Or I continue with A.2?
14.08.2017 - 00:46DROPS Design respondeu:
Hello Genevieve. You continue working A.2 during all the increases. Please remember that after the next to last increase on the sleeve (there are 4 rounds left), you must work the stitches on each sleeve in garter stitch. Happy knitting!
20.08.2017 - 18:08Genevieve escreveu:
I'm now at the beginning raglan increase and I'm stuck on the sleeves increase instruction. I've started with knit till 1 stitch before 1st marker thread, I've also made the yarn over, knit 1 and marker thread. After that I'll follow A.1 which is purl 10 for sleeves? If yes, how do I increase stitches on the sleeves now?
12.08.2017 - 06:39DROPS Design respondeu:
Hi Genevieve, You also need to increase after the marker - Knit 1, 1 yarn over. Do the same at all markers and you will have increases to raglan both on body and sleeves. On the next round knit all yarn overs so that you get holes. Happy knitting!
12.08.2017 - 07:57Genevieve escreveu:
Hi. I've just increased the stitches after the 4th round from the beginning. Do I knit 1 round followed by Raglan increase since the Raglan increase is from 2nd round onwards?
10.08.2017 - 17:44DROPS Design respondeu:
Hi Genevieve, Yes you knit 1 round between each round with increases to raglan on the body. On the sleeves you are increasing every 2nd round, but are working A.2 (while increasing alternate rounds). I hope this helps and happy knitting!
11.08.2017 - 07:10
![]() Bodil Jensen escreveu:
Bodil Jensen escreveu:
Ang. de 20 masker der skal tages ud i halsen. Er det korrekt at der skal tages ud på pind. 4 - dvs. en vrang pind, der efterfølges af ret (første raglan pind)? Hviken teknink tages der ud med? - Jeg har prøvet forskellige og udtagningerne blev desværre meget tydelige på næste pind. Mvh Bodil
29.07.2017 - 10:13DROPS Design respondeu:
Hej Bodil, ja du tager ud på 4.omgang som er vrang, her strikker du 2 vrang i samme maske, 1 i forreste maskeled og 1 i bagerste maskeled. God fornøjelse!
17.08.2017 - 15:48
![]() Virginia escreveu:
Virginia escreveu:
I think my question was not well put. What I see now for RAGLAN increases is that you do one height of A.1 (6 rows) increasing every 2nd row then move on to A.2 and increase every 2nd row until you have reached the number of 2nd row increases (27 times for L). THEN you do the 2nd paragraph - 4th row increases which are listed as Round 1-4 (2 times for L). When do you do the third paragraph "Increase as follows after the marker thread:" showing Rounds 1-4?
28.07.2017 - 18:15DROPS Design respondeu:
Dear Virginia, after you have inc every 2nd row, inc every 4th row: after the marking thread (= 3rd paragraph, ie at the beg of the sleeve) and before marking thread (= 2nd paragraph, ie at the end of the sleeve). Happy knitting!
31.07.2017 - 09:15Virginia escreveu:
I think my question was not well put. What I see now for RAGLAN increases is that you do one height of A.1 (6 rows) increasing every 2nd row then move on to A.2 and increase every 2nd row until you have reached the number of 2nd row increases (27 times for L). THEN you do the 2nd paragraph - 4th row increases which are listed as Round 1-4 (2 times for L). When do you do the third paragraph "Increase as follows after the marker thread:" showing Rounds 1-4
28.07.2017 - 16:55Virginia escreveu:
Thank you regarding A.3. Reading the pattern under RAGLAN in the first paragraph it says to "Increase every 2nd rounds as follows:" (27 times for L) and in the second paragraph it says "Increase every 4th round as follows:" (2 times for L). Then in the 3rd paragraph it says "Increase as follows, after the marker thread:" Is this 3rd paragraph referring to increases after you complete A.1 and A.2 once - 14 rows total? Yes?
28.07.2017 - 13:33DROPS Design respondeu:
Dear Virginia, under "RAGLAN" you are explained how to inc every 2nd round: first before the marking thread (at the end of each sleeve/front/back piece) then after the marking thread: at the beg of sleeve/front/back piece. Same when dec every 4th round: first how to inc before the marking thread, then how to inc after the marking thread. When A.1 has been worked 1 time in height, repeat A.2 in height until end of sleeve. Happy knitting!
28.07.2017 - 14:26
|
|||||||||||||
Petronella Top#petronellatop |
|||||||||||||
|
|
|||||||||||||
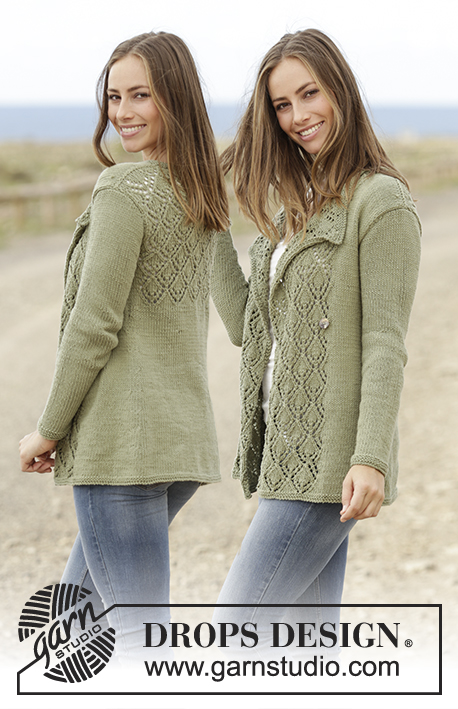
Top tricotado de cima para baixo, com raglan e ponto rendado, em DROPS Muskat. Do S ao XXXL.
DROPS 175-32 |
|||||||||||||
|
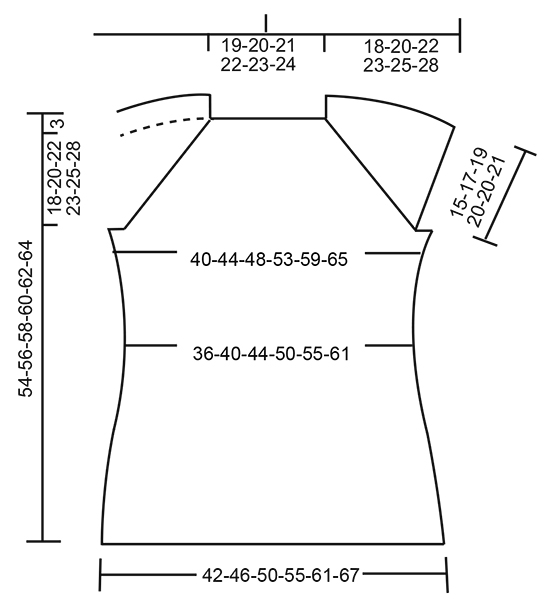
---------------------------------------------------------- PONTO JARRETEIRA (em redondo): 1 barra jarreteira = 2 carreiras. Tricotar 1 volta meia e 1 volta liga. PONTO FANTASIA: Ver os diagramas A.1, A.2 e A.3. Os diagramas mostram todas as carreiras do motivo, vistas pelo direito. RAGLAN: Aumentar a cada 2 carreiras da seguinte maneira: Aumentar da seguinte maneira antes do fio marcador: Começando 1 malha antes do fio marcador: Fazer 1 laçada, 1 malha meia, fio marcador. Aumentar da seguinte maneira depois do fio marcador: Fio marcador, 1 malha meia, fazer 1 laçada. Na carreira seguinte, tricotar as laçadas em meia para que formem buracos. Aumentar a cada 4 carreiras da seguinte maneira: Aumentar da seguinte maneira antes do fio marcador: CARREIRA 1: Começando 1 malha antes do fio marcador: Fazer 1 laçada, 1 malha meia, fio marcador. CARREIRA 2: Tricotar as laçadas em meia para que formem buracos. CARREIRA 3: Começando 3 malhas antes do fio marcador: Tricotar 2 malhas juntamente em meia, fazer 1 laçada, 1 malha meia, fio marcador. Nenhum aumento é feito, mas a carreira rendada continua como antes. CARREIRA 4: Tricotar as laçadas em meia para que formem buracos. Aumentar da seguinte maneira maneira depois do fio marcador: CARREIRA 1: Fio marcador, 1 malha meia, fazer 1 laçada. CARREIRA 2: Tricotar as laçadas em meia para que formem buracos. CARREIRA 3: Fio marcador, 1 malha meia, fazer 1 laçada, deslizar 1 malha em meia, 1 malha meia, passar a malha deslizada por cima da malha tricotada. Nenhum aumento é feito, mas o motivo rendado continua como antes. CARREIRA 4: Tricotar as laçadas em meia para que formem buracos. DIMINUIÇÕES: Começando 3 malhas antes do fio marcador, tricotar: 2 malhas juntamente em meia, 2 malhas meia (o fio marcador fica entre estes 2 malhas), deslizar 1 malha em meia, 1 malha meia, passar a malha deslizada por cima da malha tricotada = 2 malhas diminuídas. AUMENTOS: Tricotar até restar 1 malha antes do fio marcador. Fazer 1 laçada, tricotar 2 malhas meia (o fio marcador fica entre estas 2 malhas) e fazer 1 laçada. Na carreira seguinte, tricotar as laçadas torcidas em meia para evitar buracos (os aumentos tricotam-se em ponto meia). --------------------------------------------------------- TOP: Tricota-se em redondo, na agulha circular a partir do meio da parte de trás, de cima para baixo. ENCAIXE: Montar 80-84-88-92-96-100 malhas com a agulha circular 4 mm em Muskat. Tricotar 2 BARRAS JARRETEIRA – ver acima - aumentando na última carreira da barra jarreteira 20 malhas a intervalos regulares = 100-104-108-112-116-120 malhas. Colocar 4 fios marcadores da seguinte maneira: o 1.º fio marcador depois de 19-20-21-22-23-24 malhas (= metade das costas), o 2.º fio marcador depois de 12 malhas (= manga), o 3.º fio marcador depois de 38-40-42-44-46-48 malhas (= frente), o 4.º fio marcador depois de 12 malhas (= manga) - restam 19-20-21-22-23-24 malhas depois do último fio marcador (= metade das costas). Começar a aumentar para o RAGLAN como explicado acima e tricotar as malhas das costas e da frente em ponto meia e as malhas das mangas em A.1. LER COM ATENÇÃO ANTES DE CONTINUAR! Os aumentos são feitos a um ritmo diferente na frente e nas costas e nas mangas da seguinte maneira: FRENTE/COSTAS: Aumentar 12-15-17-25-30-35 vezes a cada 2 carreiras, e 7-7-7-4-3-2 vezes a cada 4 carreiras. MANGAS: Aumentar 18-23-27-29-26-25 vezes a cada 2 carreiras, e 4-3-2-2-5-7 vezes a cada 4 carreiras. Quando A.1 tiver sido tricotado 1 vez em altura, repetir A.2 em altura. Os aumentos das mangas tricotam-se no ponto fantasia à medida que os for fazendo. Depois do penúltimo aumento das mangas (restam mais 4 carreiras), tricotar as malhas das mangas em ponto jarreteira e continuar a tricotar as malhas da frente/costas em ponto meia como antes. MANTER A MESMA TENSÃO DA INDICADA PARA A AMOSTRA! Quando todos os aumentos do raglan estiverem feitos, temos 264-296-320-352-372-396 malhas. Tricotar a carreira seguinte da seguinte maneira: 38-42-45-51-56-61 malhas (= metade das costas), arrematar as 56-64-70-74-74-76 malhas seguintes, tricotar as 76-84-90-102-112-122 malhas seguintes (= frente), arrematar as 56-64-70-74-74-76 malhas seguintes, tricotar as 38-42-45-51-56-61 malhas seguintes (= metade das costas). COSTAS & FRENTE: Continuar da seguinte maneira: tricotar a metade das costas, montar 8-8-10-10-12-14 malhas, tricotar a frente, montar 8-8-10-10-12-14 malhas, tricotar a metade das costas. Temos , então, 168-184-200-224-248-272 malhas. Colocar um fio marcador de cada lado da peça, a meio das novas malhas montadas. PASSAR A MEDIR A PEÇA A PARTIR DAQUI!. Continuar em ponto meia, mas tricotar 2 barras jarreteira nas 8-8-10-10-12-14 novas malhas dos lados, e tricotar então em ponto meia em todas as malhas. Quando a peça medir 4 cm, diminuir 1 malha de cada lado dos fios marcadores (= 4 malhas diminuídas) - diminuir 4 vezes ao todo a cada 3 cm – VER DIMINUIÇÕES = 152-168-184-208-232-256 malhas. Quando a peça medir 19-19-19-18-18-19 cm, aumentar 1 malha de cada lado dos fios marcadores (= 4 aumentos) - aumentar 6 vezes ao todo a cada 2 cm – VER AUMENTOS = 176-192-208-232-256-280 malhas. Quando a peça medir 32-32-32-33-33-32 cm, tricotar A.3 em todas as malhas. Arrematar então em meia. A peça mede cerca de 54-56-58-60-62-64 cm a partir do ombro. |
|||||||||||||
Explicações do diagrama |
|||||||||||||
|
|||||||||||||
 |
|||||||||||||
 |
|||||||||||||
Terminou este projecto?Então, identifique as suas fotos com as tags #dropspattern #petronellatop ou mostre-as na galeria #dropsfan. Precisa de ajuda para este modelo?Encontrará 24 turotiais em vídeo, uma rubrica Comentários/Perguntas e muito mais ao visitar a página do modelo em www.garnstudio.com © 1982-2026 DROPS Design A/S. Todos os direitos reservados. Este documento, incluuindo as suas su-secções, tem copyrights. Saia mais o que pode fazer com os nossos modelos no fim de cada uma das páginas do nosso site. |
|||||||||||||


Com mais de 40 anos no design de modelos de tricô e de croché, a DROPS Design oferece uma das mais vastas colecções demodelos gratuitos na Internet - traduzidos em 17 línguas. Neste dia de hoje, temos 324 catálogos e 12290 modelos - dos quais 12271 estão traduzidos em português.
Trabalhamos com muito empenho para lhe proporcionar o melhor que o tricô e o croché têm para oferecer, para lhe fornecer inspiração e conselhos bem como fios da mais elevada qualidade a preços incríveis! Gostaria de usar os nossos modelos para outros fins que não uso pessoal? Pode ler o que lhe é permitido fazer no Copyright texto que se encontra na parte de baixo de todos os nossos modelos. Bom tricô! Bom croché!
Deixe um comentário acerca do modelo DROPS 175-32
Gostaríamos muito de saber o que tem a dizer-nos acerca deste modelo!
Se deixar uma pergunta acerca do modelo, certifique-se de que escolhe a categoria adequada no formulário abaixo para acelerar o processo relativo à resposta. Os campos obrigatórios estão assinalados com um *.