
Categorias populares
Procura um fio?


Comentários / Perguntas (99)
![]() Shay escreveu:
Shay escreveu:
Just starting. When I increase front/back piece, is that the "Raglan" increase? Where does the "Increase as follows after marker thread' start?
06.03.2018 - 14:56DROPS Design respondeu:
Dear Shay, the raglan inc on next round after inserting marking thread. You will inc for raglan on front/back piece after the marking thread at the beg of piece and before the marking thread at the end of piece. You will increase for raglan at the beg of sleeve after marking thread and at the end of sleeve before the marking thread. Happy knitting!
06.03.2018 - 16:08Sue escreveu:
Arrr yes that makes perfect sense. I asked the question about which the row to start the increases on on Oct 2nd and was told to increase on even rows after the ridges. That's row 6,8,10, 12. (Row12 is row 2 of A2). But I should inc on row 5,7,9,11 (row 11 is row 1 of A2) . That is what I thought should happen. Thank you. So much. Confusion over :-).
30.10.2017 - 11:54Sue escreveu:
Starting with 18 sleeve stitches. Marker, knit1, YO (raglan inc). Knit 2 tog, Yarn over (8times - A2). Then you need to do a YO, knit 1 for last raglan inc to make 20 stitches. That makes 2 YO's next to each other. If you don't do 2 yo's next to each oth r you end up with 19 stitches!!!
30.10.2017 - 08:49DROPS Design respondeu:
Dear Sue, the row with K2tog, YO, is not a row with increase for raglan, you should have increased on row before, then work row 2 in diagram as explained in previous answer (repeating K2 tog/YO the number of sts required as number of sts will inc). Happy knitting!
30.10.2017 - 10:37Sue escreveu:
Im sorry I just don't understand how this can occur. The increase occurs on the 2nd row of the A2 pattern. The row with all knit 2 tog followed by Yarn over. If you follow the pattern as per the chart as well as with the Raglan increase instructions then it should go like this..see above
30.10.2017 - 08:38DROPS Design respondeu:
Dear Sue, you inc 1 st on first row in A.2, so that you will work the 12 sts between markers for sleeve as follows: marker, K1, YO, K10, YO, K1 (= 14 sts between markers). On row 2 in A.2 work: K2 (the first K1 + YO), (K2 tog, YO) x 6, K2 (the YO + last K1). Happy knitting!
30.10.2017 - 10:34Sue escreveu:
Also I note that doing 2 Yarn overs next to each other just creates one big hole instead of 2 holes next to each other which I can't imagine is ideal. I'm stumped.
30.10.2017 - 00:53DROPS Design respondeu:
Hi Sue, The pattern does not have 2 yarn overs next to each other. They are either between 2 stitches, with 2 stitches either side or have 1 knitted stitch either side. I hope this helps and happy knitting!
30.10.2017 - 08:04Sue escreveu:
Just to add the the last comment. I tried knitting the last 'knit 2 tog followed by Yarn over' (the 8th one - on the 2nd line A2) then just knitting the last s titch but that leaves you with an odd number of stitches, which I note is the same problem another person had. I think the difficulty with this pattern is that the increases aren't so straight forward when they fall on the patterned round for the sleeves, and the instructions don't seem to account for this.
29.10.2017 - 14:07DROPS Design respondeu:
Dear Sue, you are starting sleeves with 12 sts less 2 sts for raglan line (1 st at the beg + 1 st at the end of sleeve) and you will increase 2 sts so that you should always get an even number of sts for sleeve. Happy knitting!
30.10.2017 - 09:52Sue escreveu:
Hi I'm having trouble trying to figure out the increases on the sleeve pattern A2. As per raglan instructions I knit 1 Yarn over after the marker. Then knit 2 tog, Yarn over 8 times then I'm left with 1 stitch. How do I get the last Yarn over in before the last stitch.....do I do 2 Yarn overs next to each other ??
29.10.2017 - 07:34DROPS Design respondeu:
Dear Sue, knit the last st in this case, ie when the number of sts do not match the diagram, finish pattern with K1 to avoid double yarn overs next to each other. Happy knitting!
30.10.2017 - 09:22Sue escreveu:
Secondly with the increases for the Raglan the pattern states that the increases are to be done every 2nd row, but it doesn't indicate which row to start the raglan increases on. Is it row 5 or row 6? I am assuming the first round of increases is on row 5 then 7,9 etc as this means the increases are done on the knit rows of the sleeve pattern and are not getting mixed up in the lace patterning rows. Is this correct?
01.10.2017 - 03:37DROPS Design respondeu:
Dear Sue, you will inc on round 6, ie after ridges, work 1 round in pattern as explained, then start to inc on next round. Happy knitting!
02.10.2017 - 09:50Sue escreveu:
Sorry, typos on he last question. Hello, I am trying to work out this pattern before I start. The pattern states to increase 20 stitches on the last ROUND of the ridges. Does this mean it can be done on either row 3 or 4 which both make up the last round of ridges. I wound prefer to increase on the knit row which is row 3 with a kfb. Or do the increases have to be on the 4th and last row of the ridges which is a purl row.
01.10.2017 - 03:35DROPS Design respondeu:
Hi Sue, The last round of the ridges is round 4, the purl round. So you increase on this 4th round. Happy knitting!
01.10.2017 - 12:25Sue escreveu:
Hello, I am trying to work out this pattern before I start. The pattern states to increase 20 stitches on the last ROUND of the ridges. Does this mean it can be one I thee row 3 or 4 which both make up the last round of ridges. I wound prefer to increase on the knit row which is row 3 with a kfb. Or do the increase have to be on the 4th and last row of the ridges which is a purl row.
01.10.2017 - 03:33DROPS Design respondeu:
Dear Sue, you will increase on the last round of ridges, ie on 4th round, you can increase also with kfb on last round of ridges (= P round). Happy knitting!
02.10.2017 - 09:48
|
|||||||||||||
Petronella Top#petronellatop |
|||||||||||||
|
|
|||||||||||||
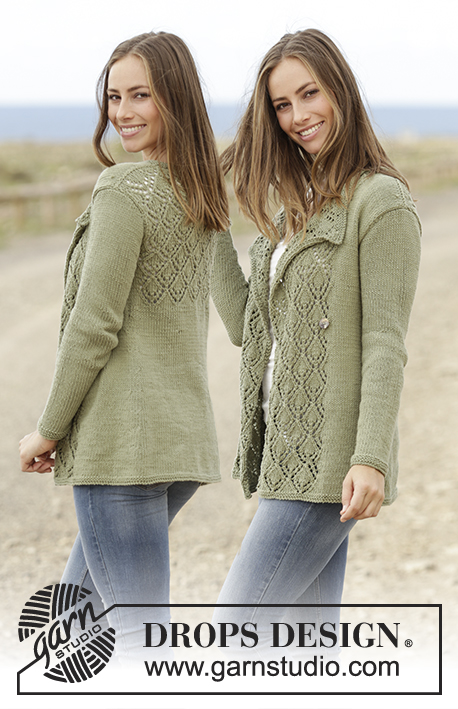
Top tricotado de cima para baixo, com raglan e ponto rendado, em DROPS Muskat. Do S ao XXXL.
DROPS 175-32 |
|||||||||||||
|
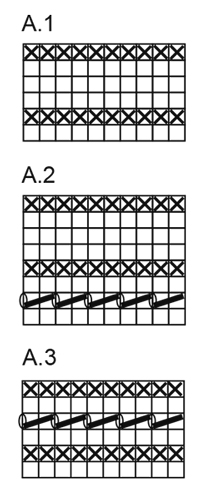
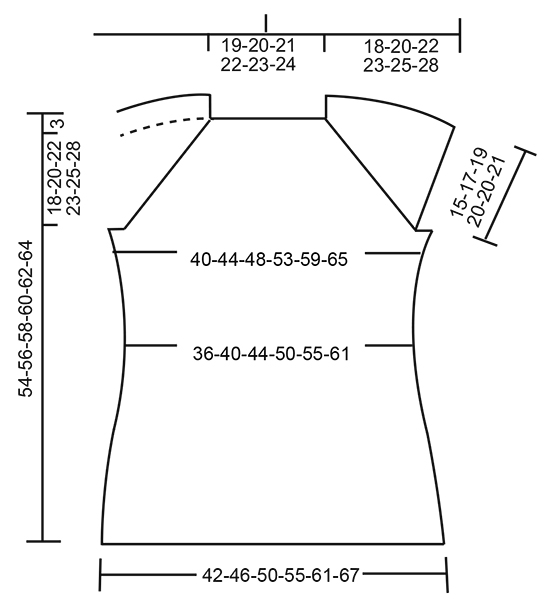
---------------------------------------------------------- PONTO JARRETEIRA (em redondo): 1 barra jarreteira = 2 carreiras. Tricotar 1 volta meia e 1 volta liga. PONTO FANTASIA: Ver os diagramas A.1, A.2 e A.3. Os diagramas mostram todas as carreiras do motivo, vistas pelo direito. RAGLAN: Aumentar a cada 2 carreiras da seguinte maneira: Aumentar da seguinte maneira antes do fio marcador: Começando 1 malha antes do fio marcador: Fazer 1 laçada, 1 malha meia, fio marcador. Aumentar da seguinte maneira depois do fio marcador: Fio marcador, 1 malha meia, fazer 1 laçada. Na carreira seguinte, tricotar as laçadas em meia para que formem buracos. Aumentar a cada 4 carreiras da seguinte maneira: Aumentar da seguinte maneira antes do fio marcador: CARREIRA 1: Começando 1 malha antes do fio marcador: Fazer 1 laçada, 1 malha meia, fio marcador. CARREIRA 2: Tricotar as laçadas em meia para que formem buracos. CARREIRA 3: Começando 3 malhas antes do fio marcador: Tricotar 2 malhas juntamente em meia, fazer 1 laçada, 1 malha meia, fio marcador. Nenhum aumento é feito, mas a carreira rendada continua como antes. CARREIRA 4: Tricotar as laçadas em meia para que formem buracos. Aumentar da seguinte maneira maneira depois do fio marcador: CARREIRA 1: Fio marcador, 1 malha meia, fazer 1 laçada. CARREIRA 2: Tricotar as laçadas em meia para que formem buracos. CARREIRA 3: Fio marcador, 1 malha meia, fazer 1 laçada, deslizar 1 malha em meia, 1 malha meia, passar a malha deslizada por cima da malha tricotada. Nenhum aumento é feito, mas o motivo rendado continua como antes. CARREIRA 4: Tricotar as laçadas em meia para que formem buracos. DIMINUIÇÕES: Começando 3 malhas antes do fio marcador, tricotar: 2 malhas juntamente em meia, 2 malhas meia (o fio marcador fica entre estes 2 malhas), deslizar 1 malha em meia, 1 malha meia, passar a malha deslizada por cima da malha tricotada = 2 malhas diminuídas. AUMENTOS: Tricotar até restar 1 malha antes do fio marcador. Fazer 1 laçada, tricotar 2 malhas meia (o fio marcador fica entre estas 2 malhas) e fazer 1 laçada. Na carreira seguinte, tricotar as laçadas torcidas em meia para evitar buracos (os aumentos tricotam-se em ponto meia). --------------------------------------------------------- TOP: Tricota-se em redondo, na agulha circular a partir do meio da parte de trás, de cima para baixo. ENCAIXE: Montar 80-84-88-92-96-100 malhas com a agulha circular 4 mm em Muskat. Tricotar 2 BARRAS JARRETEIRA – ver acima - aumentando na última carreira da barra jarreteira 20 malhas a intervalos regulares = 100-104-108-112-116-120 malhas. Colocar 4 fios marcadores da seguinte maneira: o 1.º fio marcador depois de 19-20-21-22-23-24 malhas (= metade das costas), o 2.º fio marcador depois de 12 malhas (= manga), o 3.º fio marcador depois de 38-40-42-44-46-48 malhas (= frente), o 4.º fio marcador depois de 12 malhas (= manga) - restam 19-20-21-22-23-24 malhas depois do último fio marcador (= metade das costas). Começar a aumentar para o RAGLAN como explicado acima e tricotar as malhas das costas e da frente em ponto meia e as malhas das mangas em A.1. LER COM ATENÇÃO ANTES DE CONTINUAR! Os aumentos são feitos a um ritmo diferente na frente e nas costas e nas mangas da seguinte maneira: FRENTE/COSTAS: Aumentar 12-15-17-25-30-35 vezes a cada 2 carreiras, e 7-7-7-4-3-2 vezes a cada 4 carreiras. MANGAS: Aumentar 18-23-27-29-26-25 vezes a cada 2 carreiras, e 4-3-2-2-5-7 vezes a cada 4 carreiras. Quando A.1 tiver sido tricotado 1 vez em altura, repetir A.2 em altura. Os aumentos das mangas tricotam-se no ponto fantasia à medida que os for fazendo. Depois do penúltimo aumento das mangas (restam mais 4 carreiras), tricotar as malhas das mangas em ponto jarreteira e continuar a tricotar as malhas da frente/costas em ponto meia como antes. MANTER A MESMA TENSÃO DA INDICADA PARA A AMOSTRA! Quando todos os aumentos do raglan estiverem feitos, temos 264-296-320-352-372-396 malhas. Tricotar a carreira seguinte da seguinte maneira: 38-42-45-51-56-61 malhas (= metade das costas), arrematar as 56-64-70-74-74-76 malhas seguintes, tricotar as 76-84-90-102-112-122 malhas seguintes (= frente), arrematar as 56-64-70-74-74-76 malhas seguintes, tricotar as 38-42-45-51-56-61 malhas seguintes (= metade das costas). COSTAS & FRENTE: Continuar da seguinte maneira: tricotar a metade das costas, montar 8-8-10-10-12-14 malhas, tricotar a frente, montar 8-8-10-10-12-14 malhas, tricotar a metade das costas. Temos , então, 168-184-200-224-248-272 malhas. Colocar um fio marcador de cada lado da peça, a meio das novas malhas montadas. PASSAR A MEDIR A PEÇA A PARTIR DAQUI!. Continuar em ponto meia, mas tricotar 2 barras jarreteira nas 8-8-10-10-12-14 novas malhas dos lados, e tricotar então em ponto meia em todas as malhas. Quando a peça medir 4 cm, diminuir 1 malha de cada lado dos fios marcadores (= 4 malhas diminuídas) - diminuir 4 vezes ao todo a cada 3 cm – VER DIMINUIÇÕES = 152-168-184-208-232-256 malhas. Quando a peça medir 19-19-19-18-18-19 cm, aumentar 1 malha de cada lado dos fios marcadores (= 4 aumentos) - aumentar 6 vezes ao todo a cada 2 cm – VER AUMENTOS = 176-192-208-232-256-280 malhas. Quando a peça medir 32-32-32-33-33-32 cm, tricotar A.3 em todas as malhas. Arrematar então em meia. A peça mede cerca de 54-56-58-60-62-64 cm a partir do ombro. |
|||||||||||||
Explicações do diagrama |
|||||||||||||
|
|||||||||||||
 |
|||||||||||||
 |
|||||||||||||
Terminou este projecto?Então, identifique as suas fotos com as tags #dropspattern #petronellatop ou mostre-as na galeria #dropsfan. Precisa de ajuda para este modelo?Encontrará 24 turotiais em vídeo, uma rubrica Comentários/Perguntas e muito mais ao visitar a página do modelo em www.garnstudio.com © 1982-2026 DROPS Design A/S. Todos os direitos reservados. Este documento, incluuindo as suas su-secções, tem copyrights. Saia mais o que pode fazer com os nossos modelos no fim de cada uma das páginas do nosso site. |
|||||||||||||


Com mais de 40 anos no design de modelos de tricô e de croché, a DROPS Design oferece uma das mais vastas colecções demodelos gratuitos na Internet - traduzidos em 17 línguas. Neste dia de hoje, temos 324 catálogos e 12290 modelos - dos quais 12271 estão traduzidos em português.
Trabalhamos com muito empenho para lhe proporcionar o melhor que o tricô e o croché têm para oferecer, para lhe fornecer inspiração e conselhos bem como fios da mais elevada qualidade a preços incríveis! Gostaria de usar os nossos modelos para outros fins que não uso pessoal? Pode ler o que lhe é permitido fazer no Copyright texto que se encontra na parte de baixo de todos os nossos modelos. Bom tricô! Bom croché!
Deixe um comentário acerca do modelo DROPS 175-32
Gostaríamos muito de saber o que tem a dizer-nos acerca deste modelo!
Se deixar uma pergunta acerca do modelo, certifique-se de que escolhe a categoria adequada no formulário abaixo para acelerar o processo relativo à resposta. Os campos obrigatórios estão assinalados com um *.