
Categorias populares
Procura um fio?


Comentários / Perguntas (99)
![]() Iselin escreveu:
Iselin escreveu:
Hei. Jeg sliter litt med å forstå hva jeg skal gjøre. Det står at jeg skal øke ved hver merketråd hver andre omgang under der det står om erme/raglan. Slik jeg da forstår det skal jeg øke før og etter merketråden, altså tilsammen 8 ganger hver andre runde. Det står også under forstykke og bakstykke at jeg skal øke hver andre omgang. Betyr det før og etter merketråden? For det er jo det jeg allerede skal gjøre når jeg øker for ermet. Eller skal det økes en annen plass?
11.09.2019 - 16:28DROPS Design respondeu:
Hej Iselin, det er fordi du skal øke til raglan lidt forskelligt på selve ærmet og på ryg og forstykket. I starten øker du på hver 2.omgang på hver side af alle mærketråde. Men på bolen øker du på hver 4. omgang lidt tidligere end på ærmerne alt efter hvilken størrelse du strikker: FORSTYKKE/BAKSTYKKE: Øk på hver 2.omgang 12-15-17-25-30-35 ganger, deretter på hver 4.omgang 7-7-7-4-3-2 ganger. ERMER: Øk på hver 2.omgang 18-23-27-29-26-25 ganger, deretter på hver 4.omgang 4-3-2-2-5-7 ganger.
02.10.2019 - 12:12
![]() Cori escreveu:
Cori escreveu:
I wish I had looked at this pattern before I bought yarn for it. I cannot understand how to read this at all!? What are the diagrams about? Why isn\'t it written with the usual standard abbreviations so it\'s legible? Does anyone have a translation/rewrite to make this clearer/more like a normal pattern? I keep trying to read it and figure it out but I am totally lost. Might have to find something else to do with the yarn, I doubt I can return it because I ordered internationally. Argh.
28.08.2019 - 04:40DROPS Design respondeu:
Dear Cori, The DROPS patterns are knitted and crocheted by thousands and thousands of people around the world. We understand however that in certain countries, with different knitting/crochet traditions than Scandinavia, our patterns might be written in a way that differs from what some are used to. But of course we want everyone to understand our patterns, so that’s why we have created an extensive library of tutorial videos as well as step by step lessons that explain how to follow the techniques we use and 28.08.2019 - 08:58
![]() Caroline escreveu:
Caroline escreveu:
I'm stuck at the beginning of this pattern. Knitting size M I've made the 20 stitches evenly, now trying to place my markers, what are the 12 new stiches mentioned for the second and fourth marker. Where are they written in the pattern please?
25.07.2019 - 12:25DROPS Design respondeu:
Hi Caroline, after increasing 20 stitches evenly you have 104 stitches in size M. Now you will place 4 marker threads to separate the different parts of your work: starting from mid back count 20 stitches, first marker (mid-back); 12 stitches between the first and second marker = left sleeve; 40 stitches between the second and third marker = front; 12 stitches between the third and fourth marker = right sleeve; and 20 last stitches after fourth marker = mid back (in total 104 stitches in the round). Happy knitting!
25.07.2019 - 18:26
![]() Charlotte B escreveu:
Charlotte B escreveu:
Hei. Denne toppen er veldig søt. Har lest gjennom oppskriften og kommentarfeltene. Jeg sliter med beskrivelsen av «øk på hver 2 omg 12-15-17 osv ganger» har vurdert om det er antal masker, men da blir antallet for mange totalt. Kan dere vennligst utdype.
07.07.2019 - 18:15DROPS Design respondeu:
Hei Charlotte, Du øker til raglan som beskrevet på toppen av oppskriften; Det økes forskjellige antall ganger på ermene og på for/bak-stykkene som beskrevet. Du øker på begge sider av hvert merketråd slik at det blir 4 masker økt på ermene og 4 masker økt på for/bak-stykkene hver øke-omgang. Håper dette hjelper og god fornøyelse!
08.07.2019 - 07:26
![]() Miriam escreveu:
Miriam escreveu:
Grazie mille della risposta. Ora mi è chiaro come procedere
28.06.2019 - 21:06
![]() Miriam escreveu:
Miriam escreveu:
Buonasera Drops, sono arrivata alla fine del diagramma A2: se ho capito bene devo lavorare 2maglie insieme a dir, 1 dir, 1 gettato, 1 dir, 2 maglie insieme a dir, 1 dir, 1 gettato , 1 dir,2 maglie insieme a dir ecc. ecc. . E' corretto ? grazie
27.06.2019 - 18:49DROPS Design respondeu:
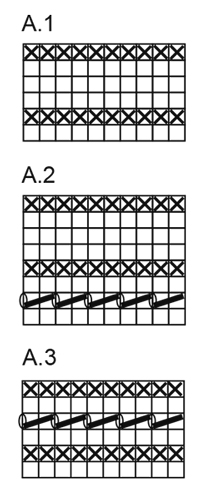
Buongiorno Miriam. La riga da lei indicata si lavora: 2 maglie insieme a diritto, 1 maglia gettata, 2 m insieme a diritto, 1 maglia gettata e così via. Ci permettiamo di ricordarle che i diagrammi si leggono dal basso verso l’alto e da destra verso sinistra . Alla seguente pagina trova indicazioni utili per la lettura dei diagrammi. Buon lavoro!
27.06.2019 - 20:11
![]() Noralie escreveu:
Noralie escreveu:
I am an experienced knitter and have been knitting for more than 50 years. I've knit cardigans, pullovers, hats, mitten, jackets, cowls, shawls and oodles of baby clothes. I've even won awards for my knitting. And I CANNOT follow this pattern! Grr.
10.06.2019 - 02:04DROPS Design respondeu:
Dear Noralie, would you like to tell us which part you don't understand so that we can help further? Happy knitting!
11.06.2019 - 13:17
![]() Ivy escreveu:
Ivy escreveu:
The part where it talks about increasing every four rounds and gives a line by line instruction - when does that take place? Also, when I change from every two to every four increases, the yarnover holes won’t be the same on the sleeves and body. Correct?
08.05.2019 - 14:44DROPS Design respondeu:
Dear Ivy, right, to avoid this, increase as explained under RAGLAN/Increase every 4th round as follows: + Increase as follows, after the marker thread. Happy knitting!
08.05.2019 - 15:20
![]() Ivy escreveu:
Ivy escreveu:
I made my increases before and after each marker at the sleeve edges every even row 15 times (medium), ending with row 8. Now I’m on row 1. I’m supposed to follow the 4 line increase for the body while still increasing the sleeves every other row. What do you even mean by front/back? Does that mean on the body side of the markers? If so, the instructions have me doing work on both sides of the marker, which means the body and the sleeve. Also row 8 had a YO, so how can row 1 as well?
08.05.2019 - 13:38DROPS Design respondeu:
Dear Ivy, after you have increased 8 sts every other round a total of 15 times (size M), continue increasing 8 more times every other round on sleeves + 3 more times every 4th round (after the marker at beg of sleeve + before the marker at the end of sleeve) and increase at the same time on body 7 times every 4th round (= at the beg of the front/back piece + at the end of front/back piece). Happy knitting!
08.05.2019 - 14:25
![]() Clairveaux escreveu:
Clairveaux escreveu:
Hallihallo, ich habe eine Frage zu den Zu- bzw. Abnahmen. Die Raglanzunahmen in jeder 2. Runde sind klar. Allerdings irritiert mich die folgende Formulierung: “In jeder 4. Runde wie folgt zunehmen: Vor dem Markierungsfaden: 1. RUNDE: 1 Masche vor dem Markierungsfaden beginnen: 1 Umschlag arbeiten, 1 Masche rechts, Markierungsfaden. etc.“ Ist die vierte Runde nun die erste Runde der unter diesem Abschnitt folgenden Erklärung? Besten Dank!
05.05.2019 - 17:39DROPS Design respondeu:
Liebe Frau Clairveaux, wenn Sie dann in jeder 4. Runde für die Raglanzunehmen, sollen Sie diese Runde zunehmen, um die Löcherreihen an der Raglanline weiter zu stricken - die Zunahmen entstehen dann bei der 1. der 4 Reihen. Viel Spaß beim stricken!
06.05.2019 - 10:06
|
|||||||||||||
Petronella Top#petronellatop |
|||||||||||||
|
|
|||||||||||||
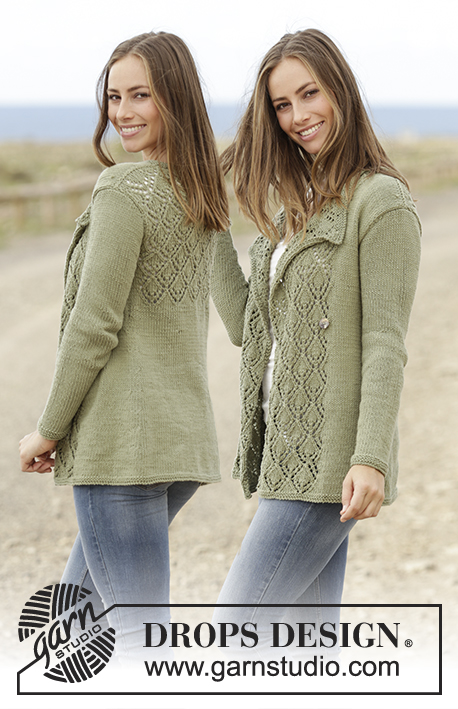
Top tricotado de cima para baixo, com raglan e ponto rendado, em DROPS Muskat. Do S ao XXXL.
DROPS 175-32 |
|||||||||||||
|
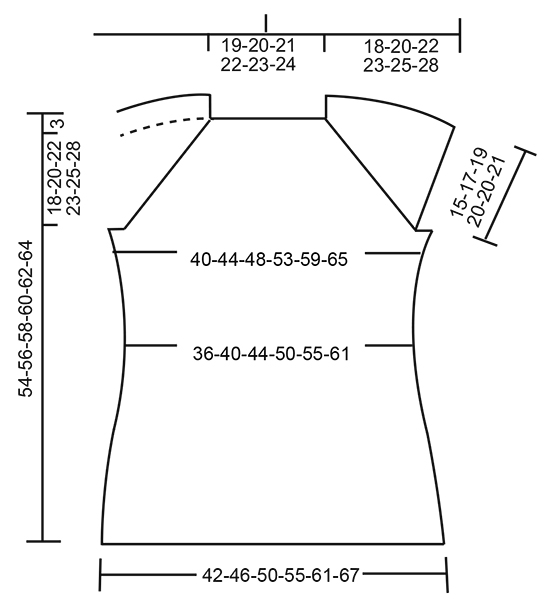
---------------------------------------------------------- PONTO JARRETEIRA (em redondo): 1 barra jarreteira = 2 carreiras. Tricotar 1 volta meia e 1 volta liga. PONTO FANTASIA: Ver os diagramas A.1, A.2 e A.3. Os diagramas mostram todas as carreiras do motivo, vistas pelo direito. RAGLAN: Aumentar a cada 2 carreiras da seguinte maneira: Aumentar da seguinte maneira antes do fio marcador: Começando 1 malha antes do fio marcador: Fazer 1 laçada, 1 malha meia, fio marcador. Aumentar da seguinte maneira depois do fio marcador: Fio marcador, 1 malha meia, fazer 1 laçada. Na carreira seguinte, tricotar as laçadas em meia para que formem buracos. Aumentar a cada 4 carreiras da seguinte maneira: Aumentar da seguinte maneira antes do fio marcador: CARREIRA 1: Começando 1 malha antes do fio marcador: Fazer 1 laçada, 1 malha meia, fio marcador. CARREIRA 2: Tricotar as laçadas em meia para que formem buracos. CARREIRA 3: Começando 3 malhas antes do fio marcador: Tricotar 2 malhas juntamente em meia, fazer 1 laçada, 1 malha meia, fio marcador. Nenhum aumento é feito, mas a carreira rendada continua como antes. CARREIRA 4: Tricotar as laçadas em meia para que formem buracos. Aumentar da seguinte maneira maneira depois do fio marcador: CARREIRA 1: Fio marcador, 1 malha meia, fazer 1 laçada. CARREIRA 2: Tricotar as laçadas em meia para que formem buracos. CARREIRA 3: Fio marcador, 1 malha meia, fazer 1 laçada, deslizar 1 malha em meia, 1 malha meia, passar a malha deslizada por cima da malha tricotada. Nenhum aumento é feito, mas o motivo rendado continua como antes. CARREIRA 4: Tricotar as laçadas em meia para que formem buracos. DIMINUIÇÕES: Começando 3 malhas antes do fio marcador, tricotar: 2 malhas juntamente em meia, 2 malhas meia (o fio marcador fica entre estes 2 malhas), deslizar 1 malha em meia, 1 malha meia, passar a malha deslizada por cima da malha tricotada = 2 malhas diminuídas. AUMENTOS: Tricotar até restar 1 malha antes do fio marcador. Fazer 1 laçada, tricotar 2 malhas meia (o fio marcador fica entre estas 2 malhas) e fazer 1 laçada. Na carreira seguinte, tricotar as laçadas torcidas em meia para evitar buracos (os aumentos tricotam-se em ponto meia). --------------------------------------------------------- TOP: Tricota-se em redondo, na agulha circular a partir do meio da parte de trás, de cima para baixo. ENCAIXE: Montar 80-84-88-92-96-100 malhas com a agulha circular 4 mm em Muskat. Tricotar 2 BARRAS JARRETEIRA – ver acima - aumentando na última carreira da barra jarreteira 20 malhas a intervalos regulares = 100-104-108-112-116-120 malhas. Colocar 4 fios marcadores da seguinte maneira: o 1.º fio marcador depois de 19-20-21-22-23-24 malhas (= metade das costas), o 2.º fio marcador depois de 12 malhas (= manga), o 3.º fio marcador depois de 38-40-42-44-46-48 malhas (= frente), o 4.º fio marcador depois de 12 malhas (= manga) - restam 19-20-21-22-23-24 malhas depois do último fio marcador (= metade das costas). Começar a aumentar para o RAGLAN como explicado acima e tricotar as malhas das costas e da frente em ponto meia e as malhas das mangas em A.1. LER COM ATENÇÃO ANTES DE CONTINUAR! Os aumentos são feitos a um ritmo diferente na frente e nas costas e nas mangas da seguinte maneira: FRENTE/COSTAS: Aumentar 12-15-17-25-30-35 vezes a cada 2 carreiras, e 7-7-7-4-3-2 vezes a cada 4 carreiras. MANGAS: Aumentar 18-23-27-29-26-25 vezes a cada 2 carreiras, e 4-3-2-2-5-7 vezes a cada 4 carreiras. Quando A.1 tiver sido tricotado 1 vez em altura, repetir A.2 em altura. Os aumentos das mangas tricotam-se no ponto fantasia à medida que os for fazendo. Depois do penúltimo aumento das mangas (restam mais 4 carreiras), tricotar as malhas das mangas em ponto jarreteira e continuar a tricotar as malhas da frente/costas em ponto meia como antes. MANTER A MESMA TENSÃO DA INDICADA PARA A AMOSTRA! Quando todos os aumentos do raglan estiverem feitos, temos 264-296-320-352-372-396 malhas. Tricotar a carreira seguinte da seguinte maneira: 38-42-45-51-56-61 malhas (= metade das costas), arrematar as 56-64-70-74-74-76 malhas seguintes, tricotar as 76-84-90-102-112-122 malhas seguintes (= frente), arrematar as 56-64-70-74-74-76 malhas seguintes, tricotar as 38-42-45-51-56-61 malhas seguintes (= metade das costas). COSTAS & FRENTE: Continuar da seguinte maneira: tricotar a metade das costas, montar 8-8-10-10-12-14 malhas, tricotar a frente, montar 8-8-10-10-12-14 malhas, tricotar a metade das costas. Temos , então, 168-184-200-224-248-272 malhas. Colocar um fio marcador de cada lado da peça, a meio das novas malhas montadas. PASSAR A MEDIR A PEÇA A PARTIR DAQUI!. Continuar em ponto meia, mas tricotar 2 barras jarreteira nas 8-8-10-10-12-14 novas malhas dos lados, e tricotar então em ponto meia em todas as malhas. Quando a peça medir 4 cm, diminuir 1 malha de cada lado dos fios marcadores (= 4 malhas diminuídas) - diminuir 4 vezes ao todo a cada 3 cm – VER DIMINUIÇÕES = 152-168-184-208-232-256 malhas. Quando a peça medir 19-19-19-18-18-19 cm, aumentar 1 malha de cada lado dos fios marcadores (= 4 aumentos) - aumentar 6 vezes ao todo a cada 2 cm – VER AUMENTOS = 176-192-208-232-256-280 malhas. Quando a peça medir 32-32-32-33-33-32 cm, tricotar A.3 em todas as malhas. Arrematar então em meia. A peça mede cerca de 54-56-58-60-62-64 cm a partir do ombro. |
|||||||||||||
Explicações do diagrama |
|||||||||||||
|
|||||||||||||
 |
|||||||||||||
 |
|||||||||||||
Terminou este projecto?Então, identifique as suas fotos com as tags #dropspattern #petronellatop ou mostre-as na galeria #dropsfan. Precisa de ajuda para este modelo?Encontrará 24 turotiais em vídeo, uma rubrica Comentários/Perguntas e muito mais ao visitar a página do modelo em www.garnstudio.com © 1982-2026 DROPS Design A/S. Todos os direitos reservados. Este documento, incluuindo as suas su-secções, tem copyrights. Saia mais o que pode fazer com os nossos modelos no fim de cada uma das páginas do nosso site. |
|||||||||||||


Com mais de 40 anos no design de modelos de tricô e de croché, a DROPS Design oferece uma das mais vastas colecções demodelos gratuitos na Internet - traduzidos em 17 línguas. Neste dia de hoje, temos 324 catálogos e 12290 modelos - dos quais 12271 estão traduzidos em português.
Trabalhamos com muito empenho para lhe proporcionar o melhor que o tricô e o croché têm para oferecer, para lhe fornecer inspiração e conselhos bem como fios da mais elevada qualidade a preços incríveis! Gostaria de usar os nossos modelos para outros fins que não uso pessoal? Pode ler o que lhe é permitido fazer no Copyright texto que se encontra na parte de baixo de todos os nossos modelos. Bom tricô! Bom croché!
Deixe um comentário acerca do modelo DROPS 175-32
Gostaríamos muito de saber o que tem a dizer-nos acerca deste modelo!
Se deixar uma pergunta acerca do modelo, certifique-se de que escolhe a categoria adequada no formulário abaixo para acelerar o processo relativo à resposta. Os campos obrigatórios estão assinalados com um *.