
Categorias populares
Procura um fio?


Comentários / Perguntas (78)
![]() Dominique escreveu:
Dominique escreveu:
On-dit. glisser attente 0 fois 0 mailles sur arrêt maille je ne comprends pas. Toute cette partie pour biais épaules est incompréhensible. "Rabattre une m au rg suivant à partir de l'encolure " on rabattre une seule fois? Merci de reformuler vos explications . Je suis en attente pour faire ce modèle. Merci
02.04.2025 - 19:31DROPS Design respondeu:
Bonjour Dominique, s'il y a un 0 dans votre taille, vous n'êtes juste pas concernée par cette information; les m des épaules sont mises en attente en début de rg qui commence par l'emmanchure vers l'encolure (ex dos: sur l'end pour l'épaule droite / sur l'env pour l'épaule gauche); et on rabat les m de l'encolure en début de rg à partir de l'encolure vers l'emmanchure (ex dos: sur l'end pour l'épaule gauche, sur l'env pour l'épaule droite). Cette vidéo d'un autre modèle pourrait vous aider à visualiser comment faire. Bon tricot!
03.04.2025 - 08:35
![]() Sandra Schradiek escreveu:
Sandra Schradiek escreveu:
Wie werden am Ärmloch die Abnahmen gemacht
27.01.2025 - 18:42DROPS Design respondeu:
Liebe Frau Schradiek, es wird hier keine Maschen für die Armlöcher abgekettet - siehe Maßskizze. Viel Spaß beim Stricken!
28.01.2025 - 09:01
![]() Ann escreveu:
Ann escreveu:
Als ik 93 steken heb en voor de schouders 28 st. aan elke kant op een hulpdraad moet zetten, hoe kan het dan dat ik de middelste 18 st. moet afkanten voor de nek? Ik heb dan toch een oneven aantal steken over?
14.12.2024 - 15:38
![]() Christine DUPRE escreveu:
Christine DUPRE escreveu:
Pourquoi la plupart de vos modèles se tricote en aiguilles circulaires ? Pour ma part, je renonce à chaque fois pour réaliser vos modèles car je n'arrive pas à travailler en aiguille circulaire ? Il serait bien d'avoir plus de choix en aiguilles droites
04.12.2024 - 08:23DROPS Design respondeu:
Bonjour Mme Dupre, les aiguilles circulaires en Scandinavie et en Europe du Nord sont très fréquemment utilisées, raison pour laquelle nombre de nos modèles en utilise, toutefois, vous pouvez souvent facilement adapter les explications sur aiguilles droites - cf cette leçon; pour ce modèle par ex, il suffit simplement de tricoter le devant et le dos comme indiqué (= séparément, en allers et retours), puis de coudre une seule des épaules pour relever les mailles du col, puis faire la couture de la 2ème épaule et du col. Bon tricot!
04.12.2024 - 16:03
![]() Marij escreveu:
Marij escreveu:
Beste mensen. Ik vind het erg moeilijk om met een rondbreinaald te werken. Hoe kan ik het patroon veranderen als ik gewoon 2 naalden gebruik??? Dat lukt mij het beste. Hopelijk kunt u mij helpen. Gr. Marij
06.11.2024 - 08:35DROPS Design respondeu:
Dag Marij,
Om een patroon aan te passen om op rechte naalden te breien hebben we een instructie gemaakt. Deze vind je hier.
06.11.2024 - 13:44
![]() Cheryl Dillinger escreveu:
Cheryl Dillinger escreveu:
How many stitches and rows for the gauge?
29.10.2024 - 19:25DROPS Design respondeu:
Dear Mrs Dillinger, you will find the tension for both needle size under header, together with needle size, sizes, amount of yarn and buttons. Happy knitting!
30.10.2024 - 08:08
![]() Ann Marie escreveu:
Ann Marie escreveu:
Vill ha beskrivningen till denna fina väst
24.10.2024 - 10:08
![]() Kirsten Sørensen escreveu:
Kirsten Sørensen escreveu:
Ønsker opskriften på den flotte vest
22.10.2024 - 15:14
![]() Paola escreveu:
Paola escreveu:
Buongiorno. Come faccio a fare questo modello con il collo alto. Grazie
13.09.2024 - 13:31DROPS Design respondeu:
Buonasera Paola, per un aiuto così personalizzato può rivolgersi al suo rivenditore DROPS di fiducia. Buon lavoro!
13.09.2024 - 21:04
![]() Bec escreveu:
Bec escreveu:
Thank you so much for your recent feedback. I think I've done it correctly. The next step has me puzzled - I've just bound of my 1 stitch on the neck, my K1 row will be on the RS, not the WS, am I missing something? TIA
12.08.2024 - 04:33DROPS Design respondeu:
Hi Bec, The knitted row after binding off the 1 stitch is from the wrong side (so work as normal from the right side before knitting from the wrong side if necessary). Regards, Drops Team.
12.08.2024 - 06:33
|
|
Winter is Coming#winteriscomingslipover |
|
 |
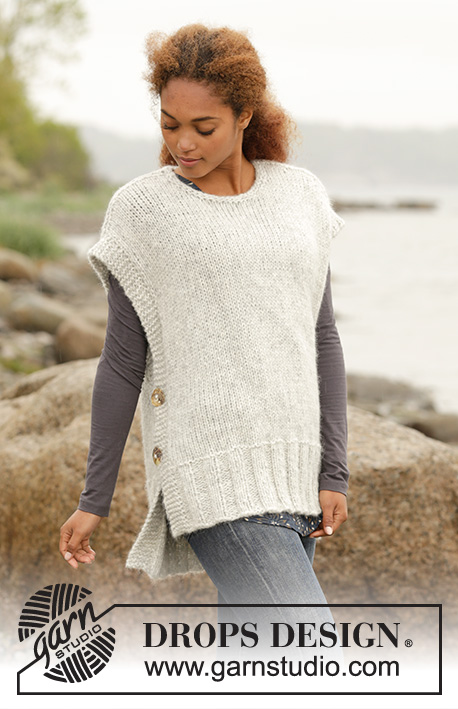 |
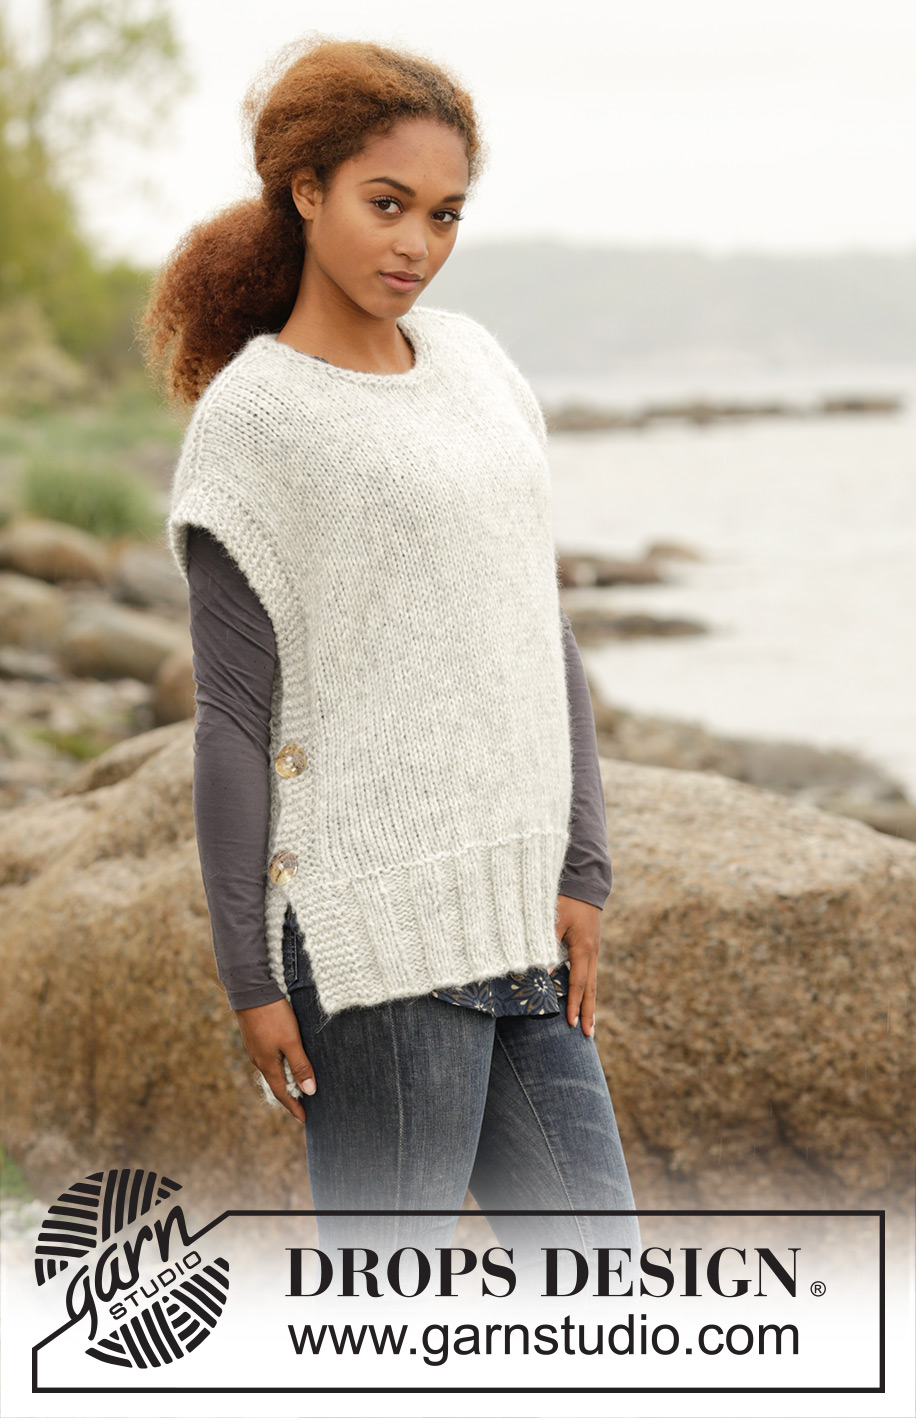
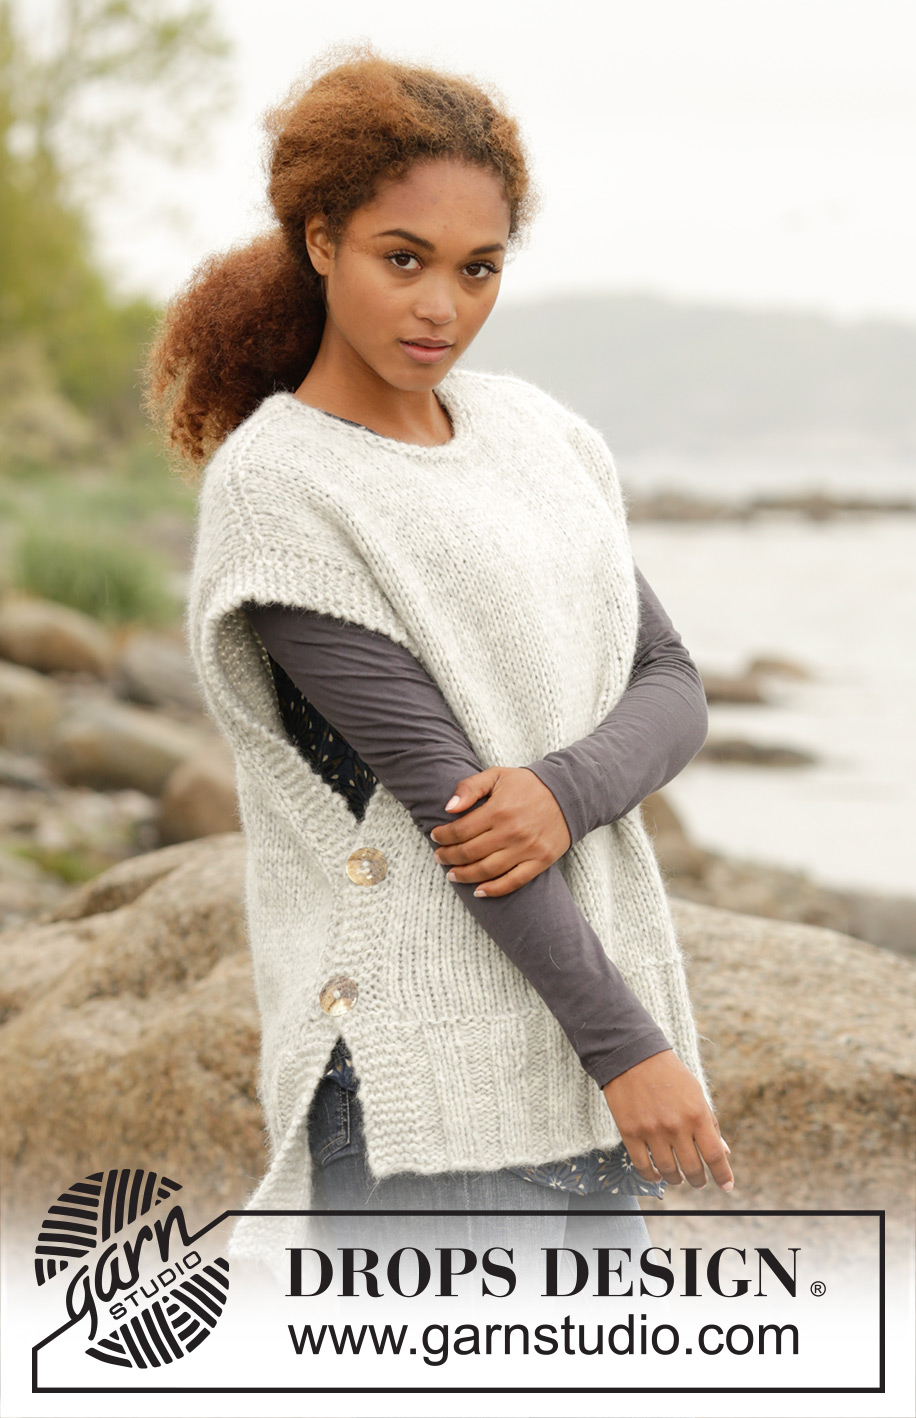
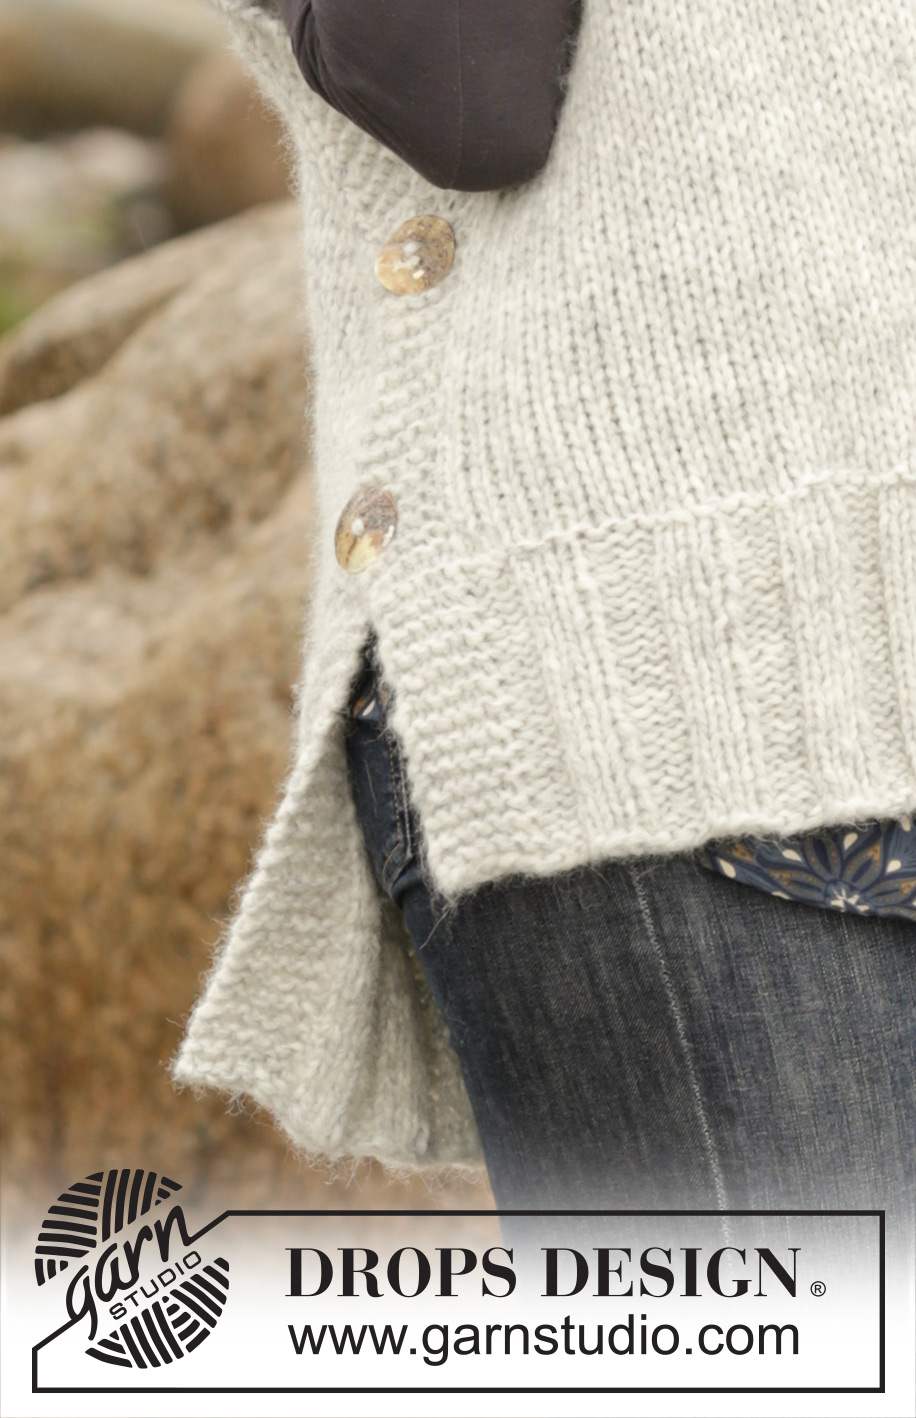
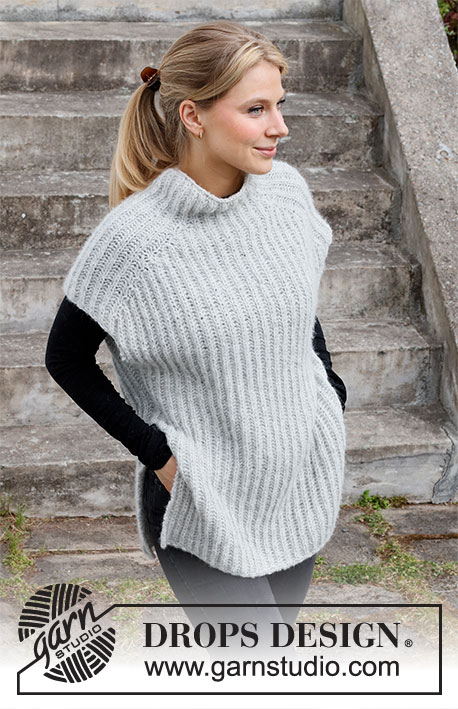
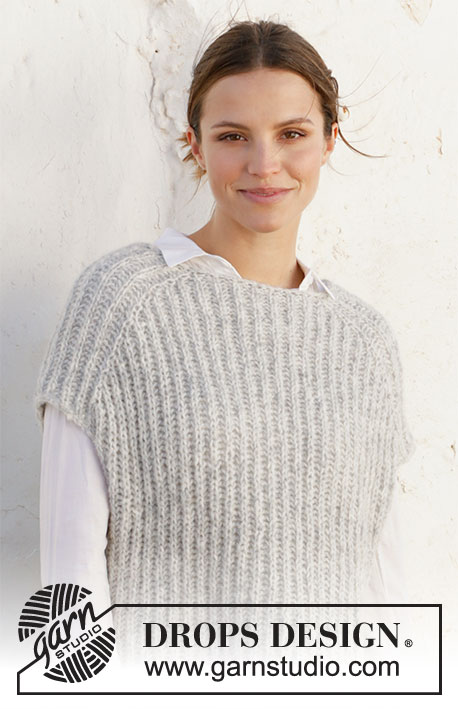
Colete DROPS de gola redonda, com fendas nos lados, em Cloud, 1 fio Wish ou 2 fios Air. Do S ao XXXL.
DROPS 173-47 |
|
|
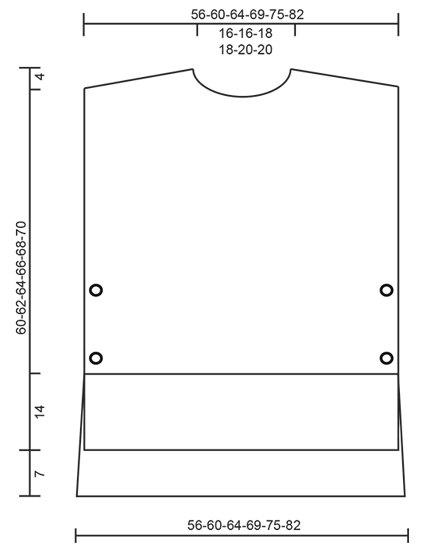
---------------------------------------------------------- NOTA: Existem termos diferentes de tricô e croché em português de Portugal e do Brasil. Tricô: Malha = Ponto Canelado = Barra Ponto Jarreteira = Cordões de Tricô Ponto Liga = Ponto Tricô Croché: mpa - meio ponto alto pa - ponto alto pad - ponto alto duplo pat - ponto alto triplo pb - ponto baixo pbx - ponto baixíssimo pc - ponto corrente ---------------------------------------------------------- PONTO JARRETEIRA (em idas e voltas): Tricotar todas as carreiras em meia. 1 barra jarreteira = 2 carreiras meia. DIMINUIÇÕES: Para calcular quando fazer as diminuições, dividir o número total de ms/pts (por ex. 75 ms/pts), menos as ms/pts das orlas (por ex. 12 ms/pts) pelo número de diminuições a fazer (por ex. 13) = 4.8. Ou seja, neste exemplo, tricotam-se juntamente em meia cerca de cada 4.ª e 5.ª m/p (não diminuir nas ms/pts das orlas). CASAS: Fazer 2 casas de cada lado da frente. 1 casa = arrematar a 3.ª e a 4.ª m/p a partir do rebordo e na carreira seguinte, montar 2 ms/pts por cima das ms/pts arrematadas. Fazer as casas quando a peça medir 16 e 26 cm para todos os tamanhos (ou o comprimento desejado). ---------------------------------------------------------- COLETE: Tricota-se em idas e voltas na agulha circular em 2 partes que são unidas, entre elas, nos ombros. COSTAS: Montar 75-81-87-93-99-105 ms/pts (incluindo 6 ms/pts ourela de cada lado da peça) com a agulha circular 7 mm com 1 fio Cloud, 1 fio Wish ou 2 fios Air. Tricotar 1 carreira liga/tricô pelo avesso, depois, a carreira seguinte da seguinte maneira pelo direito: 6 ms/pts de orla em ponto jarreteira - ver acima - *3 ms/pts liga/tricô, 3 ms/pts meia*, repetir de * a * até restarem 9 ms/pts e terminar com 3 ms/pts liga/tricô e 6 ms/pts de orla em ponto jarreteira. Continuar o canelado/barra desta maneira até a peça medir 21 cm. Na carreira seguinte pelo avesso, mudar para a agulha 8 mm e, ao mesmo tempo, distribuir 13-15-17-17-17-15 diminuições - VER DIMINUIÇÕES = 62-66-70-76-82-90 ms/pts. Tricotar em ponto meia com 6 ms/pts de orla em ponto jarreteira de cada lado da peça. NÃO ESQUECER DE MANTER A MESMA TENSÃO DA INDICADA PARA A AMOSTRA! A 63-65-67-69-71-73 cm de altura total, colocar em espera as ms/pts no princípio de cada carreira de cada lado da peça num alfinete de ms/pts para o viés dos ombros da seguinte maneira (NOTA: para evitar ter a cortar o fio, tricotar as ms/pts antes de as colocar no alfinete de ms/pts): Colocar 2-3-2-2-3-2 vezes 7-8-8-9-10-11 ms/pts e 1-0-1-1-0-1 vez 8-0-9-10-0-12 ms/pts num alfinete de ms/pts de cada lado da peça. AO MESMO TEMPO, quando a peça medir 65-67-69-71-73-75 cm, arrematar as 16-16-18-18-20-20 ms/pts centrais para o decote e terminar cada ombro separadamente. Arrematar 1 m/p na carreira seguinte a partir do decote. Quando todas as ms/pts foram arrematadas/colocadas em espera, temos 22-24-25-28-30-34 ms/pts num alfinete de ms/pts para o ombro e a peça mede cerca de 67-69-71-73-75-77 cm desde a parte de cima do ombro até à parte de baixo. Retomar as ms/pts em espera com a agulha circular 7 mm e tricotar 1 carreira meia pelo avesso (para evitar buracos nas transições das ms/pts colocadas no alfinete de ms/pts, levantar o fio entre 2 ms/pts e tricotá-lo torcido em meia com a m/p seguinte da agulha esquerda). Arrematar então FROUXAMENTE todas as ms/pts em meia pelo direito. Repetir para o outro ombro. FRENTE: Montar as ms/pts e tricotar como se fez para as costas, mas a 14 cm de altura de canelado/barra, distribuir as diminuições como se fez para as costas (a frente é 7 cm mais curta do que as costas). Tricotar como se fez para as costas mas quando a peça medir 16 e 26 cm, fazer as CASAS de cada lado da peça - ver acima! Continuar até a peça medir 53-55-57-58-60-62 cm. Colocar, então, as 10-10-12-12-14-14 ms/pts centrais num alfinete de ms/pts para o decote e terminar cada ombro separadamente. Arrematar para o decote no princípio de cada carreira a partir do decote: 1 vez 2 ms/pts e 2 vezes 1 m/p. AO MESMO TEMPO, quando a peça medir 56-58-60-62-64-66 cm, colocar as ms/pts em espera num alfinete de ms/pts para o viés dos ombros como se fez para as costas. Quando todas as ms/pts foram colocadas em espera/arrematadas, temos 22-24-25-28-30-34 ms/pts no alfinete de ms/pts para o ombro e a peça mede cerca de 60-62-64-66-68-70 cm desde a parte de cima do ombro até à parte de baixo. Retomar as ms/pts em espera com a agulha circular 7 mm e tricotar 1 carreira meia pelo avesso como se fez para as costas. Arrematar todas as ms/pts em meia pelo direito. Repetir para o outro ombro. MONTAGEM: Costurar os ombros – ter atenção para que a costura não fique demasiado apertada. Colocar a orla em ponto jarreteira com casas (frente) de um lado da pulôver por cima da orla em ponto jarreteira das costas e costurar os botões. Repetir no outro lado. GOLA: Levantar pelo direito cerca de 46 a 58 à volta do decote (incluindo as ms/pts em espera) com a pequena agulha circular 7 mm om 1 fio Cloud, 1 fio Wish ou 2 fios Air. Tricotar 1 carreira liga/tricô, 1 carreira meia, 1 carreira liga/tricô e arrematar FROUXAMENTE em meia. |
|
 |
|
Terminou este projecto?Então, identifique as suas fotos com as tags #dropspattern #winteriscomingslipover ou mostre-as na galeria #dropsfan. Precisa de ajuda para este modelo?Encontrará 21 turotiais em vídeo, uma rubrica Comentários/Perguntas e muito mais ao visitar a página do modelo em www.garnstudio.com © 1982-2026 DROPS Design A/S. Todos os direitos reservados. Este documento, incluuindo as suas su-secções, tem copyrights. Saia mais o que pode fazer com os nossos modelos no fim de cada uma das páginas do nosso site. |
|


Com mais de 40 anos no design de modelos de tricô e de croché, a DROPS Design oferece uma das mais vastas colecções demodelos gratuitos na Internet - traduzidos em 17 línguas. Neste dia de hoje, temos 324 catálogos e 12290 modelos - dos quais 12271 estão traduzidos em português.
Trabalhamos com muito empenho para lhe proporcionar o melhor que o tricô e o croché têm para oferecer, para lhe fornecer inspiração e conselhos bem como fios da mais elevada qualidade a preços incríveis! Gostaria de usar os nossos modelos para outros fins que não uso pessoal? Pode ler o que lhe é permitido fazer no Copyright texto que se encontra na parte de baixo de todos os nossos modelos. Bom tricô! Bom croché!
Deixe um comentário acerca do modelo DROPS 173-47
Gostaríamos muito de saber o que tem a dizer-nos acerca deste modelo!
Se deixar uma pergunta acerca do modelo, certifique-se de que escolhe a categoria adequada no formulário abaixo para acelerar o processo relativo à resposta. Os campos obrigatórios estão assinalados com um *.