
Categorias populares
Procura um fio?


Comentários / Perguntas (52)
![]() Lisbeth Beyer escreveu:
Lisbeth Beyer escreveu:
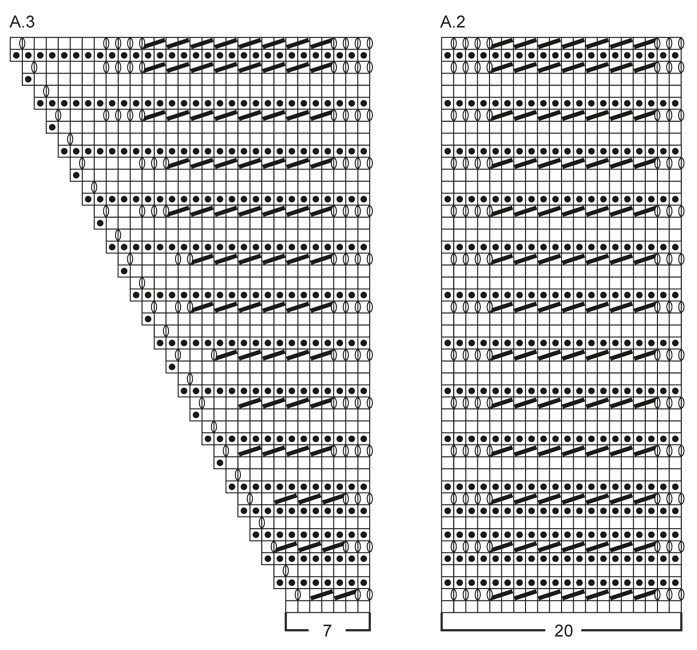
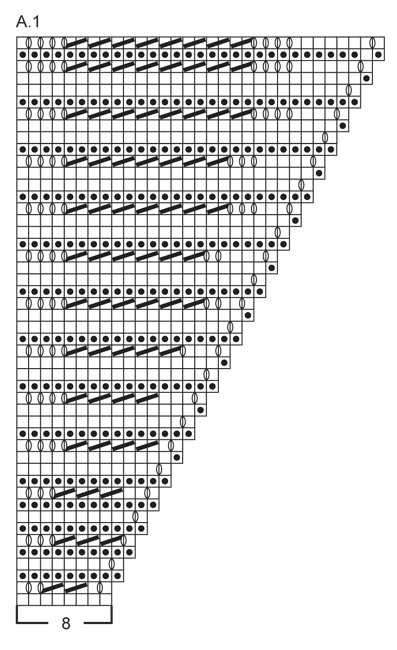
Skal starte med diagrammet finder der et sted man kan checke antallet af masker pr. runde i diagrammet, synes ikke det passe ? Hvis midte sættet (diagram A.) er 40 masker hvordan ender jeg så på 140.
11.02.2019 - 20:14DROPS Design respondeu:
Hej Lisbeth, du har 155 m på en side, strikker A.1 (8m), så A.2 (20m) 7 gange og sidst A.3 (7m) =155 m. Således strikker du på hver side. Det er kun A.1 og A.3 du tager ud, det vil sige at du tager 2 masker ud i hvert hjørne (ifølge diagrammerne) på hver 2.pind. God fornøjelse!
12.02.2019 - 09:52
![]() Susanne Madsen escreveu:
Susanne Madsen escreveu:
Hvor meget garn bruges der? Har en veninde der bestilte 8 ngl, strikkefasthed passer. Hun har bestilt mere, men kunne ikke få samme indfarvning. Det er ikke ok. Resultatet bliver ikke tilfredsstillende, samtidig med at tæppet bliver dyrere. ØV, det er ikke godt nok
09.11.2018 - 00:46DROPS Design respondeu:
Hej Susanne, Vi har brugt 7 nøgler DROPS Baby Merino, vi har ikke fået information om at det er for lidt.... men prøv også at måle strikkefastheden i højden. Strikker man strammere end hvad vi gør ifølge opskriften, så får man flere pinde på 10 cm og da går der også mere garn. God fornøjelse!
09.11.2018 - 10:52
![]() Hege Tandberg escreveu:
Hege Tandberg escreveu:
Da skjønner jeg at drops oppskrifter ikke er noe for meg. Så løst klarer jeg ikke å strikke.
21.08.2018 - 18:57
![]() Hege Tandberg escreveu:
Hege Tandberg escreveu:
Strikket med pinne 4. Da jeg var halvveis hvor det skulle være 76 riller og 52 cm hadde jeg bare 42 cm. Begynte på nytt med pinne 4 1/2, halvveis er det nå 46 cm. Dvs. at jeg må opp i pinne 5 1/2 for at oppskriften skal passe til garnet som er anbefalt. Forferdelig kjedelig. Hvor løst skal jeg måtte strikke? Mener jeg strikker normalt. Denne oppskriften kan umulig være riktig.
19.08.2018 - 19:23DROPS Design respondeu:
Hei Hege, Vi alle strikker forskjellig. Prøv å strikke 10 x 10 cm for å se hvilken pinne størrelse du trenger. God fornøyelse!
21.08.2018 - 07:46
![]() Hege Tandberg escreveu:
Hege Tandberg escreveu:
Strikket med pinne 4. Da jeg var halvveis hvor det skulle være 76 riller og 52 cm hadde jeg bare 42 cm. Begynte på nytt med pinne 4 1/2, halvveis er det nå 46 cm. Dvs. at jeg må opp i pinne 5 1/2 for at oppskriften skal passe til garnet som er anbefalt. Forferdelig kjedelig. Hvor løst skal jeg strikke? Mener jeg strikker normalt. Denne oppskriften kan umulig være riktig.
02.08.2018 - 15:34
![]() Mandy escreveu:
Mandy escreveu:
Hallo, ich würde die Decke gerne 2-farbig arbeiten. Wieviel Wolle muss ich für die Decke und wieviel für den Wellenrand rechnen? Vielen Dank im Voraus.
03.03.2018 - 11:30DROPS Design respondeu:
Liebe Mandy, leider haben wir dafür keine Erfahrung, da diese Decke nur mit einer Farbe gestrickt wurde. Ihr DROPS Laden kann Ihnen aber vielleicht weiterhelfen. Viel Spaß beim stricken!
05.03.2018 - 10:13
![]() Wertemberg McGuinness Marta escreveu:
Wertemberg McGuinness Marta escreveu:
Bonjour, je commence la bordure avec aiguilles circulaires et dans un commentaire vous dites de tricoter chaque côté séparément. On fait donc une couture ensuite aux quatre coins? Merci beaucoup!
14.08.2017 - 07:21DROPS Design respondeu:
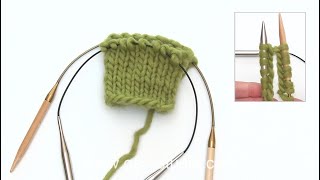
Bonjour Marta. Il n'y a aucune couture. Etant donné le nombre de mailles vous travaillez sur 4 aiguilles circulaires en rond. BON TRICOT!
14.08.2017 - 10:09
![]() Lene escreveu:
Lene escreveu:
Mønstret læses fra højre mod venstre i hver af de tre diagrammer, tak Lone
11.07.2017 - 19:11
![]() Lene Bagge escreveu:
Lene Bagge escreveu:
I hvilken side starter mønsteret i hhv. A1, A2 og A3?
09.07.2017 - 16:02DROPS Design respondeu:
Du starter altid diagrammet i nederste højre hjørne, strikker første pind i A.1, går over til A.2 også nederst i højre hjørne og sidst A.3, således fortsætter du hele vejen rundt langs med hver side af tæppet. God fornøjelse!
12.07.2017 - 12:27
![]() Kathrine escreveu:
Kathrine escreveu:
Hei, Jeg strikker dette teppet og på bølgemønsteret har alt stemt hele veien. Når jeg kommer til omgang nummer 14 i diagrammene har jeg to masker for mye når jeg kommer til slutten av A3. Jeg har telt over flere ganger, men klarer ikke å se at jeg har strikket feil. Kan det være noe som ikke stemmer i diagrammet?
19.06.2017 - 09:39DROPS Design respondeu:
Hei Kathrine. Hvor mange masker har du på hele 14. omgang? 676 masker? Når vi ser over 1. - 14. omgang skal det stemme med hvor mange 2 rett sammen man strikker og hvor mange kast man gjør.
23.06.2017 - 13:46
|
|||||||||||||
Baby Bliss#babyblissblanket |
|||||||||||||
 |
 |
||||||||||||
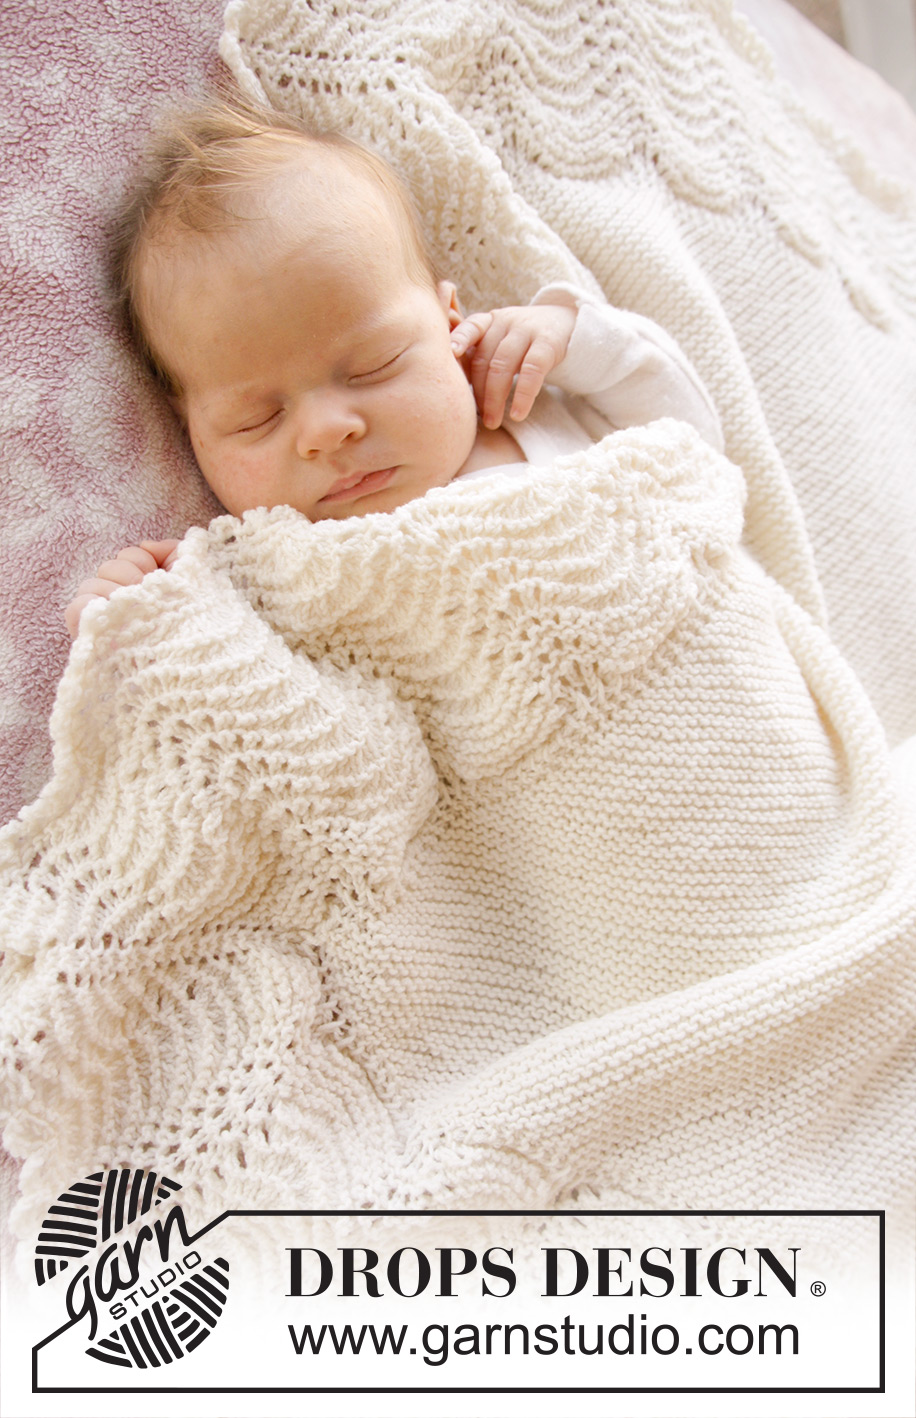
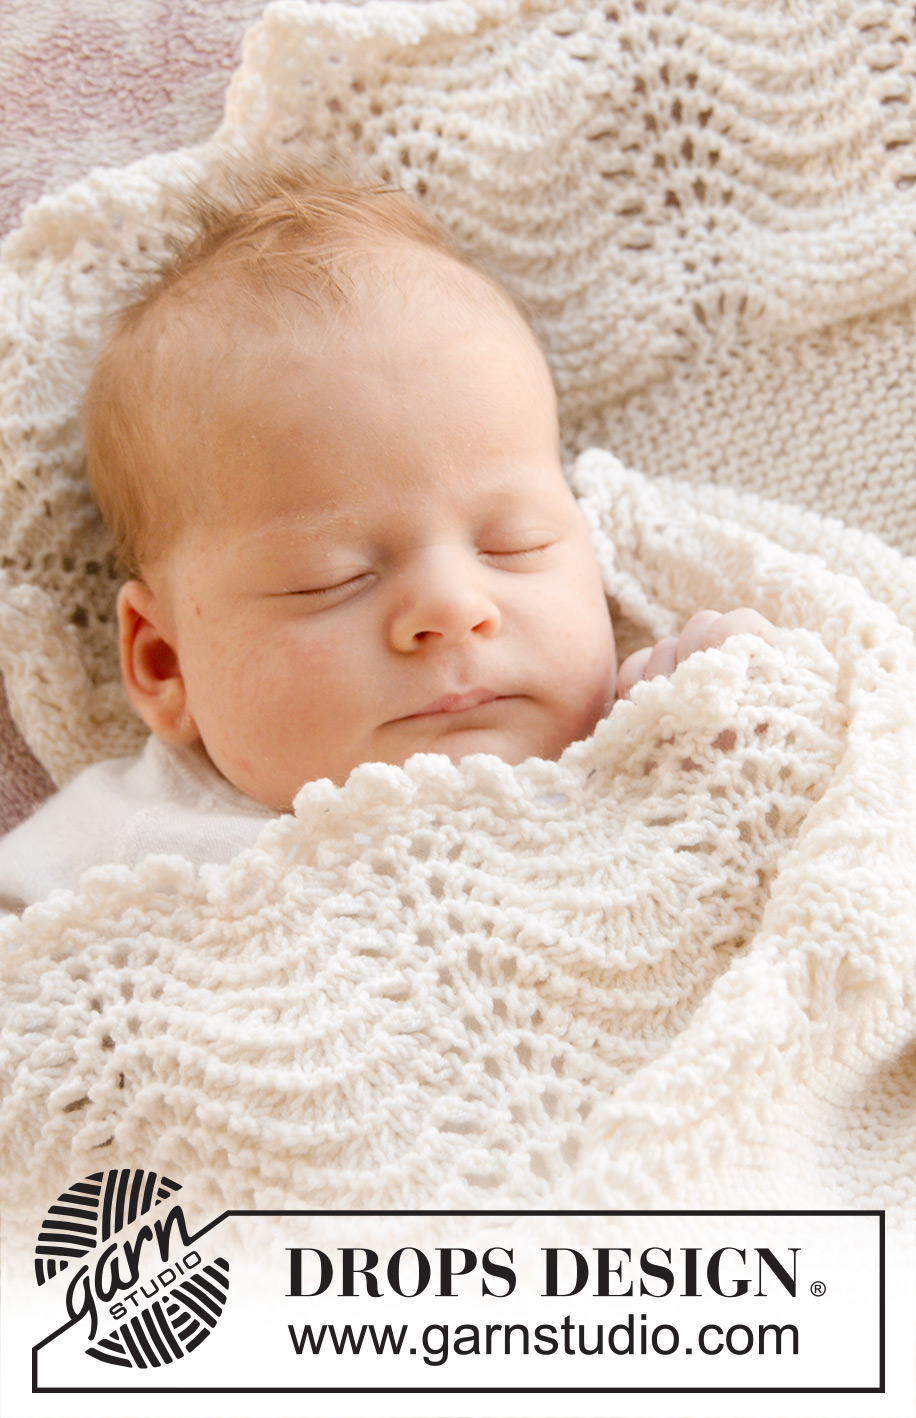
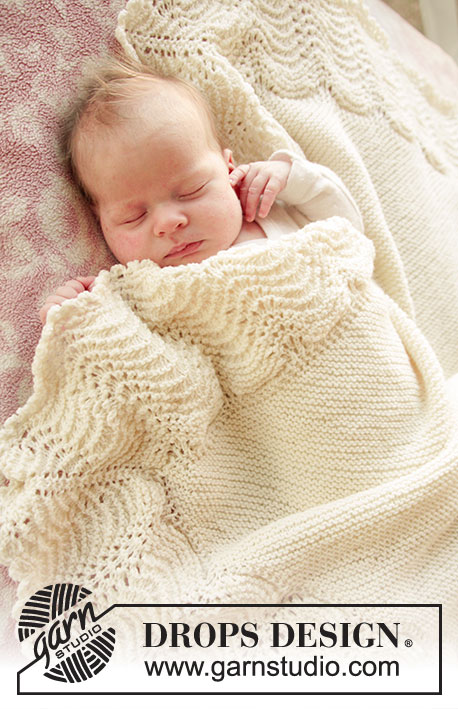
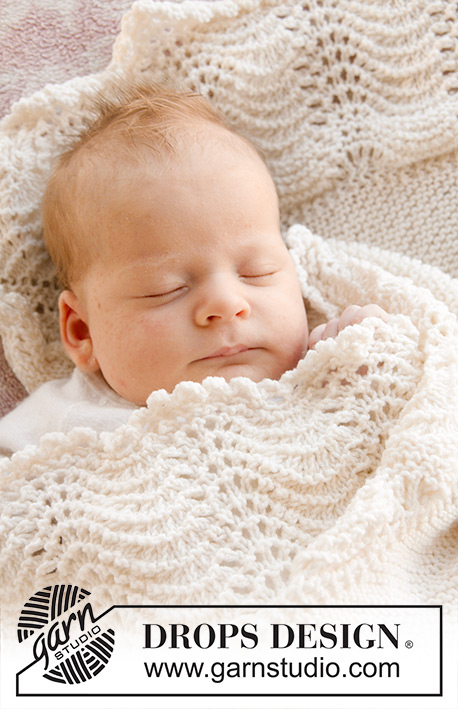
Manta tricotada em ponto jarreteira com orla em ponto de ondas para bebés em DROPS BabyMerino
DROPS Baby 25-2 |
|||||||||||||
|
---------------------------------------------------------- NOTA: Existem termos diferentes de tricô e croché em português de Portugal e do Brasil. TRICÔ : Malha = Ponto Canelado = Barra Ponto Jarreteira = Cordões de Tricô Ponto Liga = Ponto Tricô CROCHÉ : mpa – meio ponto alto pa – ponto alto pad – ponto alto duplo pat – ponto alto triplo pb – ponto baixo pbx – ponto baixíssimo pc – ponto corrente ---------------------------------------------------------- PONTO JARRETEIRA (em em idas e voltas): Tricotar todas carreiras em meia. 1 barra jarreteira = 2 carreiras meia. PONTO FANTASIA: Ver diagramas A.1 a A.3. ---------------------------------------------------------- MANTA : Tricota-se em idas e voltas na agulha circular. Tricotar primeiro na diagonal, de um canto ao outro, depois fazer a orla em ponto de ondas, em redondo, na agulha circular - NOTA: devido ao número de ms/pts, utiliza-se 1 agulha circular para cada um dos 4 lados da manta. Montar 3 ms/pts com a agulha circular 4 mm em Baby Merino e tricotar 1 carreira meia. Continuar então em PONTO JARRETEIRA - ver acima - e, AO MESMO TEMPO, aumentar da seguinte maneira no princípio de cada carreira: 1 m/p meia, tricotar 2 vezes a m/p seguinte alternadamente na alça da frente e na alça de trás, e tricotar em meia as restantes ms/pts, virar a peça. Continuar em idas e voltas desta maneira. NÃO ESQUECER DE MANTER A MESMA TENSÃO DA INDICADA PARA A AMOSTRA ! Depois de 76 barras jarreteira (= 155 ms/pts na agulha), a manta mede 52 cm ao longo de cada um dos 2 lados. Diminuir então no princípio de cada carreira da seguinte maneira: 1 m/p meia, 2 ms/pts tricotadas juntamente em meia, tricotar em meia as restantes ms/pts da carreira, virar a peça. Continuar desta maneira até restarem 3 ms/pts. Deslizar, então, 1 m/p em meia, tricotar 2 ms/pts juntamente em meia, passar a m/p deslizada por cima da m/p tricotada. Cortar o fio, passá-lo pela restante m/p, arrematar. A manta mede 52 cm de lado. ORLA PONTO DE ONDAS : Começar a meio de um dos cantos da manta e levantar, pelo direito, com a agulha circular 4 mm em natural as ms/pts a toda a volta: *Levantar 1 m/p no canto, 1 m/p no rebordo de cada barra jarreteira e fazer 1 laçada entre todas as ms/pts até ao canto seguinte, levantar 1 m/p no canto* = 155 ms/pts ao longo de um lado da manta. Começar com a agulha circular seguinte e repetir de * a * ao longo do lado seguinte da manta – NOTA: Ao levantar as ms/pts desta maneira, temos 2 ms/pts a cada canto. Repetir da mesma maneira ao longo dos 2 lados seguintes = 620 ms/pts distribuídos opor 4 agulhas circulares. Tricotar 1 carreira meia (= 1.ª carreira do diagrama), depois, a carreira seguinte da seguinte maneira : *A.1 (= 8 ms/pts), repetir A.2 acima das 140 ms/pts seguinte, A.3 (= 7 ms/pts) *, repetir de * a * ao longo dos 4 lados. Continuar desta maneira. Quando faltar fazer a última carreira de A.1, A.2 e A.3, a orla mede cerca de 13 cm. Tricotar a última carreira de A.1, A.2 e A.3 e, AO MESMO TEMPO, arrematar FROUXAMENTE – a orla será ondulada, como o ponto fantasia. ORLA EM CROCHÉ: Fazer uma orla de acabamento a toda a volta da manta, com a agulha de croché 4 mm em natural da seguinte maneira: 1 pb na m/p antes das 2 ms/pts num dos cantos, 4 pc, 1 pa no 1.º pc dos 4 pc, saltar as 2 ms/pts do canto, 1 pb na m/p seguinte, * 4 pc, 1 pa no 1.º dos 4 pc, saltar cerca de 2 ms/pts, 1 pb na m/p seguinte *, repetir de * a * a toda a volta da manta, mas ter atenção para que haja um picot em cada um dos cantos, terminar a carreira com 1 pbx no 1.º pb do princípio da carreira. Arrematar. |
|||||||||||||
Explicações do diagrama |
|||||||||||||
|
|||||||||||||
 |
|||||||||||||
 |
|||||||||||||
Terminou este projecto?Então, identifique as suas fotos com as tags #dropspattern #babyblissblanket ou mostre-as na galeria #dropsfan. Precisa de ajuda para este modelo?Encontrará 17 turotiais em vídeo, uma rubrica Comentários/Perguntas e muito mais ao visitar a página do modelo em www.garnstudio.com © 1982-2026 DROPS Design A/S. Todos os direitos reservados. Este documento, incluuindo as suas su-secções, tem copyrights. Saia mais o que pode fazer com os nossos modelos no fim de cada uma das páginas do nosso site. |
|||||||||||||


Com mais de 40 anos no design de modelos de tricô e de croché, a DROPS Design oferece uma das mais vastas colecções demodelos gratuitos na Internet - traduzidos em 17 línguas. Neste dia de hoje, temos 324 catálogos e 12290 modelos - dos quais 12271 estão traduzidos em português.
Trabalhamos com muito empenho para lhe proporcionar o melhor que o tricô e o croché têm para oferecer, para lhe fornecer inspiração e conselhos bem como fios da mais elevada qualidade a preços incríveis! Gostaria de usar os nossos modelos para outros fins que não uso pessoal? Pode ler o que lhe é permitido fazer no Copyright texto que se encontra na parte de baixo de todos os nossos modelos. Bom tricô! Bom croché!
Deixe um comentário acerca do modelo DROPS Baby 25-2
Gostaríamos muito de saber o que tem a dizer-nos acerca deste modelo!
Se deixar uma pergunta acerca do modelo, certifique-se de que escolhe a categoria adequada no formulário abaixo para acelerar o processo relativo à resposta. Os campos obrigatórios estão assinalados com um *.