
Categorias populares
Procura um fio?


Comentários / Perguntas (40)
Christel Zondagh escreveu:
Thanks for the previous answer. I am still battling with the lace edge. Do I have to attach the last stitch of the wrong side row to the edge as well or only the first stitch of the RS row?
15.12.2017 - 10:46DROPS Design respondeu:
Dear Mrs Zondagh, when working lace edge together with shawl, at the beginning of RS rows worked on lace edge, pick up 1 st from shawl with right needle, work the first st on left needle (= 1st st in A.4 for the lace edge) and pass the picked up st from shawl over the worked stitch, work remaining sts on row, turn and work WS row. Along right side of shawl, from WS: pick up a stitch from shawl, work 1st st on lace edge (= 1st st in A.5) and pass the picked up st over the worked st, work remaining st on row, turn and work next row from RS. Happy knitting!
15.12.2017 - 11:06Christel escreveu:
Hi, regarding the lace edge: 1.How many "leaves on one side of the shawl? 2. Are there 154 stitches on each side of the shawl? 3. Do you have to attach every row to the edge of the shawl? 4. Is there a tutorial on something similar?
29.10.2017 - 21:01DROPS Design respondeu:
Dear Christel, according to the pattern, after the last row of the body of the shawl, you should have 301 stitch on the row, that makes 150 stitch on both side and the middle stitch. Yes, you have to attach the edge to the body by knitting the first stitch of every RS row together a stitch from teh body. I hope this helps. Happy knitting!
26.11.2017 - 17:21
![]() Hilde escreveu:
Hilde escreveu:
Er staat: Ga verder en brei volgens A.1/A.2/A.3 tot de telpatronen in totaal 4 keer in de hoogte zijn gebreid. houden we nog rekening met de middenste steek? wordt daar nog een omslag gebreid?
29.08.2017 - 09:45DROPS Design respondeu:
Hallo Hilde, Jazeker, de middensteek brei je daarnaast ook gewoon verder zoals in de tekst staat.
04.11.2017 - 16:07Christel escreveu:
Hi! 1. I understand that there is an increase of 8 stitches after every A1, A2, A3 repetition. So after 4 times in total, I would have increased it by 32 stitches. And then 8 more before I start the lace edge. But where do the rest come from to get to 301 stitches? 2. When doing A1, A2, A3, must I start every row with 3 sts in garter stitch? Even the pearl rows? Thanks!
25.05.2017 - 21:55DROPS Design respondeu:
Dear Christel, you are working A.1, A.2 and A.3 on both sides of the middle st, ie you will inc 8 sts in diagrams on each side = 16 sts inc for every repeat in height. You work diagrams 4times in height x 16 sts inc = 64 sts inc + 229 sts + 8 sts inc evenly on last row from WS = 301 sts. Happy knitting!
26.05.2017 - 11:03
![]() Jacqueline Caillot escreveu:
Jacqueline Caillot escreveu:
Je comprends que ma question à déjà été posée mais je ne sais pas traduire...mon problème concerne le point fantaisie et le rang 8 car je n' ai pas un nombre pair: 3 mousse + 7m +1 m centrale +7m + 3 mousse Merci pour votre aide
29.05.2016 - 09:31DROPS Design respondeu:
Bonjour Mme Caillot, vous augmentez 4 m tous les 2 rangs (= tous les rangs sur l'endroit), au rang 8, vous avez augmentez 4 x (rangs 1,3,5 et 7) et vous avez 25 m, tricotez: 3 m end, (*2 m ens à l'end, 1 jeté* répétez de *-* et terminez par 1 m end)), la m centrale, répétez de (à) et 3 m end. Bon tricot!
30.05.2016 - 09:44
![]() Reidun Pettersen escreveu:
Reidun Pettersen escreveu:
I sjal nr150-38 skal blonden strikkes sammen meb sjalet. Det står at det skal plukke opp 1m fra høyre og så strikke det sammen med 1 maske fra venstre. Jeg fårstår det, men hva gjør jeg videre??
14.08.2015 - 16:46DROPS Design respondeu:
Hej, Jo men så vender du bare og strikker tilbage over blonden. Således strikker du frem og tilbage over blonden og strikker den sammen med kanten på andenhver p. God fornøjelse!
01.10.2015 - 16:51
![]() Eva escreveu:
Eva escreveu:
Ich komme mit dem Lochmuster nicht klar. Ich habe 3 M kraus rechts als Rand, dann eine ungerade Zahl M, dann 1 Mittelmasche, wieder eine ungerade Zahl M und dann die 3 M Rand. Wie kann ich da Lochmuster *2 M re zusammen, 1 Umschlag* stricken? Dafür brauche ich doch eine gerade Anzahl M.
05.07.2015 - 14:07DROPS Design respondeu:
Sie stricken die M, die übrig bleibt, einfach re. Auf diese Weise erscheint das Muster dann auch jeweils beidseitig symmetrisch.
06.07.2015 - 11:11
![]() Monique Hannay escreveu:
Monique Hannay escreveu:
I am confused about the Lace Edge: are we talking about the left side looking from the top down towards the tip or the other way around? It looks to me like pattern A4 should come down the right side if holding the shawl with the RS facing me and the tip pointing down? (working A4 upside down)
19.05.2015 - 18:15DROPS Design respondeu:
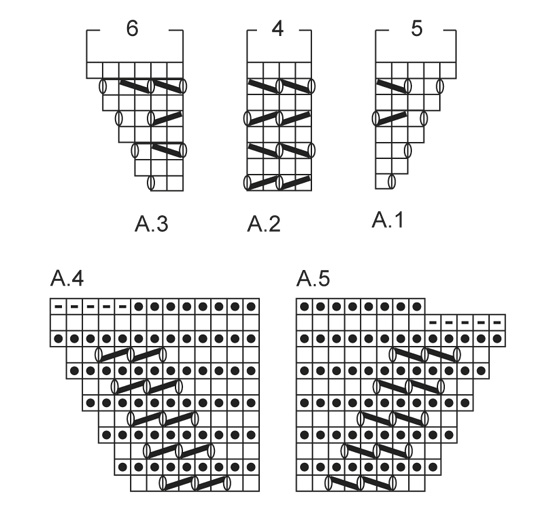
Dear Mrs Hannay, you work A.4 along the left side of shawl, seen from RS starting on top edge of shawl towards the tip, cast on 8 sts and work A.4 starting from bottom corner on the right side, and every row from RS pick up 1 st from shawl, work 1st st in A.4 and pass the st picked up from shawl over the 1st st in A.4, work remaining sts in A.4. Happy knitting!
20.05.2015 - 09:48
![]() Hilde escreveu:
Hilde escreveu:
Sliter med å forstå pinne nr 8. Jeg har nå 25 masker på pinnen etter pinne 7. Hvis jeg leser øketips riktig skal jeg strikke kastene rett. Dermed blir det på pinne 8 (som er fra vrangen) slik: 4 rette, 2 rett sammen, kast, 2 rett sammen, kast, 2 rett sammen, kast, men så har jeg bare en maske før neste kast fra forrige pinne før midtmasken og det virker rart. Det er åpenbart at jeg gjør noe galt, men hva?
17.04.2015 - 21:43DROPS Design respondeu:
Hej Hilde, Nej men det gør ikke noget, den strikker du bare ret. God fornøjelse!
15.05.2015 - 11:06
![]() Anne Marie Olsen escreveu:
Anne Marie Olsen escreveu:
På 8. Pinne med hullmønster skal det strikkes 2 rette sammen + kast , ut pinnen. Skal jeg starte etter de tre rillemasker? Skal midtmaske strikkes rett også på denne pinnen? Altså holdes utenom sammenstrikkinga?
06.04.2015 - 19:40DROPS Design respondeu:
Hej Anne Marie, Det stemmer, du holder de 3 rillemasker og midtmaskerne udenfor mønsteret. God fornøjelse!
15.05.2015 - 10:18
|
|||||||||||||||||||
Silver Mist#silvermistshawl |
|||||||||||||||||||
 |
 |
||||||||||||||||||
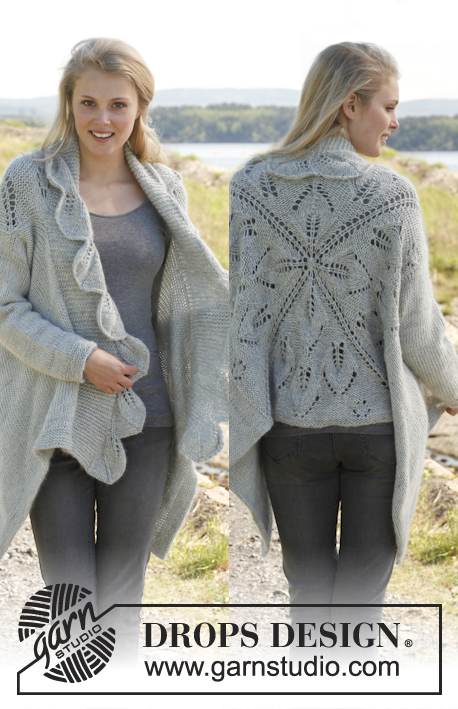
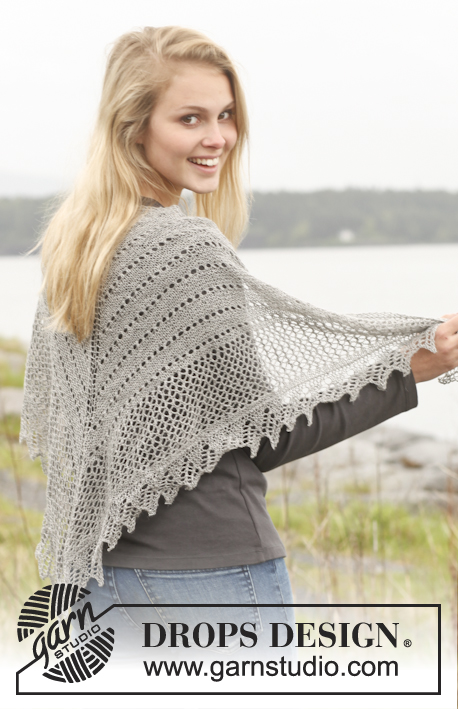
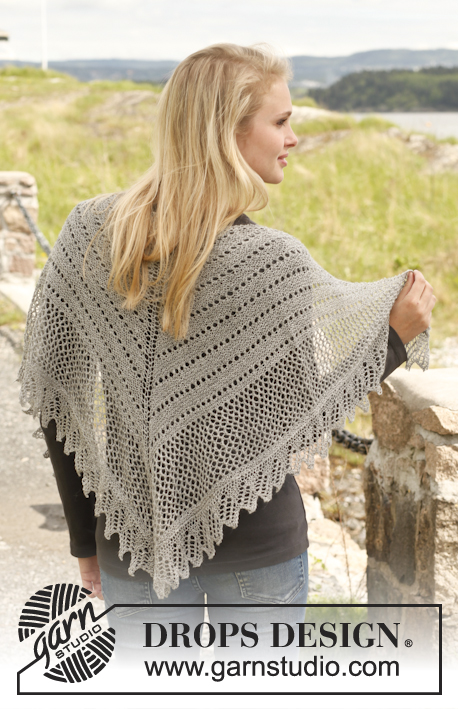
Xaile DROPS em ponto jarreteira e ponto rendado, em ”Lace”.
DROPS 150-38 |
|||||||||||||||||||
|
---------------------------------------------------------- NOTA: Existem termos diferentes de tricô e croché em português de Portugal e do Brasil. TRICÔ : Malha = Ponto Canelado = Barra Ponto Jarreteira = Cordões de Tricô Ponto Liga = Ponto Tricô CROCHÉ : mpa – meio ponto alto pa – ponto alto pad – ponto alto duplo pat – ponto alto triplo pb – ponto baixo pbx – ponto baixíssimo pc – ponto corrente ---------------------------------------------------------- PONTO JARRETEIRA (em idas e voltas) : Tricotar todas as carreiras em meia. PONTO FANTASIA COM AJOURS : Carreiras 1-7: Tricotar todas as ms/pts em meia pelo direito e em meia pelo avesso Carreira 8 (pelo avesso): * 2 ms/pts tricotadas juntamente em meia, 1 laçada *, repetir de * a *. Carreiras 9-12: Tricotar todas as ms/pts em meia pelo direito e em meia pelo avesso Repetir estas 12 carreiras. AUMENTOS: Todos os aumentos se fazem pelo direito. Aumentar 4 ms/pts (1 m/p de cada lado da peça e 2 ms/pts a meio) em todas as carreiras, pelo direito, da seguinte maneira: 3 ms/pts em ponto jarreteira, 1 laçada, continuar até à m/p com o marcador (= m/p central), 1 laçada, 1 m/p meia (= m/p central), 1 laçada, continuar até restarem 3 ms/pts, 1 laçada, 3 ms/pts em ponto jarreteira. Na carreira seguinte, (pelo avesso), tricotar todas as ms/pts, incluindo as laçadas, em meia. ---------------------------------------------------------- XAILE: Tricota-se em idas e voltas na agulha circular para que haja espaço suficiente para todas as ms/pts, a partir do meio das costas em direcção à ponta. Montar 7 ms/pts com a agulha circular 3.5 mm e o fio Lace. Colocar 1 marcador na 4.ª m/p (= m/p central) e fazê-la deslizar à medida que vai tricotando. Tricotar a 1.ª carreira da seguinte maneira (= pelo direito): 3 ms/pts em PONTO JARRETEIRA - ver explicações acima -, 1 laçada, 1 m/p meia (= m/p central com o marcador), 1 laçada, 3 ms/pts em ponto jarreteira = 9 ms/pts. Tricotar, então, em PONTO FANTASIA COM AJOURS com 3 ms/pts em ponto jarreteira de cada lado da peça e, AO MESMO TEMPO, aumentar 4 ms/pts em todas as carreiras, pelo direito - Ver AUMENTOS! Continuar a aumentar até haver 229 ms/pts. A peça mede cerca de 37 cm – medir no sentido do tricô a partir da montagem até às ms/pts que estão na agulha. Tricotar, então, da seguinte maneira: 3 ms/pts em ponto jarreteira, A.1, A.2 acima das 108 ms/pts seguintes, continuar até restarem 2 ms/pts antes da m/p central, tricotar A.3, 1 m/p em ponto jarreteira (= m/p central), A.1, A.2 acima das 108 ms/pts seguintes até restarem 5 ms/pts, tricotar A.3 e 3 ms/pts em ponto jarreteira. Continuar no ponto fantasia A.1/A.2/A.3 até os diagramas terem sido tricotados num total de 4 vezes em altura. Sempre que A.1/A.2/A.3 são tricotados 1 vez em altura, temos ms/pts suficientes para tricotar 2 vezes a mais A.2 entre A.1 e A.3 de cada lado da m/p central - AO MESMO TEMPO, na última carreira da última repetição (= pelo avesso), distribuir 8 aumentos tricotando 2 vezes a mesma m/p a intervalos regulares = 301 ms/pts. Tricotar 2 barras jarreteira em todas as ms/pts (não esquecer de aumentar como antes de cada lado da peça e ao meio) - há 309 ms/pts na agulha - e arrematar. ORLA EM AJOURS : Montar 8 ms/pts com a agulha circular 3.5 mm e o fio Lace. Tricotar em idas e voltas, no ponto fantasia A.4 e, AO MESMO TEMPO, unir a orla ao xaile – começar na parte de cima do xaile e fixar a orla ao longo da diagonal esquerda até à ponta da parte de baixo. Unir a orla ao xaile da seguinte maneira – em todas as carreiras do direito: Levantar na alça da frente da m/p mais exterior do xaile com a agulha direita, tricotar a 1.ª m/p da agulha esquerda (1.ª m/p de A.4), passar a m/p deslizada por cima da m/p tricotada, tricotar as restantes ms/pts da carreira. Quando a orla tiver sido tricotada a todo o comprimento até à ponta do xaile, tricotar em ponto jarreteira em todas as ms/pts e, AO MESMO TEMPO, arrematar 1 m/p no princípio de cada carreira, pelo avesso, e continuar em ponto jarreteira até todas as ms/pts terem sido arrematadas. Repetir ao longo do lado direito do xaile mas tricotar, então, A.5. Fixar a orla ao xaile da seguinte maneira – em todas as carreiras pelo avesso: Levantar a alça da frente da m/p mais exterior do xaile com a agulha direita, tricotar a 1,ª m/p da agulha esquerda (1.ª m/p de A.5), passar a nova m/p por cima, tricotar as restantes ms/pts da carreira. Unir as ms/pts arrematadas de A.4 e A.5 umas às outras, por baixo da ponta. BLOCAGEM : Colocar o xaile em água morna até ficar totalmente molhado. Pressionar cuidadosamente o xaile para retirar a água – não o torcer – e, depois, enrolá-lo numa toalha e pressionar suavemente para retirar mais água – o xaile está, agora, apenas húmido. Colocá-lo num tapete ou sobre um colchão – esticá-lo cuidadosamente até obter as dimensões indicadas e fixá-lo cuidadosamente com alfinetes. NOTA : colocar 1 alfinete de cada lado do xaile, e fixar 1 alfinete a meio de cada repetição ao longo das 2 diagonais, e 1 alfinete na m/p central (= ponta da parte de baixo do xaile), esticar ligeiramente antes de colocar cada alfinete para que as orlas formem pequenas pontas. Deixar secar. Repetir depois de cada lavagem. |
|||||||||||||||||||
Explicações do diagrama |
|||||||||||||||||||
|
|||||||||||||||||||
 |
|||||||||||||||||||
Terminou este projecto?Então, identifique as suas fotos com as tags #dropspattern #silvermistshawl ou mostre-as na galeria #dropsfan. Precisa de ajuda para este modelo?Encontrará 15 turotiais em vídeo, uma rubrica Comentários/Perguntas e muito mais ao visitar a página do modelo em www.garnstudio.com © 1982-2026 DROPS Design A/S. Todos os direitos reservados. Este documento, incluuindo as suas su-secções, tem copyrights. Saia mais o que pode fazer com os nossos modelos no fim de cada uma das páginas do nosso site. |
|||||||||||||||||||


Com mais de 40 anos no design de modelos de tricô e de croché, a DROPS Design oferece uma das mais vastas colecções demodelos gratuitos na Internet - traduzidos em 17 línguas. Neste dia de hoje, temos 324 catálogos e 12290 modelos - dos quais 12271 estão traduzidos em português.
Trabalhamos com muito empenho para lhe proporcionar o melhor que o tricô e o croché têm para oferecer, para lhe fornecer inspiração e conselhos bem como fios da mais elevada qualidade a preços incríveis! Gostaria de usar os nossos modelos para outros fins que não uso pessoal? Pode ler o que lhe é permitido fazer no Copyright texto que se encontra na parte de baixo de todos os nossos modelos. Bom tricô! Bom croché!
Deixe um comentário acerca do modelo DROPS 150-38
Gostaríamos muito de saber o que tem a dizer-nos acerca deste modelo!
Se deixar uma pergunta acerca do modelo, certifique-se de que escolhe a categoria adequada no formulário abaixo para acelerar o processo relativo à resposta. Os campos obrigatórios estão assinalados com um *.