
Categorias populares
Procura um fio?


Comentários / Perguntas (28)
![]() Mary escreveu:
Mary escreveu:
I am sorry, I have tried many times to work this without success. Can you please just tell me what I should do between the 1st and the 2nd marker in the second raglan? Maybe in this way, I can understand the logic. But if you do not specify the bit between these 2 markers, I am lost. Many thanks in advance!
11.02.2023 - 10:45DROPS Design respondeu:
Dear Mary, Work as follows: marker 1, k1 (=raglan line), 1YO, k7 (= sleeve), 1 YO, k1, 2nd marker, k1 (=raglan line), 1 YO, A.1, A.2, A.3 (for the front), 1 YO, k1, 3rd marker, k1 (= raglan line), e.t.c. Happy knitting!
13.02.2023 - 00:02
![]() Mary escreveu:
Mary escreveu:
Can you please specify which are the stitches included within the first 2 stitch markers? My understanding was that "knit 1, 1 yarn over, knit 7, 1 yarn over, knit 1, insert 1 marker here (transition between right sleeve and front piece), knit 1, 1 yarn over" is within the first 2 stitch markers but if I do what you told me above for the second raglan, I go over the second stitch marker and I think it's wrong, I think I should stay within the 2 stitch markers.
07.02.2023 - 13:28DROPS Design respondeu:
Dear Mary, the round starts between the first 2 raglan stitches, reason why you start with K1 (and end with K1) - then you are right, the next marker is between the 2 knitted stitches at the end of sleeve before front piece. You should have K2 on each raglan lines (K1, marker, K1) and you will increase on either side of these K2. Happy knitting!
07.02.2023 - 16:58
![]() Mary escreveu:
Mary escreveu:
Sorry, I am still not clear. In the first Raglan, I have this bit "knit 1, 1 yarn over, knit 7, 1 yarn over, knit 1, insert 1 marker here". Now, for the second raglan, which is the bit that correspond to this one?
07.02.2023 - 12:15DROPS Design respondeu:
Dear Mary, on the 2nd raglan increase, work; K1 (raglan stitch), YO (new raglan increase for sleeve), K9 (the K7 from 1st round + the 2 raglan increases), YO (new raglan increase for sleeve), K2 (raglan stitches), YO (new raglan increase for body), diagrams etc.. On 3rd raglan increase you will start with K1, YO, K11 (the K9 + the 2 sts increased the 2nd time), YO, K2, etc..Can this help?
07.02.2023 - 13:20
![]() Mary escreveu:
Mary escreveu:
Hi, always following to the last answer I got. So "this means for the 2nd increase, you will work: K1 (raglan st), YO (new increase for raglan), K9 (= K7 + 2 previous inc), YO..." does this mean that the difference between the first raglan and any additional one is that I have to add 2 more K per each increase?
07.02.2023 - 10:59DROPS Design respondeu:
Dear Mary, yes, you need to knit the increases in the next round. So you will have 2 more knitted stitches per increases in each round. Happy knitting!
07.02.2023 - 11:45
![]() Mary escreveu:
Mary escreveu:
Hi, once I have finished the first raglan, the instructions say: "Continue this pattern and increase to raglan every 2nd round.." but does this mean I have to shift to the diagram? I think this passage is not clear at all. If I redo this: "knit 1, 1 yarn over, knit 7, 1 yarn over, knit 1, insert 1 marker here (transition between right sleeve and front piece), knit 1, 1 yarn over, A.1 over the next 5-5-5-6-6-6 stitches, A.." it doe snot work as I have more stitches now. What am I missing?
07.02.2023 - 00:34DROPS Design respondeu:
Dear Mary, the increases for the raglan are worked as explained under RAGLAN at the beginning of the written pattern, this means for the 2nd increase, you will work: K1 (raglan st), YO (new increase for raglan), K9 (= K7 + 2 previous inc), YO (new inc for raglan), K2 (raglan sts), YO (inc for raglan), work row 3 diagrams A.1, A.2,A.3 as before, etc..; Happy knitting!
07.02.2023 - 10:25
![]() Lotekky escreveu:
Lotekky escreveu:
How am I supposed to work two yarn overs right next to each other? Is it supposed to make two holes side by side? If not, won’t the stitch count be off?
05.09.2022 - 20:44DROPS Design respondeu:
Dear Lotekky, there will always be at least 1 knit stitch between 2 yarn overs. Happy knitting!
06.09.2022 - 09:37
![]() Alyssa escreveu:
Alyssa escreveu:
I’m knitting size M. I don’t understand the part that says that (on the yoke) once 16 increases have finished the piece will measure 23 cm. Continue without further increases until the piece measures 23 cm. Am I misunderstanding something?
13.06.2022 - 05:50DROPS Design respondeu:
Dear Alyssa, when you have done all raglan increases, continue working the lace pattern as before but do not increase anymore - just make sure you will have enough room to work every decrease compensated by a yarn over in the lace pattern to keep correct number of stitches; if there are not enough stitches for the lace pattern, knit these stitches . Happy knitting!
13.06.2022 - 11:35
![]() Sara escreveu:
Sara escreveu:
Buonasera, vorrei sapere se possibile a quanti millimetri corrisponde lo spessore del filo del filato snow qui usato. Grazie.
31.08.2021 - 17:00DROPS Design respondeu:
Buonasera Sara, per un'assistenza così personalizzata può rivolgersi al suo rivenditore DROPS di fiducia. Buon lavoro!
02.09.2021 - 19:04
![]() Berit Terjesen escreveu:
Berit Terjesen escreveu:
Hei og takk for hjelpen hittil. Fremdeles lurer jeg på om disse 13 maskene under armene skal strikkes rett helt ned til vrangbord? slik at det dannes en "stripe "under hver arm og som deler front og bakside?
18.05.2021 - 15:36DROPS Design respondeu:
Hei Berit. Ja, det stemmer. Blir en bred "stripe" med glattstrikk under ermene. mvh DROPS design
19.05.2021 - 10:17
![]() Margaret escreveu:
Margaret escreveu:
Hi, this pattern looks lovely. Is it possible to knit this on two needles? Thank you.
12.05.2021 - 17:00DROPS Design respondeu:
Dear Margaret, please see THIS lesson about adapting our patterns for straight needles. Happy Knitting!
12.05.2021 - 17:09
|
|||||||||||||||||||
Diamonds in the Sky#diamondsintheskysweater |
|||||||||||||||||||
 |
 |
||||||||||||||||||
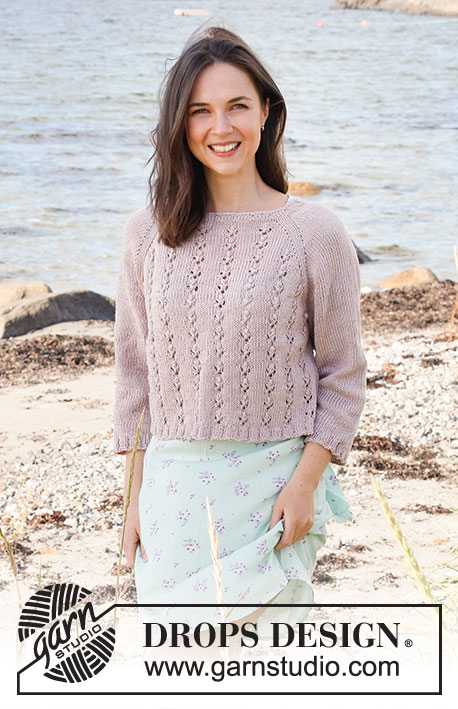
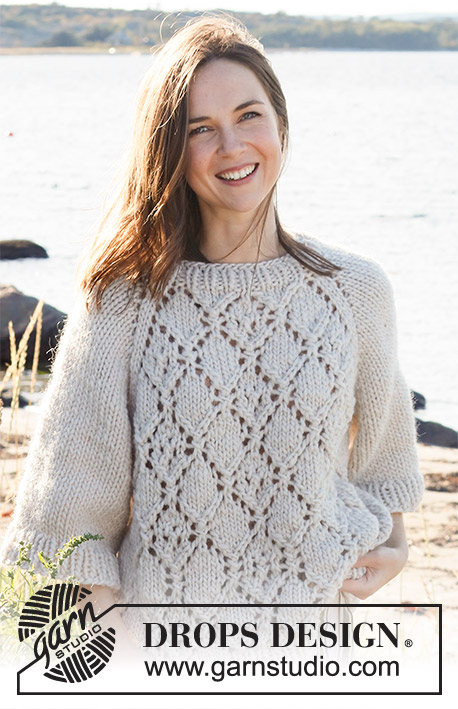
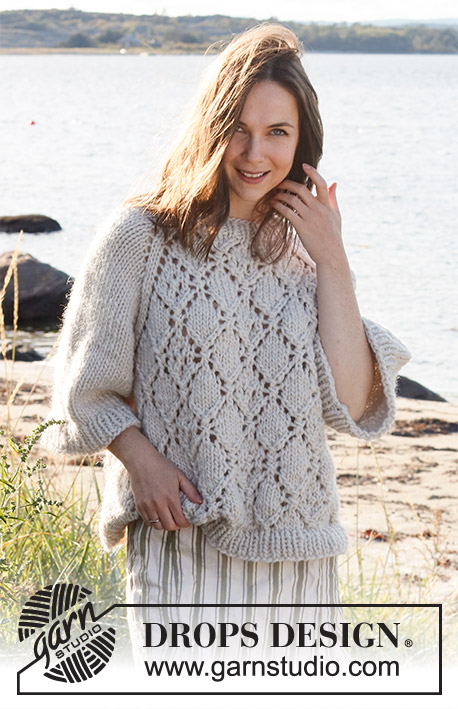
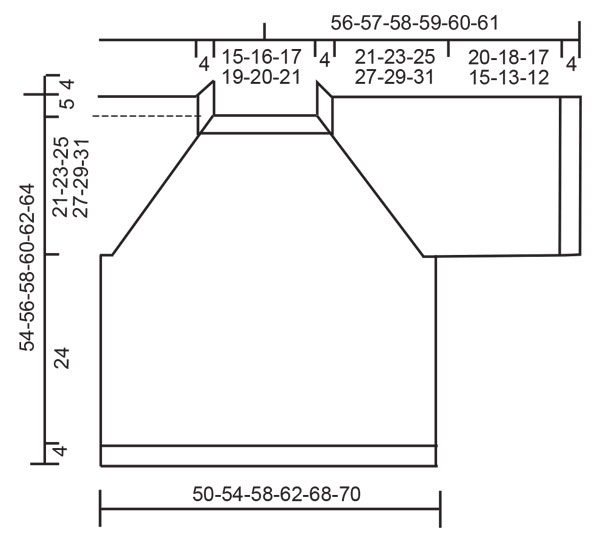
Pulôver tricotado de cima para baixo com cavas raglan, ponto rendado e mangas ¾ largas, em DROPS Snow ou DROPS Wish. Do S ao XXXL.
DROPS 221-29 |
|||||||||||||||||||
|
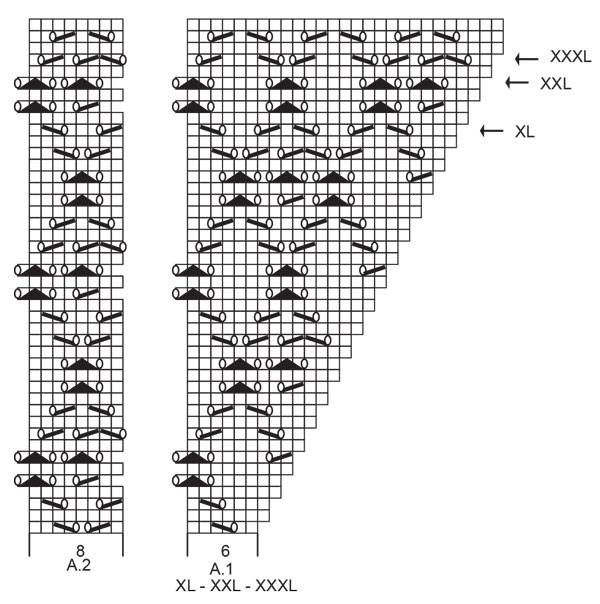
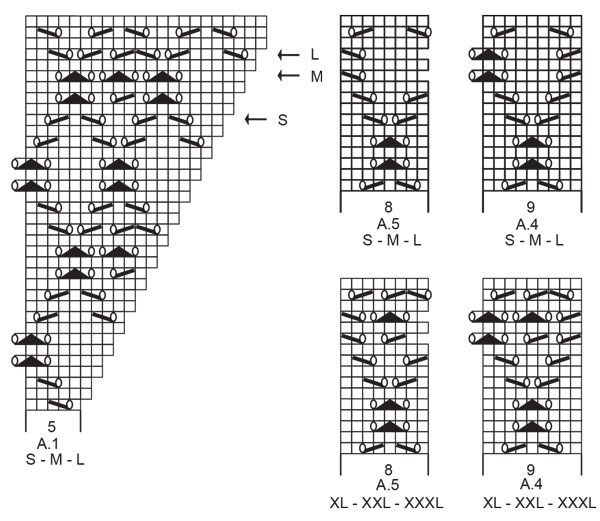
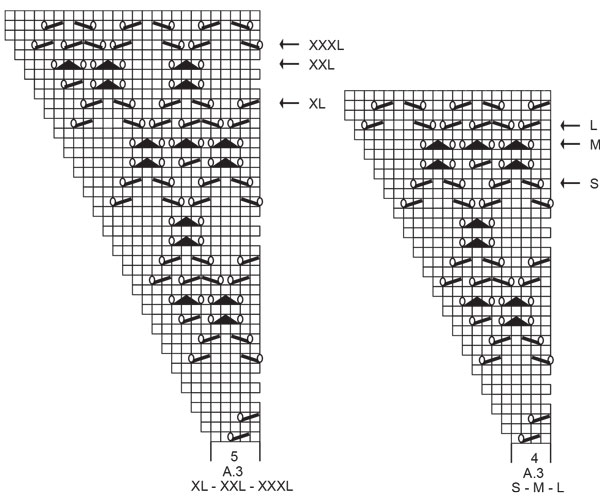
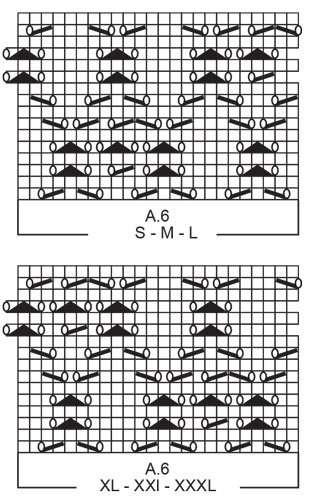
------------------------------------------------------- TÉCNICAS USADAS: ------------------------------------------------------- PONTO FANTASIA: Ver os diagramas A.1 a A.6 indicados para cada tamanho. AUMENTOS (a intervalos regulares): Para calcular quando aumentar a intervalos regulares, contar o número total de malhas (por ex. 46 malhas) e dividi-lo pelo número de aumentos a fazer (por ex. 10) = 4.6. Para aumentar neste exemplo, vai-se fazer 1 laçada depois de alternadamente cada 4.ª e 5.ª malha. Na carreira seguinte, tricotar as laçadas torcidas para evitar buracos. RAGLAN: Aumentar para o raglan fazendo 1 laçada de cada lado de 2 malhas meia (o marcador fica entre estas 2 malhas), a cada uma das transições entre as costas/a frente e as mangas, da seguinte maneira (aumenta-se 8 malhas ao todo). Para aumentar 1 malha, fazer 1 laçada. Na carreira seguinte, tricotar as laçadas em meia; devem formar buracos. Tricotar então as novas malhas da frente e das costas no ponto fantasia e as das mangas em ponto meia. DICA PARA ARREMATAR: Para evitar que as malhas arrematadas fiquem demasiado apertadas, pode-se arrematar com uma agulha um tamanho acima. Se as malhas arrematadas continuarem apertadas, fazer 1 laçada depois de cerca de cada 4.ª malha e arrematar as laçadas como malhas normais. ------------------------------------------------------- A PEÇA COMEÇA AQUI: ------------------------------------------------------- PULÔVER – SUMÁRIO DA PEÇA: A gola e o encaixe tricotam-se de cima para baixo, em redondo na agulha circular. Divide-se o encaixe e continua-se as costas/a frente e as mangas separadamente em redondo, na agulha circular, de cima para baixo. GOLA: Montar 46-48-50-54-56-58 malhas com a pequena agulha circular 8 mm em Snow ou Wish. Tricotar 1 volta meia. Tricotar então em canelado (1 malha meia, 1 malha liga) em redondo durante 4 cm. Tricotar 1 volta meia aumentando 10-8-6-6-4-2 malhas a intervalos regulares – ver AUMENTOS = 56-56-56-60-60-60 malhas. Tricotar 1 volta meia. Mudar para a agulha circular 9 mm. Colocar 1 marcador a 20-20-20-21-21-21 malhas (= meio frente aproximadamente). Medir o encaixe a partir deste marcador! ENCAIXE: Tricotar, então, colocando 4 marcadores da seguinte maneira: Colocar 1 marcador no princípio da carreira (= transição entre as costas e a manga direita), 1 malha meia, 1 laçada, 7 malhas meia, 1 laçada, 1 malha meia, colocar 1 marcador aqui (transição entre a manga direita e a frente), 1 malha meia, 1 laçada, A.1 por cima das 5-5-5-6-6-6 malhas seguintes, A.2 por cima das 8 malhas seguintes, A.3 por cima das 4-4-4-5-5-5 malhas seguintes, 1 laçada, 1 malha meia, colocar 1 marcador aqui (transição entre a frente e a manga esquerda), 1 malha meia, 1 laçada, 7 malhas meia, 1 laçada, 1 malha meia, colocar 1 marcador aqui (transição entre a manga esquerda e as costas), 1 malha meia, 1 laçada, A.1 por cima das 5-5-5-6-6-6 malhas seguintes, A.2 por cima das 8 malhas seguintes, A.3 por cima das 4-4-4-5-5-5 malhas seguintes, 1 laçada, 1 malha meia. MANTER A MESMA TENSÃO DA INDICADA PARA A AMOSTRA! O primeiro aumento do RAGLAN – ver acima – está feito. Continuar desta maneira e aumentar para o raglan 14-16-17-18-20-21 vezes ao todo a cada 2 carreiras = 168-184-192-204-220-228 malhas. Quando todos os aumentos estiverem feitos, a peça mede cerca de 20-23-24-26-29-30 cm a partir do marcador da gola. Continuar sem aumentar até a peça medir 21-23-25-27-29-31 cm a partir do marcador (tricotar tantas malhas no ponto fantasia jacquard quantas malhas há no lado do raglan – ter atenção para haver tantas laçadas quanto diminuições para que o número de malhas permaneça o mesmo – as outras malhas tricotam-se em ponto meia). Na carreira seguinte (uma carreira em malhas meia) – ajustar para que a carreira comece por 1 malha mais cedo -, tricotar da seguinte maneira: Colocar as 39-43-45-47-51-53 primeiras malhas em espera num fio para a manga, montar 5-5-7-7-9-9 malhas (= lado, sob a manga), tricotar as 45-49-51-55-59-61 malhas seguintes como antes (= frente), deslizar as 39-43-45-47-51-53 malhas seguintes em espera num fio para a manga, montar 5-5-7-7-9-9 malhas (= lado, sob a manga), tricotar as 45-49-51-55-59-61 últimas malhas como antes (= costas). Terminar as costas/a frente e as mangas separadamente. MEDIR A PEÇA A PARTIR DAQUI! COSTAS & FRENTE: = 100-108-116-124-136-140 malhas. Tricotar em meia até à malha ao meio das malhas montadas sob a manga. A carreira começa, então, aqui. Continuar o ponto fantasia do encaixe – ter atenção para continuar na carreira seguinte do diagrama depois do encaixe. Tricotar no ponto fantasia e em ponto meia dos lados da seguinte maneira: *1-3-5-3-6-7 malhas meia, A.4 por cima das 9 malhas seguintes (ver diagrama indicado para cada tamanho), A.6 por cima das 24 malhas seguintes (ver diagrama indicado para cada tamanho), tricotar as 8-8-8-16-16-16 primeiras malhas de A.6, A.5 por cima das 8 malhas seguintes (ver diagrama indicado para cada tamanho), 0-2-4-2-5-6 malhas meia*, repetir de * a * mais 1 vez. Quando a peça medir 24 cm, tricotar 1 volta meia aumentando 10-10-12-12-14-14 malhas a intervalos regulares = 110-118-128-136-150-154 malhas. Mudar para a agulha circular 8 mm e tricotar em canelado (1 malha meia, 1 malha liga) durante 4 cm. Arrematar as malhas como elas se apresentam. O pulôver mede cerca de 54-56-58-60-52-64 cm de altura total a partir do ombro. MANGAS: Retomar as 39-43-45-47-51-53 malhas em espera num dos lados da peça para a pequena agulha circular 9 mm e levantar 1 malha em cada uma das 5-5-7-7-9-9 malhas montadas sob a manga = 44-48-52-54-60-62 malhas. Tricotar em redondo, em ponto meia. Quando a manga medir 20-18-17-15-13-12 cm, aumentar 4-4-4-4-6-6 malhas a intervalos regulares = 48-52-56-58-70-68 malhas. Mudar para a agulha circular 8 mm. Tricotar em canelado (1 malha meia, 1 malha liga) durante 4 cm. Arrematar as malhas como elas se apresentam. A manga mede cerca de 24-22-21-19-17-16 cm a partir da separação. Tricotar a outra manga da mesma maneira. |
|||||||||||||||||||
Explicações do diagrama |
|||||||||||||||||||
|
|||||||||||||||||||
 |
|||||||||||||||||||
 |
|||||||||||||||||||
 |
|||||||||||||||||||
 |
|||||||||||||||||||
 |
|||||||||||||||||||
Terminou este projecto?Então, identifique as suas fotos com as tags #dropspattern #diamondsintheskysweater ou mostre-as na galeria #dropsfan. Precisa de ajuda para este modelo?Encontrará 25 turotiais em vídeo, uma rubrica Comentários/Perguntas e muito mais ao visitar a página do modelo em www.garnstudio.com © 1982-2026 DROPS Design A/S. Todos os direitos reservados. Este documento, incluuindo as suas su-secções, tem copyrights. Saia mais o que pode fazer com os nossos modelos no fim de cada uma das páginas do nosso site. |
|||||||||||||||||||


Com mais de 40 anos no design de modelos de tricô e de croché, a DROPS Design oferece uma das mais vastas colecções demodelos gratuitos na Internet - traduzidos em 17 línguas. Neste dia de hoje, temos 324 catálogos e 12290 modelos - dos quais 12271 estão traduzidos em português.
Trabalhamos com muito empenho para lhe proporcionar o melhor que o tricô e o croché têm para oferecer, para lhe fornecer inspiração e conselhos bem como fios da mais elevada qualidade a preços incríveis! Gostaria de usar os nossos modelos para outros fins que não uso pessoal? Pode ler o que lhe é permitido fazer no Copyright texto que se encontra na parte de baixo de todos os nossos modelos. Bom tricô! Bom croché!
Deixe um comentário acerca do modelo DROPS 221-29
Gostaríamos muito de saber o que tem a dizer-nos acerca deste modelo!
Se deixar uma pergunta acerca do modelo, certifique-se de que escolhe a categoria adequada no formulário abaixo para acelerar o processo relativo à resposta. Os campos obrigatórios estão assinalados com um *.