
Categorias populares
Procura um fio?


Comentários / Perguntas (28)
![]() R N escreveu:
R N escreveu:
Hei! Teen XL kokoa. Ohjeissa on virhe kun kainaloista lähdetään jatkamaan alaspäin. Kuviot eivät täsmää. Voitteko auttaa?
05.07.2024 - 10:56DROPS Design respondeu:
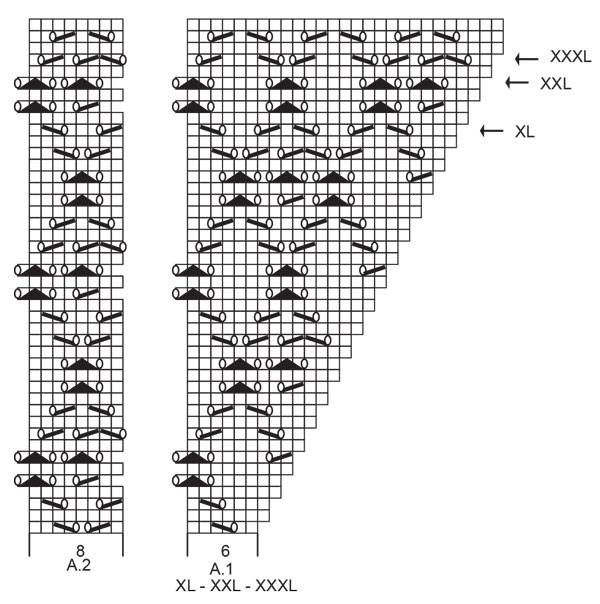
Hei, etu-/takakappaleessa neulotaan mallineuletta piirroksen A.4 mukaisesti ja mallineule jatkuu siitä, mihin se kaarrokkeessa jäi. Mikäli neuletiheys täsmää, kaarroke on valmis, kun olet neulonut ylös piirrokseen kokosi nuolella merkittyyn kerrokseen.
05.07.2024 - 17:08
![]() Mary escreveu:
Mary escreveu:
But that’s precisely the problem! If I start the third line A4 from the underarm (the first stitch of the new round is basically the third stitch from the underarm) I get the mismatch because the triangle will be stitched earlier: I can’t understand where I am going wrong
09.04.2023 - 14:12DROPS Design respondeu:
Dear Mary, you need to adjust the stitches before starting the triangle. In this case, you need to simply knit stitches (not just the amount indicated in the pattern) so that the triangle won't be mismatched. The pattern under the arm may get slightly mismatched initially but that isn't important, since it will later on match correctly. Happy knitting!
10.04.2023 - 13:34
![]() Mary escreveu:
Mary escreveu:
Yes, I can see that the pattern is the same. But if I follow the instructions from A4 third line, I should start the "triangle" after 3 stitches of the body, while according to the stitches I have after the line with the arrow, A1, I should start the triangle after 5 stitches but this means that it will be "anticipated" hence the mismatch. Does it mean that I have not divided the garment accordingly? Many thanks and Happy Easter!
09.04.2023 - 11:09DROPS Design respondeu:
Dear Mary, take into account that you should have adjusted the start of the round in the body; you adjust so that the beginning of the round is in the middle stitch cast on under the sleeve. This should help adjust the pattern so that the triangle in A.4 won't get mismatched with the pattern in the yoke in A.1. Happy knitting!
09.04.2023 - 13:30
![]() Mary escreveu:
Mary escreveu:
Thanks! But I am still confused: the instructions say that the yoke is finished when I have 168 stitches (S size). If I had not knit the last row (the one with the arrow), I would not have got 168 stitches. In any case, once I have knit the row with the arrow, if I then start A4 from the third line I still get a mismatch in the pattern and I do not know where I get it wrong. Well, I know that I do something wrong while shifting from the yoke to the body but I can't figure out what.
07.04.2023 - 10:25DROPS Design respondeu:
Dear Mary, after having worked the row with the arrow, you should have knitted round, where you separated the stitches for each part of the garment. Then, you should start the body with the third row of A.4. There shouldn't be a mismatch there. You can check that the third row of A.4 is exactly like the third row in A.1 after the row with the arrow, so they should be matching. Hope this helps!
08.04.2023 - 20:58
![]() Mary escreveu:
Mary escreveu:
Thanks! But I am still confused: the instructions say that the yoke is finished when I have 168 stitches (S size). If I had not knit the last row (the one with the arrow), I would not have got 168 stitches. In any case, once I have knit the row with the arrow, if I then start A4 from the third line I still get a mismatch in the pattern and I do not know where I get it wrong. Well, I know that I do something wrong while shifting from the yoke to the body but I can't figure out what.
07.04.2023 - 10:20DROPS Design respondeu:
Dear Mary, after having worked the row with the arrow, you should have knitted round, where you separated the stitches for each part of the garment. Then, you should start the body with the third row of A.4. There shouldn't be a mismatch there. You can check that the third row of A.4 is exactly like the third row in A.1 after the row with the arrow, so they should be matching. Hope this helps!
08.04.2023 - 20:59
![]() Mary escreveu:
Mary escreveu:
Sorry, I am still unclear: I have finished the yoke knitting the A1-A3-A5 line with the arrow. Then I divided the work and I went for a knitted round. Now which line should I knit first and from which diagram?
05.04.2023 - 09:04DROPS Design respondeu:
Dear Mary, the arrows in the chart mean that, if the gauge is correct, you should finish the raglan/yoke when you reach the arrow for your size (before working it). If you have worked this row, then you will need to start the new part by working the third row of the new chart (A.4). Happy knitting!
06.04.2023 - 23:29
![]() Mary escreveu:
Mary escreveu:
Hi! "Continue the pattern from yoke on body – making sure to continue with the correct row in the diagram after the yoke. " Does this mean that if I finish A1 (S size) with the line with the arrow, the next line for the body in A4 is in fact the thirs one of the diagram?
04.04.2023 - 08:59DROPS Design respondeu:
Hi Mary, Yes, if you finished the diagram before separating for the body and sleeves, you continue with the first row in the diagram. Happy Easter!
05.04.2023 - 07:01
![]() Mary escreveu:
Mary escreveu:
"Knit as far as the middle stitch cast on under the sleeve. The round now starts here." Does it mean that the round starts after the second or after the third stitch under the sleeve? Many thanks!
08.03.2023 - 16:03DROPS Design respondeu:
Dear Mary, yes correct: work the first 2 of the 5 stitches cast on under 1st sleeve, the rounds will now start here, before the middle of the new stitches. Happy knitting!
08.03.2023 - 16:08
![]() Mary escreveu:
Mary escreveu:
Following from your last answer: "...you will start the next round 1 stitch eariler. So, you need to not work the last stitch of the previous round". I interpret this as moving the stitch marker one stitch behind and working that stitch as the first one of the next round rather than the last one of the previous round. Is this correct? So it is basically just a matter of moving the stitch marker?
07.03.2023 - 12:16DROPS Design respondeu:
Dear Mary, you will now work the dividing round, this means you don't need the markers anymore, you start working the dividing round when the last stitch on previous round remain on left needle, slip the next 39 sts (starting with the last stitch previous round + the first 38 sts next round). Happy knitting!
07.03.2023 - 14:37
![]() Mary escreveu:
Mary escreveu:
Hi, I have just finished all the increases on the raglan and I have 168 stitches (S size). I'll go now go for a knitted round but what does it mean " adjust so the round now starts 1 stitch earlier"? Plus, the 39 stitches I habe to put aside, correspond to the stiches that are within the first and the second marker?
04.03.2023 - 10:25DROPS Design respondeu:
Dear Mary, after finishing the increases and reaching the indicated length (21cm from the marker), you will start the next round 1 stitch eariler. So, you need to not work the last stitch of the previous round. On the other hand, the first marker was inserted in the transition between the back and the sleeve and the second marker between the sleeve and the front. Since you have to put aside the stitches which correspond to the sleeve, these stitches are all in between the first and 2nd marker. Happy knitting!
05.03.2023 - 20:45
|
|||||||||||||||||||
Diamonds in the Sky#diamondsintheskysweater |
|||||||||||||||||||
 |
 |
||||||||||||||||||
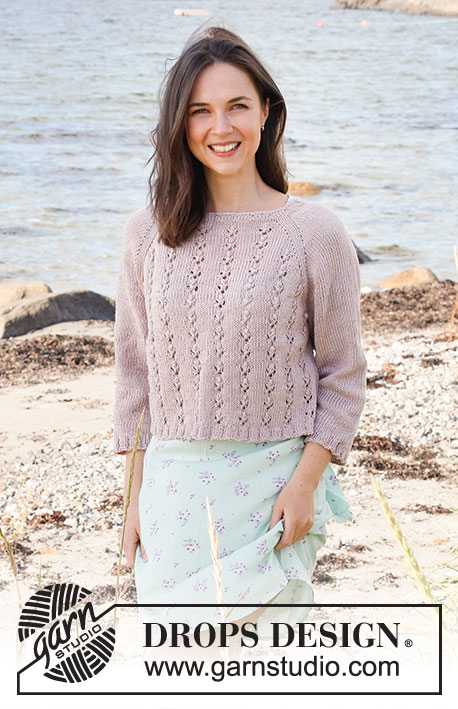
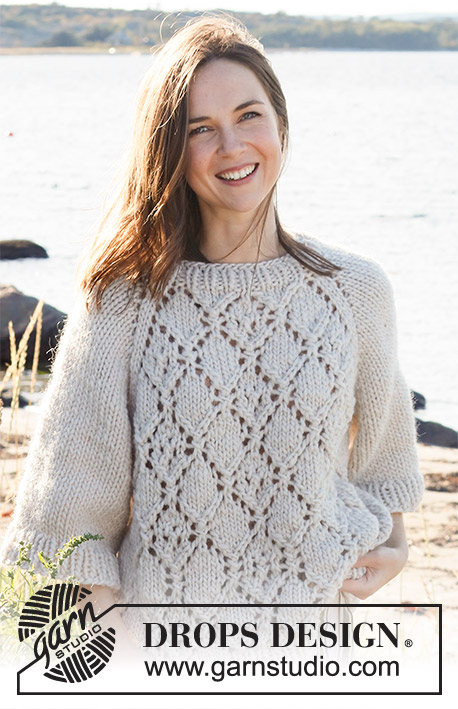
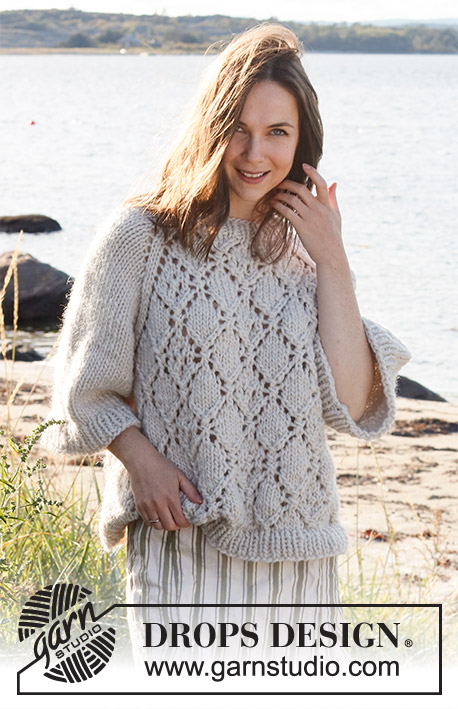
Pulôver tricotado de cima para baixo com cavas raglan, ponto rendado e mangas ¾ largas, em DROPS Snow ou DROPS Wish. Do S ao XXXL.
DROPS 221-29 |
|||||||||||||||||||
|
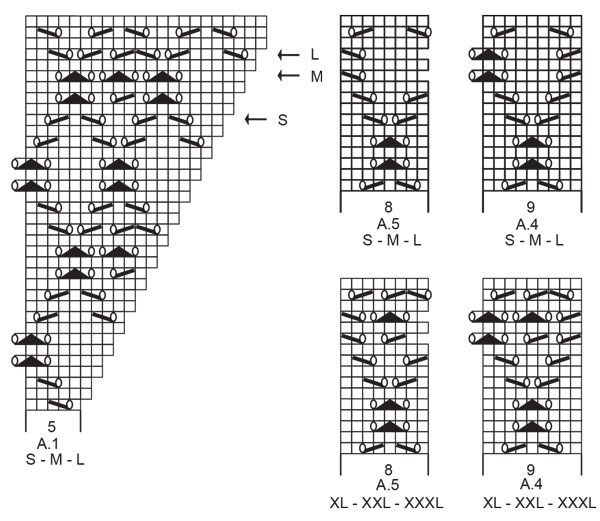
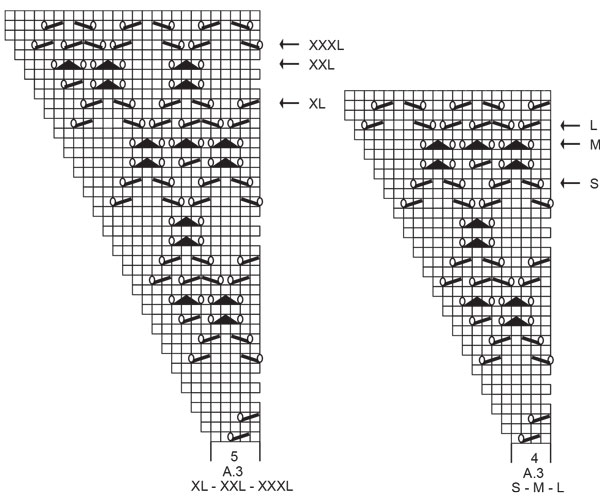
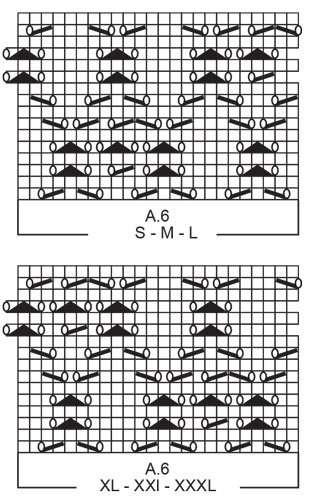
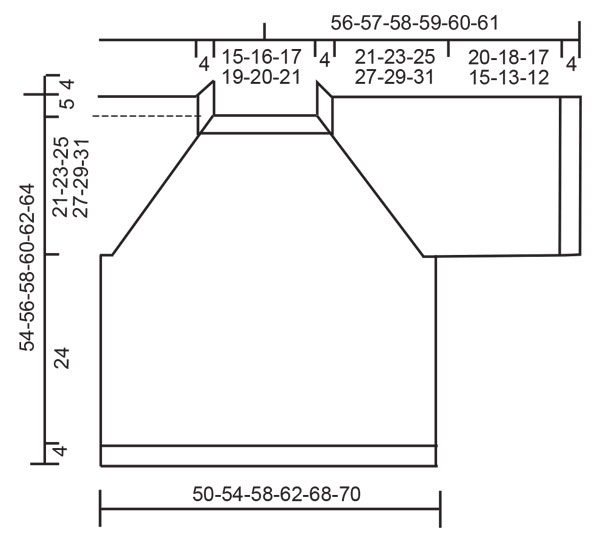
------------------------------------------------------- TÉCNICAS USADAS: ------------------------------------------------------- PONTO FANTASIA: Ver os diagramas A.1 a A.6 indicados para cada tamanho. AUMENTOS (a intervalos regulares): Para calcular quando aumentar a intervalos regulares, contar o número total de malhas (por ex. 46 malhas) e dividi-lo pelo número de aumentos a fazer (por ex. 10) = 4.6. Para aumentar neste exemplo, vai-se fazer 1 laçada depois de alternadamente cada 4.ª e 5.ª malha. Na carreira seguinte, tricotar as laçadas torcidas para evitar buracos. RAGLAN: Aumentar para o raglan fazendo 1 laçada de cada lado de 2 malhas meia (o marcador fica entre estas 2 malhas), a cada uma das transições entre as costas/a frente e as mangas, da seguinte maneira (aumenta-se 8 malhas ao todo). Para aumentar 1 malha, fazer 1 laçada. Na carreira seguinte, tricotar as laçadas em meia; devem formar buracos. Tricotar então as novas malhas da frente e das costas no ponto fantasia e as das mangas em ponto meia. DICA PARA ARREMATAR: Para evitar que as malhas arrematadas fiquem demasiado apertadas, pode-se arrematar com uma agulha um tamanho acima. Se as malhas arrematadas continuarem apertadas, fazer 1 laçada depois de cerca de cada 4.ª malha e arrematar as laçadas como malhas normais. ------------------------------------------------------- A PEÇA COMEÇA AQUI: ------------------------------------------------------- PULÔVER – SUMÁRIO DA PEÇA: A gola e o encaixe tricotam-se de cima para baixo, em redondo na agulha circular. Divide-se o encaixe e continua-se as costas/a frente e as mangas separadamente em redondo, na agulha circular, de cima para baixo. GOLA: Montar 46-48-50-54-56-58 malhas com a pequena agulha circular 8 mm em Snow ou Wish. Tricotar 1 volta meia. Tricotar então em canelado (1 malha meia, 1 malha liga) em redondo durante 4 cm. Tricotar 1 volta meia aumentando 10-8-6-6-4-2 malhas a intervalos regulares – ver AUMENTOS = 56-56-56-60-60-60 malhas. Tricotar 1 volta meia. Mudar para a agulha circular 9 mm. Colocar 1 marcador a 20-20-20-21-21-21 malhas (= meio frente aproximadamente). Medir o encaixe a partir deste marcador! ENCAIXE: Tricotar, então, colocando 4 marcadores da seguinte maneira: Colocar 1 marcador no princípio da carreira (= transição entre as costas e a manga direita), 1 malha meia, 1 laçada, 7 malhas meia, 1 laçada, 1 malha meia, colocar 1 marcador aqui (transição entre a manga direita e a frente), 1 malha meia, 1 laçada, A.1 por cima das 5-5-5-6-6-6 malhas seguintes, A.2 por cima das 8 malhas seguintes, A.3 por cima das 4-4-4-5-5-5 malhas seguintes, 1 laçada, 1 malha meia, colocar 1 marcador aqui (transição entre a frente e a manga esquerda), 1 malha meia, 1 laçada, 7 malhas meia, 1 laçada, 1 malha meia, colocar 1 marcador aqui (transição entre a manga esquerda e as costas), 1 malha meia, 1 laçada, A.1 por cima das 5-5-5-6-6-6 malhas seguintes, A.2 por cima das 8 malhas seguintes, A.3 por cima das 4-4-4-5-5-5 malhas seguintes, 1 laçada, 1 malha meia. MANTER A MESMA TENSÃO DA INDICADA PARA A AMOSTRA! O primeiro aumento do RAGLAN – ver acima – está feito. Continuar desta maneira e aumentar para o raglan 14-16-17-18-20-21 vezes ao todo a cada 2 carreiras = 168-184-192-204-220-228 malhas. Quando todos os aumentos estiverem feitos, a peça mede cerca de 20-23-24-26-29-30 cm a partir do marcador da gola. Continuar sem aumentar até a peça medir 21-23-25-27-29-31 cm a partir do marcador (tricotar tantas malhas no ponto fantasia jacquard quantas malhas há no lado do raglan – ter atenção para haver tantas laçadas quanto diminuições para que o número de malhas permaneça o mesmo – as outras malhas tricotam-se em ponto meia). Na carreira seguinte (uma carreira em malhas meia) – ajustar para que a carreira comece por 1 malha mais cedo -, tricotar da seguinte maneira: Colocar as 39-43-45-47-51-53 primeiras malhas em espera num fio para a manga, montar 5-5-7-7-9-9 malhas (= lado, sob a manga), tricotar as 45-49-51-55-59-61 malhas seguintes como antes (= frente), deslizar as 39-43-45-47-51-53 malhas seguintes em espera num fio para a manga, montar 5-5-7-7-9-9 malhas (= lado, sob a manga), tricotar as 45-49-51-55-59-61 últimas malhas como antes (= costas). Terminar as costas/a frente e as mangas separadamente. MEDIR A PEÇA A PARTIR DAQUI! COSTAS & FRENTE: = 100-108-116-124-136-140 malhas. Tricotar em meia até à malha ao meio das malhas montadas sob a manga. A carreira começa, então, aqui. Continuar o ponto fantasia do encaixe – ter atenção para continuar na carreira seguinte do diagrama depois do encaixe. Tricotar no ponto fantasia e em ponto meia dos lados da seguinte maneira: *1-3-5-3-6-7 malhas meia, A.4 por cima das 9 malhas seguintes (ver diagrama indicado para cada tamanho), A.6 por cima das 24 malhas seguintes (ver diagrama indicado para cada tamanho), tricotar as 8-8-8-16-16-16 primeiras malhas de A.6, A.5 por cima das 8 malhas seguintes (ver diagrama indicado para cada tamanho), 0-2-4-2-5-6 malhas meia*, repetir de * a * mais 1 vez. Quando a peça medir 24 cm, tricotar 1 volta meia aumentando 10-10-12-12-14-14 malhas a intervalos regulares = 110-118-128-136-150-154 malhas. Mudar para a agulha circular 8 mm e tricotar em canelado (1 malha meia, 1 malha liga) durante 4 cm. Arrematar as malhas como elas se apresentam. O pulôver mede cerca de 54-56-58-60-52-64 cm de altura total a partir do ombro. MANGAS: Retomar as 39-43-45-47-51-53 malhas em espera num dos lados da peça para a pequena agulha circular 9 mm e levantar 1 malha em cada uma das 5-5-7-7-9-9 malhas montadas sob a manga = 44-48-52-54-60-62 malhas. Tricotar em redondo, em ponto meia. Quando a manga medir 20-18-17-15-13-12 cm, aumentar 4-4-4-4-6-6 malhas a intervalos regulares = 48-52-56-58-70-68 malhas. Mudar para a agulha circular 8 mm. Tricotar em canelado (1 malha meia, 1 malha liga) durante 4 cm. Arrematar as malhas como elas se apresentam. A manga mede cerca de 24-22-21-19-17-16 cm a partir da separação. Tricotar a outra manga da mesma maneira. |
|||||||||||||||||||
Explicações do diagrama |
|||||||||||||||||||
|
|||||||||||||||||||
 |
|||||||||||||||||||
 |
|||||||||||||||||||
 |
|||||||||||||||||||
 |
|||||||||||||||||||
 |
|||||||||||||||||||
Terminou este projecto?Então, identifique as suas fotos com as tags #dropspattern #diamondsintheskysweater ou mostre-as na galeria #dropsfan. Precisa de ajuda para este modelo?Encontrará 25 turotiais em vídeo, uma rubrica Comentários/Perguntas e muito mais ao visitar a página do modelo em www.garnstudio.com © 1982-2026 DROPS Design A/S. Todos os direitos reservados. Este documento, incluuindo as suas su-secções, tem copyrights. Saia mais o que pode fazer com os nossos modelos no fim de cada uma das páginas do nosso site. |
|||||||||||||||||||


Com mais de 40 anos no design de modelos de tricô e de croché, a DROPS Design oferece uma das mais vastas colecções demodelos gratuitos na Internet - traduzidos em 17 línguas. Neste dia de hoje, temos 324 catálogos e 12290 modelos - dos quais 12271 estão traduzidos em português.
Trabalhamos com muito empenho para lhe proporcionar o melhor que o tricô e o croché têm para oferecer, para lhe fornecer inspiração e conselhos bem como fios da mais elevada qualidade a preços incríveis! Gostaria de usar os nossos modelos para outros fins que não uso pessoal? Pode ler o que lhe é permitido fazer no Copyright texto que se encontra na parte de baixo de todos os nossos modelos. Bom tricô! Bom croché!
Deixe um comentário acerca do modelo DROPS 221-29
Gostaríamos muito de saber o que tem a dizer-nos acerca deste modelo!
Se deixar uma pergunta acerca do modelo, certifique-se de que escolhe a categoria adequada no formulário abaixo para acelerar o processo relativo à resposta. Os campos obrigatórios estão assinalados com um *.