
Popular categories
Looking for a yarn?


Comments / Questions (62)
![]() Muriel wrote:
Muriel wrote:
Bonjour , je souhaiterais tricoter ce joli modèle en coton merino [B] et Brushed alpaca [C] = [D] (association de fils = 14 mailles). Est-ce que ce choix conviendrait également pour ce modèle (pas trop dense ?). Merci par avance pour votre retour et vos jolis modèles. Bonne journée
19.02.2026 - 11:42DROPS Design answered:
Bonjour, peut-être un peu quand même, mais l'idéal serait que vous fassiez un échantillon avec cette association pour vérifier si vous avez la bonne tension et si la texture vous convient. Bon tricot!
19.02.2026 - 17:15
![]() Patricia wrote:
Patricia wrote:
Je m’apprête à commencer le pull Cherish Sweater en laine Daisy et Kid Silk en taille M. Je viens de relire le modèle. Pour faire le col, on doit monter 108 mailles pendant 11 cm et on replie et on coud sur l’envers. Ensuite il est indiqué de continuer le 1er tour de mailles anglaises 72 mailles. Je ne comprends pas comment on passe de 108 mailles à 72 mailles sans faire de diminution. Merci par avance pour votre aide.
01.02.2026 - 11:19DROPS Design answered:
Bonjour Patricia, notez que la couture du col est faite à la fin (cf. ASSEMBLAGE. Quand le col est terminé, on va tricoter le 1er tour des côtes anglaises, autrement dit: (2 m ens à l'env, 1 jeté, glissez 1 m à l'envers) = vous diminuez ainsi les mailles envers des côtes, il n'y aura plus qu'1 m envers et 1 m en côtes anglaises, ainsi, vous répétez 36 fois de (à) ci-dessus = il reste 72 mailles (les jetés ne comptent pas pour des mailles car ils appartiennent à la maille glissée); tricotez et répétez ensuite les tours 2 et 3 des côtes anglaises. Bon tricot!
02.02.2026 - 08:49
![]() Touzalin Françoise wrote:
Touzalin Françoise wrote:
Bonjour, Je voudrais faire se modèle de pull raglan pour mon mari, en taille 42 ? Est-ce possible !! SVP. Merci . Françoise
30.01.2026 - 15:48DROPS Design answered:
Bonjour Mme Touzalin, retrouvez ici nos modèles de pulls raglan en côtes anglaises, pour homme; retrouvez également sous l'onglet FAQ en haut de page, comment adapter un vêtement femme pour homme. Bon tricot!
30.01.2026 - 16:41
![]() Valérie wrote:
Valérie wrote:
Bonjour, tout d'abord merci de nous proposer des modèles et une aide gratuites! Concernant ce modèle je voulais savoir si je pouvais le tricoter en Air drops pour avoir un modèle plus 'léger', en sachant que pour obenir le bon echantillon je tricoterai ce pull en aiguilles 7. Merci
17.01.2026 - 09:45DROPS Design answered:
Bonjour Valérie, vous aurez effectivement un effet différent, mais si vous avez la bonne tension et que vous aimez la texture obtenue, alors oui probablement. Bon tricot!
19.01.2026 - 08:25
![]() Heather wrote:
Heather wrote:
Hi there, I'd like to see what size I need for this jumper but the diagram for this pattern isn't automatically opening. Please can you help? Many thanks.
06.01.2026 - 09:24DROPS Design answered:
Hi Heather, it works now. If not, wait a few minutes or try to change your browser. Happy knitting!
06.01.2026 - 09:28
![]() Stanislava wrote:
Stanislava wrote:
Hallo, ich habe zwei Fragen. Raglanzunahme - werden die Zunahmen aus der 1. und 7. Masche? 2. Ich stricke sehr gleichmäßig, aber die 2 Faden (Puna und Silk) machen sehr unschönes Maschenbild, es ist dünn, zu locker - kein Vergleich mit dem Foto in der Anleitung?
03.12.2025 - 00:58DROPS Design answered:
Liebe Stanislav, die Raglanzunahmen entstehen in die Masche vor + in die Masche nach den 7 Raglanmaachen. Stimmt Ihre Maschenprobe? So wird der Pullover gestrickt; passen Sie die Nadelgröße an, wenn nötig ist. Viel Spaß beim Stricken!
03.12.2025 - 08:39
![]() Agnieszka wrote:
Agnieszka wrote:
Utknęłam na pierwszym okrążeniu rękawa. Według instrukcji powinnam teraz robić 3 okrążenie ściegu angielskiego (czyli *"Przerobić razem na lewo narzut i oczko zdjęte, wykonać 1 narzut, zdjąć 1 oczko jak do przerobienia na lewo "), a w opisie rękawa pierwsze okrążenie to "dalej przerabiać od 5-5-9-9-11-13 oczek nabranych pod rękawem, przerobić razem na prawo narzut i oczko zdjęte, wykonać 1 narzut, zdjąć 1 oczko jak do przerobienia na lewo ". Jak to pogodzić?
24.11.2025 - 12:04DROPS Design answered:
Witaj Agnieszko, zobacz video TUTAJ. Pamiętaj, że nowe oczka przerabiane po raz pierwszy nie mają jeszcze swoich narzutów, czyli ta sekwencja: * przerobić razem na prawo narzut i oczko zdjęte, wykonać 1 narzut, zdjąć 1 oczko jak do przerobienia na lewo * będzie wyglądała następująco: * przerobić oczko na prawo, wykonać 1 narzut, zdjąć 1 oczko jak do przerobienia na lewo *. Pozdrawiamy!
27.11.2025 - 11:37
![]() Anna wrote:
Anna wrote:
Hey, ich hätte zwei Fragen. Zum einen, wird Passe gleich anschließend an die Halsblende gestrickt oder danach die Halsblende angenäht? Und zum anderen, hält man sich für das Vollpatent an die Anleitung oder an das Video? Vielen Dank schon mal im Voraus für Ihre Antwort.
08.09.2025 - 21:23DROPS Design answered:
Liebe Anna, entschuldigen Sie die sehr verspätete Antwort. Sie stricken die Passe direkt an die Halsblende an, allerdings wird die Halsblende später noch zur Hälfte nach innen umgeschlagen und auf der Innenseite festgenäht. Für das Vollpatent folgen Sie der Anleitung, da sich die Anleitung ja ganz speziell auf diesen Pullover bezieht und das Video eine allgemeinere Erklärung ist. Insbesondere die 1. Runde wird in dieser Anleitung etwas spezieller gestrickt. Wiederholen tun Sie dann aber nur die 2. und 3. Runde. Viel Spaß beim Stricken!
23.10.2025 - 19:59
![]() Christine wrote:
Christine wrote:
Au début du premier rang de l’empiècement j’ai 114 mailles. Je fais le premier tour de mailles anglaises sur toutes les mailles et par la suite je place les fils de couleur? Pouvez-vous m’expliquer comment on complète l’empiècement svp?
01.09.2025 - 23:51DROPS Design answered:
Bonjour Christine, vous tricotez effectivement le 1er tour des côtes anglaises, puis vous placze vos fils marqueurs comme indiqué (sans tricoter le tour suivant), vous tricotez ensuite come indiqué: continuez les côtes anglaises en répétant les rangs 2 et 3, puis, quand vous avez tricoté 5 tours, tricotez le 6ème tour (= tour 2 des côtes anglaises) en augmentant pour le raglan (16 m au total sur le tour), et tricotez ces augmentations 10 fois au total tous les 8 tours. Bon tricot!
02.09.2025 - 17:46
![]() Susanne wrote:
Susanne wrote:
Kann ich statt DROPS Daisy das Garn DROPS Fiesta Print verwenden? Oder ist das Garn Fiesta zu fest für dieses Modell, da es nicht aus 100 Prozent Schurwolle besteht? Lieben Dank schon einmal für Ihre Antwort.
25.08.2025 - 10:51DROPS Design answered:
Liebe Susanne, sicher da beide Garne der selben Garngruppe B gehören, damit sollen Sie immer noch mit 1 Faden Kid-Silk (oder irgendeinem Garn der Garngruppe A); benutzen Sie den Garnumrechner für Alternative sowie passende Garnmenge. Viel Spaß beim Stricken!
27.08.2025 - 07:30
|
|
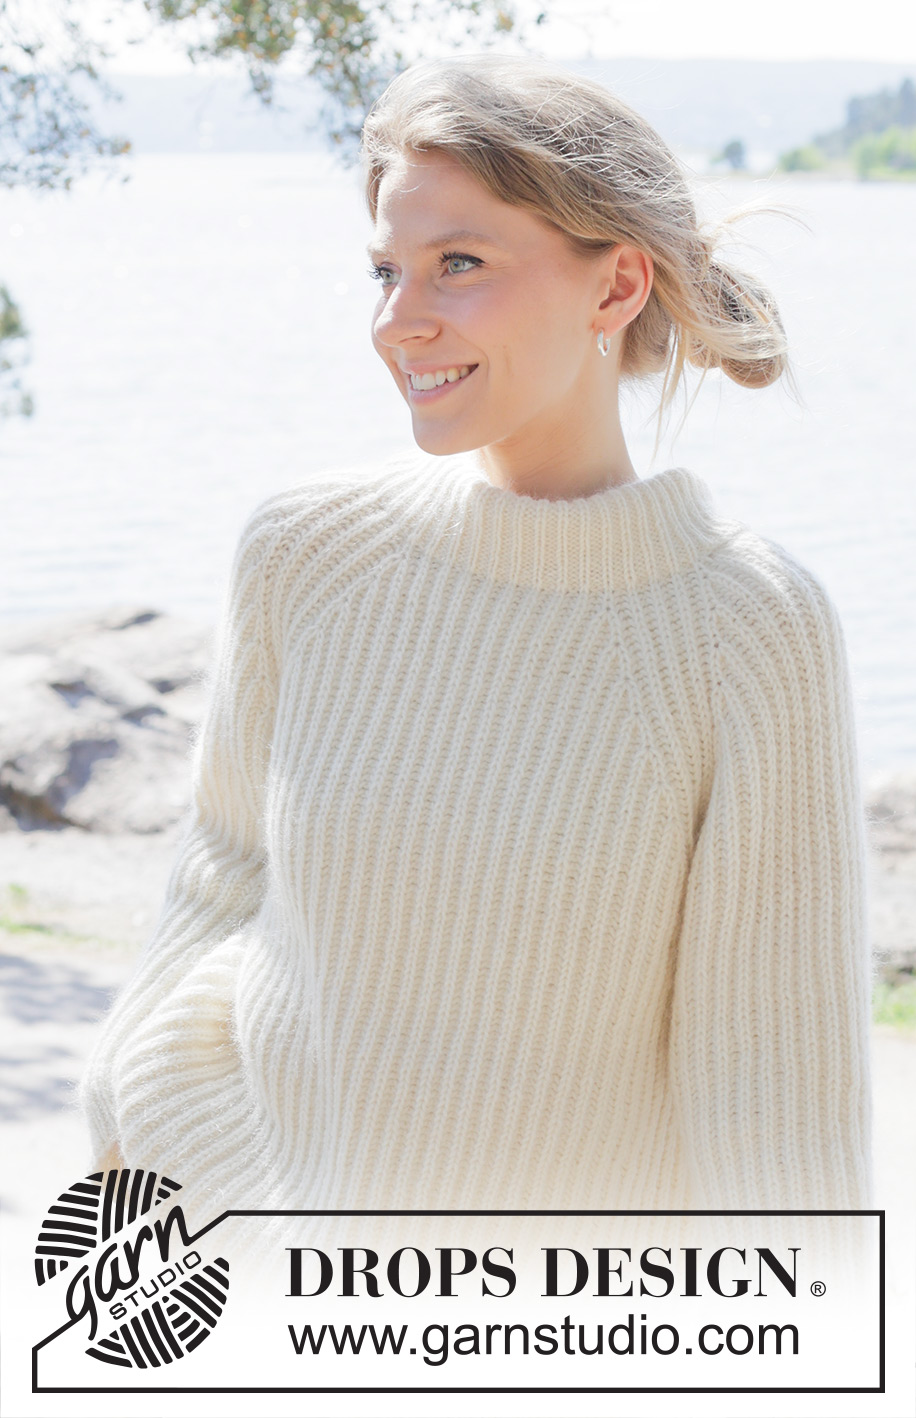
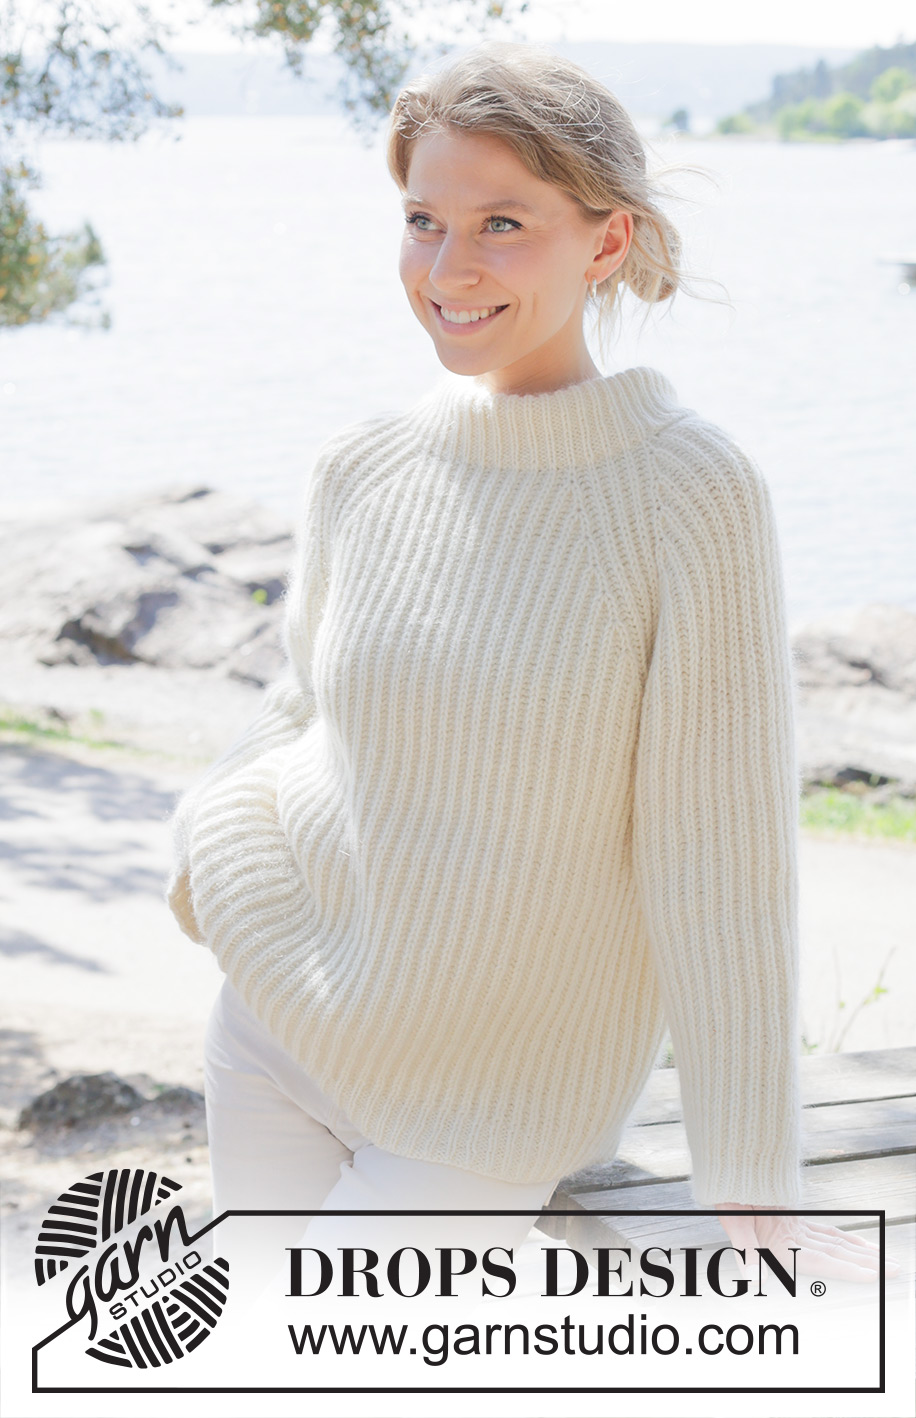
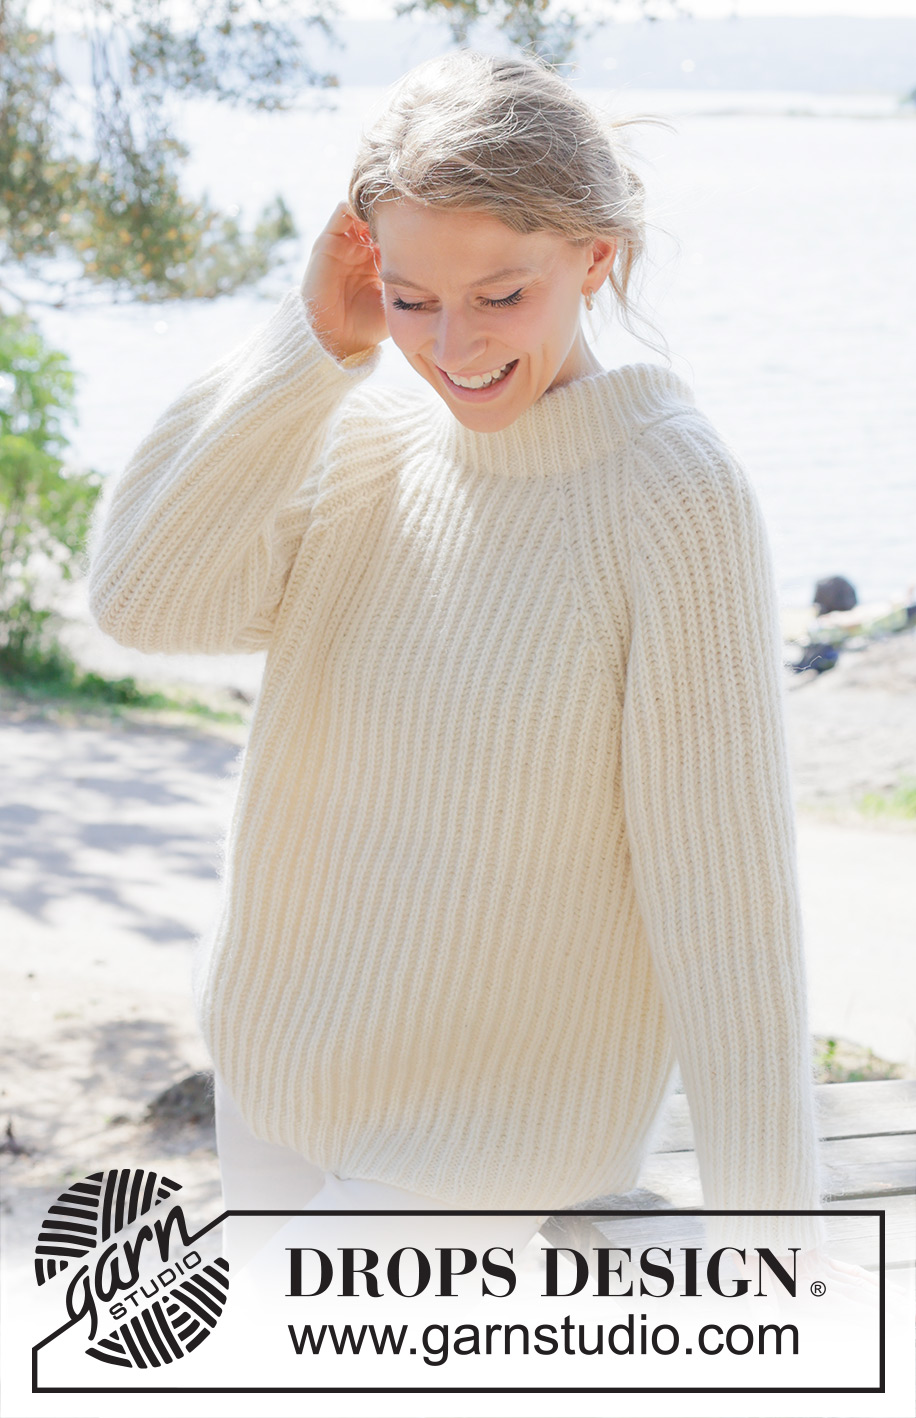
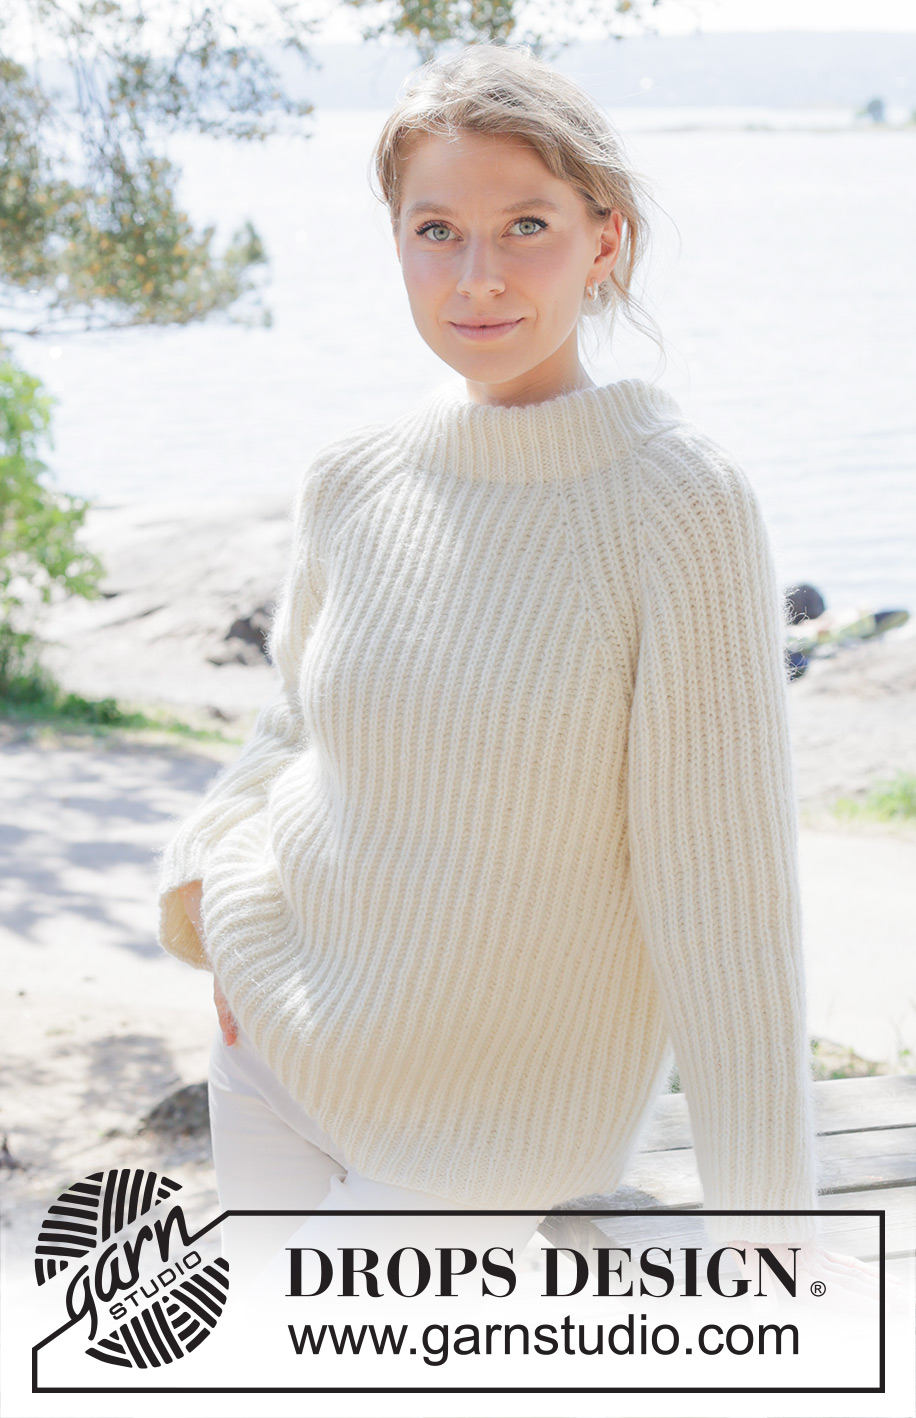
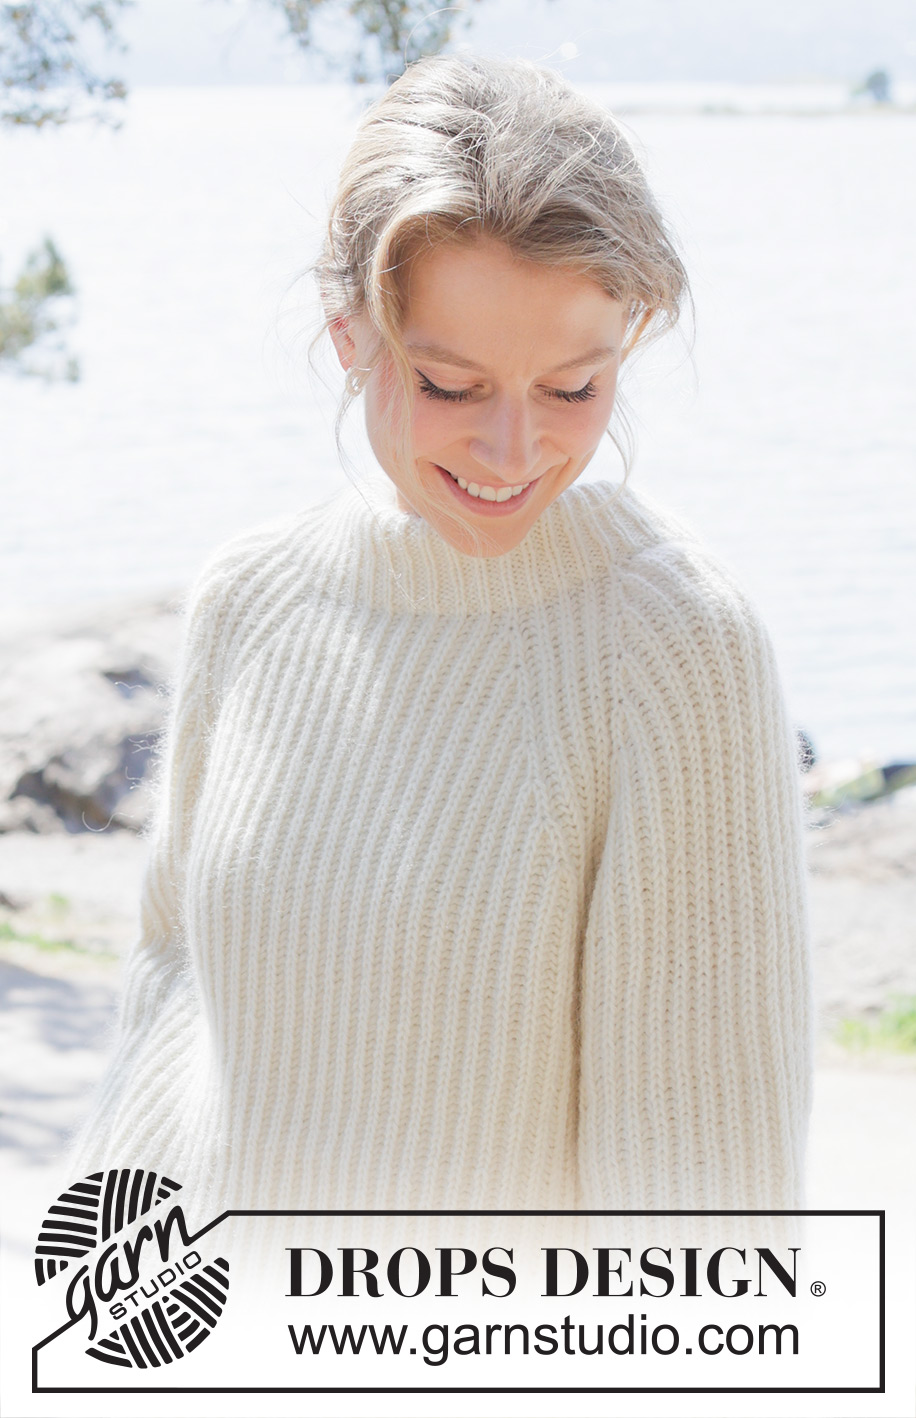
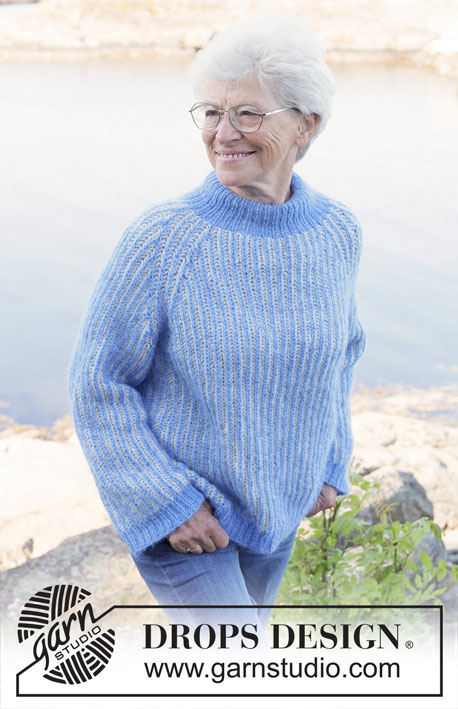
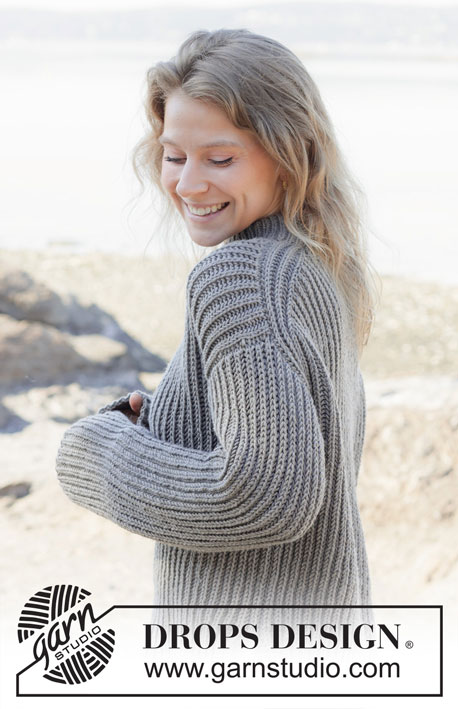
Cherish Sweater#cherishsweater |
|
 |
 |
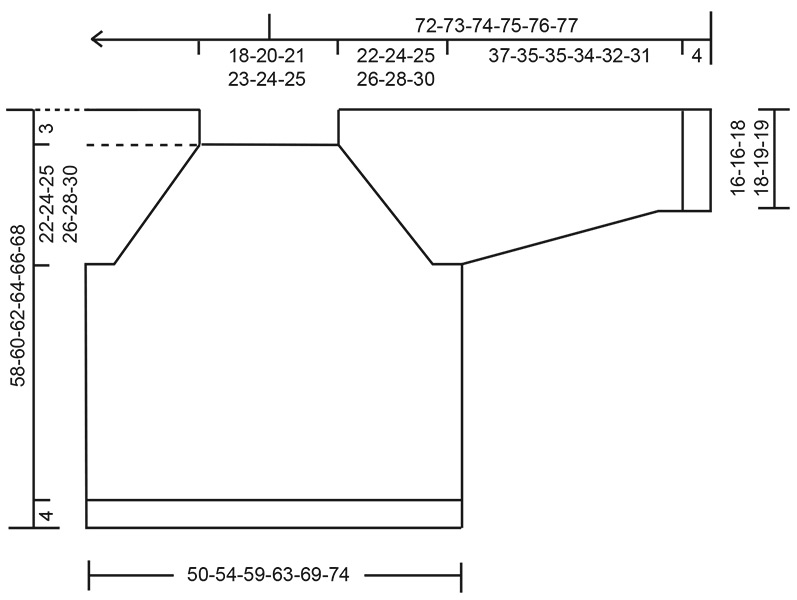
Knitted jumper in 1 strand DROPS Daisy and 1 strand DROPS Kid-Silk or 1 strand DROPS Puna and 1 strand DROPS Kid-Silk. Piece is knitted top down with raglan and English rib. Size: S - XXXL
DROPS 252-8 |
|
|
---------------------------------------------------------- EXPLANATION FOR THE PATTERN: ---------------------------------------------------------- KNITTING TIP: When counting the stitches, the yarn overs are not counted as stitches. INCREASE TIP: All increases are done on a round where yarn over and knit stitch are knitted together. Increase 2 stitches in knit stitch and yarn over by working 3 stitches in stitch and yarn over as follows: Knit stitch and yarn over together but wait to slip stitch and yarn over off the left needle, make 1 yarn over on right needle and knit the same stitch and yarn over together one more time (= 2 stitches increased). Then work the new stitches in English rib but note that the increased stitches are missing the yarn over the first time they are worked. ENGLISH RIB: ROUND 1: * Purl 2 together, make 1 yarn over, slip 1 stitch purlwise *, repeat from *-* the entire round. ROUND 2: * Make 1 yarn over, slip 1 stitch purlwise, knit yarn over and slipped stitch together *, repeat from *-* the entire round. ROUND 3: * Purl yarn over and the slipped stitch together, make 1 yarn over, slip 1 stitch purlwise *, repeat from *-* the entire round. AFTER ROUND 3: Repeat rounds 2 and 3. DECREASE TIP (applies to sleeves): All decreases are done on a round where yarn over and knit stitch are knitted together. Decrease 2 stitches on each side of stitch with marker as follows: DECREASE 2 STITCHES AT BEGINNING OF ROUND: Begin at first knit stitch in English rib after stitch with marker: Slip first stitch and yarn over loosely on to right needle knitwise, knit the next 2 together (i.e. 1 purl + knit stitch and yarn over), then pass loose stitch and yarn over over stitches worked together (= 2 stitches decreased). DECREASE 2 STITCHES AT END OF ROUND: Work until next to last knit stitch in English rib before stitch with marker: Slip first knit stitch and yarn over loosely on to right needle knitwise, purl 1, pass slipped stitch and yarn over over purl stitch, slip stitch back on to left needle, slip stitch and yarn over over stitch slipped back on to left needle, slip the remaining stitch on to right needle (= 2 stitches decreased). ---------------------------------------------------------- START THE PIECE HERE: ---------------------------------------------------------- JUMPER - SHORT OVERVIEW OF THE PIECE: In this pattern needles of different length have been used, begin with fitting length for number of stitches and switch as needed. Work neck edge and yoke in the round on circular needle from right shoulder back, and work top down. When yoke is done, divide piece for body and sleeves. Work body down wards in the round on circular needle while putting the sleeves aside. Then work sleeves downwards in the round on needle. Fold the neck edge double against the wrong side and fasten. NECK EDGE: Cast on 102-108-114-120-126-132 stitches on circular needle size 5 mm with 1 strand DROPS Daisy and 1 strand DROPS Kid-Silk, or 1 strand DROPS Puna and 1 strand DROPS Kid-Silk (= 2 strands). Switch to circular needle size 3.5 mm (cast on on a larger needle to get an elastic cast-on edge). Work rib in the round (= purl 2/knit 1) for 11 cm. The neck edge is later folded in towards wrong side and assembled to form a neck edge of approx. 5 cm. YOKE: Switch to circular needle size 5 mm and work 1st round with ENGLISH RIB, read explanation above = 68-72-76-80-84-88 stitches. Beginning of round is at right shoulder at the back. Insert 1 marker in piece after the first 26-27-28-29-30-31 stitches on round (= approx. mid front), measures piece from this marker. Read KNITTING TIP and insert 8 marker threads on needle between 2 stitches as follows: Insert 1 marker thread (= beginning of round), count 7 stitches (= raglan stitches), insert 1 marker thread before next stitch, count 5 stitches (= sleeve), insert 1 marker thread before next stitch, count 7 stitches (= raglan stitches), insert 1 marker thread before next stitch, count 15-17-19-21-23-25 stitches (= front piece), insert 1 marker thread before next stitch, count 7 stitches (= raglan stitches), insert 1 marker thread before next stitch, count 5 stitches (= sleeve), insert 1 marker thread before next stitch, count 7 stitches (= raglan stitches), insert 1 marker thread before next stitch. 15-17-19-21-23-25 stitches remain on row after last marker thread (= back piece). Continue to work in the round from 2nd round with English rib, AT THE SAME TIME increase for RAGLAN as explained below. Remember to follow the knitting tension! RAGLAN: When 5 rounds have been worked in the round with English rib (= on next round work as 2nd round English rib), increase 2 stitches in knit stitch and yarn over on each side of the 7 raglan stitches – read INCREASE TIP (= 16 stitches increased). Increase like this every 8th round (i.e. every other 4th round with visible English rib stitches vertically) 9-10-10-11-11-12 times in total vertically = 212-232-236-256-260-280 stitches. Increases for sleeve are now done, but continue to increase for raglan on front piece and back piece on every 8th round 1-1-1-1-2-2 more times = 220-240-244-264-276-296 stitches on needle. Work without increasing until piece measures 22-24-25-26-28-30 cm from marker after neck edge – adjust so that next round worked is the same as 3rd round with English rib. Now divide yoke for body and sleeves. DIVIDING FOR BODY AND SLEEVES: AT THE SAME TIME as next round is worked divide yoke for body and sleeves as follows: Work 5 stitches as before (= belongs to back piece), slip the next 45-49-49-53-53-57 stitches on a thread for sleeve, cast on 5-5-9-9-11-13 new stitches on needle (= in the side mid under sleeve), work 65-71-73-79-85-91 stitches as before (= front piece), slip the next 45-49-49-53-53-57 stitches on a thread for sleeve, cast on 5-5-9-9-11-13 new stitches on needle (= in the side mid under sleeve) and work the last 60-66-68-74-80-86 stitches (= rest of back piece). Finish body and sleeves separately. BODY: = 140-152-164-176-192-208 stitches. Work with the same thread, round begins by marker thread as before, and continue with English rib in the round until piece measures 51-53-55-57-59-61 cm from marker mid front – adjust so that next round worked is the same as 3rd round with English rib. Switch to circular needle size 3.5 mm, * make 1 yarn over, purl the purl stitch, knit yarn over and the slipped stitch together *, work from *-* the rest of round. Work rib (= purl 2/knit 1) as follows: Work knit over knit and purl over purl AT THE SAME TIME purl all yarn overs = 210-228-246-264-288-312 stitches. When rib measures 4 cm, cast off with knit over knit and purl over purl. Jumper measures 55-57-59-61-63-65 cm from marker mid front and approx. 58-60-62-64-66-68 cm from the top of shoulder. SLEEVES: Slip the 45-49-49-53-53-57 sleeve stitches from one thread on circular needle size 5 mm. Begin by picking up 1 stitch in each of the 5-5-9-9-11-13 stitches cast on under sleeve = 50-54-58-62-64-70 stitches. Insert 1 marker in the middle of the 5-5-9-9-11-13 new stitches under sleeve - round begins with this stitch. To make the English rib stitches fit nicely over sleeves work first round in the round as follows: Continue from where the 5-5-9-9-11-13 stitches were picked up under sleeve, * knit yarn over and the slipped stitch together, make 1 yarn over, slip 1 stitch purlwise *, repeat from *-* all the round until the new stitches mid under sleeve – note that the new stitches are missing the yarn over the first time they are worked. In sizes S, M, L, XL and XXXL marker is in a knit stitch, in size XXL marker is in a purl stitch. Move the marker upwards when working; it should be used for decrease mid under sleeve. Continue in the round with English rib as before. When sleeve measures 4 cm from division, decrease mid under sleeve – read DECREASE TIP and decrease as follows: Decrease 4 stitches every 4 cm 1-2-2-3-3- 4 times in total = 46-46-50-50-52-54 stitches. Work until sleeve measures 37-35-35-34-32-31 cm from division – adjust so that last round worked is the same as 3rd round with English rib. Switch to double pointed needles size 3.5 mm, work 1st round as follows: SIZE S, M, L, XL and XXXL: * Make 1 yarn over, purl 1, knit yarn over and knit stitch together *, work from *-* the rest of round. SIZE XXL: * Knit yarn over and knit stitch together, make 1 yarn over, purl 1 *, work from *-* the entire round. Work rib (= knit 1/purl 2). Work knit over knit and purl over purl AT THE SAME TIME purl all yarn overs = 69-69-75-75-78-81 stitches. When rib measures 4 cm, cast off with knit over knit and purl over purl. Sleeve measures approx. 41-39-39-38-36-35 cm from division. ASSEMBLY: Fold rib at the top of neck down on inside of garment. Fasten rib to get a double neck edge. To avoid a tight neck edge that sticks out it is important to keep the seam elastic. |
|
 |
|
Have you finished this pattern?Tag your pictures with #dropspattern #cherishsweater or submit them to the #dropsfan gallery. Do you need help with this pattern?You'll find 29 tutorial videos, a Comments/Questions area and more by visiting the pattern on garnstudio.com. © 1982-2026 DROPS Design A/S. We reserve all rights. This document, including all its sub-sections, has copyrights. Read more about what you can do with our patterns at the bottom of each pattern on our site. |
|


With over 40 years in knitting and crochet design, DROPS Design offers one of the most extensive collections of free patterns on the internet - translated to 17 languages. As of today we count 324 catalogues and 12290 patterns translated into English (UK/cm). 12290
We work hard to bring you the best knitting and crochet have to offer, inspiration and advice as well as great quality yarns at incredible prices! Would you like to use our patterns for other than personal use? You can read what you are allowed to do in the Copyright text at the bottom of all our patterns. Happy crafting!
Post a comment to pattern DROPS 252-8
We would love to hear what you have to say about this pattern!
If you want to leave a question, please make sure you select the correct category in the form below, to speed up the answering process. Required fields are marked *.