DROPS Belle
DROPS Belle
53% Cotton, 33% Viscose, 14% Linen
from 2.00 £ /50g
Get the yarn to make this pattern from 24.00£.

The yarn cost is calculated from the pattern’s smallest size and the yarn’s cheapest product type. Looking for an even better price? You might find it on the DROPS Deals!

DROPS Super Sale

Angelica

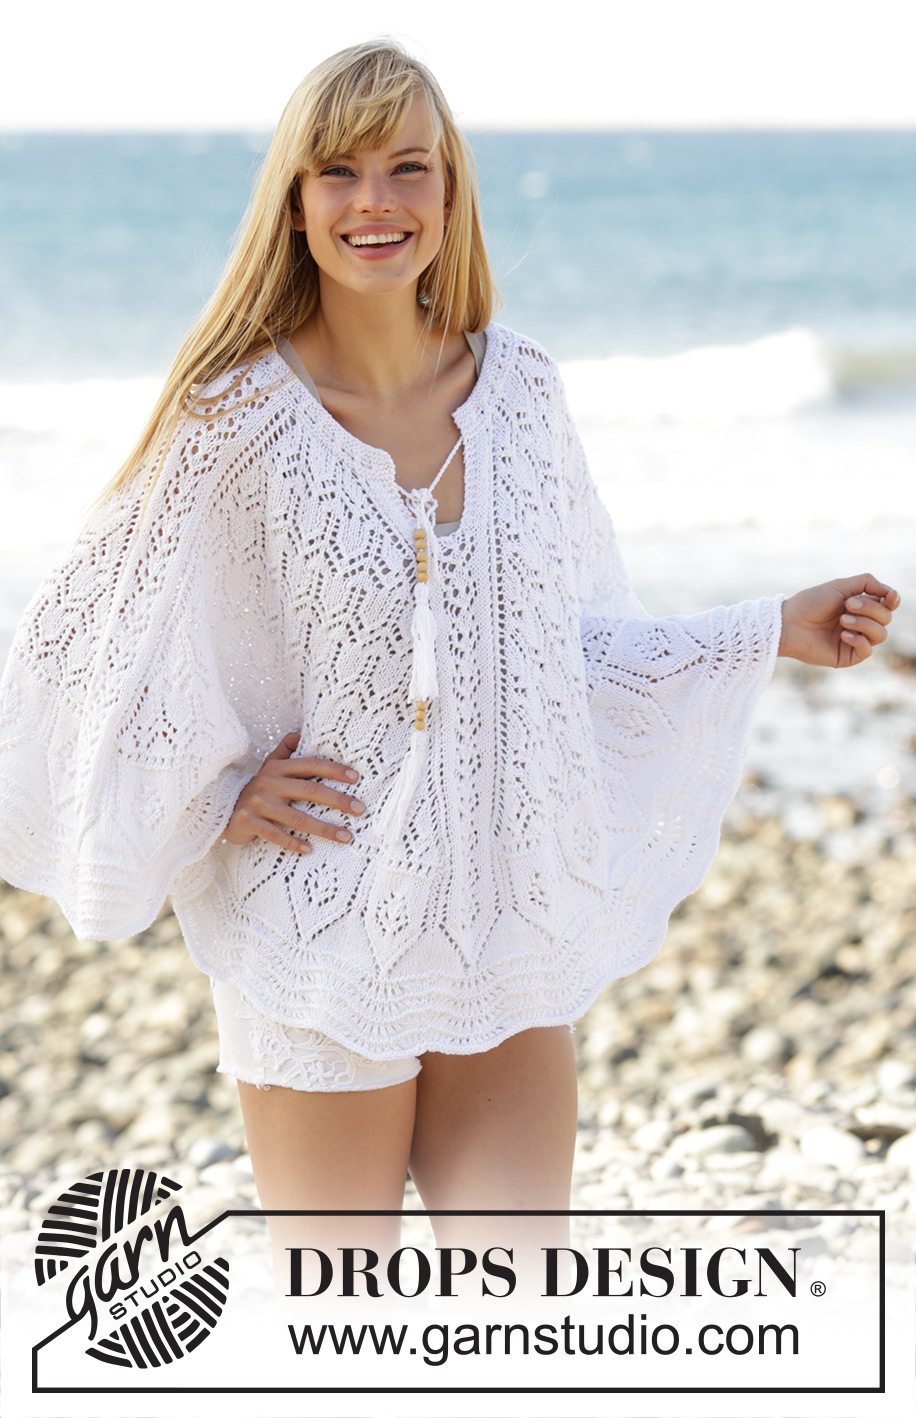
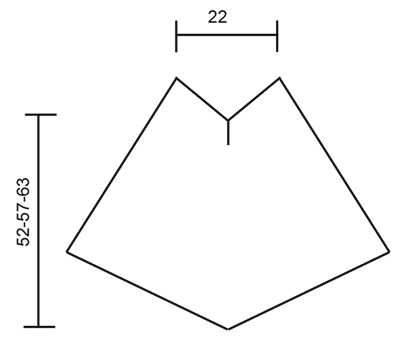
Knitted DROPS poncho with lace pattern and vent at the front in ”Belle”. Worked top down. Size: S - XXXL.

DROPS 170-25
DROPS design: Pattern no vs-018
Yarn group B
----------------------------------------------------------
Size: S/M – L/XL – XXL/XXXL
Materials:
DROPS BELLE from Garnstudio
600-700-800 g colour no 01, white

DROPS CIRCULAR NEEDLE (60 and 80 cm) SIZE 3.5 mm - or size needed to get 22 sts x 30 rows in stocking st = 10 x 10 cm.
ACCESSORIES: Wooden beads - 10 pieces

-------------------------------------------------------

Alternative Yarn – See how to change yarns here
Yarn Groups A to F – Use the same pattern and change the yarn here
Yarn usage using an alternative yarn – Use our yarn converter here

-------------------------------------------------------

DROPS Belle
DROPS Belle
53% Cotton, 33% Viscose, 14% Linen
from 2.00 £ /50g
Get the yarn to make this pattern from 24.00£.

The yarn cost is calculated from the pattern’s smallest size and the yarn’s cheapest product type. Looking for an even better price? You might find it on the DROPS Deals!

Pattern instructions

NOTE: This pattern is written in British English. All measurements in charts are in cm. For conversion from cm to inches - click here. There are different terms for crocheting in British and American English. If this pattern includes crochet, click for "crochet terms" here. For this pattern in American English, please click here.
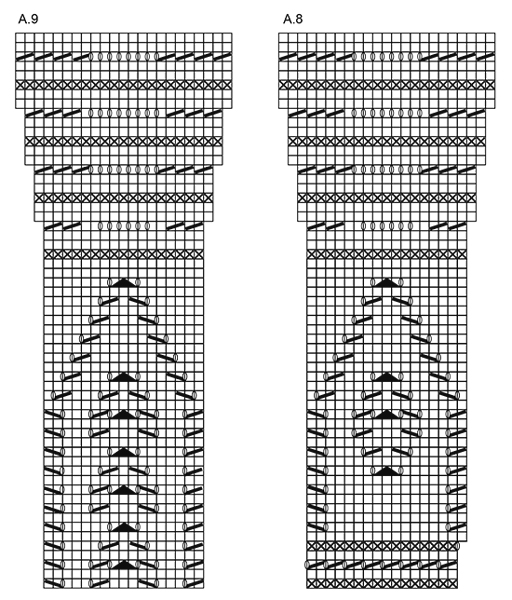
PATTERN:
See diagrams A.1 to A.9. The diagrams show all rounds/rows in pattern seen from RS.
----------------------------------------------------------

PONCHO:
Worked top down, first back and forth on circular needle, then in the round on circular needle. This is done to get a vent mid front.
Cast on 119 sts on a short circular needle size 3.5 mm with Belle. Work A.1 over all sts, on round where K 2 tog and YOs are worked, finish with K 1. When A.1 has been worked 1 time vertically, continue as follows: A.2 (= 8 sts), * A.4 (= 2 sts), A.5 (= 8 sts), A.6 (= 3 sts), A.3 (= 17 sts) *, repeat from *-* 2 more times, A.4, A.5, A.6, A.7 (= 8 sts). Every time A.4 to A.6 have been worked 1 time vertically, work 2 repetitions more of A.5 between A.4 and A.6. Continue this pattern back and forth until 2 repetitions of A.2/A.7 have been worked vertically. Cut the yarn. Now work in the round over all sts but beg round before the 8 sts in A.7. Work A.3 over A.2/A.7, AT THE SAME TIME cast on 1 st between A.2 and A.7 (= middle st in A.3). Continue this pattern upwards, switch to a longer circular needle when needed. REMEMBER THE KNITTING TENSION When A.4 to A.6 have been worked 6-7-8 times vertically (there are now 504-568-632 sts on round), continue as follows: * Work A.9 (= 17 sts) over A.3, work A.8 (= 16 sts) over the next 109-125-141 sts, AT THE SAME TIME on first round in A.8 inc 3 sts evenly over the 109-125-141 sts (= 7-8-9 repetitions of A.8) *, repeat from *-* 3 more times = 516-580-644 sts. When A.8/A.9 have been worked one time vertically, P 1 round over all sts. Cast off. Piece now measures approx. 52-57-63 cm mid front.

TWINED STRING:
Cut 2 lengths of 3 metres each. Twine the strands tog until they resist, fold the string double so that it twines again. Make a knot at each end. Thread tie up and down around the neck. Thread 5 beads in each end of the tie. Cut 8 lengths of yarn of 20 cm. Thread the ends through the end of the tie and fold them double. Twine one of the strand around the top of tassel. Make a tassel the same way in the other end of tie.

Diagram

symbols = K from RS, P from WS

symbols = K from WS, P from RS
symbols = K 2 tog
symbols = slip 1 st as if to K, K 1, psso
symbols = 1 YO between 2 sts
symbols = slip 1 st as if to K, K 2 tog, psso
diagram
diagram
diagram
Do you have a question? See a list of frequently asked questions (FAQ)

Knitting tension is what determines the final measurements of your work, and is usually measured per 10 x 10 cm. It is provided like so: number of stitches in width x number of rows in height - eg: 19 stitches x 26 rows = 10 x 10 cm.

The knitting tension is very individual; some people knit/crochet loosely while others work tightly. You adjust the knitting tension with the needle size, which is why the suggested needle size is only meant as a guide! You need to adjust this (up or down) to ensure that YOUR knitting tension matches the knitting tension provided in the pattern. If you work with a different knitting tension than provided you will have a different yarn consumption, and your work will have different measurements than what the pattern suggests.

The knitting tension also determines which yarns can replace each other. As long as you achieve the same knitting tension you can replace one yarn with another.

See DROPS lesson: How to measure your tension/gauge

See DROPS video: How to make a gauge tension swatch

The required amount of yarn is provided in grams, eg: 450 g. To calculate how many balls you’ll need you first need to know how many grams are in 1 ball (25g, 50g or 100g). This information is available if you click on the individual yarn quality on our pages. Divide the amount required with the amount of each ball. For example, if each ball is 50g (the most common amount), the calculation will be as follows: 450 / 50 = 9 balls.

The important thing when changing from one yarn to another is that the knitting/crochet tension remains the same. This is so that the measurements of the finished piece will be the same as on the sketch provided. It is easier to achieve the same knitting tension using yarns from the same yarn group. It is also possible to work with multiple strands of a thinner yarn to achieve the knitting tension of a thicker one. Please try our yarn converter. We recommend you to always work a test swatch.

Please NOTE: when changing yarn the garment might have a different look and feel to the garment in the photo, due to individual properties and qualities of each yarn.

See DROPS lesson: Can I use a different yarn than the one mentioned in the pattern?

All our yarns are categorised into yarn groups (from A to F) according to thickness and knitting tension – group A contains the thinnest yarns and group F the thickest. This makes it easier for you to find alternative yarns to our patterns, should you wish to switch yarn. All yarns within the same group have a similar knitting tension and can easily replace each other. However, different yarn qualities have different structures and properties which will give the finished work a unique look and feel.

Click here for an overview of the yarns in each yarn group

At the top of all our patterns you’ll find a link to our yarn calculator, which is a helpful tool should you wish to use a different yarn than suggested. By filling in the yarn quality you wish to replace, the amount (in your size) and number of strands, the calculator will present good alternative yarns with the same knitting tension. Additionally it will tell you how much you’ll require in the new qualities and whether you’ll need to work with multiple strands. Most skeins are 50g (some are 25g or 100g).

If the pattern is worked with multiple colours, every colour will have to be calculated separately. Similarly, if the pattern is worked with several strands of different yarns (for example 1 strand Alpaca and 1 strand Kid-Silk) you will have to find alternatives for each, individually.

Click here to see our yarn calculator

Since different yarns have different qualities and textures we have chosen to keep the original yarn in our patterns. However, you can easily find options among our available qualities by using our yarn calculator, or simply pick a yarn from the same yarn group.

It is possible that some retailers still have discontinued yarns in stock, or that someone has a few skeins at home that they would like to find patterns for.

The yarn calculator will provide both alternative yarn as well as required amount in the new quality.

If you think it's hard to decide what size to make, it can be a good idea to measure a garment you own already and like the size of. Then you can pick the size by comparing those measures with the ones available in the pattern's size chart.

You'll find the size chart at the bottom of the pattern.

See DROPS lesson: How to read size chart

The needle size provided in the pattern serves only as a guide, the important thing is to follow the knitting tension. And since knitting tension is very individual, you will have to adjust the needle size to ensure that YOUR tension is the same as in the pattern – maybe you’ll have to adjust 1, or even 2 needle sizes, up or down to achieve the correct tension. For this, we recommend that you work test swatches.

Should you work with a different knitting tension than the one provided, the measurements of the finished garment might deviate from the measurement sketch.

See DROPS lesson: How to measure your tension/gauge

See DROPS video: How to make a tension/gauge swatch

Working a garment top-down provides more flexibility and room for personal adjustment. For example it is easier to try the garment on while working, as well as making adjustments to length of yoke and shoulder caps.

The instructions are carefully explaining every step, in the correct order. Diagrams are adjusted to the knitting direction and are worked as usual.

The diagram depicts all rows/rounds, and every stitch seen from the right side. It is read from bottom to top, from right to left. 1 square = 1 stitch.

When working back and forth, every other row is worked from the right side and every other row is worked from the wrong side. When working from the wrong side, the diagram will have to be worked reversed: from left to right, knit stitches are purled, purl stitches are knit etc.

When working in the round every round is worked from the right side and the diagram are worked from right to left on all rounds.

See DROPS lesson: How to read knitting diagrams

The diagram depicts all rows/rounds, and every stitch seen from the right side. It is worked from bottom to top, from right to left.

When working back and forth every other row is worked from the right side: from right to left and every other row is worked from the wrong side: from left to right.

When working in the round, every row in the diagram are worked from the right side, from right to left.

When working a circular diagram you start in the middle and work your way outwards, counter clockwise, row by row.

The rows usually start with a given number of chain stitches (equivalent to the height of the following stitch), this will either be depicted in the diagram or explained in the pattern.

See DROPS lesson: How to read crochet diagrams

Instructions for working several diagrams after each other on the same row/round, will often be written like so: “work A.1, A.2, A.3 a total of 0-0-2-3-4 times". This means you work A.1 once, then A.2 is worked once, and A.3 is repeated (in width) the number of times provided for your size – in this case like so: S = 0 times, M = 0 times, L=2 times, XL= 3 times and XXL = 4 times.

The diagrams are worked as usual: begin with the first row in A.1, then work the first row in A.2 etc.

See DROPS lesson: How to read knitting diagrams

See DROPS lesson: How to read crochet diagrams

The total width of the garment (from wrist-to-wrist) will be larger in the larger sizes, despite the actual sleeves being shorter. The larger sizes have longer sleeve caps and wider shoulders, so there will be a good fit in all sizes.

The measurement sketch/schematic drawing provides information regarding the full length of the garment. If it’s a jumper or a jacket the length is measured from the highest point on the shoulder closest to the neckline, and straight down to the bottom of the garment. It is NOT measured from the tip of shoulder. Similarly, the length of yoke is measured from the highest point on the shoulder and down to where yoke is split into body and sleeves.

On a jacket measures are never taken along bands, unless specifically stated. Always measure inside band stitches when measuring the length.

See DROPS lesson: How to read a schematic drawing

Diagrams are often repeated on the round or in height. 1 repeat is the diagram the way it appears in the pattern. If it says to work 5 repeats of A.1 in the round, then you work A.1 a total of 5 times after/next to each other in the round. If it says to work 2 repeats of A.1 vertically/in height you work the entire diagram once, then begin again at the start and work the entire diagram one more time.

Chain stitches are slightly narrower than other stitches and to avoid working the cast-on edge too tight, we simply chain more stitches to begin with. The stitch count will be adjusted on the following row to fit the pattern and measurement sketch.

The rib edge is more elastic and will contract slightly compared to, for example, stocking stitch. By increasing before the rib edge, you avoid a visible difference in width between the rib edge and the rest of the body.

It’s very easy to cast off too tightly, and by making yarn overs while casting off (and simultaneously casting these off) you avoid a too tight cast off edge.

See DROPS video: How to bind off with yarn overs (yo)

To achieve an even increase (or decrease) you can increase on, for example: every 3rd and 4th row alternately, like so: work 2 rows and increase on the 3rd row, work 3 rows and increase on the 4th. Repeat this until the increase is complete.

See DROPS lesson: Increase or decrease 1 st on every 3rd and 4th row alternately

Should you prefer to work in the round instead of back and forth, you may of course adjust the pattern. You’ll need to add steeks mid-front (usually 5 stitches), and follow the instructions. When you would normally turn and work from the wrong side, simply work across the steek and continue in the round. At the end you’ll cut the piece open, pick up stitches to work bands, and cover the cut edges.

See DROPS video: How to knit steeks and cut open

Should you prefer to work back and forth instead of in the round, you may of course adjust the pattern so you work the pieces separately and then assemble them at the end. Divide the stitches for the body in 2, add 1 edge stitch in each side (for sewing) and work the front and back pieces separately.

See DROPS lesson: Can I adapt a pattern for circular needles into straight needles?

Pattern repeats can vary slightly in the different sizes, in order to get the correct proportions. If you’re not working the exact same size as the garment in the photo, yours might deviate slightly. This has been carefully developed and adjusted so that the complete impression of the garment is the same in all sizes.

Make sure to follow instructions and diagrams for your size!

If you have found a pattern you like which is available in women’s size it’s not very difficult to convert it to men’s size. The biggest difference will be the length of sleeves and body. Start working on the women size that you think would fit across the chest. The additional length will be worked right before you cast off for the armhole/sleeve cap. If the pattern is worked top-down you can add the length right after the armhole or before the first decrease on sleeve.

Regarding additional yarn amount, this will depend on how much length you add, but it is better with a skein too many than too few.

All yarns will have excess fibres (from production) that might come off as lint or shedding. Brushed yarns (ie hairier yarns) have more of these loose, excess fibres, causing more shedding.

Shedding also depends on what is worn under or over the garment, and whether this pulls at the yarn fibres. It’s therefore not possible to guarantee that there will be no shedding

Below are some tips on how to get the best result when working with hairier yarns:

1. When the garment is finished (before you wash it) shake it vigorously so the looser hairs come off. NOTE: do NOT use a lint roller, brush or any method that pulls at the yarn.

2. Place the garment in a plastic bag and put it in your freezer - the temperature will cause the fibres to become less attached to each other, and excess fibres will come off easier.

3. Leave in the freezer for a few hours before taking it out and shaking it again.

4. Wash the garment according to the instructions on the yarn label.

Pilling is a natural process that happens to even the most exclusive of fibers. It's a natural sign of wear and tear that is hard to avoid, and that is most visible in high friction areas of your garment like a sweater's arms and cuffs.

You can make your garment look as new by removing the pilling, using a fabric comb or a pill/lint remover.

Still can't find the answer you need? Then scroll down and leave your question so one of our experts can try to help you. This will be done normally within 5 to 10 working days.
In the meantime, you can read the questions and answers that others have left to this pattern or join the DROPS Workshop on Facebook to get help from fellow knitters/crocheters!

You might also like...

Post a comment to pattern DROPS 170-25

We would love to hear what you have to say about this pattern!

If you want to leave a question, please make sure you select the correct category in the form below, to speed up the answering process. Required fields are marked *.

Comments / Questions (94)

country flag Alvy wrote:

Bonjour, j'ai fait une partie des grilles A9 et A8. je viens de finir le niveau du motif représenté par le petit triangle et un jeté de chaque côté, au milieu de la grille. J'ai ensuite fait le rang à l'envers. Par contre j'ai un doute pour les 3 prochains rangs. Si je fait un rang endroit, le suivant à l'endroit et le suivant à l'envers est-ce que c'est bon ? (sachant que je tricote en rond) merci par avance.

06.09.2017 - 13:31

DROPS Design answered:

Bonjour Alvy, après le surjet double et les 2 jetés dans A.8 et A.9, tricotez 2 tours endroit et 1 tour envers (en rond), puis 2 tours endroit et commencez ensuite le point de vagues et ses augmentations. Bon tricot!

06.09.2017 - 15:19

country flag BIRGIT wrote:

Bonjour. Donc A1est tricoté une fois 1x en hauteur, 12 rangs. Après 4 rangs de suite, j'ai déjà 16 mailles en plus, donc 135 mailles. Comment dois je comprendre: chaque fois que A.4 à A.6 sont tricotés 1 fois en hauteur ???C'est après combien de rangs???Puis jusqu'à ce que A.2/A.7 aient été tricotés 2 fois en hauteur - c'est après combien de rangs ???? Merci beaucoup pour votre aide.

01.04.2017 - 08:53

DROPS Design answered:

Bonjour Birgit, voir les réponses ci-dessous. B on tricot!

03.04.2017 - 09:05

Birgit wrote:

Bonjour. Donc, j'ai un vrai problème.Je suis déjà perdue au début. Donc A1est tricoté une fois 1x en hauteur, donc 12 rangs. Après 4 rangs de suite, j'ai déjà 16 mailles en plus, donc 135 mailles. Comment dois je comprendre: chaque fois que A.4 à A.6 sont tricotés 1 fois en hauteur ???C'est après combien de rangs???Puis jusqu'à ce que A.2/A.7 aient été tricotés 2 fois en hauteur - c'est après combien de rangs ????

01.04.2017 - 08:51

DROPS Design answered:

Bonjour Birgit, il n'y a pas d'augmentation dans A.1, vous devez avoir toujours le même nombre de mailles, veillez bien à ce qu'au 6ème rang vous ayez bien 1 dim = 1 jeté pour ne pas augmenter de mailles. Les diagrammes A.4 à A.6 = 16 rangs - A.2 et A.7 = 8 rangs, donc 2 x A.2/A.7 = 16 rangs. Bon tricot!

03.04.2017 - 09:04

country flag Birgit wrote:

Also, habe echte Probleme, obwohl ich eigentlich viel und aufwendige Muster stricke.Bin schon zu Anfang verloren. Bitte helft mir. DerPoncho sieht so toll aus! A1 ist einmal in Höhe gestrickt, also 12R.Nach weiteren 4R habe ich schon 16 M mehr.Was bedeutet: wenn A4 bis A6 1x in Höhe gestrickt wurden???Nach wieviel Reihen soll das sein? Noch eine Frage: Nach wieviel Reihen sind 2 Rapporte von A2/A7 in Höhe gestrickt???

01.04.2017 - 07:56

DROPS Design answered:

Liebe Birgit, in A.1 sollen Sie keine Maschen zunehmen, bei der 6. Reihe sollen Sie genausoviel 2 M zs und Umschläge haben. A.4 - A.6 = 16 R in der Höhe, nachdem Sie diese diagramme 1x in der Höhe gestrickt haben, gibt es genügend Maschen um 2 x mehr A.5 inzwischen zu stricken. A.2 und A.7 sind 8 Reihe hoch, dh 2 x A.2/A.7 sind 16 Reihen. Viel Spaß beim stricken!

03.04.2017 - 09:01

country flag Milli wrote:

Buongiorno, alla seconda lavorazione in verticale, al ferro 1 sul diritto aggiungo A5 a sinistra, che finisce con un gettato, seguito da A4, che inizia con un gettato, quindi ho due gettati di seguito. Sul secondo ferro a rovescio mi viene fuori un buco grande,cosa sbaglio? Grazie Milli

25.03.2017 - 18:00

DROPS Design answered:

Buonasera Milli. Dopo la prima ripetizione, lavora A5 due volte in più tra A4 e A6, quindi la successione diventa: A4,A5, A5,A5, A6. Non ci sono due gettati consecutivi. Ci riscriva se ancora in difficoltà. Buon lavoro!

25.03.2017 - 20:23

country flag Agathe Brosset wrote:

J'ai encore une question concernant les diagrammes. Après un jeté, est ce qu'il faut tricoter systématiquement une maille endroit où il faut faire un surjet simple par exemple A5. Merci pour vos réponses et votre réactivité.

10.01.2017 - 18:44

DROPS Design answered:

Bonjour Mme Brosset, au 1er rang de A.5, vous avez: 1 m end, 1 jeté, 1 surjet simple, 3 m end, 2 m ens à l'end, 1 jeté. Suivez bien le diagramme et la légende pour que les jetés compensent les diminutions, on aura une diminution soit avant soit après le jeté, et parfois (rangs 11 & 13) 1 surjet double entouré de 2 jetés. Bon tricot!

11.01.2017 - 09:11

country flag Agathe Brosset wrote:

Bonjour, je découvre votre site et j'ai beaucoup de mal dans les explications. En effet, les diagrammes sont ils tricotes de haut en bas et de gauche à droite ou l'inverse?

10.01.2017 - 13:36

DROPS Design answered:

Bonjour Mme Brosset, sauf mention spécifique dans les explications, tous nos diagrammes se lisent en commençant en bas à droite, de droite à gauche sur l'endroit (ou tous les tours quand on tricote en rond) et de gauche à droite sur l'envers (quand on tricote en aller-retour). Voir aussi ici. Bon tricot!

10.01.2017 - 13:49

country flag B. De Bruijn wrote:

A9 onder A3 alleen snap ik A8 niet. Als ik de tweede naald brei en ik begin bij A9 dan klopt het maar bij A8 kom bij de eerste steek moet ik eerst 1 steek doen en dan twee samen en 1 omslag of meteen twee samen Ik hoor graag snel

03.12.2016 - 16:45

DROPS Design answered:

Hoi. Is het misschien de derde nld van A.8? Je breit die als volgt: *2 st r samenbreien, 1 omsl* - en herhaal *-* nog 7 keer (in totaal 8 keer per herhaling). Het aantal st blijft dus in deze nld hetzelfde.

07.12.2016 - 16:26

country flag Alvy wrote:

Je viens de faire le rang (étape tricot en rond avec la modif du A3 sur A2/A7), mais après comment doit on faire pour le rang habituellement fait en maille envers ?

03.10.2016 - 22:53

DROPS Design answered:

Bonjour Mme Alvy, quand on tricote en rond, on tricote toujours sur l'endroit, tricotez les mailles comme indiqué dans le diagramme (les m env sur l'env se tricotent maintenant à l'end sur l'endroit et les m end sur l'envers se tricotent maintenant à l'env sur l'endroit). Bon tricot!

04.10.2016 - 10:04

country flag Edith wrote:

Hatte mich direkt verliebt. Jetzt ist er fertig und einfach nur genial. Danke für die Anleitung :-)

29.09.2016 - 21:45