
Popular categories
Looking for a yarn?


Comments / Questions (48)
![]() Natalia wrote:
Natalia wrote:
Pues debo hacerlo mal porque mevoy quedando cada pasada con menos puntos. Diagrama 2: 1 hebra_1 punto derecho_deslizo punto_dos puntos puntos juntos (o sea, un punto menos)_paso el punto deslizado por encima del punto que avabo de hacer_1 punto derecho. Y así, repetir la secuencia. Qué hago mal?
07.08.2014 - 12:08DROPS Design answered:
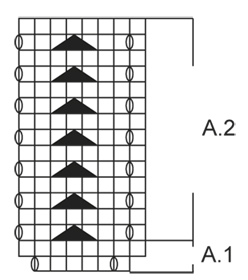
Hola Natalia. A.2 se trabaja como sigue: *1 d., 1 HEB, 2 d., 1 pt desl como de derecho, 2 pjd, pasar el pt desl por encima, 2 d., 1 HEB*, repetir de * a *. En cada repetición hay 2 HEB y 2 pts dism = el número de puntos es igual.
08.08.2014 - 15:09
![]() Natalia wrote:
Natalia wrote:
Pues debo hacerlo mal porque mevoy quedando cada pasada con menos puntos. Diagrama 2: 1 hebra_1 punto derecho_deslizo punto_dos puntos puntos juntos (o sea, un punto menos)_paso el punto deslizado por encima del punto que avabo de hacer_1 punto derecho. Y así, repetir la secuencia. Qué hago mal?
07.08.2014 - 12:08DROPS Design answered:
Hola Natalia. A.2 se trabaja como sigue: *1 d., 1 HEB, 2 d., 1 pt desl como de derecho, 2 pjd, pasar el pt desl por encima, 2 d., 1 HEB*, repetir de * a *. En cada repetición hay 2 HEB y 2 pts dism = el número de puntos es igual.
08.08.2014 - 15:10Natalia wrote:
Después del diagrama A1 tenemos 421 puntos en la hilera. ¿Se mantienen los 421 puntos mientras tejemos el diagrama A2?
06.08.2014 - 19:56DROPS Design answered:
Hola Natalia. El diagrama A.2 se trabaja sobre 421 pt.
06.08.2014 - 22:26
![]() Jack wrote:
Jack wrote:
Ich haben zunächst das Tuch bis zu dem Diagramm gestrickt. Bis dahin war es gut verständlich, jedoch ist mir das Diagramm noch etwas unklar. Klar ist, daß ich in der Hinreihe so stricke, wie es die Schrift vorschreibt. Wie stricke ich aber die Rückreihen? Stricke ich sie simpel mit linken Maschen durch, ohne Umschläge zu machen, oder muß ich die Umschläge auch in den Rückreihen machen? Es ist mein erstes Muster, welches ich nach Strickanleitung stricke. Freue mich über jede Hilfe! :)
25.06.2014 - 20:19DROPS Design answered:
Antwort siehe unten! :-)
25.06.2014 - 21:58
![]() Jack wrote:
Jack wrote:
Ich haben zunächst das Tuch bis zu dem Diagramm gestrickt. Bis dahin war es gut verständlich, jedoch ist mir das Diagramm noch etwas unklar. Klar ist, daß ich in der Hinreihe so stricke, wie es die Schrift vorschreibt. Wie stricke ich aber die Rückreihen? Stricke ich sie simpel mit linken Maschen durch, ohne Umschläge zu machen, oder muß ich die Umschläge auch in den Rückreihen machen? Es ist mein erstes Muster, welches ich nach Strickanleitung stricke. Freue mich über jede Hilfe! :)
25.06.2014 - 20:17DROPS Design answered:
Das Diagramm zeigt ALLE R, also auch die Rück-R. Bei diesem Diagramm sind die Hin-R die R, in denen Sie die Umschläge arbeiten und die M zusammenstricken. Die Rück-R werden hier durchweg einfach immer links gestrickt, also auch die Umschläge, damit sich die Löcher ergeben. Die Hin-R lesen Sie übrigens von rechts nach links, die Rück-R von links nach rechts, wobei das hier bei den Rück-R egal ist, da ja nur links gestrickt wird.
25.06.2014 - 21:52
![]() Patricia wrote:
Patricia wrote:
Ich kann eigentlich gut stricken,aber die Anleitung mit den Zunahmen ist sehr schwer zu verstehen.Muss ich ab der 3.Reihe nur noch in der Hinrunde zunehmen? Wäre gut wenn es in einem Video sehen könnte.
07.05.2014 - 22:59DROPS Design answered:
Liebe Patricia, Sie stricken die Zunahmen an den beiden Seiten des Tuchs in JEDER R (es wird ja immer neben den beiden kraus re gestrickten M am Rand je 1 M zugenommen), die Zunahmen an den beiden Markierern stricken Sie aber nur in Hin-R. Somit nehmen Sie also in jeder Hin-R 4 M zu (1 am rechten Rand, 1 am ersten Markierer, 1 am zweiten Markierer, 1 am linken Rand) und in jeder Rück-R nehmen Sie 2 M zu (1 am rechten Rand und 1 am linken Rand).
08.05.2014 - 00:32
![]() Jos De Zwart wrote:
Jos De Zwart wrote:
Goede middag, ik wil niet zeggen dat ik een fout gevonden heb maar ik begrijp iets niet van het meerderen: 1 St. Naast 2 St. In ribbelst aan elke kant (2 St.) en 1 St voor de 1e markeerder en 1 St na de tweede markeerder (2 St) ik kom maar aan 4 St gemeerderd om de nld. Wat lees ik niet goed? Hopelijk kunt u mij helpen, met vriendelijke groet, Jos
03.03.2014 - 15:27DROPS Design answered:
Hoi Jos. Je meerdert aan de zijkanten (naast de 2 ribbelst) in ELKE nld (dus ook op de verkeerde kant, en je meerdert voor/na de markeerders in elke 2e nld (= naalden op de goede kant). Dwz, in nld 1 (goede kant) meerder je 4 st, en in nld 2 (verkeerde kant) meerder je 2 st = 6 st om de nld.
04.03.2014 - 17:04
![]() Martina wrote:
Martina wrote:
Meiner Ansicht stimmt die Anzahl zu Zunahmen hier nicht.. Wenn ich in der Hinreihe bei beiden Markierungen jeweils 2 mal 1 Masche zunehme,dann kann ich nicht mach 2 Reihen 6 Maschen zugenommen haben, sondern nur 2. es sei denn für sie heißen 2 reihen immer hin und rückreihe, aber auch dann wären es 4 Zunahmen und nicht 6.für mein Verständnis nimmt man an 2 Stellen in der Hinreihe zu und in der Rückreihe gar nicht.
28.02.2014 - 05:44DROPS Design answered:
Liebe Martina, Sie nehmen in JEDER R, d.h. in Hin- und Rück-R am rechten und linken Rand neben den 2 kraus re gestrickten M je 1 M zu (= 2 Zunahmen in der Hin-R und 2 Zunahmen in der Rück-R). Außerdem nehmen Sie in jeder Hin-R (also nicht in Rück-R) vor dem 1. Markierer und nach dem 2. Markierer je 1 M zu (= 2 Zunahmen). Insgesamt haben Sie also nach 1 Hin-R und 1 Rück-R 6 M zugenommen, 4 in der Hin-R und 2 in der Rück-R.
28.02.2014 - 15:16
![]() Gebhardt wrote:
Gebhardt wrote:
Hallo,ich verstehe die Zunahmereihen nicht. Ist es richtig: Hinreihe 1 Umschlag vor + nach der Markierung,Rückreihe 1Umschlag vor dem nunmehr links zu strickenden ehemaligen Umschlag der Hinreihe und 1 Umschlag vor bzw nach der Markierung. Diese Reihen im Wechsel? ist das richtig?? Danke für Ihre Mühe. Mit freundlichen Grüßen U.
17.12.2013 - 17:39DROPS Design answered:
Hallo Frau Gebhardt, bei den Aufnahmen neben dem mittleren Teil nimmt man nur in der Hin-R zu.
18.12.2013 - 11:41
![]() Elena wrote:
Elena wrote:
Per le principianti come me,gli aumenti si fanno così:1 gettato dopo le prime 2 maglie a punto legaccio e 1 gettato prima delle 2 maglie finali a punto legaccio SU TUTTI I FERRI, sia sul diritto che sul rovescio del lavoro, mentre solo SUL DIRITTO del lavoro facciamo 1 gettato prima del primo marcapunti e 1 gettato dopo il secondo marcapunti. Le 59 maglie centrali le lavoriamo normalmente ma non le aumentiamo, gli aumenti li facciamo ai lati di questa zona.
31.07.2013 - 09:37DROPS Design answered:
Buongiorno Elena. Ci dispiace che abbia trovato difficoltà con le spiegazioni. Abbiamo modificato leggermente il testo, nella speranza di averlo reso più chiaro. Ci riscriva dovesse trovarsi ancora in difficoltà. Buon lavoro!
31.07.2013 - 13:45
|
||||||||||
Wings#wingsshawl |
||||||||||
 |
 |
|||||||||
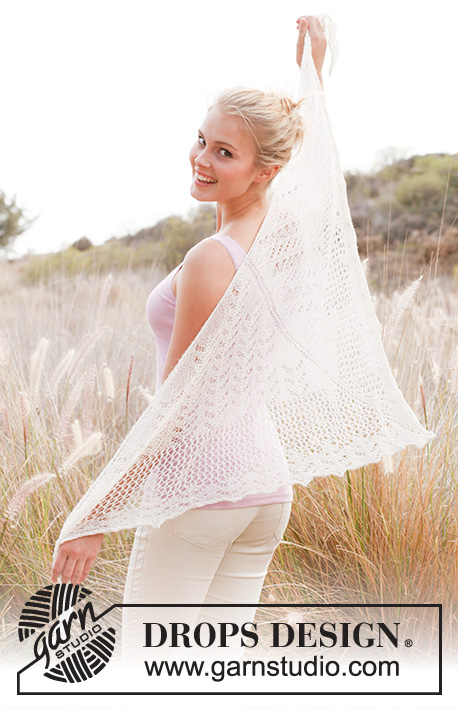
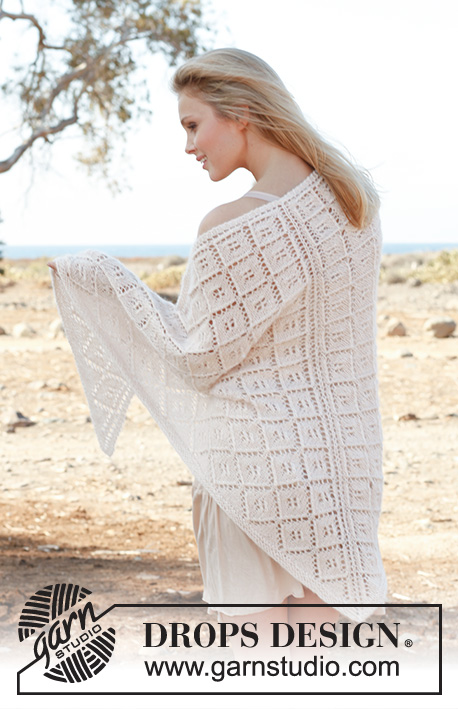
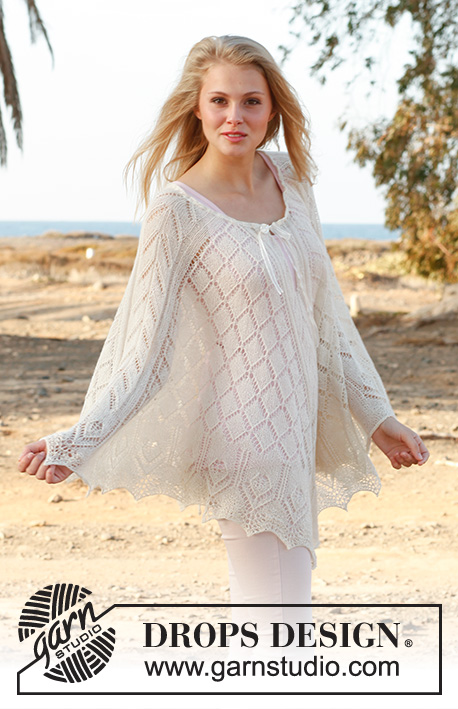
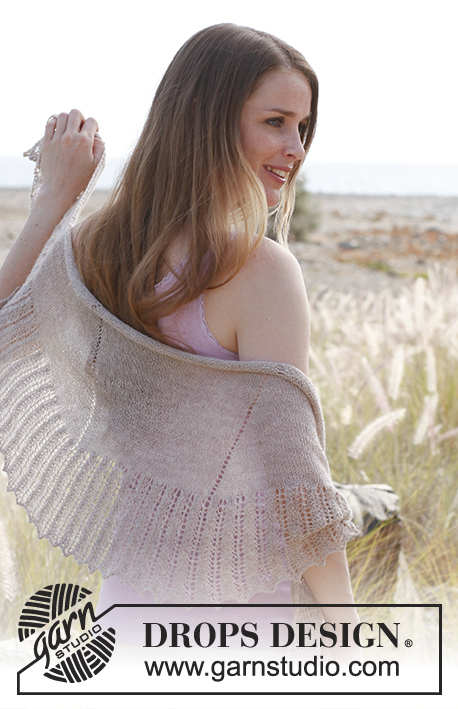
Knitted DROPS shawl with lace pattern in ”Lace”.
DROPS 146-28 |
||||||||||
|
GARTER ST (back and forth on needle): K all rows. 1 ridge = 2 rows K. PATTERN: See diagrams A.1 and A.2. Diagrams show all rows in pattern seen from RS. INCREASE TIP: Inc 1 st inside 2 sts in garter st in each side of piece on every row by making a YO, P the YO from WS and K the YO from RS to make holes. Inc 1 st before 1st marker from RS by making a YO before marker and inc 1 st after 2nd marker from RS by making a YO after marker, P the YOs from WS to make holes. ---------------------------------------------------------- SHAWL: Worked back and forth on circular needle to make room for all the sts. Cast on 65 sts on circular needle size 3.5 mm with Lace. Insert markers inside 3 sts in each side of shawl (= 59 sts between markers) and move the markers upwards when working. Work in stocking st with 2 sts in GARTER ST - see explanation above, in each side (1st row = RS) - AT THE SAME TIME inc - read INCREASE TIP above, 1 st inside 2 sts in garter st in each side of piece on every row, and inc 1 st before 1st marker and 1 st after 2nd marker on every row from RS (= 6 inc sts after every other row). Continue to work and inc this way until there are 129 sts before 1st marker, 59 sts in the middle and 129 sts after 2nd marker = 317 sts on row. After all inc piece measures approx. 28 cm in the knitting direction along one of the markers. On next row from RS work as follows: 2 sts in garter st and diagram A.1(= 6 sts) 52 times until 3 sts remain, work 1 st in stocking st and finish with 2 sts in garter st. When diagram A.1 has been worked 1 time vertically, there are 421 sts on row. Continue to work 2 sts in garter st, diagram A.2 until 3 sts remain, 1 st in stocking st and 2 sts in garter st, work until diagram A.2 has been worked a total of 3 times vertically, piece measures approx. 42 cm measured in knitting direction along one of the markers. On next row from RS, loosely cast off as follows – NOTE: It is very important to cast off very LOOSELY otherwise the edge cannot be shaped into tips: Cast of the first 3 sts in garter st (lightly pull them when casting off so that they are loose), * make 1 loose YO on right needle, cast off YO, cast off 2 sts (lightly pull when casting off so that they are loose) *, repeat from *-* until 2 sts remain, cast off these sts. BLOCKING: Place the shawl in lukewarm water until it is soaking wet. Carefully squeeze the water out of the shawl - do not twist the shawl - then roll the shawl in a towel and squeeze to remove more water - the shawl will now only be moist. Place the shawl on a carpet or mattress - carefully stretch it out to size and fasten it with pins. NOTE: Fasten several pins in the outermost sts along cast on edge and out to the outermost sts in each side of shawl, fasten 1 pin between every repetition along the 2 diagonal sides, lightly pull at every pin so that the edge is shaped with small tips. Leave to dry. Repeat the process when the shawl has been washed. |
||||||||||
Diagram explanations |
||||||||||
|
||||||||||
 |
||||||||||
Have you finished this pattern?Tag your pictures with #dropspattern #wingsshawl or submit them to the #dropsfan gallery. Do you need help with this pattern?You'll find 14 tutorial videos, a Comments/Questions area and more by visiting the pattern on garnstudio.com. © 1982-2026 DROPS Design A/S. We reserve all rights. This document, including all its sub-sections, has copyrights. Read more about what you can do with our patterns at the bottom of each pattern on our site. |
||||||||||


With over 40 years in knitting and crochet design, DROPS Design offers one of the most extensive collections of free patterns on the internet - translated to 17 languages. As of today we count 324 catalogues and 12290 patterns translated into English (UK/cm).
We work hard to bring you the best knitting and crochet have to offer, inspiration and advice as well as great quality yarns at incredible prices! Would you like to use our patterns for other than personal use? You can read what you are allowed to do in the Copyright text at the bottom of all our patterns. Happy crafting!
Post a comment to pattern DROPS 146-28
We would love to hear what you have to say about this pattern!
If you want to leave a question, please make sure you select the correct category in the form below, to speed up the answering process. Required fields are marked *.