
Popular categories
Looking for a yarn?


Comments / Questions (138)
![]() Karima wrote:
Karima wrote:
Als beginnende breister wil ik deze poncho graag maken, maar dan zonder split. Hoe pas ik het patroon daarop aan?
03.05.2022 - 18:47DROPS Design answered:
Dag Karima,
Om geen split te maken brei je in plaats van heen en weer, direct vanaf het begin in de rondte en maak je het voorpand net zoals het achterpand. Dus in plaats van A.1 aan elke kant van het voorpand, brei je daar A.3, net als op het achterpand.
04.05.2022 - 09:12
![]() Людмила wrote:
Людмила wrote:
Перевод
04.09.2021 - 12:05
![]() Lebigot wrote:
Lebigot wrote:
Bonjour, j'ai l'impression qu'il manque des jetés aux rangs 15, 17 et 19 sinon il n'y a plus le bon nombre de mailles? Je suppose qu'il faut faire des jetés avant et après les 3 mailles envers? J'ai oublié de préciser qu'il s'agit des rangs du diagramme A6!Merci!
14.03.2021 - 13:18DROPS Design answered:
Bonjour Mme Lebigot, aux rangs 13, 15, 17 et 19, il faut faire les 2 jetés de chaque côté de la maille centrale, autrement dit, vous avez au milieu du rang 13 de A.6: (1 diminution, 1 jeté, 1 m env, 1 jeté, 1 diminution) - répétez ces jetés ainsi aux rangs 15, 17 et 19, avant et après la maille centrale. Bon tricot!
15.03.2021 - 08:46
![]() Lebigot wrote:
Lebigot wrote:
Bonjour, je suis vraiment désolée de vous déranger encore mais même si je coupe mon fil et que je retourne mon tricote sur l'endroit, les 17 dernières mailles sont sur la droite et non sur la gauche donc ça ne va encore pas...Peut être qu'il ne faut pas faire le dernier rang envers et rester sur l'endroit pour commencer à tricoter en rond? Je ne sais plus trop quoi faire et ça m'ennuie de laisser tomber ce modèle qui a l'air très beau. Merci.
01.02.2021 - 19:24DROPS Design answered:
Bonjour Mme Lebigot, terminez les diagrammes A.1 et A.4 par un rang sur l'envers, tournez l'ouvrage et glissez les 17 premières mailles vu sur l'endroit (= A.1), sur l'aiguille gauche (juste avant les 17 dernières mailles du rang = A.4), vous avez maintenant A.1 et A.4 côte à côte, et vous pouvez tricoter A.3 au-dessus de ces 34 mailles. Les tours commencent maintenant par A.3 et les autres mailles se tricotent comme avant. Bon tricot!
02.02.2021 - 09:52
![]() Lebigot wrote:
Lebigot wrote:
Bonjour, Vous dites que je dois tricoter mon dernier rang sur l'endroit or mon dernier rang (Rang32) est sur l'envers par sur l'endroit or si je veux tricoter le début de A3 sur ces 17 dernières mailles, elles seront toutes contrariées...donc ça n'ira pas. Est-ce que le dernier rang doit être alors le rang 31 sur l'endroit mais du coup les 17 dernières mailles sont celles de A4 et non celles de A1? Je suis désolée de vous déranger encore!
30.01.2021 - 19:27DROPS Design answered:
Bonjour Mme Lebigot, on aura effectivement une petite différence, pour l'éviter, coupez le fil après les diagrammes A.1/A.4 (en fin de rang sur l'envers), et commencez A.3 sur l'endroit sur les 17 dernières mailles du rang + les 17 premières. Bon tricot!
01.02.2021 - 09:02
![]() Lebigot wrote:
Lebigot wrote:
Bonjour, J'ai tricoté en aller et retour et je suis arrivée aux 17 mailles et donc le moment où il faut tricoter en rond. Je ne sais pas si je dois retourner mon tricot et repartir dans l'autre sens où alors continuer à tricoter ces 17 mailles et si oui comment je les tricote? Merci!
29.01.2021 - 11:35DROPS Design answered:
Bonjour Mme Lebigot, tricotez votre rang sur l'endroit jusqu'à ce qu'il reste les 17 dernières mailles, placez un marqueur, tricotez maintenant les 17 mailes suivantes + les 17 mailles de la fin des rangs précédent à suivre, comme indiqué dans A.3 (= 34 mailles). Et continuez en rond comme avant. Bon tricot!
29.01.2021 - 14:35
![]() Lebigot wrote:
Lebigot wrote:
Bonjour, je suis au tout début de ce modèle, après les 4 rangs endroits j'ai tricoté A1 puis *A2-A3* et enfin A2 puis A4 sur l'endroit. Pour le rang envers je ne sais pas si je dois faire A1 puis *A2-A3* et enfin A2 puis A4 ou alors l'inverse A4 puis A2 puis *A2-A3* et enfin A1. Merci!
18.01.2021 - 23:15DROPS Design answered:
Bonjour Mme Lebigot, sur l'envers, lisez dans l'autre sens pour que les diagrammes s'alignent correctement, autrement dit, tricotez (en lisant les diagrammes cette fois de gauche à droite): A.4, puis A.2, puis (A.3, A.2), et terminez par A.1. Retrouvez ici plus d'infos sur les diagrammes. Bon tricot!
19.01.2021 - 07:24
![]() Anna wrote:
Anna wrote:
Hej, 6 rapporter av A3 och 8 av A5 blir det i storlek XXL
29.11.2020 - 02:27
![]() Anna wrote:
Anna wrote:
DROPS Design 28.10.2020 kl. 13:19: Hej Anna, du starter tidligere med A.3, for du starter først A.5 når du er færdig med A.2. God fornøjelse! I storlek XXL är A2 32 varv och 2 rapporter av A1/A4 är 32 varv = man börjar både A3 och A5 på varv 1 när man börjar sticka A5. Vilket innebär att jag inte kan göra 8 rapporter av både A3 och A5... 8 rapporter av A3 är 128 varv, 8 rapporter av A5 är 96 varv.... detta går inte ihop för mig.
28.10.2020 - 16:23DROPS Design answered:
Hej Anna, det kan jeg godt se... vi kan rette antal rapporter... hvor mange rapporter har du strikket i A.3 og A.5 når du har 732 masker på pinden?
29.10.2020 - 09:51
![]() Anna wrote:
Anna wrote:
Hej, När jag stickat A1/A4 två gånger på höjden i den stora storleken så har jag också stickat klart A2 på höjden. När jag då börjar A3 och A5 så börjar jag båda på varv 1 vilket innebär att jag har 4 varv kvar av A3 när jag stickat A5 en gång på höjden. Hur får ni då ihop att man ska sticka båda 8 gånger? Måste väl bli fler gånger av A5 om jag ska kunna sticka 8 omgångar av A3 på höjden?
25.10.2020 - 10:22DROPS Design answered:
Hej Anna, du starter tidligere med A.3, for du starter først A.5 når du er færdig med A.2. God fornøjelse!
28.10.2020 - 13:19
|
|||||||||||||||||||
Honeymoon#honeymoonponcho |
|||||||||||||||||||
 |
 |
||||||||||||||||||
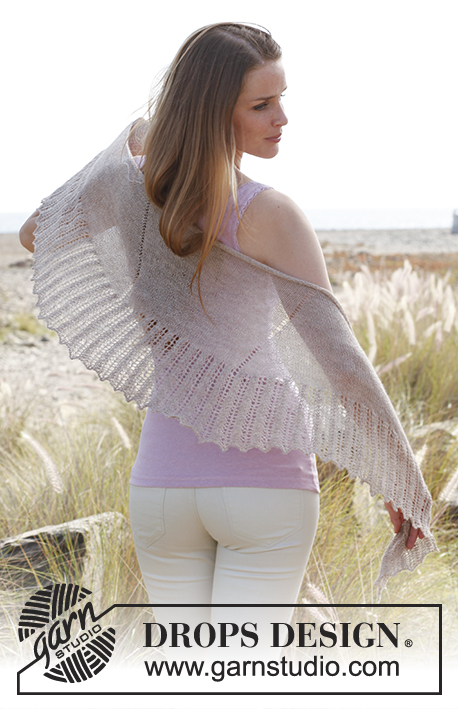
Knitted DROPS poncho with lace pattern in "BabyAlpaca Silk" or "Lace". Size: S - XXXL.
DROPS 146-4 |
|||||||||||||||||||
|
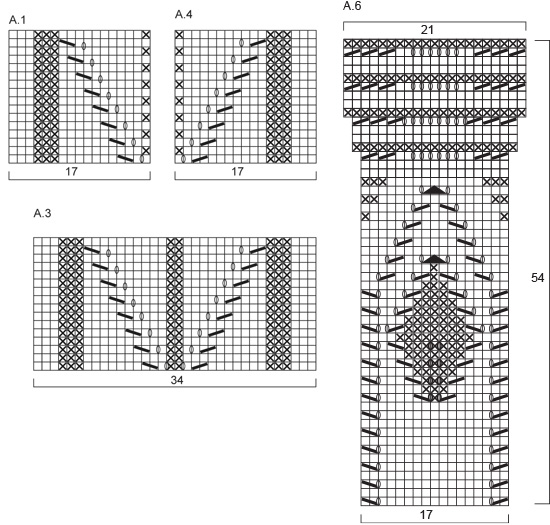
KNITTING TENSION: This garment is to be soaked and stretched to size afterwards. The knitting tension is therefore not that important but to get a sense of whether you are working to loose/tight, 23 sts x 30 rows on needle size 3.5 mm = approx. 10 x 10 cm. ---------------------------------------------------------- GARTER ST (back and forth on needle): K all rows. 1 ridge = 2 rows K. GARTER ST (in the round on circular needle): 1 ridge = * K 1 round and P 1 round *, repeat from *-*. PATTERN: See diagrams A.1 to A.6. Diagrams show all rows in pattern seen from RS. See arrow for your size in Diagram A.2. ---------------------------------------------------------- PONCHO: Piece is worked top down, first back and forth on circular needle and then in the round. This is done to make a vent mid front. Cast on 156-220 sts on circular needle size 3.5 mm (40 cm) with Baby Alpaca Silk or Lace. Work 2 ridges in GARTER ST - see explanation above. Then work as follows: A.1 (= 17 sts), * A.2 (= 5-21 sts), A.3 (= 34 sts) *, repeat from *-* 3 times in total, A.2 (= 5-21 sts), A.4 (= 17 sts). Continue this pattern back and forth until 2 repetitions of A.1/A.4 have been worked vertically, finish when 17 sts remain on needle. This is now the beg of round. Now continue to work in the round over all sts, continue with A.3 over A.1/A.4. Continue this pattern upwards, switch to a longer circular needle when needed. When A.2 has been worked 1 time vertically, there are 348 sts on needle in both sizes. Then work as follows: * A.3, A.5 A, A.5 B 2 times, A.5 C *, repeat from *-* 4 times in total. Every time A.5 has been worked 1 time vertically, there is 1 A.5 B more between every A.5 A and A.5 C. Continue this pattern until a total of 9-8 repetitions of A.3 and 8-8 repetitions of A.5 have been worked vertically = 732 sts on needle in both sizes. K 1 round over all sts, over all A.5 dec 9 sts evenly (= 140 sts remain over every A.5, 696 sts in total.) Then work as follows: * A.6 2 times, continue with the first 2 sts in A.5 A, work A.6 8 times, work the last 2 sts in A.5 C, * repeat from *-* 4 times in total. Continue like this until A.6 has been worked 1 time vertically – K the inc sts in A.5 = 1072 sts. Loosely cast off. BLOCKING: If the poncho is worked in Lace, it needs to be blocked to get the right measurements and shape. If it is worked in Baby Alpaca Silk, lightly stretch or steam it. Place the poncho in lukewarm water until it is soaking wet. Carefully squeeze the water out of the poncho - do not twist the poncho - then roll the poncho in a towel and squeeze to remove more water - the poncho will now only be moist. Place the poncho on a carpet or mattress - carefully stretch it out to size in a nice circle and fasten it with pins. Leave to dry. Repeat the process when the poncho has been washed. Thread a silk ribbon up and down in the ridges on the neck of poncho and tie a bow. |
|||||||||||||||||||
Diagram explanations |
|||||||||||||||||||
|
|||||||||||||||||||
 |
|||||||||||||||||||
 |
|||||||||||||||||||
Have you finished this pattern?Tag your pictures with #dropspattern #honeymoonponcho or submit them to the #dropsfan gallery. Do you need help with this pattern?You'll find 11 tutorial videos, a Comments/Questions area and more by visiting the pattern on garnstudio.com. © 1982-2026 DROPS Design A/S. We reserve all rights. This document, including all its sub-sections, has copyrights. Read more about what you can do with our patterns at the bottom of each pattern on our site. |
|||||||||||||||||||


With over 40 years in knitting and crochet design, DROPS Design offers one of the most extensive collections of free patterns on the internet - translated to 17 languages. As of today we count 324 catalogues and 12278 patterns translated into English (UK/cm).
We work hard to bring you the best knitting and crochet have to offer, inspiration and advice as well as great quality yarns at incredible prices! Would you like to use our patterns for other than personal use? You can read what you are allowed to do in the Copyright text at the bottom of all our patterns. Happy crafting!
Post a comment to pattern DROPS 146-4
We would love to hear what you have to say about this pattern!
If you want to leave a question, please make sure you select the correct category in the form below, to speed up the answering process. Required fields are marked *.