
Popular categories
Looking for a yarn?


Comments / Questions (39)
![]() Marianna Capitani wrote:
Marianna Capitani wrote:
Aiutoooo...sono arrivata al cm 13 del lavoro poi non capisco a quale triangolo si riferisce io non vedo triangoli ......poi parla di 30 maglie da tenere sui ferri e 30 in sospeso e le restanti maglie.....poi quando devo riprendere le maglie non ci capisco niente ....tenendo presente che io ho fatto una circonferenza di 80 maglie invecie di 100 e sto lavorando in tondo sui ferri circolari ho sbagliato qualcosa...
03.11.2015 - 18:47
![]() Marianna Capitani wrote:
Marianna Capitani wrote:
Nello schema il primo giro ok nel secondo il gettato va fatto solo sulle maglie dritte vero ??
02.11.2015 - 13:10DROPS Design answered:
Buongiorno Marianna. Sì esatto, la m gettata va fatta tra le 2 m diritte rimaste dal giro precedente. Buon lavoro!
03.11.2015 - 08:36
![]() Svensson wrote:
Svensson wrote:
Tacksam för hjälp då jag inte får det att stämma. Fråga 1: Sista varvet på ruta ett, ska jag sticka räta maskor = 30 m kvar, eller ska jag sticka med mönster 1 = 25 m kvar? Fråga 2: I ruta två blir det maskor kvar från ruta ett, alltså alla har inte blivit "ihopstickade" för jag har inte vänt 30 ggr. Sista meningen under ruta 2 " Sedan stickas det över dessa m så (varv 1 = rätsidan)" förstår jag inte vad det innebär?? Har text fallit bort?
09.10.2015 - 17:42DROPS Design answered:
Hej Svensson, det står att du skall fortsätta med 30 m, så sticka räta m. Men kan du fortsätta til du har stickat alla m som det står i beskrivningen? Jag är inte säker på att jag forstår frågan... ?
26.11.2015 - 15:32
![]() Claire wrote:
Claire wrote:
Bonjour, Que veux dire exactement "1 m end sur l'endroit, env sur l'envers" Merci
20.02.2014 - 20:18DROPS Design answered:
Bonjour Claire, c'est une m jersey end, on la tricote à l'end sur l'endroit de l'ouvrage (et tous les tours quand on tricote en rond) et à l'env sur l'envers (quand on tricote en allers et retours). Bon tricot!
21.02.2014 - 08:36
![]() Jürgen Wolf wrote:
Jürgen Wolf wrote:
Guten tag, wird dieses modell erst in runden und dann für die ecken in reihen gestrickt? mfg jürgen
16.01.2014 - 23:20DROPS Design answered:
Lieber Jürgen, ja genau, so wird es gemacht.
17.01.2014 - 15:29
![]() Rosaria wrote:
Rosaria wrote:
E' possibile fare questo modello con i ferri tradizionali? Se si come mi devo regolare? Grazie
16.10.2013 - 14:28DROPS Design answered:
Buongiorno Rosaria, il modello è stato appositamente disegnato per essere lavorato in tondo, sui f circolari o sul gioco di ferri. Se vuole lavorarlo in piano su ferri dritti, deve fare una cucitura al centro dietro e riadattare il modello e il motivo al lavoro in piano, in ogni caso non è un modello semplice da riadattare. Buon lavoro!!
16.10.2013 - 14:49
![]() Fandart wrote:
Fandart wrote:
Je ne comprends pas comment on fait pour le diagramme M.1 doit on tricoter 2 mailles en mêmetemps et passer par dessus avec la maille glissée et au retour ou fait on le jeté merci de me dépanner car j'aime beaucoup le modèle
21.03.2013 - 10:23DROPS Design answered:
Bonjour Madame Fandart, sur 3 m on tricote ainsi : on glisse 1 m à l'end, on tricote les 2 m suiv à l'end (= normalement) et on passe ensuite la m glissée par-dessus les 2 m tricotées = on diminue ainsi 1 m que l'on "récupère" on rang/tour suivant en faisant 1 jeté = ainsi, on a toujours 3 m. Bon tricot !
25.03.2013 - 10:41
![]() Wolthuis wrote:
Wolthuis wrote:
Lijkt nogal ingewikkeld en wat is telpatroon M1??
03.12.2012 - 23:24DROPS Design answered:
Telpatroon M.1 staat onderaan het patroon. Het is de tekening van het patroon - hoe u dat moet breien.
04.12.2012 - 15:03
![]() Dorte Højmose wrote:
Dorte Højmose wrote:
Jeg kan simpelthen ikke få 2. rude til at passe :-( Jeg har pillet op igen og igen. Har andre oplevet det samme??
24.11.2012 - 22:49Pilunnguaq Olsen wrote:
Hvad betyder så forkortelsen oms? Er det omslag eller?
27.02.2012 - 17:21DROPS Design answered:
Ja oms betyder omslag!
29.02.2012 - 11:32
|
||||||||||
Nieves#nievesset |
||||||||||
|
|
||||||||||
Knitted DROPS hat in ”Alpaca” and ”Kid-Silk”.
DROPS 122-12 |
||||||||||
|
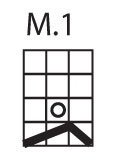
PATTERN: See diagram M.1. Diagram shows the pattern from RS. KNITTING TIP: When turning mid piece, tighten thread before continuing in order to avoid a hole in transition. -------------------------------------------------------- HAT: Cast on 100 sts on circular needle size 3 mm with 1 strand of each quality (= 2 strands). K 1 round and continue in rib, K2/ P2. When piece measures approx 3 cm inc 1 st in the middle of each P-section by making 1 YO between the 2 P sts. Work 1 round with K over K and P over P, P YO into back of loop to avoid a hole. On next round inc 1 st in each K-section by making 1 YO = 150 sts. Work 1 round with K over K and P over P, K YO into back of loop (= K3/ P3). Change to circular needle size 3.5 mm. Continue in M.1 on all K3, work all P3 as before. Continue like this until piece measures approx 13 cm (finish after row 4 in M.1). Now keep the first 30 sts on needle and slip the remaining sts on a stitch holder. Now work the top of hat in squares with shortened rows on the 30 sts as follows (row 1 = RS) - See KNITTING TIP: SQUARE-1: Work first 3 sts in M.1, turn piece and work return row. Work M.1 + 1 st, turn and work return row. Work M.1 + 2 sts, turn and work return row. Work M.1 + 3 sts, turn and work return row. Work * M.1 + 3 sts + M.1 *, turn and work return row. Work from *-* + 1 st, turn and work return row. Work from *-* + 2 sts, turn and work return row. Work from *-* + 3 sts, turn and work return row. Work ** M.1 + 3 sts + M.1 + 3 sts + M.1 **, turn and work return row. Work from **-** + 1 st, turn and work return row. Work from **-** + 2 sts, turn piece and work return row. Work from **-** + 3 sts, turn piece and work return row. Work *** M.1 + 3 sts + M.1 + 3 sts + M.1 + 3 sts + M.1 ***, turn and work return row. Work from ***-*** + 1 st, turn and work return row. Work from ***-*** + 2 sts, turn and work return row. Work from ***-*** + 3 sts, turn and work return row. Work **** M.1 + 3 sts + M.1 + 3 sts + M.1 + 3 sts + M.1 + 3 sts + M.1 ****, turn and work return row. Work from ****-**** + 1 st, turn and work return row. Work from ****-**** + 2 sts, turn and work return row. Work from ****-**** + 3 sts, turn and work return row. Work 1 row on the 30 sts on needle and leave sts on needle. Slip the next 30 sts from stitch holder back on needle and continue on these sts as follows (row 1 = RS): SQUARE 2: Work first 3 sts in M.1, turn and work return row but P tog the last st with the last st from previous square. Work M.1 + 1 st, turn piece and work return row but P tog the last st with the next st from previous square. Work M.1 + 2 sts, turn and work return row but P tog the last st with the next st from previous square. Work M.1 + 3 sts, turn piece and work return row but P tog the last st with all 3 sts in M.1 from previous square (= P4 tog). Continue in the same way as on square 1, and continue to P tog the last st with st from previous square as described above. Continue like this until you have worked all sts. Work 1 row on the 30 sts on needle and leave sts on needle. Slip the next 30 sts from stitch holder back on needle and continue on these as follows (row 1 = RS): SQUARE 3: Like square 2. SQUARE 4: Like square 2. SQUARE 5: Like square 2, but when all sts from square 4 are knitted cast off the 30 sts on square 5. ASSEMBLY: Sew tog square 1 and square 5. Sew edge to edge with small sts to create an invisible seam. |
||||||||||
Diagram explanations |
||||||||||
|
||||||||||
 |
||||||||||
Have you finished this pattern?Tag your pictures with #dropspattern #nievesset or submit them to the #dropsfan gallery. Do you need help with this pattern?You'll find 10 tutorial videos, a Comments/Questions area and more by visiting the pattern on garnstudio.com. © 1982-2026 DROPS Design A/S. We reserve all rights. This document, including all its sub-sections, has copyrights. Read more about what you can do with our patterns at the bottom of each pattern on our site. |
||||||||||


With over 40 years in knitting and crochet design, DROPS Design offers one of the most extensive collections of free patterns on the internet - translated to 17 languages. As of today we count 324 catalogues and 12290 patterns translated into English (UK/cm).
We work hard to bring you the best knitting and crochet have to offer, inspiration and advice as well as great quality yarns at incredible prices! Would you like to use our patterns for other than personal use? You can read what you are allowed to do in the Copyright text at the bottom of all our patterns. Happy crafting!
Post a comment to pattern DROPS 122-12
We would love to hear what you have to say about this pattern!
If you want to leave a question, please make sure you select the correct category in the form below, to speed up the answering process. Required fields are marked *.