
Popular categories
Looking for a yarn?


Comments / Questions (23)
![]() Yvon Janssen wrote:
Yvon Janssen wrote:
Ik kan/wil ook niet met een rondbreinaald breien,kan ik dit patroon ook met twee naalden breien?
25.07.2014 - 11:28DROPS Design answered:
Hoi Yvon. Ja, dit patroon wordt heen en weer gebreid op de rondbreinaald vanwege het grote aantal st. Maar kan je alle st passen op een rechte naald, dan kan je het patroon ook breien op de rechte naald. Veel breiplezier.
25.07.2014 - 11:36
![]() Charlotte Aagaard wrote:
Charlotte Aagaard wrote:
Hej. Jeg kan se den kun er 56 cm lang ifølge diagrammet. Men den ser ud til at være mindst 70-75 cm på billedet?
21.03.2012 - 16:09DROPS Design answered:
Mönstret er korrekt. Str. S bliver ca. 56 cm lang og XXXL ca. 65 cm. Du maa regne med at modellen traekker lidt ned pga vaegten af garnet.
27.03.2012 - 20:38
![]() Drops Design wrote:
Drops Design wrote:
Yes it means that on following 2 rows that are full rows and worked towards the neckline you increase 1 st in the penultimate st. Method is optional. On our tutorial videos we show different ways of inc 1 st.
02.09.2009 - 16:51
![]() Amy wrote:
Amy wrote:
I'm having the same problem as Ghazaleh, but I don't see an answer. Does it mean the penultimate stitch from the neckline M1? And which method?
02.09.2009 - 16:32Ghazaleh wrote:
Hi I have a problem. In this pattern you say:"AT THE SAME TIME inc 1 st in the last but one st from neckline at the end of the next 2 rows worked all the way to neckline = 62-64-66-68-70-72 sts." I can't understan it. please explain this section. Thanks. Best regard,Ghazaleh
29.06.2009 - 09:25
![]() Linda wrote:
Linda wrote:
Soo cute
29.05.2009 - 17:15
![]() Drops Design France wrote:
Drops Design France wrote:
Vanessa, la veste se tricote en allers retours sur aiguille circulaire pour avoir assez de place pour loger toutes les mailles et rendre le tricot plus confortable, mais vous pouvez tout à fait le tricoter sur des aiguilles droites si vous le préférez. La veste se tricote dans le sens de la longueur, comme certaines brassières bébé d'autrefois.
30.01.2009 - 10:15
![]() Vanessa wrote:
Vanessa wrote:
Bonjour,j'adore ce modèle,mais malheureusement,vous le proposez à tricoter qu'avec des aiguilles circulaires.J'aurai bien aimé des explications avec deux aiguilles normales,et tricoter "façon brassière bébé",de droite à gauche...Mais je vous félicite pour le site que vous nous proposez!!
30.01.2009 - 09:55
![]() Drops Design France wrote:
Drops Design France wrote:
Angelique, pour la taille L il faut 950 g en Drops Ice, donc 950 /50 = 19 pelotes
19.01.2009 - 09:18
![]() Regina wrote:
Regina wrote:
Den här vill jag sticka. Den här vill jag ha. Håller med Åsa om Odd-Molly stuket, men den här vill jag hellre ha (och priset blir mycket bättre...).
18.01.2009 - 19:16
|
|
Pink Rum#pinkrumcardigan |
|
|
|
|
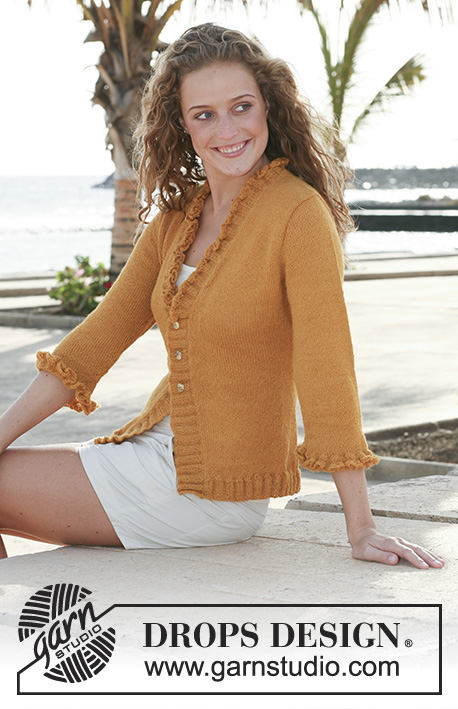
DROPS jacket knitted from side to side in garter st in 1 thread Ice or 2 threads Paris. Size S - XXXL.
DROPS 111-28 |
|
|
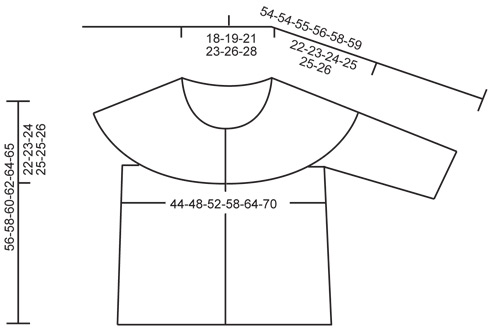
GARTER ST (back and forth on needle): K all rows. TURNS: Work shortened rows as follows: * Work row from bottom edge to neckline, turn piece and work return row. Work next row to Marker-1, turn piece and work return row. Work next row to marker-2, turn piece and work return row. Work next row to marker-3, turn piece and work return. Work next row on all sts, turn piece and work return row *. Repeat from *-*. There are now 10 rows towards bottom edge and 4 rows towards neckline. KNITTING TIP: Work the turns as follows: K tog the last 2 sts before marker, turn and work return row. On next row make 1 YO over the turn and work the YO into back of loop on return row. -------------------------------------------------------- Jacket is worked from side to side from bottom edge towards neckline. Beg mid front on left front piece, knit the sleeve, the back piece, the other sleeve and finish with right front piece. The whole jacket is worked in garter st. LEFT FRONT PIECE: Loosely cast on 60-62-64-66-68-70 sts on circular needle size 8 mm with 1 thread Ice or 2 threads Paris. Insert 3 markers in piece as follows (from bottom edge towards neckline): Marker-1: after 38-39-40-41-42-43 sts. Marker-2: after 45-47-48-50-51-53 sts. Marker-3: after 57-59-61-63-65-67 sts. Leave the markers in the same place until finished measurements so that all turns sit in straight lines. Row 1 = RS, from bottom edge towards neckline. Work approx 3 cm on all sts (= front band) – finish with 1 row from WS. Now work TURNS – see above. AT THE SAME TIME inc 1 st in the last but one st from neckline at the end of the next 2 rows worked all the way to neckline = 62-64-66-68-70-72 sts. Continue in garter st with turns until piece measures 25-27-29-32-35-38 cm from casting on row – measured between marker-1 and marker-2. Now insert a new marker in piece (= the side). Slip the 38-39-40-41-42-43 sts towards bottom edge on a stitch holder (to be used for back piece later) and continue on remaining sts for sleeve. LEFT SLEEVE: = 24-25-26-27-28-29 sts on needle. Loosely cast on 25-24-23-22-21-20 new sts at the end of row over sts on stitch holder = 49-49-49-49-49-49 sts. Marker-1 now sits between the new sleeve sts and sts on front piece. Work TURNS – see above – and continue until piece measures 35-37-39-41-43-45 cm, measured between marker-1 and marker-2. Loosely cast off the 25-24-23-22-21-20 sts towards sleeve edge = 24-25-26-27-28-29 sts left on row. BACK PIECE: Slip the 38-39-40-41-42-43 sts from stitch holder back on needle = 62-64-66-68-70-72 sts. Continue with TURNS until piece measures 44-48-52-58-64-70 cm from marker at the side (measured between marker-1 and marker-2). Slip the 38-39-40-41-42-43 sts towards bottom edge on a stitch holder (to be used for front piece later) and continue on remaining sts for sleeve. RIGHT SLEEVE: Like left sleeve. RIGHT FRONT PIECE: Slip the 38-39-40-41-42-43 sts from stitch holder back on needle = 62-64-66-68-70-72 sts. Continue with TURNS. When 3 rows worked all the way to neckline remain before you have the same number of rows on right front piece as on left front piece (less front band) K tog the last 2 but one sts from neckline on the next 2 rows from RS = 60-62-64-66-68-70 sts. Work 3 cm on all sts (= front band). Cast off. ASSEMBLY: Sew under arm seam, edge to edge. Thread the silk ribbon through the turns round neckline and tie a bow mid front. |
|
 |
|
Have you finished this pattern?Tag your pictures with #dropspattern #pinkrumcardigan or submit them to the #dropsfan gallery. Do you need help with this pattern?You'll find 13 tutorial videos, a Comments/Questions area and more by visiting the pattern on garnstudio.com. © 1982-2026 DROPS Design A/S. We reserve all rights. This document, including all its sub-sections, has copyrights. Read more about what you can do with our patterns at the bottom of each pattern on our site. |


With over 40 years in knitting and crochet design, DROPS Design offers one of the most extensive collections of free patterns on the internet - translated to 17 languages. As of today we count 324 catalogues and 12290 patterns translated into English (UK/cm).
We work hard to bring you the best knitting and crochet have to offer, inspiration and advice as well as great quality yarns at incredible prices! Would you like to use our patterns for other than personal use? You can read what you are allowed to do in the Copyright text at the bottom of all our patterns. Happy crafting!
Post a comment to pattern DROPS 111-28
We would love to hear what you have to say about this pattern!
If you want to leave a question, please make sure you select the correct category in the form below, to speed up the answering process. Required fields are marked *.