
Popular categories
Looking for a yarn?


Comments / Questions (10)
![]() Gesine wrote:
Gesine wrote:
Ich bin bei der passe bei der linken Schulter bei größe s an der stelle wo die luftmaschen zugenommen werden für den halsausschnitt. Ich soll mit einer Rückreihe also dopelstäbchen enden, 15 luftmaschen zunehmen und weiter doppelstäbchen arbeiten. Damit wäre das muster nicht mehr abwechselnd. ( Ich hoffe das war jetzt einigermaßen verständlich )
20.05.2025 - 17:03DROPS Design answered:
Liebe Gesine, die Rückreihen in A.1 sind die Reihen mit dem Stäbchen (= 2. Reihe im Diagram), so werden die 15 neuen Luftmaschen am Ende einer Rückreihe = am Ende einer Reihe mit Stäbchen. Viel Spaß beim Häkeln!
21.05.2025 - 08:04
![]() Gesine wrote:
Gesine wrote:
Bei der zunahme der Luftmaschen für den Halsausschnitt doppelt sich bei mir das Muster, da die Rückreihe eine reihe mit Doppelstäbchen ist und die Hinreihe, die in die Luftmaschen gehäckelt wird auch aus doppelstäbchen besteht. Das verstehe ich nicht, da beim Foto der Tunika keine doppelte Muster reihe erkennbar ist.
20.05.2025 - 13:51DROPS Design answered:
Liebe Gesine, leider verstehe ich nicht ganz was Sie hier meinen. Könnten Sie uns bitte sagen, welche Größe sowie wo genau Sie noch sind. Danke im voraus für Ihr Verständnis.
20.05.2025 - 15:49
![]() Maria wrote:
Maria wrote:
Jag blir inte klok på hur jag ska läsa mönstret. V2: A1c + A2b, börja vid stjärnan. Men under raden med stjärnan på A2b är det fasta maskor. När gör jag dom?
09.06.2021 - 09:39DROPS Design answered:
Hei Maria. Her har det nok blitt en feil. Det skal ikke være A.2b, men A1b. A.1b går over 2 masker slik det står i oppskriften og hekles sammen med A.1c og A.1a, men A.2b går over 6 masker og hekles sammen med A.2a og A.2c. Takk for at du gjorde oss oppmerksom på dette, vi vil lage en rettelse asap. mvh DROPS design
14.06.2021 - 10:55
![]() Elena wrote:
Elena wrote:
Bonjour, je suis en train de réaliser ce joli modèle, mais en large, crochet 4 et safran les tailles n’ont pas l’air justes. En crochetant serré un rapport Ab avec un rang de brides et un rang de doubles brides ma hauteur et ma largeur sont beaucoup plus grandes qu’attendues pour l’empiecement. Et pour l’échantillon de 10 cm j’ai 17 db au lieu de 20 en largeur et 6 rangs de db en hauteur au lieu de 7.5. N’y aurait il pas une erreur ? Par avance merci
22.04.2021 - 00:00DROPS Design answered:
Bonjour Elena, n'hésitez pas à ajuster la taille du crochet si besoin, l'échantillon est plus important - retrouvez ici encore plus d'infos sur l'échantillon. Pour régler des problèmes de hauteur une fois que vous aurez la largeur, essayez de tirer un peu plus ou un peu moins (en fonction de votre échantillon) pour que la hauteur soit aussi juste. Bon crochet!
22.04.2021 - 07:50
![]() Nikki wrote:
Nikki wrote:
I followed the pattern as far as the right shoulder, but the part after does not make sense to me. Could you help me understand what the following means for a medium - "Work 16 chain stitches and continue the pattern over the right shoulder..." until the end of that paragraph?
29.09.2020 - 15:06DROPS Design answered:
Dear Nikki, when working 1st row on left shoulder, you worked over the 12 sts on one side of back piece then you worked front piece. Now you will crochet from WS on same row as you worked first row on left shoulder (leaving 29 sts unworked between shoulders for neckline on back piece) over 12 sts. After you have worked 16 rows in pattern cut the yarn. Crochet now 16 chains (neck on front piece) and work in pattern as before (as you crocheted on left front piece, but you have here to cut first the yarn, then crochet the chains and continue over sts on right shoulder as before). Happy crocheting!
30.09.2020 - 07:53
![]() Eneli wrote:
Eneli wrote:
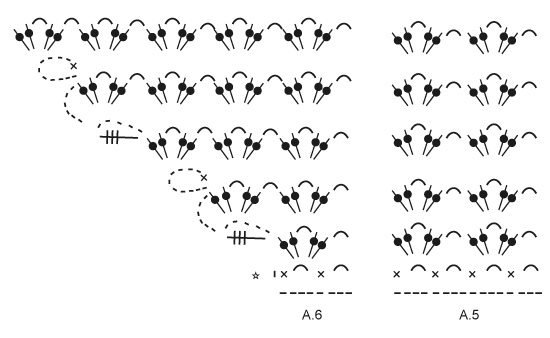
Jag har svårt att förstå diagrammen A.4 och A.6- vart ska tredubbelstolpen virkas- blir det före eller efter massa luftmaskor..? Ökningen av solfjädersgrupper när man ska göra ärmar är svårt att förstå just i dessa A.4 och A.6 diagrammen- vad betyder långa kedjor av luftmaskor och hur kommer tredubbelstolpen in i det hela? Tack för svaret!
01.08.2020 - 02:48DROPS Design answered:
Hei Eneli. Du starter ved stjernen i A.6 og hekler 1.rad (A.6-A.5-A.4). Når du har avsluttet 1 rad, skal du hekle 6 luftmasker (for å komme opp i «høyden» til 2.rad), så hekler du 10 nye luftmasker som du avslutter med å hekle 1 fastmaske i den 1. luftmasken av disse 10 luftmaskene (= en ring med luftmasker). Nå hekler du 2. rad og når du kommer til slutten av 2.rad/A.6 hekler du 5 luftmasker (= en luftmaskebue som det skal hekles i når du hekler 3. rad), så hekler du en 3-dbl stav i siste maske på 2. rad, deretter hekler du 6 luftmasker, 10 nye luftmasker og 1 fastmaske i 1. luftmaske (= en luftmaskering), så fortsetter du med 3. rad på diagrammene. God Fornøyelse!
10.08.2020 - 09:20
![]() Marie Binkowski wrote:
Marie Binkowski wrote:
I am not familar with your patterns how do I find out how much yarn I need of each color am I missing something ? Thank You
06.06.2019 - 22:30DROPS Design answered:
Hi Marie, on top of the pattern in section 'materials' you see how much yarn you need in each colour depending on your size. Each skein of Safran is 50 g. For example: in size S you will need: 9 skeins color 13, raspberry, 1 skein color 20, rust, 1 skein color 12, peach, 1 skein color 06, denim blue and 1 skein color 50, light ice blue. Happy crocheting!
07.06.2019 - 07:16
![]() Waltraud Brureiner wrote:
Waltraud Brureiner wrote:
Hallo, wenn ich die Anleitung drucken will, kommt bei mir nur die 1. Seite. Scheint irgendwo ein Fehler zu sein. Bitte prüfen. Danke mfg W. Brureiner
09.12.2018 - 16:27DROPS Design answered:
Liebe Frau Brureiner, beachten Sie, daß alle Seiten richtig gedruckt werden und nicht nur einige/die erste - die Druckeinstellungen prüfen. Vielleicht können Sie auch den Cache leeren und den Browser aktualisieren, das kann auch helfen. Viel Spaß beim häkeln!
10.12.2018 - 09:47
![]() Neirynck Brigitteb wrote:
Neirynck Brigitteb wrote:
Je ne comprends pas le rang 2 ( début du travail ) merci
17.07.2018 - 16:31DROPS Design answered:
Bonjour Mme Neirynck, au rang 2, on crochète sur l'envers les diagrammes A.1c, A.2b et A.1a en commençant au rang avec la flèche (pas l'étoile - la correction sera faite): A.1c (= 3 ml), puis on répète A.1b: *1 ml, sautez 1 m, 1 B dans la m suivante*, répétez de *-* jusqu'à ce qu'il reste 2 m et terminez par 1 ml, sautez 1 m, 1 B dans la 4ème ml du début du rang précédent. Au rang 3, lisez de droite à gauche: A.1a, répétez A.1b et terminez par A.1c. Bon crochet!
17.07.2018 - 16:57
![]() Sabine wrote:
Sabine wrote:
Cette tunique me plait bien, mais malheureusement les explications sont trop dispersées pour moi. Passer du haut du texte aux schémas en bas est assez éprouvant. J'aime quand même tous vos modèles.
20.06.2018 - 13:15
|
||||||||||||||||||||||||||||||||||||||||||||||||||||||||||
Holiday Feeling#holidayfeelingtunic |
||||||||||||||||||||||||||||||||||||||||||||||||||||||||||
|
|
||||||||||||||||||||||||||||||||||||||||||||||||||||||||||
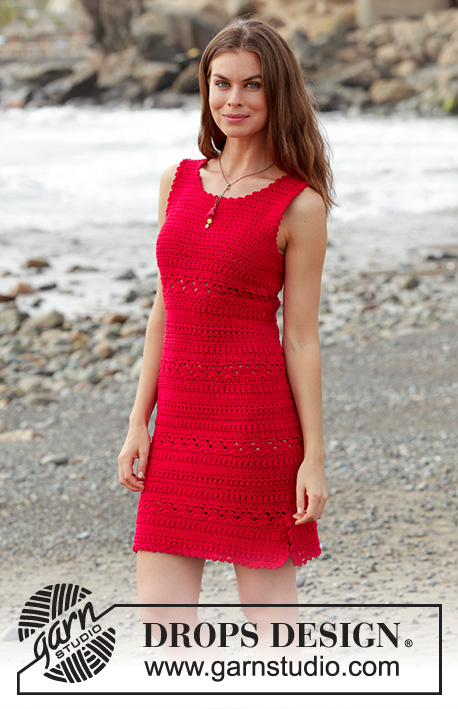
Crocheted tunic with multi-coloured yoke and fans, worked top down. Sizes S- XXXL. The piece is worked in DROPS Safran.
DROPS 187-40 |
||||||||||||||||||||||||||||||||||||||||||||||||||||||||||
|
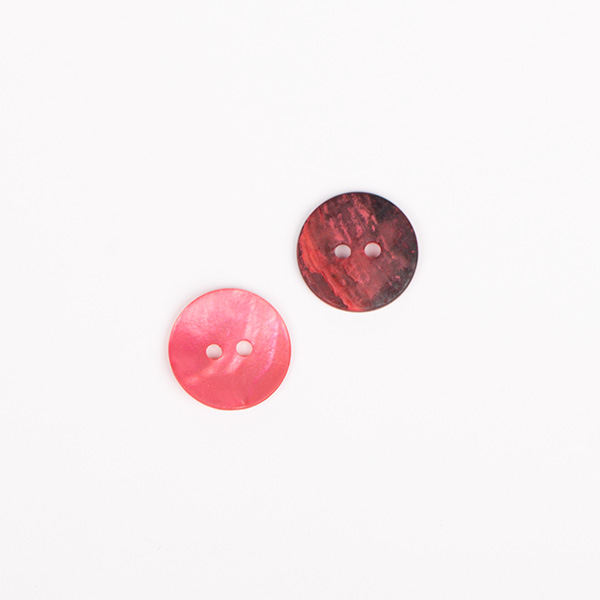
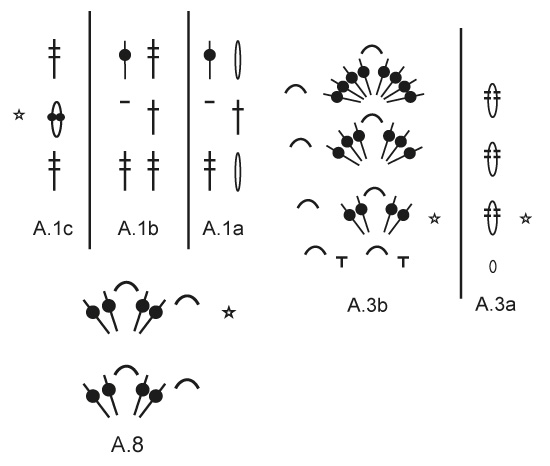
INFORMATION FOR THE PATTERN: CROCHET INFORMATION: At the beginning of each row of treble crochets, replace the first treble crochet with 3 chain stitches. At the beginning of each row of double treble crochets, replace the first double treble crochet with 4 chain stitches. COLOUR CHANGE: When changing colour at the beginning of a round, work the slip stitch at the end of the previous round with the new colour. PATTERN: See diagrams A.1 to A.8. STRIPES: ROUND 1: peach ROUND 2: light ice blue ROUND 3: denim blue ROUND 4: rust ROUND 5: light ice blue ROUND 6: peach ---------------------------------------------------------- TUNIC: You start by working the yoke back and forth from the back, over each shoulder and down to the front. Then you work a multi-coloured edge around the whole yoke. After the multi-coloured edge, you work around the bottom edge of the yoke, both front and back, then work loose chain stitches for the armholes and the body is continued in the round. The sleeves are worked at the end and sewn into the armholes. YOKE: Work 63-65-68-70-75-75 chain stitches with raspberry and hook size 4 mm. ROW 1 (right side): Work 1 double treble crochet in the 4th chain stitch from the hook (= 2 double treble crochets), work 1 double treble crochet in each of the next 4-6-3-5-4-4 chain stitches, * skip 1 chain stitch, 1 double treble crochet in each of the next 5 chain stitches *, work from *-* a total of 9-9-10-10-11-11 times = 51-53-55-57-61-61 double treble crochets (including the first 4 chain stitches on the row). ROW 2 (wrong side): Start on the row with a star in the diagrams and work A.1c (= 1 stitch), A.1b (= 2 stitches) until there are 2 stitches left, A.1a (= 2 stitches). ROW 3: Work A.1a, A.1b until there is 1 stitch left, A.1c. Repeat the last 2 rows of A.1a-A.1c until you have worked 9-9-11-11-11-13 rows (including row 1 where you skipped approx. every 5th chain stitch). REMEMBER THE CROCHET TENSION! Now divide the piece and work the left shoulder first – the first row is from the wrong side: Continue the pattern as before over the first 11-11-11-11-13-13 stitches, work 1 treble crochet in the next stitch (= 12-12-12-12-14-14 stitches on shoulder). Repeat rows 2 and 3 in A.1a-A.1c + 1 extra treble crochet/double treble crochet towards the neck until you have worked 15-17-17-17-19-19 rows on the shoulder (= a total of 24-26-28-28-30-32 rows from the beginning of the yoke) – the last row is from the wrong side. Work 18-19-20-21-21-21 chain stitches at the end of the last row (= stitches for neck on the front piece). Turn and work the next row from the right side as follows: Work 1 double treble crochet in the 4th chain stitch from the hook (= 2 double treble crochets), 1 double treble crochet in each of the next 1-2-3-4-4-4 chain stitches * skip 1 chain stitch, work 1 double treble crochet in each of the next 5 chain stitches *, work from *-* a total of 2 times (= 13-14-15-16-16-16 double treble crochets), continue to end of row as before = 25-26-27-28-30-30 stitches on the front piece. Continue the pattern back and forth until you have worked 6-6-8-8-8-10 rows on the front piece – the last row is from the wrong side, work 1 chain stitch mid front (= split). Cut the strand, but leave approx. 20 cm of strand end (will be used for assembly later). Work the right shoulder: Start from the wrong side, by the left shoulder and skip 27-29-31-33-33-33 double treble crochets for the neck at the back = 12-12-12-12-14-14 stitches on right shoulder. Continue the pattern from the row with a star in diagrams A.1a-A.1c, back and forth in the same way as on the left shoulder, but reversed; in other words you work 2 treble crochets towards the neck as on the left shoulder – read CROCHET INFORMATION! Repeat rows 2 and 3 in A.1a-A.1c + 1 extra treble crochet/double treble crochet towards the neck until you have worked 14-16-16-16-18-18 rows (= a total of 23-25-27-27-29-31 rows from the beginning of the yoke) - the last row is from the right side. Cut the strand. Work 15-16-17-18-18-18 chain stitches and continue the pattern over the right shoulder from the wrong side. Turn and work the next row from the right side as far as the row of chain stitches, then work as follows: * skip 1 chain stitch, work 1 double treble crochet in each of the next 5 chain stitches *, work from *-* a total of 2 times, work 1 double treble crochet in each of the last 3-4-5-6-6-6 chain stitches = 25-26-27-28-30-30 stitches on the right front piece. Continue the pattern until you have worked 6-6-8-8-8-10 rows on the right front piece. Sew the strand end from the split on the left front piece to the outermost treble crochet (i.e. the 3rd chain stitch at the beginning of the last row worked on the right front piece). Now work the 2 front pieces together from the right side as follows: Work 1 double treble crochet in each stitch/around each chain stitch over all stitches on the right front piece, 1 treble crochet around the chain stitch mid front for the split and continue with 1 double treble crochet in each stitch /around each chain stitch over all stitches on the left front piece = 51-53-55-57-61-61 double treble crochets. There are now 31-33-37-37-39-43 rows on the yoke. The yoke measures 25-26-27-28-30-30 cm x 34-36-41-41-43-47 cm. Cut the strand. You now work an edge around the yoke. EDGE AROUND THE YOKE WITH MULTI-COLOURED PATTERN: The edge is worked in the round and in STRIPES - see description above. Change to peach and fasten the strand with 1 double crochet in the first corner – see illustration of yoke! Work 2 double crochets around each of the first 11 rows, 3 double crochets around each of the next 9-11-15-15-17-21 rows, 2 double crochets around each of the next 11 rows (= 71-77-89-89-95-107 double crochets along the side + 1 double crochet in 1st corner), work 3 chain stitches (= corner), 1 double crochet in each stitch between corners 2 and 3, but skip the same chain stitches as you skipped at the beginning of the yoke and AT THE SAME TIME increase 2-0-4-2-4-4 double crochets evenly between the corners (= 53-53-59-59-65-65 double crochets between corners 2 and 3), work 3 chain stitches (= corner), 2 double crochets around each of the first 11 rows, 3 double crochets around each of the next 9-11-15-15-17-21 rows, 2 double crochets around each of the next 11 rows (= 71-77-89-89-95-107 double crochets along the side), work 3 chain stitches (= corner), 1 double crochet in each stitch between corners 4 and 1, AT THE SAME TIME as you increase 2-0-4-2-4-4 double crochets evenly spaced (= 53-53-59-59-65-65 double crochets between corners 4 and 1), work 3 chain stitches (= corner), finish with 1 slip stitch in the first double crochet at the beginning of the round, then work 1 slip stitch in the next double crochet (= 2nd double crochet after the 3 chain stitches in the corner) – read COLOUR CHANGE! Continue with stripes and work pattern from the round with a star in the diagrams as follows: Work A.2a (shows how the round starts and ends), A.2b over the next 66-72-84-84-90-102 stitches (= 11-12-14-14-15-17 repeats), A.2c (= corner), A.2b over the next 48-48-54-54-60-60 stitches (= 8-8-9-9-10-10 repeats), A.2c (= corner), A.2b over the next 66-72-84-84-90-102 stitches (= 11-12-14-14-15-17 repeats), A.2c (= corner), A.2b over the next 48-48-54-54-60-60 stitches, A.2c (= corner). When all the rounds in A.2a-A.2c have been worked, cut the strand and the 5 last rounds are folded down with right side to right side. Work chain-spaces with peach in the first round of double crochets (= round with peach): Start around the chain-space in corner 1 and work * 1 double crochet on the right side of the light ice blue double crochet around the chain-space in the corner, 3 chain stitches, 1 double crochet in the first double crochet after the 3 chain stitches in the corner from the previous round, (3 chain stitches, skip the next double crochet and the double crochet where there is a double crochet already worked (light ice blue), work 1 double crochet in the next double crochet) as far as the 2nd double crochet in A.2c (= corner), work 3 chain stitches *, work from *-* 3 more times, i.e. it is worked the same way between 2nd and 3rd corner, between 3rd and 4th corner and between 4th and 1st corner. Finish with 1 slip stitch in the double crochet in the corner. There are now 19-19-21-21-23-23 chain-spaces along the sides of both front and back pieces and 25-27-31-31-33-37 chain-spaces along each side of the yoke. Change to raspberry and continue in the previous round worked with peach: 3 chain stitches (= 1 treble crochet), work 42-48-54-60-66-78 chain stitches (in side under sleeve), skip the next side (between corners 1 and 2 = armhole), 1 treble crochet in the double crochet in corner 2, (3 chain stitches, 1 double crochet around the first/next chain-space) as far as corner 3, 3 chain stitches, 1 treble crochet in the double crochet in the corner, 40-48-54-60-66-78 chain stitches (in side under sleeve), skip the next side (between corners 3 and 4 = armhole), 1 treble crochet in the double crochet in corner 4, (3 chain stitches, 1 double crochet around the first/next chain-space) as far as corner 1, 3 chain stitches, finish with 1 slip stitch in the 3rd chain stitch at the beginning of the round. There are now 20-20-22-22-24-24 chain-spaces on the front and back pieces. BODY: Insert a marker thread mid front in the last round worked. THE PIECE IS NOW MEASURED FROM HERE! The whole of the body is worked with raspberry. Now work a round of chain-spaces (1 chain space = 3 chain stitches + 1 double crochet) around the last round with raspberry that was worked as follows: Work 1 chain stitch on the start of round, * work a total of 10-12-14-16-18-20 chain spaces around the 40-48-54-60-66-78 chain stitches in the side under the sleeve, work 2 chain-spaces around each of the next 3-3-3-3-4-4 chain-spaces, 1 chain-space around each of the next 4 chain-spaces, 2 chain-spaces around each of the next 6-6-8-8-8-8 chain-spaces, 1 chain-space around each of the next 4 chain-spaces, 2 chain-spaces around each of the next 3-3-3-3-4-4 chain-spaces *, work from *-* 1 more time and finish with 1 double crochet in the corner = 84-88-100-104-112-120 chain-spaces on the round. Start on the round with a star in the diagrams and work in the round as follows: Work A.3a (shows how the round starts and ends and replaces the first stitch on the round), work A.3b a total of 42-44-50-52-56-60 times on the round. Work round 2 (= the round with an arrow) until the piece measures approx. 12 cm from the marker thread. Work round 3 until the piece measures approx. 23 cm from the marker thread. Work round 4 until the piece measures approx 47-48-47-49-50-50 cm. Cut and fasten the strand. The tunic measures approx. 64-66-68-70-72-74 cm from the shoulder down. SLEEVE: The sleeves are worked back and forth. They are worked top and down with raspberry and are sewn onto the body to finish. You work a large sleeve cap back and forth where you increase fans in each side. Work 29 chain stitches with hook size 4 mm and raspberry, turn and work A.6 (= over the first 8 chain stitches), A.5 over the next 16 chain stitches, A.4 over the last 5 chain stitches. Continue back and forth like this. When you have worked 4 rows with fans in height, continue working in the different sizes as follows: Sizes S and M: Work the last row in the diagrams, but skip the last 10 chain stitches + 1 double crochet (= A.7) at the beginning of the last row worked = 5-5 rows with fans in height and there are 12-12 fans in width. Sizes L and XL: Continue back and forth and increase in each side as before (there will be 2 more fans in width for every row worked) until you have worked 6-6 rows with fans in height, but skip the last 10 chain stitches + 1 double crochet (= A.7) at the beginning of the last row worked = 6-6 rows with fans and 14-14 fans in width. Sizes XXL and XXXL: Continue back and forth and increase in each side as before (there will be 2 more fans in width for every row worked) until you have worked 7-7 rows with fans in height, but skip the last 10 chain stitches + 1 double crochet (= A.7) at the beginning of the last row worked = 7-7 rows with fans and 16-16 fans in width. ALL SIZES: Continue working fan-groups without increasing in each side as follows: ROW 1: Work 3 chain stitches at the beginning of the row, A.8 over all 12-12-14-14-16-16 fans, turn. Repeat row 1 until you have worked a total of 3-3-4-4-5-5 rows without increasing in the sides. The sleeve is now finished. Work another sleeve in the same way. ASSEMBLING SLEEVES: Insert a marker thread in the middle of the armhole on each side of the body. Place the sleeve in the armhole so that the middle of the sleeve cap is at the top of the shoulder and divide the rest of the side between rows 1 and 5-5-6-6-7-7 down to the corner at the bottom of the armhole, the last 3-3-4-4-5-5 rows on the sleeve are placed along the armhole and as far as the marker thread in the side. Start at the marker thread in the side. Work from the inside/wrong side of the sleeve, through both layers (i.e. sleeve and armhole): 1 double crochet, * 3 chain stitches, skip approx. 1 cm, 1 double crochet *, work from *-* around the whole armhole. Cut the strand. Work a round from the right side around the sleeve as follows: Start in the chain-space in one of the fan groups under the sleeve, work round 3 in A.3b (A.3a shows how the round starts and finishes) around the whole sleeve. Cut and fasten strand. Assemble the other sleeve in the same way. ASSEMBLY: Sew the button onto the outermost stitch at top of left front piece. Work a loop for the button with raspberry as follows. Fasten the strand with 1 double crochet in the outermost stitch at the top of the right front piece, work 8 chain stitches, fasten the strand with 1 slip stitch in the double crochet, cut and fasten strand. |
||||||||||||||||||||||||||||||||||||||||||||||||||||||||||
Diagram explanations |
||||||||||||||||||||||||||||||||||||||||||||||||||||||||||
|
||||||||||||||||||||||||||||||||||||||||||||||||||||||||||
 |
||||||||||||||||||||||||||||||||||||||||||||||||||||||||||
 |
||||||||||||||||||||||||||||||||||||||||||||||||||||||||||
 |
||||||||||||||||||||||||||||||||||||||||||||||||||||||||||
 |
||||||||||||||||||||||||||||||||||||||||||||||||||||||||||
 |
||||||||||||||||||||||||||||||||||||||||||||||||||||||||||
Have you finished this pattern?Tag your pictures with #dropspattern #holidayfeelingtunic or submit them to the #dropsfan gallery. Do you need help with this pattern?You'll find 10 tutorial videos, a Comments/Questions area and more by visiting the pattern on garnstudio.com. © 1982-2026 DROPS Design A/S. We reserve all rights. This document, including all its sub-sections, has copyrights. Read more about what you can do with our patterns at the bottom of each pattern on our site. |
||||||||||||||||||||||||||||||||||||||||||||||||||||||||||


With over 40 years in knitting and crochet design, DROPS Design offers one of the most extensive collections of free patterns on the internet - translated to 17 languages. As of today we count 324 catalogues and 12245 patterns translated into English (UK/cm). 12245
We work hard to bring you the best knitting and crochet have to offer, inspiration and advice as well as great quality yarns at incredible prices! Would you like to use our patterns for other than personal use? You can read what you are allowed to do in the Copyright text at the bottom of all our patterns. Happy crafting!
Post a comment to pattern DROPS 187-40
We would love to hear what you have to say about this pattern!
If you want to leave a question, please make sure you select the correct category in the form below, to speed up the answering process. Required fields are marked *.