
Popular categories
Looking for a yarn?


Comments / Questions (29)
![]() Marian Wyn wrote:
Marian Wyn wrote:
Can you please provide charts A.4 and A.5? I cannot find them in the instructions. I would very much like to crochet the neck warmer. It is exactly what I am looking for.
05.01.2022 - 13:25DROPS Design answered:
Dear Mrs Wyn, you will find A.4 and A.5 at the very bottom of the pattern, just below A.7 and A.6 (they are small diagrams). Happy crocheting!
05.01.2022 - 16:56
![]() Anna wrote:
Anna wrote:
Nel diagramma del cappello dice di sostituire la prima maglia alta di ogni giro con tre catenelle, ma nello schema compaiono solo maglie alte (e non il simbolo delle 3 catenelle). Cosa è meglio?
27.11.2021 - 15:30DROPS Design answered:
Buonasera Anna, deve seguire il suggerimento per il lavoro per l'inizio e la fine del giro. Buon lavoro!
08.12.2021 - 19:15
![]() Elisabet Dahlström wrote:
Elisabet Dahlström wrote:
Var finns texten till diagramförklaringen? Det saknas förklaring till alla symboler utom en.
16.08.2021 - 16:50DROPS Design answered:
Hej Elisabeth. Tack för info, nu finns förklaringen på alla symboler. Mvh DROPS Design
17.08.2021 - 13:52
![]() Thais wrote:
Thais wrote:
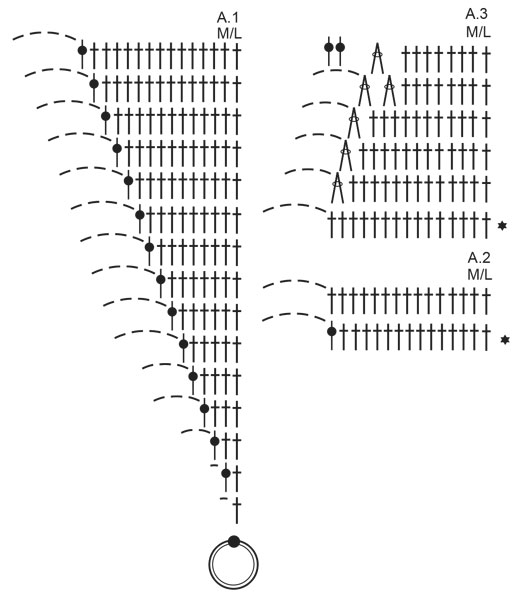
Dev'esserci un errore nello schema... come si può fare 9 volte il pattern attorno ad un anello di solo 6 punti? Non dovrebbe essere un anello di 9 punti per cominciare?
15.04.2021 - 11:36DROPS Design answered:
Buonasera Thais, sul 1° giro deve lavorare le maglie alte attorno all'anello di catenelle, cioè ripetere la sequenza "1 maglia alta attorno all'anello di catenelle, 1 catenella per un totale di 9 volte. Buon lavoro!
15.04.2021 - 19:25
![]() Emilie wrote:
Emilie wrote:
Another pattern that isn't loading up the diagrams, I think there is something wrong with your website. This is the 5th pattern so far. I give up.
15.03.2021 - 18:14DROPS Design answered:
Dear Emilie, or site had difficulties with the pictures for afew days, but it has been solved.. Please try again, everything should load correctly now. Happy Crafting!
22.03.2021 - 23:52
![]() Melanie wrote:
Melanie wrote:
Hi I’m confused about the ring of 6 chain stitches and from this to work diagram a1 9 times. But there’s only 6 stitches to work to?
08.02.2021 - 23:59DROPS Design answered:
Dear Melanie, on the very first round work the treble crochet around the ring of chains, ie work (1 treble around the chain ring, 1 chain) work from (to) a total of 9 times. Happy crocheting!
09.02.2021 - 08:47
![]() Clara wrote:
Clara wrote:
Er det muligt at bruge bomuldsgarn 8/4 med hæklefasthed 27/36?
29.01.2021 - 09:45DROPS Design answered:
Hej Clara, du kan prøve med Drops Loves You 7 det er en 8/4 bomuld. God fornøjelse!
29.01.2021 - 12:54
![]() Lucia Anello Cortiñas wrote:
Lucia Anello Cortiñas wrote:
No se ven los diagramas
21.11.2020 - 23:42DROPS Design answered:
Hola Lucía, se estaban haciendo unas correcciones al diagrama, por lo que se habían ocultado las instrucciones; ahora están visibles.
22.11.2020 - 12:08
![]() Emm wrote:
Emm wrote:
Is there any way that the comments can be translated to English (or another language )? I would love to read all the comments .
14.11.2020 - 19:22DROPS Design answered:
Dear Emm, the only way would be to use an online translator, but remember it might look weird. Should you have any question, please feel free to ask them here. Happy crocheting!
16.11.2020 - 08:35
![]() Naomi wrote:
Naomi wrote:
Enjoying making this pattern- just wondering what the upside down "V" symbol is on chart A3 please?
03.11.2020 - 23:23DROPS Design answered:
Dear Naomi, thanks for your feedback, this symbol will be added in the description - you should work here 2 treble crochets together (= decrease 1 stitch): work 1 treble in the next stitch but wait with last yarn over and pull through, work 1 treble in the next stitch the same way, but on last yarn over pull through all loops on hook. See also video. Happy crocheting!
04.11.2020 - 09:35
|
||||||||||||||||||||||
Green Gables#greengablesset |
||||||||||||||||||||||
 |
 |
|||||||||||||||||||||
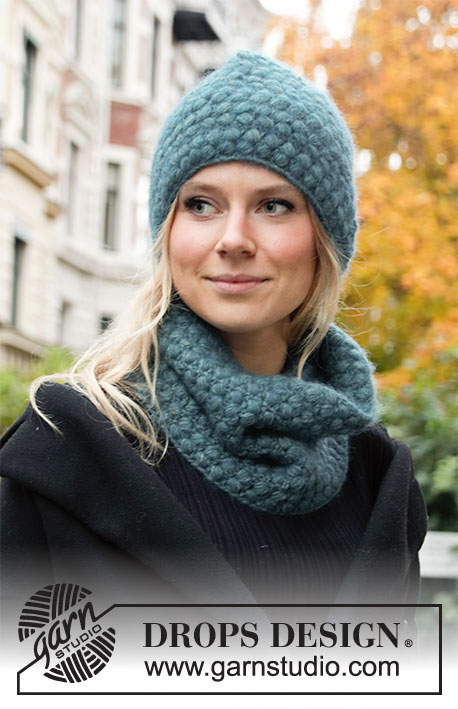
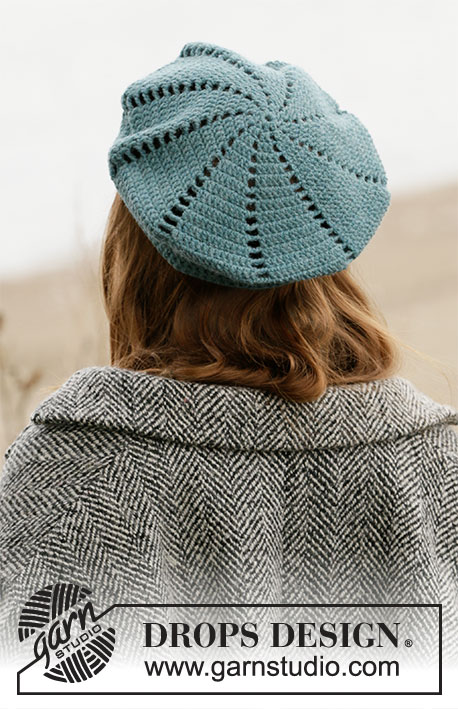
Crocheted beret and neck warmer in DROPS Lima. Crocheted with spiral pattern in treble crochets.
DROPS 204-26 |
||||||||||||||||||||||
|
---------------------------------------------------------- EXPLANATION FOR THE PATTERN: ---------------------------------------------------------- PATTERN: Hat: See diagrams A.1, A2 and A.3. Choose diagram for your size. Neck warmer: See diagram A.4, A.5, A.6 and A.7. CROCHET INFORMATION: Replace first treble crochet at beginning of round with 3 chain stitches, finish round with 1 slip stitch in 3rd chain stitch. CROCHET TIP FOR CHAIN STITCH: If you work at the end of crochet hook the chain stitch will often be too tight 1 chain stitch should be just as long as 1 treble crochet is wide. DECREASE TIP (evenly): To calculate how to decrease evenly, use the total number of stitches (e.g. 99 treble crochets) and divide stitches by number of decreases to be done (e.g. 7) = 14.1. In this example decrease by work every 13th and 14th treble crochet together. ---------------------------------------------------------- START THE PIECE HERE: ---------------------------------------------------------- HAT - SHORT OVERVIEW OF THE PIECE: Piece is worked in the round top down in a spiral pattern. HAT: Use hook size 4 mm and Lima. Read CROCHET INFORMATION and CROCHET TIP FOR CHAIN STITCH in explanation above. Work 6 chain stitches and form a ring with 1 slip stitch in 1st chain stitch Work diagram A.1 9 times in total around the ring. When A.1 has been worked, there are 14-15 treble crochets and 1 chain space in every repetition, there are 126-135 treble crochets in total and 9 chain spaces on round. Work diagram A.2 over A.1 the entire round. Repeat diagram A.2 3-4 times in total vertically. Work diagram A.3 over A.2, when diagram has been worked, there are 10-11 treble crochets in every repetition and there are 90-99 treble crochets in total on round. Work 1 round with treble crochets, AT THE SAME TIME decrease 2-7 treble crochets evenly on round - read DECREASE TIP in explanation above. = 88-92 treble crochets. Work 1 round with 1 treble crochet in every treble crochet the entire round. Cut and fasten the yarn. ---------------------------------------------------------- NECK WARMER - SHORT OVERVIEW OF PIECE: Piece is worked in the round top down in a spiral pattern. NECK WARMER: Use hook size 4 mm and Lima. Read CROCHET TIP FOR CHAIN STITCH in explanation above. Work 110-120 chain stitches and form a ring with 1 slip stitch. Work 1 round with 1 treble crochet in every chain stitch = 110-120 treble crochets. Work according to diagram A.4 and A.5 as follows: Work A.4 over 10 stitches (= 1-1 repetition), then repeat A.5 the entire round (= 10-11 repetitions). When A.4-A.5 have been worked 1 time vertically, repeat last round until piece measures 10-12 cm in total. Work diagram A.6 over A.4 and diagram A.7 over A.5. When diagrams have been worked, there are 187-204 treble crochets in total on last round and piece measures approx. 21-23 cm from beginning. Cut and fasten the yarn. |
||||||||||||||||||||||
Diagram explanations |
||||||||||||||||||||||
|
||||||||||||||||||||||

|
||||||||||||||||||||||
|
||||||||||||||||||||||

|
||||||||||||||||||||||
Have you finished this pattern?Tag your pictures with #dropspattern #greengablesset or submit them to the #dropsfan gallery. Do you need help with this pattern?You'll find 7 tutorial videos, a Comments/Questions area and more by visiting the pattern on garnstudio.com. © 1982-2025 DROPS Design A/S. We reserve all rights. This document, including all its sub-sections, has copyrights. Read more about what you can do with our patterns at the bottom of each pattern on our site. |
||||||||||||||||||||||


With over 40 years in knitting and crochet design, DROPS Design offers one of the most extensive collections of free patterns on the internet - translated to 17 languages. As of today we count 314 catalogues and 11820 patterns translated into English (UK/cm). 11820
We work hard to bring you the best knitting and crochet have to offer, inspiration and advice as well as great quality yarns at incredible prices! Would you like to use our patterns for other than personal use? You can read what you are allowed to do in the Copyright text at the bottom of all our patterns. Happy crafting!
Post a comment to pattern DROPS 204-26
We would love to hear what you have to say about this pattern!
If you want to leave a question, please make sure you select the correct category in the form below, to speed up the answering process. Required fields are marked *.