
Popular categories
Looking for a yarn?


Comments / Questions (14)
![]() Hilda wrote:
Hilda wrote:
Prima uitleg met fantastisch resultaat. Heel mooi ! Nu nog het zonnetje...
27.04.2016 - 12:45
![]() Sibylle wrote:
Sibylle wrote:
Soll der Armausschnitt im Vorderteil nach 44 cm und im Rückenteil nach 47 cm angefangen werden?
11.04.2016 - 20:07DROPS Design answered:
Liebe Sybille, herzlichen Dank für Ihre Rückmeldung. Da ist uns bei der deutschen Übersetzung ein Fehler passiert, wir werden uns sofort darum kümmern.
12.04.2016 - 14:19
![]() Maria wrote:
Maria wrote:
Elegante y sencillo. Pero me temo que como sea para circulares o de doble punta no podré ponerlo en práctica.
19.12.2015 - 12:23
![]() Maria wrote:
Maria wrote:
Precioso y elegante. Si es con dos agujas normales podré intentar hacerlo ,ahora bien si es con circulares o de doble punta será para mi imposible de hacer. Pero es elegante y muy bonito.
19.12.2015 - 11:25
|
||||||||||||||||
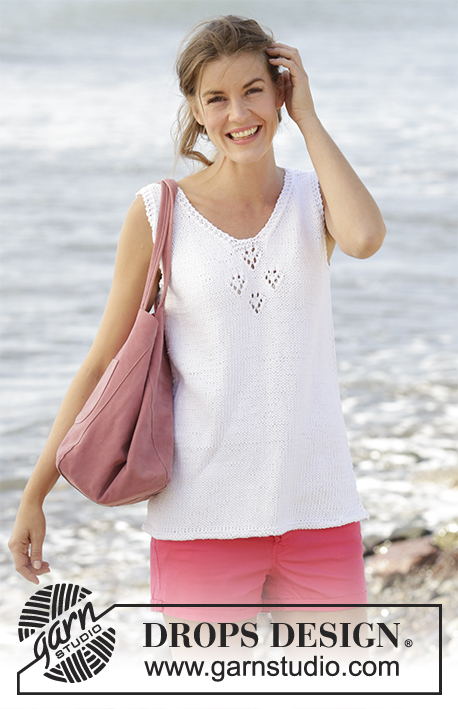
Sunny Day Top#sunnydaytop |
||||||||||||||||
 |
 |
|||||||||||||||
Knitted DROPS top with V-neck, lace pattern and vents in the sides in ”Paris”. Size: S - XXXL.
DROPS 170-32 |
||||||||||||||||
|
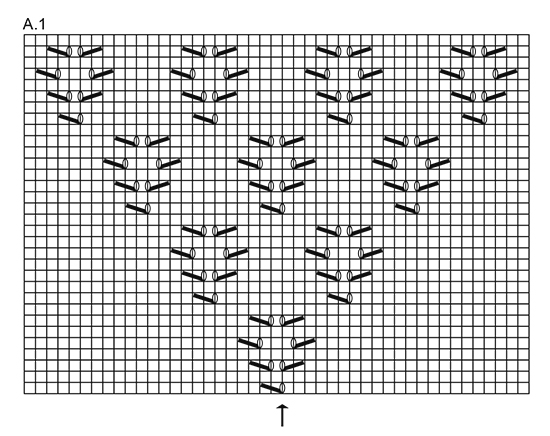
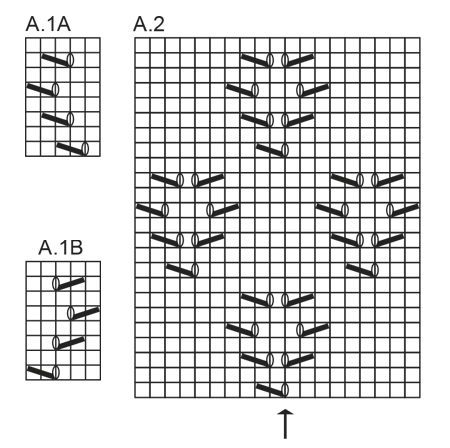
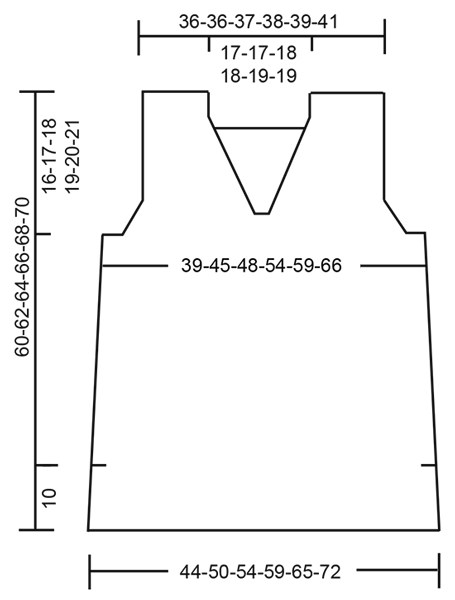
GARTER ST (back and forth): K all rows. 1 ridge = 2 rows K. PATTERN: See diagrams A.1 and A.2. The diagrams show all rows in pattern seen from RS. DECREASE TIP (applies to sides on body, at armholes and neck): Dec inside 2 edge sts in garter st on front and back piece and inside 3 edge sts in garter st along armholes and neck. All dec are done from RS! Dec as follows after 2 or 3 edge sts: Slip 1 st as if to K, K 1, psso. Dec as follows before 2 or 3 edge sts: Beg 2 sts before edge sts and K 2 tog. ---------------------------------------------------------- TOP: Piece is worked bottom up in two parts. BACK PIECE: Cast on 75-85-91-101-111-123 sts on needle size 4 mm with Paris. Work 2 ridges in GARTER ST - see explanation above. Insert 1 marker after the first 37-42-45-50-55-61 sts on needle (seen from RS) = 38-43-46-51-56-62 sts on needle after marker, move the marker upwards when working. Switch to needle size 5 mm and work in stocking st with 2 edge sts in garter st in each side. REMEMBER THE KNITTING TENSION When piece measures 12 cm, dec 1 st in each side - READ DECREASE TIP! Repeat dec every 8-8-7-7-7-7 cm a total of 4-4-5-5-5-5 times in each side = 67-77-81-91-101-113 sts. AT THE SAME TIME when piece measures 15-16-17-14-15-16 cm, work pattern according to diagram A.1 over the middle sts – pattern beg from RS after marker in the middle of piece (see arrow in diagram) – work the other sts as before. When A.1 has been worked 1 time in height continue the pattern towards the edge st in each side as before - adjust to a whole or half heart - see A.1A and A.1B, (work A.1A in the right side of work and work A.1B in the left side of work), inside edge st in each side. Work the sts that do not fit a whole or half heart out towards the sides in stocking st. When piece measures 43-44-45-46-47-48 cm, work 2 ridges over the outermost 5-7-8-9-10-11 sts in each side (work the other sts as before). Then cast off the first 2-4-5-6-7-8 sts at beg of the next 2 rows for armholes. Continue pattern with 3 edge sts in garter st in each side (where there is not enough room for a whole or half heart out towards armholes work these sts in stocking st). AT THE SAME TIME dec for armholes inside edge st on every other row (i.e. every row from RS) as follows: Dec 1 st 1-4-4-7-10-14 times in total – READ DECREASE TIP = 61-61-63-65-67-69 sts remain on needle. When piece measures 52-54-56-58-60-62 cm, work 2 ridges over the middle 29-29-31-31-33-33 sts on needle (work the other sts as before). On next row from RS, cast off the middle 23-23-25-25-27-27 sts for neck and finish each shoulder separately. Continue as before with 3 edge sts in garter st in each side. AT THE SAME TIME dec for neck on every other row as follows: Dec 1 st 3 times in total – READ DECREASE TIP = 16-16-16-17-17-18 sts remain on shoulder. Continue until piece measures 60-62-64-66-68-70 cm and cast off. Repeat on the other shoulder. FRONT PIECE: READ ALL OF THE FOLLOWING SECTION BEFORE CONTINUING! Cast on and work as on back piece until piece measures 35-37-38-39-40-42 cm - NOTE: Do not work A.1 on front piece. Now work pattern according to diagram A.2 over the middle sts – pattern beg from RS after marker in the middle of piece (see arrow in diagram) – work the other sts as before. ARMHOLE: AT THE SAME TIME when piece measures 43-44-45-46-47-48 cm, work 2 ridges over the outermost 5-7-8-9-10-11 sts in each side as on back piece (work the other sts as before). Then dec for armhole in the side as on back piece. V-NECK: AT THE SAME TIME when A.2 has been worked 1 time vertically work 2 ridges over the middle 9 sts mid front (work the other sts as before). On next row from RS after ridges, cast off the middle 3 sts for neck and finish each part separately. Continue in stocking st with dec for armhole as before and dec AT THE SAME TIME for V-neck on every other row (i.e. on every row from RS) as follows: Dec 1 st 13-13-14-14-15-15 times in total - READ DECREASE TIP. After all dec for armholes and V-neck, 16-16-16-17-17-18 sts remain on shoulder. Continue until piece measures 60-62-64-66-68-70 cm and cast off. Repeat on the other shoulder - NOTE: Work first row from mid front (= WS). Beg by picking up 1 st in first st from the other side and work this tog with first st on needle. This is done to avoid a nick at the bottom of vent. ASSEMBLY: Sew shoulder seams inside cast-off edge. Sew side seams – sew edge to edge in outer loops of edge sts - beg at the top by armhole and sew until approx. 10 cm remain in each side (= vent). |
||||||||||||||||
Diagram explanations |
||||||||||||||||
|
||||||||||||||||
|
||||||||||||||||
|
||||||||||||||||
|
||||||||||||||||
Have you finished this pattern?Tag your pictures with #dropspattern #sunnydaytop or submit them to the #dropsfan gallery. Do you need help with this pattern?You'll find 19 tutorial videos, a Comments/Questions area and more by visiting the pattern on garnstudio.com. © 1982-2025 DROPS Design A/S. We reserve all rights. This document, including all its sub-sections, has copyrights. Read more about what you can do with our patterns at the bottom of each pattern on our site. |
||||||||||||||||


With over 40 years in knitting and crochet design, DROPS Design offers one of the most extensive collections of free patterns on the internet - translated to 17 languages. As of today we count 314 catalogues and 11820 patterns translated into English (UK/cm). 11820
We work hard to bring you the best knitting and crochet have to offer, inspiration and advice as well as great quality yarns at incredible prices! Would you like to use our patterns for other than personal use? You can read what you are allowed to do in the Copyright text at the bottom of all our patterns. Happy crafting!
Post a comment to pattern DROPS 170-32
We would love to hear what you have to say about this pattern!
If you want to leave a question, please make sure you select the correct category in the form below, to speed up the answering process. Required fields are marked *.