
Popular categories
Looking for a yarn?


Comments / Questions (59)
![]() Caroline wrote:
Caroline wrote:
Zie nu wat ik fout heb gedaan, misschien handig om bij het blokje 1 recht te vermelden dat teruggaande naald averecht is Telpatroon voor de voorpanden klopt niet vanaf regel 23
14.09.2023 - 10:29
![]() Caroline wrote:
Caroline wrote:
Voorpanden veel langer 26 naalden is 10 cm Bij ongeveer 20cm begin je met de minderingen voor de hals maar M 4 en 5 zijn 108 naalden dat is dan ongeveer 40 cm Alleen de heengaande naalden worden weergegeven Wat doe ik fout?
08.09.2023 - 13:25DROPS Design answered:
Dag Caroline,
In het telpatronen worden alle steken weergegeven zoals ze er aan de goede kant uitzien, maar wel zijn alle naalden in het telpatroon opgenomen, dus zowel de heengaande als de teruggaande naald. Je hebt dus waarschijnlijk 2 keer zoveel naalden gebreid en het ajourpatroon zal er dan ook anders (meer uitgerekt in de hoogte) uitzien.
20.09.2023 - 19:26
![]() Caroline wrote:
Caroline wrote:
Als 2xM1, 48 naalden, ongeveer 17cm is dan heb ik nog 20cm te doen met M4 Aen B Maar dat zijn 108 naalden dus dat is ongeveer 40 cm!! Waar maak ik de fout? Alleen de heengaande naalden worden weergegeven toch? Vriendelijke groet, Caroline
08.09.2023 - 13:16
![]() Pascale wrote:
Pascale wrote:
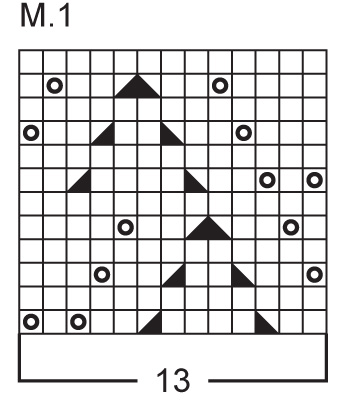
Bonjour, J’ai vu que des questions ont déjà été posées sur u sujet du problème que je rencontre mais les réponses apportées à d’autres personnes ne résolvent rien. Êtes-vous certains qu’il n’y a pas un problème avec le diagramme M1 : en dépit des marqueurs et du respect des 13 mailles (1 jeté pour deux mailles ensembles ou glissée), il y a un décalage entre le 5ème et 7eme rang. Je vous remercie par avance pour votre aide. Bonne journée
28.08.2023 - 17:13
![]() BigiLana wrote:
BigiLana wrote:
Hallo, Rücken Teil grösse L In der Anleitung steht das man nach 17 cm Arbeit + 2 Krausrippen ca 19-20 cm Arbeit angefangen wird abzuketten im Diagramm steht nach ca 39 cm ? Des weiteren Steht da am Anfang der nächsten 2 Runden beidseitig 4 Maschen für Armausschnitt (insgesamt -16M abketten) Dann 1 M beidseitig 7 mal (-14M) 98M- 16M-14M = 68 M übrig in der Anleitung steht 78M Was verstehe ich falsch? Danke für die Hilfe
10.07.2023 - 15:57DROPS Design answered:
Liebe BigiLana, Nach 17 cm und den beiden Falten beginnen wir mit dem Schließen für die Armausschnitte. Wir schließen die Arbeit bei 39 cm ab. Wie Sie im Diagramm sehen können, beträgt die Gesamtlänge 39 cm, während bis zum Armausschnitte ca. 39-21 = 18 cm betragen. Dann ketten Sie für die Armausschnitte zu Beginn 1 Mal je 4 Maschen auf jeder Seite ab (= 8 Maschen), nicht 16. Viele Spass beim stricken!
27.07.2023 - 10:03
![]() Vera wrote:
Vera wrote:
Guten Tag! Ich habe ein Problem mit dem Muster M1 Bei Reihe 7, wo rechts 1 Umschlag 1 rechts 1 Umschlag 2 rechts stehen verschiebt sich bei mir das Muster und die Löcher laufen dann nicht mehr schräg Was mache ich falsch? Lg Vera
07.05.2023 - 22:02
![]() Lucilla wrote:
Lucilla wrote:
Correzione schema Davanti Sinistro M5A R. 1: finire con 2 m a d. e no diminuzione R. 23: finire con 4 m a d. R. 27: finire con 5 m a d. R. 31: finire con 8 m a d. R. 35: finire con 1 m a d. (dopo il gettato) R. 39: finire con 2 m a d. (dopo il gettato) R. 43: finire con 2 m assieme
03.05.2023 - 17:54DROPS Design answered:
Buonasera Lucilla, al momento non sono previste correzioni per questo modello. Buon lavoro!
03.05.2023 - 22:17
![]() Lucilla wrote:
Lucilla wrote:
Correzione schema Davanti Destro M4A Riga 1: iniziare con 2 m a d. e no diminuzione R. 23: iniziare con 7 m. a d. R. 27: iniziare con 2 m a d. R. 31: iniziare con 1 m a d. R. 35: iniziare con 4 m a d. R. 39: iniziare con 5 m a d. R. 43: iniziare con 1 accavallata
03.05.2023 - 17:53DROPS Design answered:
Buonasera Lucilla, al momento non sono previste correzioni per questo modello. Buon lavoro!
03.05.2023 - 22:17
![]() Lucilla wrote:
Lucilla wrote:
Buonasera, sto lavorando il davanti destro e sto iniziando lo schema M4A. Il problema è che il primo ferro di tale schema è lavorato su 27 maglie mentre io, arrivando dallo schema M1, ho 26 maglie disponibili... Come è possibile? Si può avere uno schema corretto? (Ho già visto che anche lo schema M5A parte da 27 maglie!).
26.04.2023 - 23:25DROPS Design answered:
Buonasera Lucilla, inoltreremo la sua segnalazione al settore design. Buon lavoro!
03.05.2023 - 22:16
![]() Michèle wrote:
Michèle wrote:
Merci
24.04.2023 - 11:33
|
|||||||||||||
DROPS 73-6 |
|||||||||||||
|
|
|||||||||||||
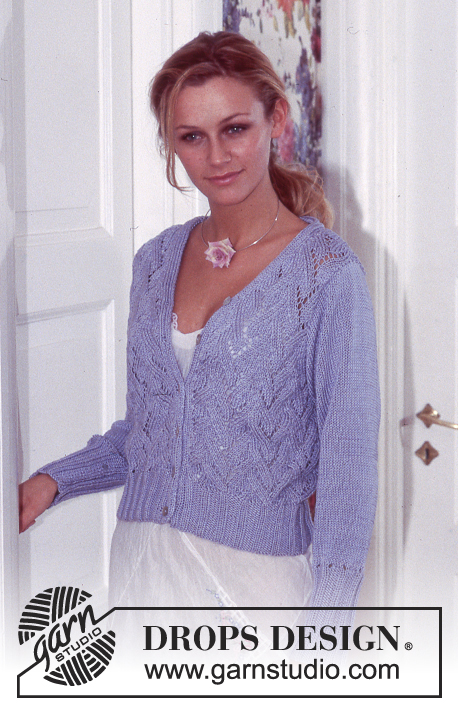
DROPS Top in Muskat
DROPS 73-6 |
|||||||||||||
|
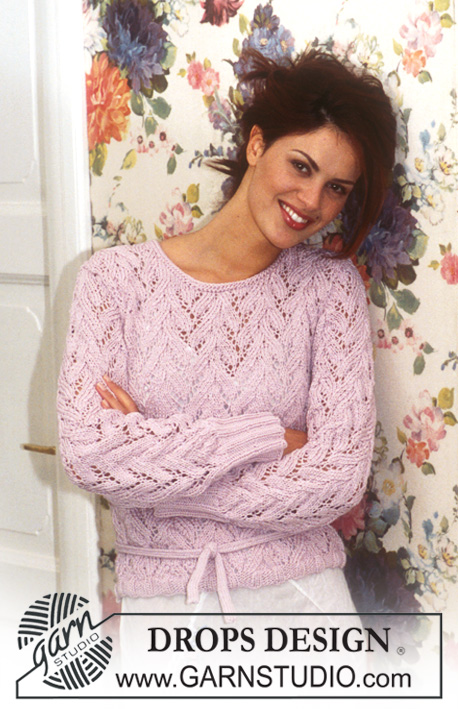
Gauge: 20 sts x 26 rows = 10 x 10 cm on larger needles in pattern. 1 repeat of Pattern 1 = 7 cm wide. Garter st, when knitting flat: Knit all sts, all rows. Pattern: See diagrams M.1, M.4 and M.5. The pattern is seen from the right side. NB: On the garment, the lace pattern (by mistake) is shown with a couple of holes too small, but follow the diagram and possibly see DROPS Design Model no. 73-5 to see how the pattern will look when the diagram is worked. Knitting tips (for armhole): All decs are made on right side rows. Dec 1 st inside 3 edge sts knit in garter st as follows: After 3 sts: Slip 1 as if to knit, K 1, psso. Before 3 sts: K 2 tog. Buttonhole: Make buttonholes along right button band. 1 buttonhole = bind off the center st of buttonband and yo over the bound off st on the next row. Make buttonhole when the piece measures (for all sizes): 2 cm, 6.5 cm, 11 cm, 15.5 cm and 20 cm. ---------------------------------------------------------------------- Back: Cast on 72-80-88-96 sts on smaller needles. Knit 6 rows garter st. Change to larger needles and continue as follows: K 1 (edge st), 9-13-17-21 sts stockinette st, Pattern 1 over 52 sts (4 repeats), 9-13-17-21 sts stockinette st, K 1 (edge st). When the piece measures 5 cm inc 1 st at each side every 2 cm a total of 5 times = 82-90-98-106 sts - knit the increased sts in stockinette st. When the piece measures 17 cm knit 4 rows garter st over 6-6-7-8 sts at each side (knit the remaining sts as before). On the next row bind off the outermost 3-3-4-5 sts at each side for armhole. Then dec 1 st at armholes inside 3 garter st edge sts every other row 2-5-7-9 times - see knitting tips = 72-74-76-78 sts remain. Continue with 3 sts garter st and 7-8-9-10 sts stockinette st at each side of Pattern 1. When the piece measures 35-36-37-38 cm knit 4 rows garter st over the center 32 sts - knit the remaining sts as before. Then bind off the center 26 sts for the neck = 23-24-25-26 sts remain on each shoulder. Knit pattern as before with 3 sts in garter st at each neck edge. Bind off when the piece measures approx. 37-38-39-40 cm. Right front: Cast on 39-43-47-51 sts on smaller needles. Knit 6 rows garter st, change to larger needles and knit the next row as follows from center front edge: K 3 (buttonband sts knit in garter st throughout), Pattern 1 over 26 sts (2 repeats), 9-13-17-21 sts stockinette st and K 1 (edge st). Make buttonholes along buttonband - see instructions above. When the piece measures 5 cm inc at the side as on back = 44-48-52-56 sts (knit the increased sts in stockinette st). When the piece measures 17 cm knit 4 rows garter st over 6-6-7-8 sts at the side (knit the remaining sts as before). On the next row bind off the outermost 3-3-4-5 sts at the side for armhole. Then shape armhole as on back. At the same time when the piece measures approx. 20 cm - adjust to end after a complete repeat of Pattern 1 - knit and bind off for the neck following Pattern 4A - dec for neck inside 3 button band sts knit in garter st. Knit the remaining sts in each row as before. After all armhole and neck shaping is complete 23-24-25-26 sts remain on shoulder. Continue with Pattern 4B and remaining sts in stockinette st and garter st until piece measures approx. 37-38-39-40 (match back). Bind off. Left front: Cast on as right front and knit 6 rows garter st, change to larger needles. Knit the next row as follows from side: K 1 (edge st), 9-13-17-21 sts stockinette st, Pattern 1 over 26 sts (2 repeats) and 3 sts in garter st (buttonband). Inc at the side and shape armhole as on right front. For neck shaping follow Pattern 5A, then continue with Pattern 5B. Bind off when piece matches right front. Assembly: Sew shoulder- and side seams using edge sts as seam allowance. Sew on buttons. |
|||||||||||||
Diagram explanations |
|||||||||||||
|
|||||||||||||
|
|||||||||||||

|
|||||||||||||

|
|||||||||||||
Have you finished this pattern?Tag your pictures with #dropspattern or submit them to the #dropsfan gallery. Do you need help with this pattern?You'll find 14 tutorial videos, a Comments/Questions area and more by visiting the pattern on garnstudio.com. © 1982-2025 DROPS Design A/S. We reserve all rights. This document, including all its sub-sections, has copyrights. Read more about what you can do with our patterns at the bottom of each pattern on our site. |
|||||||||||||


With over 40 years in knitting and crochet design, DROPS Design offers one of the most extensive collections of free patterns on the internet - translated to 17 languages. As of today we count 314 catalogues and 11821 patterns translated into English (UK/cm). 11821
We work hard to bring you the best knitting and crochet have to offer, inspiration and advice as well as great quality yarns at incredible prices! Would you like to use our patterns for other than personal use? You can read what you are allowed to do in the Copyright text at the bottom of all our patterns. Happy crafting!
Post a comment to pattern DROPS 73-6
We would love to hear what you have to say about this pattern!
If you want to leave a question, please make sure you select the correct category in the form below, to speed up the answering process. Required fields are marked *.