
Popular categories
Looking for a yarn?


Comments / Questions (142)
![]() BERNARD Régine wrote:
BERNARD Régine wrote:
Vraiment désolée du mail que je vous ai envoyé hier. Les explications sont complètes. Me suis trompée. Excusez-moi. Vous en remerciant. votre site est un des meilleurs.
03.07.2013 - 13:00
![]() BERNARD Régine wrote:
BERNARD Régine wrote:
J'adore ce gilet, mais impossible à faire car les explications ne correspondent pas avec les dessins du modéle. De magnifiques ouvrages que vous avez là.
02.07.2013 - 14:54DROPS Design answered:
Bonjour Mme Bernard, si vous éprouvez des difficultés à faire les points fantaisie, n'hésitez pas à demander au magasin où vous avez acheté votre fil, ou bien à vous enregistrer sur le forum DROPS. Bon crochet!
02.07.2013 - 16:28
![]() Annette Franke wrote:
Annette Franke wrote:
Anleitung sagt: VORDER- UND RÜCKENTEIL: Von der Anschlagskante nach unten häkeln (hinten in der Mitte anfange): Meine Frage: warum muss ich hinten in der Mitte anfangen? Heisst dass, dass ich das Muster M2 bzw. die untere Hälfte der Jacke ,in 2 Teilen stricke?
09.06.2013 - 21:35DROPS Design answered:
Liebe Anette, Sie haben völlig Recht! Leider hat unsere damalige Übersetzerin diese Stelle nicht korrekt übersetzt: Man beginnt nicht in der hinteren Mitte, wie Sie schon vermutet haben. Man beginnt mit einer Rück-R am Reihenanfang. Wir werden dies sofort korrigieren und entschuldigen uns für die Umstände!
10.06.2013 - 09:51
![]() Rühl-scholten wrote:
Rühl-scholten wrote:
Super Süße Jacke!Würde gerne nachhäkeln.Eine Frage dazu: Warum sind in Muster 1 u.2 die ersten Reihen feste Maschen?
18.05.2013 - 20:07DROPS Design answered:
Hallo, Frau Rühl-scholten, wir haben dies zur besseren Darstellung gewählt. Sie beginnen ja mit Reihe 2 im Diagramm, Reihe 1 ist in der Anleitung erklärt.
21.05.2013 - 08:53
![]() MOLLARD Anny wrote:
MOLLARD Anny wrote:
Je ne comprends pas l'explication pour débuter ce gilet
05.05.2013 - 17:39DROPS Design answered:
Bonjour Madame Mollard, pour toute aide complémentaire, je vous recommande de vous adresser à votre magasin DROPS ou sur le forum DROPS. Bon crochet !
06.05.2013 - 08:04
![]() Lisette Forrer wrote:
Lisette Forrer wrote:
Kunt u mij helpen met de eerste twee toeren. ik heb geen goed beeld (plaatje) hoe dat eruit moet gaan zien en met de beschrijving kom ik er niet uit.
11.04.2013 - 12:10DROPS Design answered:
Bedoel je de eerste twee toeren van de patronen M.1 of M.2 of de eerste twee toeren van het patroon zelf? Bij de teltekening worden het motief schriftelijk per toer maar ook met een teltekening beschreven. In het patroon zelf begin je met een ketting van lossen. Hier haak je zoals beschreven vasten in. Vervolgens haak je l-lussen van 5 l met 1 v tussen en slaat 2, 3 en 4 v over.
17.04.2013 - 22:28
![]() Lise R. wrote:
Lise R. wrote:
Hej. Jeg synes det ser ud til at der er en fejl i symbolforklaringen til diagrammet. Betyder en vandret streg ikke en luftmaske?
15.03.2013 - 10:29DROPS Design answered:
Jo, det er en luftmaske. Det staar ogsaa i diagrammet (= lm).
15.03.2013 - 16:37Manda Bala wrote:
Mi piace molto. Bellissimo.
13.03.2013 - 01:59
![]() Hanne Nielsen wrote:
Hanne Nielsen wrote:
Hej! I har nogle dejlige opskrifter og garner. Ang. opskrifter ved jeg ikke hvilken størrelse jeg skal vælge, mangler længde og overvidde. Er det mig der ikke kan finde det på hjemmesiden? venlig hilsen hanne
08.03.2013 - 14:11DROPS Design answered:
Hej Hanne. Nederst paa vores mönstre kan du finde en maaltabel. Her staar maalene per str i cm. Du kan sammenligne disse med dine egne maal og vaelge din str. God fornöjelse.
08.03.2013 - 16:43
![]() Saroj wrote:
Saroj wrote:
I am working the bottom edge . What does 20 repetitions of the row mean . Please help.
25.02.2013 - 14:42DROPS Design answered:
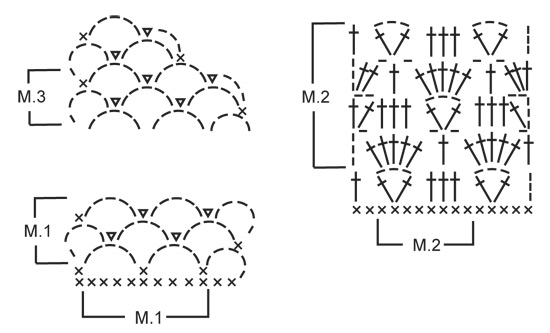
Dear Mrs Saroj, M.2 is a pattern worked on 8 sts (see frame in diagram below), you will repeat 20 times the "frame" M.2 in the diagram. Happy crocheting!
26.02.2013 - 10:10
|
||||||||||||||||
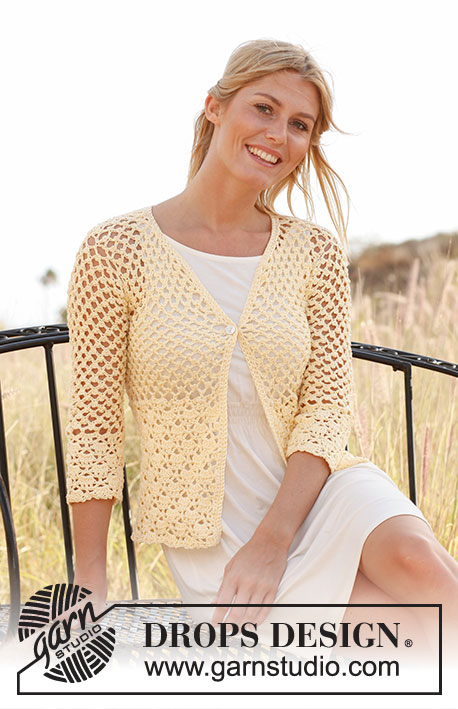
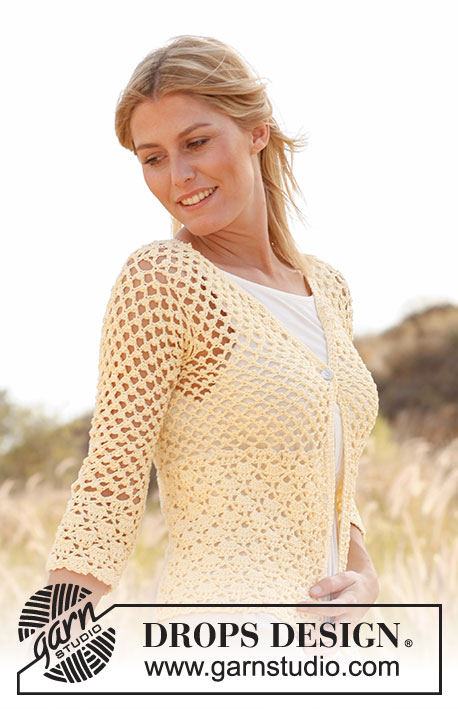
Buttercup#buttercupcardigan |
||||||||||||||||
 |
 |
|||||||||||||||
Crochet DROPS jacket in ”Muskat”. Size: XS - XXXL.
DROPS 136-30 |
||||||||||||||||
|
PATTERN 1 (also see diagram M.1): ROW 1: See explanation in pattern. ROW 2: 5 ch, 1 dc in middle ch on first ch-loop, 2 ch, 1 sl st in same ch, * 5 ch, 1 dc in middle ch on next ch-loop, 2 ch, 1 sl st in same ch *, repeat from *-* until 1 ch-loop remains, 5 ch, 1 dc in middle ch on last ch-loop, turn piece. Repeat 2nd row upwards. PATTERN 2 (also see diagram M.2): ROW 1: See explanation in pattern. ROW 2: 4 ch, * 5 tr in ch-loop, 1 ch, skip 2 tr, 1 tr in next tr, 1 ch, skip 2 tr *, repeat from *-* until 1 ch-loop remains, work 5 tr in this ch-loop, 1 ch and 1 tr in 3rd ch from beg of row, turn piece. ROW 3: 5 ch, 1 tr in first tr, * skip 1 tr, 1 tr in each of the next 3 tr, skip 1 tr, in next tr work 1 tr + 3 ch + 1 tr *, repeat from *-* until 5 tr remain, skip 1 tr, 1 tr in each of the next 3 tr, skip 1 tr, 1 tr + 2 ch + 1 tr in 3rd ch from beg of previous row, turn piece. ROW 4: 3 ch, 2 tr in first ch-loop, * 1 ch, skip 2 tr, 1 tr in next tr, 1 ch, skip 2 tr, in next ch-loop work 5 tr *, repeat from *-* until 5 tr remain, 1 ch, skip 2 tr, 1 tr in next tr, 1 ch, skip 2 tr, in last ch-loop work 3 tr, turn piece. ROW 5: 3 ch, skip 2 tr, *in next tr work 1 tr + 3 ch + 1 tr, skip 1 tr, 1 tr in each of the next 3 tr, skip 1 tr *, repeat from *-* until 4 tr remain, in next tr work 1 tr + 3 ch + 1 tr, skip 2 tr, 1 tr in 3rd ch from beg of previous row. Repeat rows 2 to 5. -------------------------------------------------------- JACKET: Worked back and forth from mid front. First work PATTERN 1 up to shoulder, then work PATTERN 2 from cast on edge and down. The sleeves are worked from armholes and down. Work 187-224-262-298-335 ch on hook size 4.5 mm with Muskat. Turn, work 1 dc in 2nd ch from hook, then work 1 dc in each of the next 3-5-1-2-4 ch, * skip 1 ch, work 1 dc in each of the next 6 ch *, repeat from *-* the rest of row = 160-192-224-255-287 dc. Work next row as follows: 5 ch, skip the first 2 dc, 1 dc in next dc, * 5 ch, skip 3 dc, 1 dc in next dc, 5 ch, skip 4 dc, 1 dc in next dc *, repeat from *-* until 4-0-5-0-5 dc remain. Sizes M and XXL are done. SIZE XS/S: 5 ch, skip 3 dc, 1 dc in last dc. SIZE L/XL and XXXL: 5 ch, skip 4 dc, 1 dc in last dc. Turn piece (= 35-42-49-56-63 large ch-loops + loop used when turning at beg of row). Continue PATTERN 1 (beg on 2nd row) – see explanation above! REMEMBER THE CROCHET TENSION! When piece measures approx. 12-13-14-15-16 cm, divide for armholes and finish each part separately. RIGHT FRONT PIECE: Work diagram M.1 back and forth over the first 9-11-12-14-16 large ch-loops - AT THE SAME TIME next time 3rd row in diagram is worked, dec for neck according to diagram M.3. Repeat dec until 6-7-9-10-11 large ch-loops remain on shoulder. Continue to work diagram M.1 until piece measures approx. 29-31-33-35-37 cm – work last row as follows: 5 ch, 1 dc in middle ch on first ch-loop from previous row, * 5 ch, 1 dc in middle ch on next ch-loop *, repeat from *-* the rest of row, cut the thread. LEFT FRONT PIECE: Work as right front piece but reversed. BACK PIECE: Work back and forth over the middle 17-20-25-28-31 large ch-loops. When piece measures approx. 29-31-33-35-37 cm (count so that no of ch-loops vertically on front piece is the same as on back piece), work 1 last row over 6-7-9-10-11 ch-loops in each side as on front piece (the 5-6-7-8-9 middle ch-loops = neck). EDGE AT THE BOTTOM: Work down from cast on edge as follows (beg from WS): 1 sl st in first dc, then 3 ch, skip 2 dc, in next dc work 1 tr + 3 ch + 1 tr, * skip 2 dc, work 1 tr in each of the next 3 dc, skip 2 dc, in next dc work 1 tr + 3 ch + 1 tr *, repeat from *-* until 4-4-4-3-3 dc remain, skip 3-3-3-2-2 dc and work 1 tr in last dc, turn piece. Continue PATTERN 2 (beg on 2nd row) – see explanation above! There will be a total of 20-24-28-32-36 repetitions on row. Work diagram M.2 for approx. 22 cm, finish after 2nd or 4th row in pattern. Work last row as follows: * 3 ch, skip 1 st (either 1 tr or 1 ch), 1 dc in next tr *, repeat from *-* the rest of row, cut the thread. The entire body measures approx. 52-54-56-58-60 cm vertically. ASSEMBLY: Crochet the shoulders tog as follows: * 1 dc in first large ch-loop on front piece, 2 ch, 1 dc in first large ch-loop on back piece, 2 ch *, repeat from *-* on both shoulders. SLEEVE: Worked back and forth from armhole and down. Work 1 dc in first ch-loop at the bottom of armhole, * 5 ch, skip approx. 2 cm, fasten with 1 dc *, repeat from *-* until bottom of other side of armhole, there should be 18-19-20-21-22 ch-loops in total. Turn and continue with 2ND ROW in PATTERN 1 (= 17-18-19-20-21 large ch-loops on row + ch-loop used when turning). When piece measures 2 cm, dec 1 large ch-loop at the end of next row, this is done by working until 2 large ch-loops remain, work 5 ch, skip first ch-loop and work 1 dc in middle ch on last ch-loop. Repeat dec every 4-3-3-2-2 cm (dec alternately in the right and left side) until 11-11-13-13-15 large ch-loops remain + ch-loop used when turning. When sleeve measures 24-21-18-15-13 cm (shorter measurements in the larger sizes because of broader shoulder width), work next row as follows: 5 ch, 1 dc in middle ch on first ch-loop, * 5 ch, 1 dc in middle ch on next ch-loop *, repeat from *-* the rest of row. Work next row as follows: 4 dc in every ch-loop and 3 dc in last ch-loop on row = 47-47-55-55-63 dc. Work next row as follows: 3 ch, skip the first 2 dc, in next dc work 1 tr + 3 ch + 1 tr, * skip 2 dc, work 1 tr in each of the next 3 dc, skip 2 dc, in next dc work 1 tr + 3 ch + 1 tr *, repeat from *-* until 4 dc remain, skip 3 dc and work 1 tr in last dc, turn piece. Continue PATTERN 2 (beg on 2nd row) – see explanation above! There will be a total of 6-6-7-7-8 repetitions on row. When diagram M.2 has been worked for approx. 12 cm (finish after 2nd or 4th row in pattern), work next row as follows: * 3 ch, skip 1 st (either 1 tr or 1 ch), 1 dc in next tr *, repeat from *-* the rest of row, cut the thread. ASSEMBLY: Work sleeve seams tog the same way as on shoulders. BANDS AND NECK EDGE: Work 1 dc row up along right band, around the neck and down along left band - make sure that dc row neither tightens nor widens the edges. There should be approx. 16 dc on 10 cm. Turn and work 1 row with 1 dc in every dc - when finished around the neck and beg down right front piece work as follows: 1 dc in first dc, 2 ch, skip 2 dc (= button hole), continue with dc down along the rest of front piece. Turn and work 1 dc row – work 2 dc in ch-loop. Cut and fasten the thread. Sew on button. |
||||||||||||||||
Diagram explanations |
||||||||||||||||
|
||||||||||||||||
|
||||||||||||||||

|
||||||||||||||||
Have you finished this pattern?Tag your pictures with #dropspattern #buttercupcardigan or submit them to the #dropsfan gallery. Do you need help with this pattern?You'll find 3 tutorial videos, a Comments/Questions area and more by visiting the pattern on garnstudio.com. © 1982-2025 DROPS Design A/S. We reserve all rights. This document, including all its sub-sections, has copyrights. Read more about what you can do with our patterns at the bottom of each pattern on our site. |
||||||||||||||||


With over 40 years in knitting and crochet design, DROPS Design offers one of the most extensive collections of free patterns on the internet - translated to 17 languages. As of today we count 314 catalogues and 11820 patterns translated into English (UK/cm). 11820
We work hard to bring you the best knitting and crochet have to offer, inspiration and advice as well as great quality yarns at incredible prices! Would you like to use our patterns for other than personal use? You can read what you are allowed to do in the Copyright text at the bottom of all our patterns. Happy crafting!
Post a comment to pattern DROPS 136-30
We would love to hear what you have to say about this pattern!
If you want to leave a question, please make sure you select the correct category in the form below, to speed up the answering process. Required fields are marked *.