
Popular categories
Looking for a yarn?


Comments / Questions (31)
![]() Ulla Scherer wrote:
Ulla Scherer wrote:
Hallo ! Wie strickt man die Blendenmaschen ? Strickt man nach dem Anfang von 3 cm gleich das Patentmuster?
15.02.2023 - 21:57DROPS Design answered:
Liebe Frau Scherer, die Blendenmaschen sind die ersten und letzten 7 Maschen der Reihe, die stricken Sie so am Anfang der Hin-Reihe: 1 M kraus rechts, 1 M re, 1 M li, 1 M re, 1 M li, 1 M re, 1 M li und am Ende der Rückreihe: 1 M li, 1 M re, 1 M li, 1 M re, 1 M li, 1 M re, 1 M kraus rechts (= dh wie zuvor, in Bündchen mit 1 Kantmaske krausrechts). Viel Spaß beim stricken
16.02.2023 - 11:55
![]() Christine Müller wrote:
Christine Müller wrote:
Bitte wie stricke ich 7 blendenmaschen? In der Anleitung steht 7 Blendenmaschen wie gehabt Dankeschön liebe Grüße c
03.10.2021 - 11:54
![]() Marzena wrote:
Marzena wrote:
Pięknie dziękuję. Pozdrawiam
16.02.2021 - 19:58
![]() Marzena Goszcz wrote:
Marzena Goszcz wrote:
Witam! Mam prośbę o tłumaczenie na język polski. To bardzo ładny projekt. Pozdrawiam Marzena
16.02.2021 - 00:19DROPS Design answered:
Witaj Marzeno, już się zabieram, patrz jutro na stronie :) Pozdrawiamy!
16.02.2021 - 09:21
![]() Klara Norberg wrote:
Klara Norberg wrote:
Aha... Stickas nerifrån. Botten upp! ;)
24.01.2019 - 18:57
![]() Klara Norberg wrote:
Klara Norberg wrote:
Error vid knapphålens placering. Första knapphålet görs enligt bild i början av arbetet (vid resårstickningen).
24.01.2019 - 18:29
![]() Nina wrote:
Nina wrote:
Tack!
07.11.2017 - 21:27
![]() Nina wrote:
Nina wrote:
På skissen står 38-42-46-52-58-64 och därunder 33-37-41-48-54-60. I mönstret är det bara några varv från 37 cm i storlek medium till okets början. I vänsterkant anges 58 cm ( stl M) till okets början. Förstår inte detta.
28.09.2017 - 22:21DROPS Design answered:
Hej Nina, enligt måttskissen har du 58-20=38cm i höjden till oket. Du har 37x2=74 cm i midjan och 41x2=82cm runt höften.
03.10.2017 - 11:35
![]() Céline wrote:
Céline wrote:
Bonjour, Pouvez-vous me préciser les explications de l'empiècement : le texte dit "Tricoter 1 rang env sur l'envers (avec les bordures devants comme avant), EN MÊME TEMPS, répartir 56-66-76-88-100-114 diminutions" . Les diminutions doivent-elles se faire également sur les mailles rajoutées pour les emmanchures ? Merci de votre réponse.
23.07.2015 - 15:15DROPS Design answered:
Bonjour Céline, tout à fait, on répartit ces diminutions entre les mailles des bordures des devants, sans diminuer au-dessus des ces mailles de chaque côté. Bon tricot!
27.07.2015 - 17:02Eirini Thanasoulia wrote:
Thank you for the lovely pattern! I got stuck for a while at the yoke and have come to the conclusion there is an error in the initial guidelines when it comes to the decreasing tip. It says all decreasing should be from RS whereas in the yoke description it is clearly stated you have to purl and decrease at the same time. Please inform me in case I am wrong.
04.05.2014 - 23:31
|
|
Florine#florinevest |
|
|
|
|
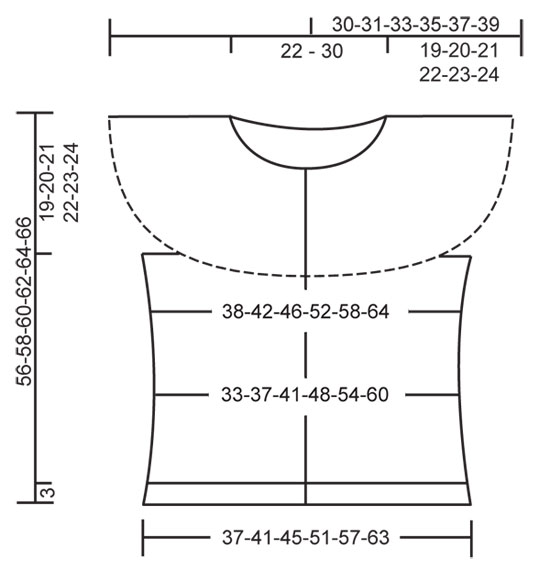
DROPS short sleeved top with yoke in English rib in ”Kid-Silk”. Size S - XXXL.
DROPS 121-11 |
|
|
GARTER ST (back and forth on needle): K all rows. DECREASING TIP: Make all dec from RS! Dec as follows after marker: slip 1 st as if to K, K1, psso. Dec as follows 2 sts before marker: K2 tog. INCREASING TIP: Make all inc from RS! Inc 1 st by picking up st from previous row, K this st. ENGLISH RIB (back and forth on needle): Row 1: 7 front band sts as before, * K1, 1 YO, slip 1 st as if to P *, repeat from *-* until 8 sts remain, finish with K1 and 7 front band sts as before. Row 2: 7 front band sts as before, * 1 YO, slip 1 st as if to P, K tog YO and slipped st *, repeat from *-* until 8 sts remain, finish with 1 YO, slip 1 st as if to P and 7 front band sts as before. Row 3: 7 front band sts as before, * K tog YO and slipped st, 1 YO, slip 1 st as if to P *, repeat from *-* until 9 sts remain, K tog YO and slipped st, 7 front band sts as before. Repeat Row 2 and 3. SHORTENED ROWS: To avoid the front band stretching on yoke when working English rib work shortened rows each side as follows: * beg from RS and work 3 rows English rib on all sts, turn piece. Work English rib until 7 front band sts remain, turn piece and work English rib until 7 front band sts remain the other side – NOTE: when turning mid piece tighten first st when continuing to avoid a hole. Turn piece, work all sts (including front band) *, repeat from *-* along yoke until English rib is finished. Continue back and forth on all sts left. BUTTONHOLES: Make buttonholes on right front band. 1 BUTTONHOLE = P tog 3rd and 4th st from the edge and make 1 YO. Make buttonholes when piece measures approx: SIZE S: 37, 46 and 55 cm. SIZE M: 38, 47 and 56 cm. SIZE L: 39, 49 and 59 cm. SIZE XL: 40, 50 and 60 cm. SIZE XXL: 41, 52 and 63 cm. SIZE XXXL: 42, 53 and 64 cm. I.e. the bottom buttonhole is in transition between stocking st and English rib, and the top one 1-2 cm before finished measurements. -------------------------------------------------------- TOP: Worked back and forth on circular needle. BODY PIECE: LOOSELY cast on 125-137-149-167-185-203 sts (includes 7 front band sts each side towards front edge) on circular needle size 6 mm with 2 strands Kid-Silk. Work rib (K1/P1) with 1 edge st in GARTER ST - see above - and K1 each side towards front edge (row 1 = RS). When rib measures 3 cm insert 4 markers in piece as follows: marker-1 after 19-20-22-22-23-24 sts, marker-2 after new 32-36-38-47-54-61 sts, marker-3 after new 23-25-29-29-31-33 sts, marker-4 after new 32-36-38-47-54-61 sts (= 19-20-22-22-23-24 sts left after the last marker). Continue in stocking st with 7 front band sts each side in rib as before. REMEMBER THE KNITTING TENSION! When piece measures 6-6-6-9-9-9 cm dec 1 st before marker-1 and -3 and 1 st after marker-2 and -4 (= 4 dec sts) – See DECREASING TIP! Repeat the dec on every 6-6-6-9-9-9 cm a total of 3-3-3-2-2-2 times = 113-125-137-159-177-195 sts. When piece measures 24-24-25-26-26-26 cm inc 1 st before marker-1 and -3 and 1 st after marker-2 and -4 (= 4 inc sts) – See INCREASING TIP! Repeat the inc on every 3-3.5-3.5-5-5-6 cm a total of 4-4-4-3-3-3 times = 129-141-153-171-189-207 sts. Now insert 2 new markers 36-39-42-46-51-55 sts in from each side (= 57-63-69-79-87-97 sts between markers on back piece). When piece measures approx 36-37-38-39-40-41 cm – adjust so that next row is from WS – K 2 rows on the middle 12-12-12-14-14-14 sts each side (i.e. 6-6-6-7-7-7 sts each side of both markers – work remaining sts as before). On next row (= WS) cast off the middle 6-6-6-8-8-8 sts each side for armhole – NOTE: K the 3 sts each side of the 6-6-6-8-8-8 cast off sts from WS. There are now 33-36-39-42-47-51 sts left on each front piece and 51-57-63-71-79-89 sts on back piece. YOKE: Work next row as follows from RS: Work 33-36-39-42-47-51 sts as before (= front piece), cast on 40-42-45-48-51-54 new sts over the 6-6-6-8-8-8 cast off sts (= over armhole), work 51-57-63-71-79-89 sts (= back piece), cast on 40-42-45-48-51-54 new sts over the 6-6-6-8-8-8 cast off sts (= over armhole) and work the remaining 33-36-39-42-47-51 sts = 197-213-231-251-275-299 sts. P 1 row from WS (front bands as before) AT THE SAME TIME dec 56-66-76-88-100-114 sts evenly – NOTE: do not dec on front bands = 141-147-155-163-175-185 sts. READ ALL OF THE FOLLOWING SECTION BEFORE CONTINUING! Continue in ENGLISH RIB - see above - with 7 front band sts in rib each side as before (row 1 = RS). REMEMBER BUTTONHOLES ON RIGHT FRONT BAND - see above. AT THE SAME work SHORTENED ROWS - see above. When yoke measures 17-18-19-20-21-22 cm work rib, K1/P1, on all sts (instead of English rib) with 1 edge st each side in garter st – NOTE: I.e. on row 1 K tog YO and slipped st (= K1), P next st. When yoke measures approx 19-20-21-22-23-24 cm work next row as follows from RS: 7 front band sts as before, * K2 tog into back of loop, P2 tog *, repeat from *-* until 8 sts remain and finish with K1 and 7 front band sts as before = 78-81-85-89-95-100 sts. On next row cast off with K over K and P over P, top measures approx 56-58-60-62-64-66 cm up to shoulder. Sew on buttons. |
|
|
|
Have you finished this pattern?Tag your pictures with #dropspattern #florinevest or submit them to the #dropsfan gallery. Do you need help with this pattern?You'll find 19 tutorial videos, a Comments/Questions area and more by visiting the pattern on garnstudio.com. © 1982-2025 DROPS Design A/S. We reserve all rights. This document, including all its sub-sections, has copyrights. Read more about what you can do with our patterns at the bottom of each pattern on our site. |


With over 40 years in knitting and crochet design, DROPS Design offers one of the most extensive collections of free patterns on the internet - translated to 17 languages. As of today we count 314 catalogues and 11820 patterns translated into English (UK/cm). 11820
We work hard to bring you the best knitting and crochet have to offer, inspiration and advice as well as great quality yarns at incredible prices! Would you like to use our patterns for other than personal use? You can read what you are allowed to do in the Copyright text at the bottom of all our patterns. Happy crafting!
Post a comment to pattern DROPS 121-11
We would love to hear what you have to say about this pattern!
If you want to leave a question, please make sure you select the correct category in the form below, to speed up the answering process. Required fields are marked *.