
Popular categories
Looking for a yarn?


Comments / Questions (164)
![]() Johanna wrote:
Johanna wrote:
Hej! förstår inte riktigt hur jag ska tolka denna sista del av beskrivningen. Har stickat 10 cm och ökat 9 ggr per varv. hur tolkar jag detta - Upprepa minskningen på varje v från rätsidan totalt 46-52-58 ggr men när alla ökningar till ärmkant är färdiga (arb mäter ca 10-11-12 cm på höjden) avslutas det med 1 v på avigsidan. Med vänlig hälsning Johanna
12.01.2014 - 20:28DROPS Design answered:
Hej Johanna. Du skal först strikke BAKST og FRAMST. Naar du saetter alle m in paa samme rundpind og strikker videre fortsaetter du med minskningen som för. Saa noter hvor mange du har minskat paa bak- og framst og fortsaet herefter paa samme maade.
15.01.2014 - 15:48
![]() Gea Bobeldijk wrote:
Gea Bobeldijk wrote:
Ik vind de hoeveelheid benodigde wol die wordt opgegegeven nogal weinig? Ik heb nu 1 bol Symphonie gebreid en nog maar 7 cm hoogte. Lukt het dan wel om met 650 gram Symphonie deze poncho te breien in maat L?
08.01.2014 - 06:17DROPS Design answered:
Hoi Gea. De aangegeven hoeveelheid zou moeten kloppen, we hebben nog niet eerder reacties gehad op dit model. Controleer eventueel dat de stekenverhouding klopt en kom je niet uit aan het eind van het patroon, dan laat het aan ons weten. Veel breiplezier.
08.01.2014 - 10:48
![]() Evi wrote:
Evi wrote:
When the pattern says "put aside" (back) does that mean that you take the stitches off and place them on scrap yarn until the front is finished? Then place both on a circular needle? Thank you so much.
10.12.2013 - 22:26DROPS Design answered:
Dear Evi, you are correct, you put sts from back piece on a thread, work front piece separately the same way and put all sts all together and work in the round. Happy knitting!
11.12.2013 - 09:12
![]() Mebe wrote:
Mebe wrote:
Hei! Aivan ihana poncho-malli! Olen kutonut jo kaksi ja kolmas menossa! Superkiva kutoa ja hyvät ohjeet!!
02.12.2013 - 11:08
![]() Mireille wrote:
Mireille wrote:
J'ai fait ce modèle avec 2 fils d'alpaga et une aig circ n° 5. Il est super beau mais les diminutions sont trop rapides et la ligne formée par ces dim. n'arrive pas jusqu'en haut. C'est dommage, il faudrait indiquer de diminuer seulement tous les 3 rgs au lieu de tous les rgs. Merci, j'aime beaucoup votre site et le conseille à toutes mes amies qui tricotent.
27.11.2013 - 12:06DROPS Design answered:
Bonjour Mireille et merci. Aviez-vous bien la bonne tension en largeur/hauteur ? Les diminutions se font tous les rangs sur l'endroit, c'est-à-dire tous les 2 rangs puis quand on tricote en rond tous les 6 tours (tous les 3 cm environ). Bon tricot!
27.11.2013 - 14:20
![]() Sandra wrote:
Sandra wrote:
Nog een vraagje mbt het minderen vd steken midden voor en achter. Wanneer alle steken op de rondbreinaald staan moeten de minderingen dan niet om de naald gedaan worden ipv elke naald? Ben nu op 32cm hoogte en per pand nog maar 104 steken staan. Heb ik niet teveel geminderd?
15.11.2013 - 08:52DROPS Design answered:
Hoi Sandra. Nee, je moet doorgaan met minderen in elke 2e nld of dan gaat de minderingen te snel.
15.11.2013 - 15:52
![]() Sandra wrote:
Sandra wrote:
Klopt het dat als voor en achterpand op de rondbreinaald staan, je elk naald recht in de rondte breit? Moet nu nog 19 cm breien en heb per pand nog 108 steken staan. Heb aan de zijkanten 7 x geminderd. Bij voorbaat dank voor de hulp
12.11.2013 - 21:36DROPS Design answered:
Hoi Sandra. Ja, brei je tricotsteken in de rondte dan brei je elke nld recht. Veel breiplezier verder
13.11.2013 - 15:06
![]() Tove Carlsson wrote:
Tove Carlsson wrote:
Finnes det et garn som ikke er pusete som kan brukes til denne. ett lett garn?
12.11.2013 - 12:11DROPS Design answered:
Hej Tove. Du kan erstatte Symphony med Verdi eller Vienna. Eller du kan pröve 2 traader af et garn fra gruppe B eller 3 traader af et garn fra gruppe A. Se her: https://www.garnstudio.com/lang/no/visgarn_oversikt_alt.php Og tag om muligt hen i din garnbutik for mere information og se garnerne.
12.11.2013 - 12:44
![]() Malene wrote:
Malene wrote:
Mine indtagninger midt for og midt bag ser anderledes ud end på modellen, Jeg får en bred kant foran og bagved
03.11.2013 - 19:41DROPS Design answered:
Hvis du følger indtagningstipset får du 2 m midt foran + de to m på hver side som du tager ind i hver gang. Det er sådan vi har gjort i ospkriften. Men hvis du vil have den mindre kan du strikke efter INDTAGNINGSTIPS 2 :)
04.11.2013 - 11:55Злата wrote:
Please can anyone explain why at the pattern picture at the Decease middle part is not shown the DECREASING TIP 1 (applies to mid front and mid back) -- i got 4 st stripe ...instead DECREASING TIP 2 (applies to the side)so i can get the 2 st stripe like the picture...
01.10.2013 - 05:53DROPS Design answered:
Dear Злата, you can choose to work dec 1 instead of dec 2 if you prefer it that way. It's up to you. You can see different way to make this poncho on Ravelry. Happy knitting!
01.10.2013 - 20:58
|
|
Hometown |
|
 |
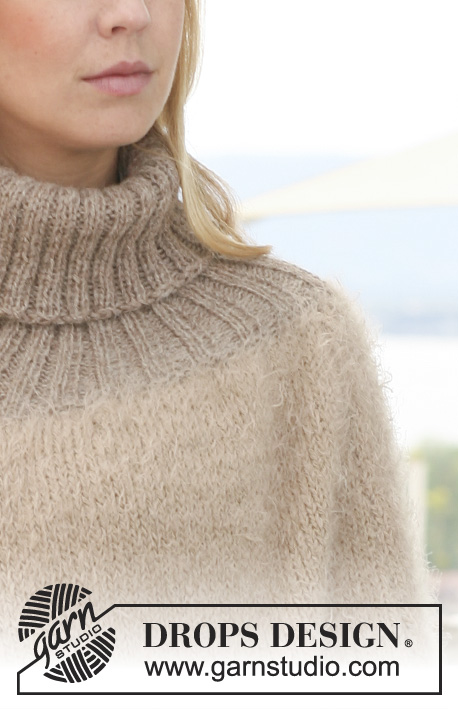 |
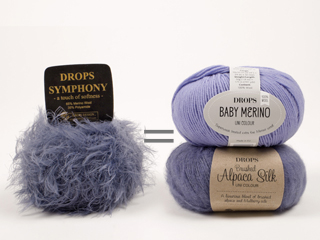
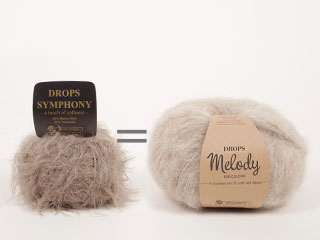
Knitted DROPS poncho in 1 thread ”Symphony”, 1 thread "Melody" or 1 thread "Brushed Alpaca Silk" + 1 thread "Alpaca" with rib in ”Alpaca”. Size S to XXXL.
DROPS 123-28 |
|
|
GARTER ST (back and forth on needle): K all rows. DECREASING TIP 1 (applies to mid front and mid back): Dec from RS each side of 2 sts. Dec as follows 3 sts BEFORE marker: K2 tog, K1. Dec as follows AFTER marker: K1, slip 1 st as if to K, K1, psso. DECREASING TIP 2 (applies to the side): Dec by K2 tog before marker and K2 tog into back of loop after marker. -------------------------------------------------------- PONCHO: Worked in 2 parts, then parts are put tog and piece completed in the round on all sts. Arrows in diagram show the knitting direction. BACK PIECE: Worked back and forth on circular needle from the bottom edge up. Cast on 162-180-198 sts on circular needle size 6 mm with 1 thread Symphony, 1 tread Melody or 1 thread Brushed Alpaca Silk + 1 thread Alpaca. Work 4 rows GARTER ST - see above! Insert a marker in the middle of piece, i.e. after 81-90-99 sts. READ ALL OF THE FOLLOWING SECTION BEFORE CONTINUING: REMEMBER THE KNITTING TENSION! Continue in stocking st, AT THE SAME TIME cast on 2 new sts at the end of the next 2 rows for sleeve edges. Repeat the inc at the end of every row a total of 9-10-11 times each side (= 18-20-22 inc sts for sleeve edge each side). AT THE SAME TIME when piece measures 3 cm dec 1 st each side of marker – See DECREASING TIP 1! Repeat the dec on every row from RS a total of 46-52-58 times, and when all inc for sleeve edges are complete (piece measures approx 10-11-12 cm) finish with 1 row from WS. Put piece aside. FRONT PIECE: Like back piece. PONCHO: Slip all sts on the same circular needle and continue in the round. Insert 1 marker at beg of round and 1 after half the sts (to mark the sides). Continue to dec mid front and mid back as before. AT THE SAME TIME when piece measures 12-12-13 cm dec 1 st each side of marker each side – See DECREASING TIP 2! Repeat the dec at the sides on every 6th round (every 3 cm) a total of 13-15-17 times (= until finished measurements). After all dec are complete there are 160-172-184 sts left on needle. Continue until piece measures 51-57-63 cm. NECK: Change to circular needle size 4 mm and 2 strands Alpaca. K 1 round, AT THE SAME TIME K2 tog across the round = 80-86-92 sts. P 1 round and K 1 round, AT THE SAME TIME inc 20-22-24 sts evenly = 100-108-116 sts. Now continue in rib, K2/P2, on all sts. When rib measures 28 cm cast off LOOSELY with K over K and P over P. SLEEVE EDGES: Worked in the round. Sew the garter st at the bottom of back and front piece tog with a couple of sts each side (sleeve edge now has a circumference of approx 24-26-30 cm). Pick up 44-48-52 sts round sleeve edge on double pointed needles size 4 mm with 2 strands Alpaca. P 1 round and continue in rib, K2/P2, on all sts. When rib measures 12 cm cast off with K over K and P over P. |
|

|
|
Have you finished this pattern?Tag your pictures with #dropspattern or submit them to the #dropsfan gallery. Do you need help with this pattern?You'll find 18 tutorial videos, a Comments/Questions area and more by visiting the pattern on garnstudio.com. © 1982-2025 DROPS Design A/S. We reserve all rights. This document, including all its sub-sections, has copyrights. Read more about what you can do with our patterns at the bottom of each pattern on our site. |
|


With over 40 years in knitting and crochet design, DROPS Design offers one of the most extensive collections of free patterns on the internet - translated to 17 languages. As of today we count 314 catalogues and 11821 patterns translated into English (UK/cm). 11821
We work hard to bring you the best knitting and crochet have to offer, inspiration and advice as well as great quality yarns at incredible prices! Would you like to use our patterns for other than personal use? You can read what you are allowed to do in the Copyright text at the bottom of all our patterns. Happy crafting!
Post a comment to pattern DROPS 123-28
We would love to hear what you have to say about this pattern!
If you want to leave a question, please make sure you select the correct category in the form below, to speed up the answering process. Required fields are marked *.