
Popular categories
Looking for a yarn?


Comments / Questions (35)
![]() Raluca wrote:
Raluca wrote:
Hello, I cannot figure out how I should do the increases for the armholes. If I do the increases on 6 rows the armholes are asymmetric, because I start increasing for one armhole, and on the next row I increase for the other armhole. So there is a lag of one row between the increases which makes the armholes asymmetric. Is this how it is supposed to be?
08.05.2013 - 14:30DROPS Design answered:
Dear Raluca, you inc for the armholes at the end of each row, every row, each side so that you will have increased both sides (=RS rows as well as WS rows to have the correct number of sts). Happy crocheting!
08.05.2013 - 14:37
![]() Gro wrote:
Gro wrote:
Stemmer garnmengdene her? Det er samme mengde fra nyfødt størrelse og den største barnestørrelsen...
07.05.2013 - 08:11DROPS Design answered:
Heisann. Garnmengden på denne modellen skal stemme. Om heklefastheten stemmer brukes det litt mer enn et nøste i de minste størrelsene og begge nøstene i de største størrelsene. mvh Drops design
10.05.2013 - 07:08
![]() Rowena wrote:
Rowena wrote:
Goedemiddag. Er staat bij de meeste vestjes "haak als linker voorkantkant, maar dan in spiegelbeeld". Dat lijkt mij erg lastig zonder patroon. Of kun je ook 2x de linkervoorkant haken en eentje ervan omdraaien?? Uiteraard die drie L van de knoopsgaten vervangen door een stokje. Of is dit niet mogelijk, het omdraaien van één voorpand??
02.01.2013 - 13:11DROPS Design answered:
Het is niet zo moeilijk als het lijkt. Je kan het zien als volgt (voorbeeld van dit patroon) Voor het rechter voorpand meerder je aan het begin van de toer (voor de hals) maar voor het linker voorpand meerder je aan het eind van de toer. Ik zou niet 2x het linker voorpand haken en dan omdraaien. Ik heb zelf duidelijk een goede/verkeerde kant als ik haak, dus de panden zouden niet gelijk worden als ik één omdraai.
05.01.2013 - 16:08Nathalie wrote:
Bonjour, Je ne comprends pas comment faire les augmentation après le 4ème rang : à 5 cm, il est demandé d'augmenter de chaque côté et à tous les rangs 1x1B, 1x2B et 1x4B. Puis de continuer jusqu'à 11 cm (=1 cm après la dernière augmentation). Sauf que après les augmentations, je n'ai pas 10 cm de hauteur. Dois-je laisser des rangs sans augmentation pour arriver à 10 cm ?
19.09.2012 - 13:02DROPS Design answered:
Bonjour Nathalie, après les augmentations, vous continuez "droit" (=sans augmenter) jusqu'à 11 cm puis vous mettez en attente et crochetez les devants. Bon crochet !
19.09.2012 - 14:43
![]() Mina wrote:
Mina wrote:
Skjønner ikke ermhull økingen. Etter 7 cm skal mn starte økingen. Økingen består av 3 rader (1,2 og 4 staversøkning på hver side). Etter det skal man hekle 1 cm abeidet skal totalt måle 13 cm 13-7= 6 cm. Minus 1cm til pga den etter økingen. Da sitter igjen med 5cm som skal være det samme som de tre radene med økning. (5/3=1,66cm per rad) Og dette stemmer ikke overens med hekle fastheten. (10/12 =0,83 cm per rad)
17.06.2012 - 17:01DROPS Design answered:
Opskriften stemmer. Du øker slut på hver rad 3 gange i hver side = 6 rader i alt.
28.12.2012 - 11:09
|
|
Sweet Buttercup Vest#sweetbuttercupvest |
|
|
|
|
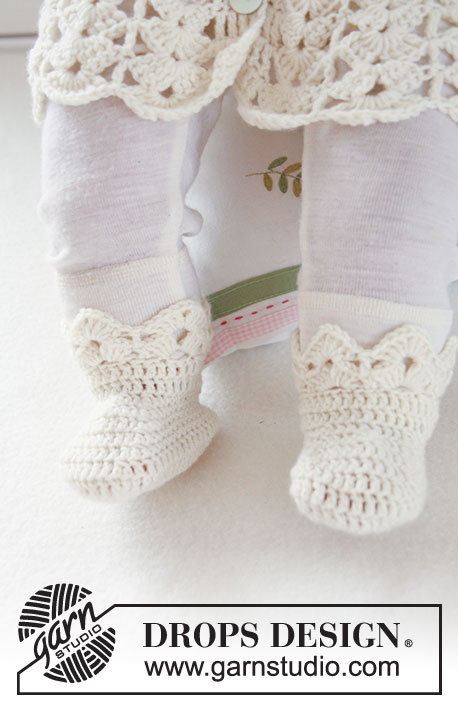
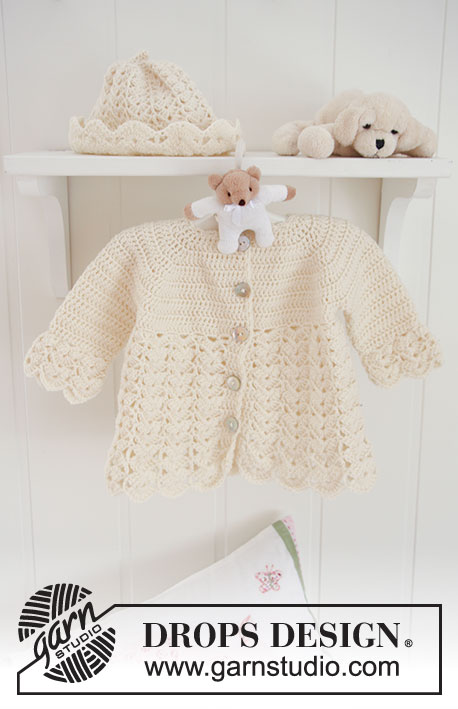
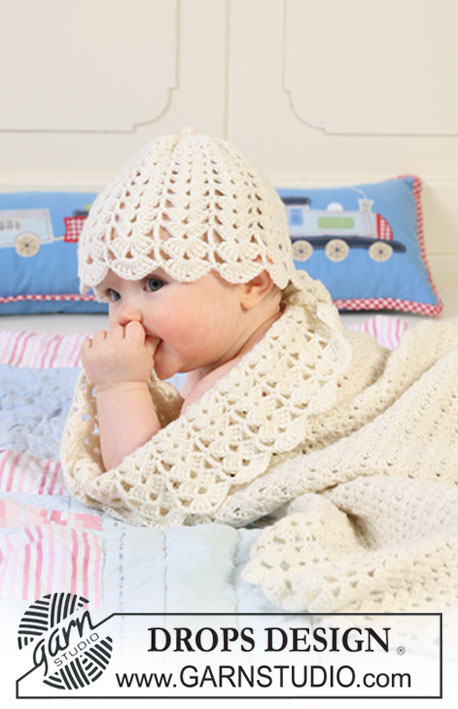
Crochet waistcoat with fan pattern for baby and children in DROPS BabyMerino
DROPS Baby 19-7 |
|
|
WAISTCOAT: CROCHET INFO: Replace first tr on each row with 3 ch. Finish each row with 1 tr in 3rd ch from beg of previous row. INCREASING TIP-1 (applies to armhole and neckline): When inc more than 1 tr crochet the same number of ch as tr to be inc + 2 extra ch at the end of the row, turn piece and crochet 1 tr in 4th ch from hook (= 2 tr), then crochet 1 tr in each of the remaining ch. Continue as before. INCREASING TIP-2: Inc 1 tr by working 2 tr in the same tr. BUTTONHOLES: Make buttonholes on right front band. 1 BUTTONHOLE = replace 3rd tr from mid front with 1 ch. On next row crochet 1 tr in this ch. Make buttonholes when piece measures (measured from shoulder, the first buttonhole should be approx 1 cm after the last inc for neck): SIZE 1/3 MONTHS: 8, 11 and 14 cm. SIZE 6/9 MONTHS: 9, 12 and 15 cm. SIZE 12/18 MONTHS: 9, 13 and 17 cm. SIZE 2 YEARS: 10, 14 and 18 cm. SIZE 3/4 YEARS: 11, 15 and 19 cm. --------------------------------------------------------- --------------------------------------------------------- Back piece and both front pieces are crochet separately from shoulder and down to below the armholes. Now pieces are sewn tog and the body piece is worked in one piece back and forth from mid front in fan pattern. RIGHT SHOULDER BACK PIECE: Crochet 10-12-14 (16-18) LOOSE ch with crochet hook size 3.5 mm with Baby Merino. ROW 1: Crochet 1 tr in 4th ch from hook, then 1 tr in each ch = 8-10-12 (14-16) tr on row, turn piece. ROW 2: See CROCHET INFO! Now crochet 1 tr in each tr, AT THE SAME TIME inc 2 tr towards neckline – See INCREASING TIP-1 = 10-12-14 (16-18) tr, turn piece. Put piece aside and crochet left shoulder in the same way, turn piece. ROW 3: Crochet 1 tr in each tr on left shoulder, then 10-12-14 (16-18) ch (= neckline back), then 1 tr in each tr on right shoulder, turn piece. ROW 4: Crochet 1 tr in each tr and 1 tr in each ch on neckline = 30-36-42 (48-54) tr on row. Continue with tr on back piece. AT THE SAME TIME when piece measures 5-6-7 (8-9) cm inc for armhole each side at the end of every row as follows – See INCREASING TIP-1: 1 tr 1 time, 2 tr 1 time and 4 tr 1 time = 44-50-56 (62-68) tr on row. When back piece measures 11-12-13 (14-15) cm (= 1 cm after the last inc), put piece aside and crochet the front pieces. RIGHT FRONT PIECE: Crochet 10-12-14 (16-18) LOOSE ch with crochet hook size 3.5 mm with Baby Merino. ROW 1: Crochet 1 tr in 4th ch from hook, then 1 tr in each ch = 8-10-12 (14-16) tr, turn piece. Now crochet 1 tr in each tr. When piece measures 2-3-2 (3-3) cm inc 1 tr towards mid front for neckline – See INCREASING TIP-2. Repeat the inc on every row a total of 5-5-6 (6-7) times, then inc 6-7-7 (8-8) tr 1 time. AT THE SAME TIME when piece measures 5-6-7 (8-9) cm inc for armhole at the side as described for back piece – remember buttonholes on front band – SEE ABOVE. When all inc are complete there are 26-29-32 (35-38) tr on row. When piece measures 11-12-13 (14-15) cm – adjust length to back piece - put piece aside and crochet left front piece. LEFT FRONT PIECE: Crochet like right front piece but mirrored – NOTE: Do not make buttonholes! ASSEMBLY: Sew shoulder seams edge to edge with neat sts. Sew side seams edge to edge – there are now 96-108-120 (132-144) tr on row. FAN PATTERN: Continue back and forth for body piece from mid front as follows: ROW 1: Crochet 1 tr in each tr, AT THE SAME TIME inc 8 tr evenly (do not inc on 4 tr each side towards mid front = front bands) = 104-116-128 (140-152) tr on row. ROW 2: 3 ch, 1 tr in each of the next 3 tr (= front band), * 2 ch, skip approx 2 tr, 1 dc in next tr *, repeat from *-* so that you will have 30-34-38 (42-46) ch-loops and 6 or 7 tr remain, crochet 2 ch and finish with 1 tr in each of the last 4 tr on row (= front band), turn piece. There are now 31-35-39 (43-47) ch-loops with 4 tr each side for front band. ROW 3: 3 ch, 1 tr in each of the next 3 tr, skip first ch-loop, * 4 tr + 2 ch + 4 tr in next ch-loop, 1 tr in next ch-loop *, repeat from *-* until 2 ch-loops remain, crochet 4 tr + 2 ch + 4 tr in next ch-loop, skip last ch-loop and finish with 1 tr in each of the 4 tr on front band = 15-17-19 (21-23) fans with 4 tr each side towards mid front, turn piece. ROW 4: 3 ch, 1 tr in each of the next 3 tr, * 4 tr + 2 ch + 4 tr in the middle of the next tr-group (i.e. in ch-loop in the tr-group), 1 tr in tr from previous row *, repeat from *-* until 1 tr-group remain, 4 tr + 2 ch + 4 tr in the middle of this tr-group and finish with 1 tr in each of the 4 tr on front band, turn piece. Now repeat row 4 until piece measures approx 18-20-23 (23-25) cm from shoulder. CROCHET NEXT ROW AS FOLLOWS: 4 ch, 1 dtr in each of the next 3 tr, * 4 dtr + 2 ch + 4 dtr in the middle of next tr-group, 1 dtr in tr from previous row *, repeat from *-* until 1 tr-group remain, 4 dtr + 2 ch + 4 dtr in the middle of this tr-group and finish with 1 dtr in each of the 4 tr on front band, turn piece. Repeat this row until piece measures approx 23-25-28 (30-32) cm from shoulder. Cut and fasten threads. CROCHET BORDER: Crochet a border along the opening with crochet hook size 3.5 mm with Baby Merino as follows – beg at the bottom of right front piece and crochet up along front piece and neckline on front piece: * 3 ch, skip approx 1 cm, 1 dc in next st *, repeat from *-* up to the shoulder seam, * skip approx 2 cm, 3 tr + 2 ch + 3 tr in next st, skip approx 2 cm, 1 dc in next st *, repeat from *-* along neckline on back piece to the other shoulder seam, * 3 ch, skip approx 1 cm, 1 dc in next st *, repeat from *-* along neckline and front band on left front piece. ARMHOLE: Crochet 1 dc in first st, * skip approx 2 cm, 3 tr + 2 ch + 3 tr in next st, skip approx 2 cm, 1 dc in next st *, repeat from *-* and finish with 1 sl st in first st from beg of round. ASSEMBLY: Sew on buttons. |
|

|
|
Have you finished this pattern?Tag your pictures with #dropspattern #sweetbuttercupvest or submit them to the #dropsfan gallery. Do you need help with this pattern?You'll find 6 tutorial videos, a Comments/Questions area and more by visiting the pattern on garnstudio.com. © 1982-2025 DROPS Design A/S. We reserve all rights. This document, including all its sub-sections, has copyrights. Read more about what you can do with our patterns at the bottom of each pattern on our site. |


With over 40 years in knitting and crochet design, DROPS Design offers one of the most extensive collections of free patterns on the internet - translated to 17 languages. As of today we count 314 catalogues and 11820 patterns translated into English (UK/cm). 11820
We work hard to bring you the best knitting and crochet have to offer, inspiration and advice as well as great quality yarns at incredible prices! Would you like to use our patterns for other than personal use? You can read what you are allowed to do in the Copyright text at the bottom of all our patterns. Happy crafting!
Post a comment to pattern DROPS Baby 19-7
We would love to hear what you have to say about this pattern!
If you want to leave a question, please make sure you select the correct category in the form below, to speed up the answering process. Required fields are marked *.