
Populära kategorier
Letar du efter ett garn?


Kommentarer / Frågor (50)
![]() Niva skrev:
Niva skrev:
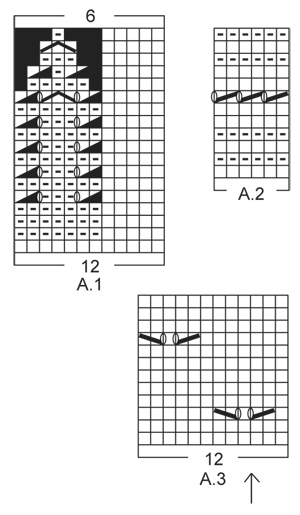
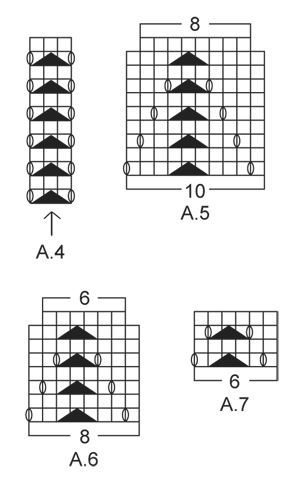
Must admit this is the most confusing pattern I’ve ever tried and I’m an accomplished knitter. I’ve read it so many times to work it out and I’m almost there. Does the A4 pattern stop after the 12 rows in the graph?
08.04.2021 - 04:33DROPS Design svarede:
Dear Niva, A.4 will be repeated in height until all decreases for raglan are done. Happy knitting!
08.04.2021 - 07:51
![]() Nova skrev:
Nova skrev:
At the beginning of the A4 graph is the YO between the last stitch on the body and the first stitch on the sleeve?
07.04.2021 - 13:43DROPS Design svarede:
Dear Nova, the stitch with the arrow in A.4 should be the one with the marker at the transitions, so that you will have 1 yarn over, the double decrease with marker in the middle stitch, 1 yarn over; this means there will be one hole (yarn over) on body and on sleeve. Happy knitting!
07.04.2021 - 14:26
![]() Nova skrev:
Nova skrev:
After attaching the sleeves for size L and beginning middle back for the first round, it says to start on the same row for the sleeve as for the body. Does this mean if I’m on row 4 on the body (A1) that I start on row 4 for the sleeves (A3)? Also A1 the arrow designates the middle of the sleeve but the graph starts with A4 which is 3 stitches and A3 is another 3 sts total 6 sts wouldn't the middle be half of 68 sts which is 34 sts?
06.04.2021 - 14:03DROPS Design svarede:
Dear Nova, you should finish the sleeves 8adjust its length) so you will end up in the same row if the pattern as on the body, so you can continue the pattern without disrupting it. The arrow should match the middle of the sleeves, the upper middle line, put the stitch marked there, and count outwards to find out where you should start. Happy Knitting!
06.04.2021 - 14:26
![]() Nova skrev:
Nova skrev:
This is becoming a real challenge but I’m not going to give up! I am attaching the sleeves to the body but notice you don’t mention double pointed needles in your materials needed for this project. How are you supposed to knit these sleeves together with the body without them? It won’t work.
25.03.2021 - 01:52DROPS Design svarede:
Dear Nova, when you have knitted the sleeves, you put all the stitches on one curcular needle, (back, sleeve, fron, sleeve), and knot the circular needle on the round. You don't knit "together" as a three needle bind off, but along with the body, in one big circle, that is getting decreased as you get to the neckline. Happy Knitting!
25.03.2021 - 02:26
![]() Nova skrev:
Nova skrev:
Hi again. I’m up to the yoke and I’m really confused about this section of the pattern. The fact that there are 3 graphs to be worked is a challenge in itself. The confusion is in the A4 graph between the body and the sleeves, does this have to do with the shaping of the raglan?
09.03.2021 - 13:31DROPS Design svarede:
Dear Nova, pattern A.4 is between each body and sleeve, right at the raglan line. Shaping happens before and after this pattern. Happy Knitting!
09.03.2021 - 13:57
![]() Nova skrev:
Nova skrev:
When you get to the side where the first increases have been worked you have two extra stitches so to keep the eyelet pattern uniform, the space between the next eyelet is 9 stitches and that throws the whole eyelet pattern out. I don’t know how you can keep the eyelet pattern 7 stitches between with these increases on the side. The new repeat would make more sense at the beginning of the round.
26.02.2021 - 23:15DROPS Design svarede:
See answer below - if you can't work a part of decrease (K2 tog, YO), over the new stitches, just work these stitches in stocking stitch without the lace pattern. You shoulud have the correct number of sts between each eyelet in width. Hope this will help. Happy knitting!
01.03.2021 - 08:00
![]() Nova skrev:
Nova skrev:
The beginning of the round the increases can be worked out but it’s the increases halfway on the side marker those stitches throw the whole eyelet pattern out. You can’t do 7 stitches between the pattern it doesn’t work out I’ve tried it
26.02.2021 - 22:52DROPS Design svarede:
Dear Nova, if you don't have enough stitches to work the whole lace pattern on the side, this means there are not enough stitches yet, just work these stitches in stocking stitch. Work the lace pattern over the new stitches only if you have enough stitches to work them. This means each lace pattern should be worked with 7 knit stitches in between. Happy knitting!
01.03.2021 - 07:58
![]() Nova skrev:
Nova skrev:
Are you saying to read the graph from left to right and then right to left alternately and the added stitches will work out with the eyelet pattern?
26.02.2021 - 16:33DROPS Design svarede:
Hi Nova, when working in the round all rounds are worked from the right side, and the diagram is read solely from right to left. When starting a new round, simply start working the first symbol on the next row in diagram. Happy knitting!
28.02.2021 - 21:14
![]() Nova skrev:
Nova skrev:
For example on the 3rd round after the first increases there are 4 stitches left at the end of the round and I’m not sure whether to knit those stitches as normal or do the pattern.
26.02.2021 - 15:19DROPS Design svarede:
Dear Nova, see previous answer, make always sure that the eyelet pattern fit in height, it shouldn't be displaced. Happy knitting!
26.02.2021 - 16:17
![]() Nova skrev:
Nova skrev:
When doing the body and the A3 and making the increases on either side of the markers I notice that those extra stitches will throw the alternate pattern out where the holes should be. Is that how it’s supposed to be?
26.02.2021 - 15:08DROPS Design svarede:
Dear Nova, the increased stitches should be worked in A.3, this means at the beg of A.3 work the new stitches as a new repeat reading diagram from the left towards the right (= there should be always 7 sts before the next K2 tog, YO in the lace pattern. And at the end of A.3, work the new stitches as a new repeat of A.3 (reading from the right towards the left). Hope this will help. Happy knitting!
26.02.2021 - 16:16
|
||||||||||||||||||||||||||||
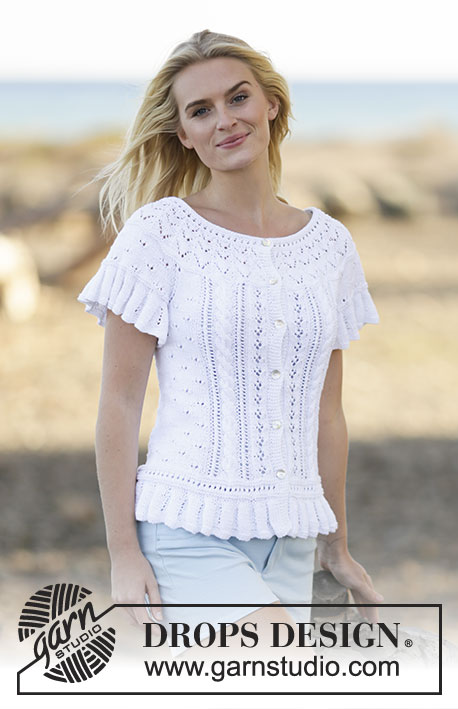
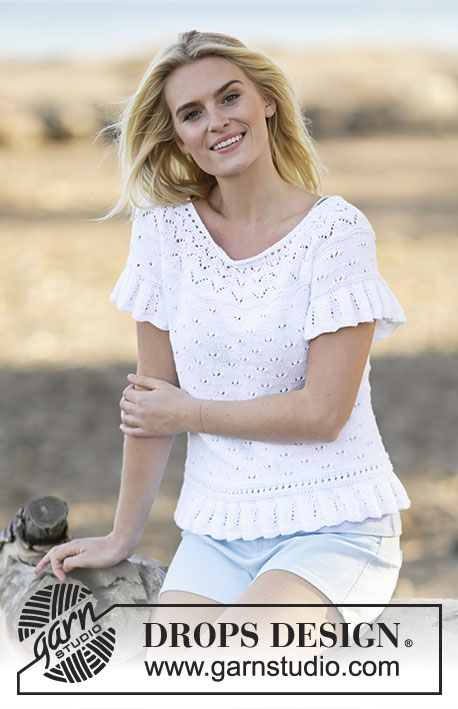
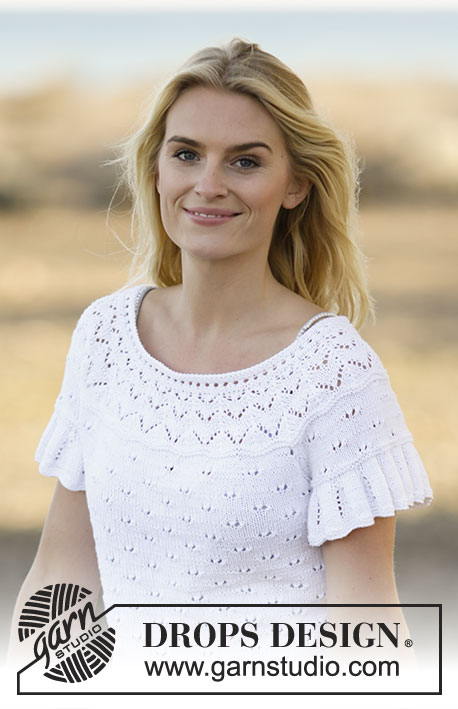
White Romance#whiteromancetop |
||||||||||||||||||||||||||||
 |
 |
|||||||||||||||||||||||||||
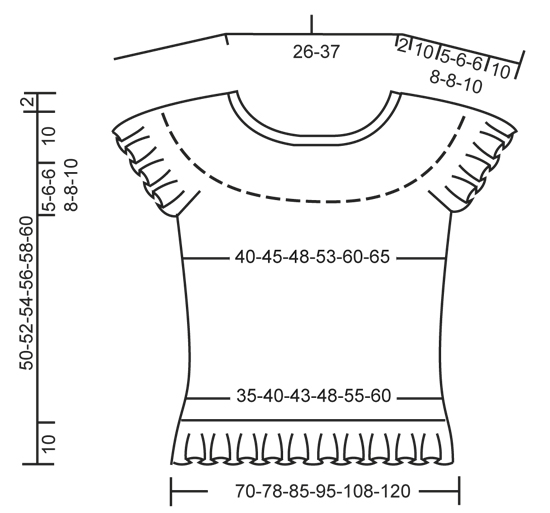
Stickad DROPS topp i ”Safran” med hålmönster, korta ärmar och runt ok. Stl S - XXXL.
DROPS 159-12 |
||||||||||||||||||||||||||||
|
RÄTST (runt på rundst): *1 v rätt och 1 v avigt*, upprepa *-*. MÖNSTER: Se diag A.1 till A.7. Diag visar alla v i mönstret sett från rätsidan. ÖKNINGSTIPS: Det ökas 1 m genom att göra 1 omslag. På nästa v stickas omslaget vridet så att det inte blir hål - de ökade m stickas i slätst. RAGLAN: Det minskas till raglan på varje sida av A.4 i varje övergång mellan fram- och bakst och ärmar. Minska så här efter A.4: Lyft 1 m som om den skulle stickas rät, 1 rm, drag den lyfta m över. Minska så här 2 m före A.4: 2 m räta tills. ---------------------------------------------------------- FRAM- OCH BAKST: Arb stickas runt på rundst. Lägg upp 336-372-408-456-516-576 m på rundst 2,5 med Safran. Sticka 4 v RÄTST – se förkl ovan. Byt till rundst 3 och sticka mönster efter diag A.1. När A.1 har stickats 1 gång på höjden är det 168-186-204-228-258-288 m på st. Sedan stickas det mönster efter diag A.2. Efter A.2 stickas det 2 räta v SAMTIDIGT som det ökas 0-6-0-0-6-0 m jämnt fördelat på sista v = 168-192-204-228-264-288 m. Sätt 1 markör i början på v och 1 markör efter 84-96-102-114-132-144 m (= sidorna). Sedan stickas det mönster efter diag A.3. KONTROLLERA STICKFASTHETEN! SAMTIDIGT när arb mäter 12 cm ökas det 1 m på varje sida av båda markörerna – LÄS ÖKNINGSTIPS (= 4 m ökade). Upprepa ökningen med 4-4-4-5-5-5 cm mellanrum totalt 6 ggr i varje sida = 192-216-228-252-288-312 m – OBS: De ökade m stickas i slätst. Sticka sedan vidare tills arb mäter 35-36-38-38-40-40 cm. Nästa v stickas så här: maska av 5-5-5-6-6-6 m för ärmhål, sticka 86-98-104-114-132-144 m (= framst), maska av 10-10-10-12-12-12 m för ärmhål (dvs 5-5-5-6-6-6 m på varje sida av markören), sticka 86-98-104-114-132-144 m (= bakst) och maska av de resterande 5-5-5-6-6-6 m. Lägg arb åt sidan och sticka ärmarna. ÄRM: Arb stickas runt på rundst. Lägg upp 144-156-156-168-168-180 m på rundst 2,5 med Safran. Sticka 4 v RÄTST – se förkl ovan. Byt till rundst 3 och sticka mönster efter diag A.1. När A.1 är färdigt är det 72-78-78-84-84-90 m på st. Sticka 4 v rätst. SAMTIDIGT på sista v maskas de mittersta 10-10-10-12-12-12 m mitt under ärmen av = 62-68-68-72-72-78 m kvar på st. Lägg arb åt sidan och sticka en ärm till. OK: Sätt in ärmarna på samma rundst som fram- och bakst där det maskades av för ärmhål (detta görs utan att m stickas) = 296-332-344-372-408-444 m. SAMTIDIGT sätts det 1 markör i första och sista m på båda ärmarna (= 4 markörer). Börja mitt bak och fortsätt mönstret som förut på fram- och bakst SAMTIDIGT som A.3 också stickas på ärmarna (pil i diag ska stämma mot mitten på ärmen, börja på samma v i diag som på fram- och bakst). Dessutom stickas A.4 i varje övergång mellan fram- och bakst och ärmar (pil i diag ska stämma mot m med markör i). När det har stickats 2 v runt över alla m börjar minskn till RAGLAN – se förkl ovan (= 8 m minskade). Upprepa minskn på vart 4:e v totalt 4-5-5-7-7-8 ggr = 264-292-304-316-352-380 m. Sticka 4 v rätst runt över alla m SAMTIDIGT som det minskas 4-12-4-6-12-10 m jämnt fördelat på 1:a v = 260-280-300-310-340-370 m. Sticka 2 räta v. Nu börjar runt ok och det stickas mönster runt efter diag A.5 (= 26-28-30-31-34-37 rapporter på v – OBS: gå över till mindre rundst efterhand som det minskas och blir färre m på st). När A.5 har stickats 1 gång på höjden stickas A.6 i stället för A.5. När A.6 har stickats 1 gång på höjden är det 156-168-180-186-204-222 m på st. Nu stickas A.7 i stället för A.6. När A.7 har stickats 1 gång på höjden stickas det förhöjning bak i nacken. Sätt 1 markör mitt fram. Börja mitt bak och sticka rm tills det återstår 14-14-16-16-18-20 m före markören. Vänd, sticka rm tillbaka tills det återstår 14-14-16-16-18-20 m före markören i den andra sidan. Vänd, sticka rm tills det återstår 30-30-34-34-38-42 m före markören. Vänd, sticka rm tillbaka tills det återstår 30-30-34-34-38-42 m före markören i den andra sidan. Vänd, sticka rm tills det återstår 46-46-52-52-58-64 m före markören. Vänd, sticka rm tillbaka tills det återstår 46-46-52-52-58-64 m före markören i den andra sidan. Vänd, sticka rm tills det återstår 62-62-70-70-76-86 m före markören. Vänd, sticka rm tillbaka tills det återstår 62-62-70-70-76-86 m före markören i den andra sidan. Vänd arb och sticka rm tillbaka till början av v. HALSKANT: Byt till rundst 2,5 och sticka mönster runt över alla m efter diag A.2. SAMTIDIGT på 1:a v minskas det 22-24-24-26-30-32 m jämnt fördelat = 134-144-156-160-174-190 m. Efter A.2 maskas det av löst med rm från rätsidan. Toppen mäter ca 52-54-56-58-60-62 cm från axeln och ned. MONTERING: Sy ihop öppningarna under ärmarna. |
||||||||||||||||||||||||||||
Diagram förklaring |
||||||||||||||||||||||||||||
|
||||||||||||||||||||||||||||
 |
||||||||||||||||||||||||||||
 |
||||||||||||||||||||||||||||
 |
||||||||||||||||||||||||||||
Har du gjort detta mönster?Tagga då dina bilder med #dropspattern #whiteromancetop eller skicka in de till #dropsfan galleriet. Behöver du hjälp med mönstret?Du hittar 30 instruktionsvideoer, kommentarer/frågor och mer i mönstret på www.garnstudio.com © 1982-2026 DROPS Design A/S. Alla rättigheter är reserverade. Detta dokument med tillhörande underdokument har copyright. Läs mer om vad du kan göra med våra mönster längst ner på vår hemsida. |
||||||||||||||||||||||||||||


Med över 40 år i stick- och virkbranschen erbjuder DROPS Design en av de mest omfattande samlingarna av gratis mönster på internet - översatt till 17 språk. Per idag har vi 324 kataloger och 12290 mönster på och alla är översatta till Svenska.
Vi arbetar hårt för att kunna erbjuda det bästa inom stickning och virkning, inspiration och goda råd, men också kvalitetsgarn till fantastiska priser! Vill du använda våra mönster till annat än personligt användande? Du kan läsa om vilka regler som gäller i texten Copyright längst ner på sidan på alla våra mönster. Lycka till!
Kommentera mönster DROPS 159-12
Vi vill gärna ha din åsikt om denna modell!
Om du har en fråga kring den, kom ihåg att välja rätt kategori i menyn under, så får du snabbare svar! Obligatoriska fält är markerade med *.