
Populära kategorier
Letar du efter ett garn?


Kommentarer / Frågor (13)
![]() Linda Pine skrev:
Linda Pine skrev:
I am COMPLETELY confused by the instructions for working the stripe pattern "at the same time inc 1 st each side on every and every other row alternately". After reading the questions and answers in the Comments section - I am even MORE confused. Surely there is a better way to describe what should be done.!!!!
06.01.2023 - 16:39
![]() Kathy Tee skrev:
Kathy Tee skrev:
The instructions state “ inc 1 st each side on every and every other row alternately”. What specifically does “every and every other row alternately” mean. Please provide an example in your reply eg. if I have to work a total of 10 rows, on which of those rows do I include the increases.
12.08.2022 - 03:34DROPS Design svarede:
Dear Mrs Tee, this lesson explains how to decrease or increase on every 3rd and 4th row alternately, maybe it can help you to understand how to decrease here on every row (instead of on every 3rd row in the lesson) and 2nd row (instead of every 4th row in the lesson). Hope it can help you.
12.08.2022 - 09:57
![]() Kathy Tee skrev:
Kathy Tee skrev:
In your earlier reply to HCL (05.03.2020 kl. 10:06 ) you advise, ”*1 row with decreases, 1 row with decreases, 1 row without decreases*” which confirms I am to work in the first 2 of every 3 rows, but the decreases would occur on Rows 1, 2, 4, 5, 7, 8, 10, 11, 13 etc. instead. Please confirm which example, either the one shown here or the one in my previous message (12.08.2022 - 00:56.) is correct.
12.08.2022 - 01:33DROPS Design svarede:
Dear Mrs Tee, you can also work that way, you will have decreased the same number of rows at the end with the same number of rows, decreasing alternately on every row and every other row would be more likely as previous comment. Hope it can help.
12.08.2022 - 09:51
![]() Kathy Tee skrev:
Kathy Tee skrev:
Based on your reply to Jane Doe (10.08.2022 kl. 16:14), if for example I worked in pattern for 13 rows, are you indicating the decreases would occur on Rows 1, 3, 4, 6, 7, 9, 10, 12, 13 etc. So, after Rows 1 and 2, I am to then decrease in the first 2 of every next 3 rows. “Row 1 - decrease, Row 2 -no decrease, then *Decrease in next 2 rows, next row (rows 5, 8, 11 etc) no decrease* repeat from *to*”. Is this correct?
12.08.2022 - 00:56DROPS Design svarede:
Dear Mrs Tee, that's correct. Happy knitting!
12.08.2022 - 09:49
![]() Jane Doe skrev:
Jane Doe skrev:
Your answer is incredibly confusing! "you will decrease 1 stitch on both sides of the 2 middle stitches but you should decrease on every row and on every other row alternately, i.e.: *work 1 row with decrease, 1 row without decrease, 1 row with decrease* and repeat from *-*" So, I actually decrease every other row (1 row without decrease, 1 row with decrease). Not every row and every other row alternately.
11.08.2022 - 18:22DROPS Design svarede:
Dear Mrs Doe, sorry for confusion, let me try again - you have to decrease 2 stitches alternately on every row and every other row, this means the decreases might occure from the right side as well as from the wrong side, after 1 row you have decreased 2 sts, after these 3 rows you will have decreased 4 sts. Hope it can help.
12.08.2022 - 09:56
![]() Kathy Tee skrev:
Kathy Tee skrev:
Please provide detailed explanation as to which rows inc’s and dec’s are worked in the following instructions: “inc 1 st each side on every and every other row alternately”, “Continue inc each side, at the same time dec 1 st on both sides of the 2 middle sts on every and every other row alternately”, “discontinue dec in the middle of piece and now dec each side as inc before on every and every row alternately”
10.08.2022 - 16:33
![]() Jane Doe skrev:
Jane Doe skrev:
After joining the two top pieces on the front, I understand that you increase at either end of every row and decrease every other row 2 stitches in the center ? Is this correct?
10.08.2022 - 13:22DROPS Design svarede:
Dear Mrs Doe, not exactly, you will decrease 1 stitch on both sides of the 2 middle stitches but you should decrease on every row and on every other row alternately, i.e.: *work 1 row with decrease, 1 row without decrease, 1 row with decrease* and repeat from *-*. Happy knitting!
10.08.2022 - 16:14
![]() Wilma Keighley skrev:
Wilma Keighley skrev:
Sorry, it’s me again. I’m at the stage where the central deceased have been discontinued and decreases at the edges are happening. I can see that the side decreases are forming the shoulder but it really looks like the central decreases should continue. I am definitely correct that the central decreases should have stopped ;as the pattern says). Even the picture of the jersey looks like the central decreases continue the the end.
16.03.2022 - 15:59
![]() Wilma Keighley skrev:
Wilma Keighley skrev:
Re your reply. Yes tension is fine. What should mid front (where the decrease line is) measure when side measures 52cm?
08.03.2022 - 14:58DROPS Design svarede:
Hi Wilma, When you now continue and start to decrease in each side, the sides will not get any longer, but the mid front will. When piece measures 39-40-42 cm mid front, put piece aside. :)
09.03.2022 - 09:11
![]() Wilma Keighley skrev:
Wilma Keighley skrev:
I am working on the front and the side now measures 52 cm. Looking at the diagram, I think the mid front ought to be about 26 cm but it is much less than this. Have I misunderstood where to measure the side or done something else wrong? Thanks.
07.03.2022 - 23:18DROPS Design svarede:
Dear Mrs Keighley, do you have correct tension? ie 36 rows stocking stitch = 10 cm?
08.03.2022 - 11:09
|
|
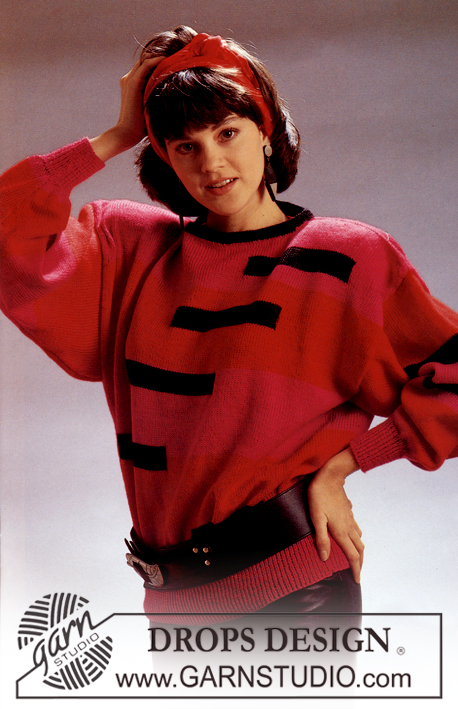
City Jungle |
|
 |
 |
Stickad diagonalt randig tröja i DROPS Camelia eller DROPS Alpaca.
DROPS 9-18 |
|
|
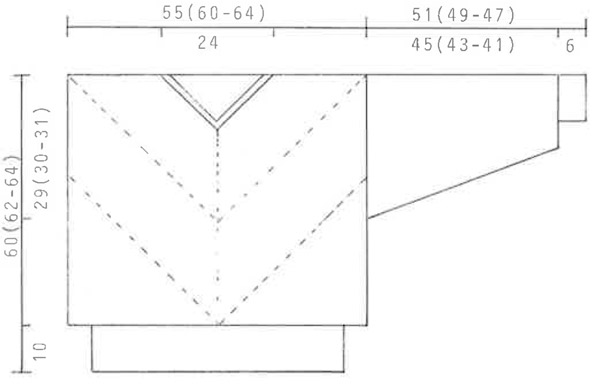
Stickfasthet: 10 x 10 cm = 25 m x 36 v på st 3 och slätst. Resår: * 1 vriden rät, 1 am * Randning: Hela mönstret slätst. * 2 v svart, 2 v beige *. Förklaring till minskningen fram: De 2 m innan de 2 mittersta m stickas tills videt rätt.- de 2 m efter de 2 mittersta m stickas tills rätt. På avigan stickas m avigt el vridet avigt tills i stället för rätt el vridet rätt. Framst: Stickas från hörnet till, mitten och sedan sätts alla m på en sticka. Lägg upp 3 m med svart på st 3, sticka ränder och vidare ökas det i var sida 1 m växelvis varje och vartannat v. Kontroll-era stickfastheten. När det år 99 (107-115) m på stickan läggs arb åt sidan - sidan mäter ca 28 (30-32) cm. Sticka ännu en del. Sätt alla m på en sticka - 198 (214-230) m. Fortsätt öka i var sida på växelvis varje och vartannat v - samtidigt som det minskas 1 m på var sida av de 2 mittersta m på växelvis varje och vartannat v så ökn i sidorna blir uppvägt av minskaningarna mitt fram -se förkl. När sidan på framst mäter 50 (52-54) cm minskas det nu i var sida i stället för ökn, växelvis på varje och vartannat v. När arb mitt fram mäter 39 (40-42) cm läggs arb åt sidan. Bakst: Stickas som framst. Ärmar: Lägg upp 50 (52-54) m på strumpst 2,5 med svart och sticka 6 cm resår. Byt till strumpst 3 och sticka ränder samtidigt som det ökas 25 (25-25) m jämt fördelat på 1:a v = 75 (77-79) m. Vidare ökas det på var sida av m mitt under ärmen (= 2 nya m vid varje ökn) 1 m x 35 (37-38) St S: på vart 4:e v. St M/L: på växelvis vart 3:e och 4:e v = 145 (151-155) m. Maska av når ärmen mäter 51 (49-47) cm. Montering: Sy axelsömmarna. Plocka upp m runt halsen med svart på strumpst 2,5 och sticka 2 cm resår samtidigt som det minskas mitt fram och bak: sticka till de 3 m mitt fram, sått mittm på en hjälpst, sticka 1:a och sista m tills rätt, trå mittm över de ihopst, upprepa vart 4:e v. Sy sid-sömmarna. Plocka upp ca 214 (222-230) m på rundst 2,5 med svart runt bålen nederst och sticka 10 cm resår, maska av elastiskt. Sy i ärmarna och axelvaddar. |
|
 |
|
Har du gjort detta mönster?Tagga då dina bilder med #dropspattern eller skicka in de till #dropsfan galleriet. Behöver du hjälp med mönstret?Du hittar 27 instruktionsvideoer, kommentarer/frågor och mer i mönstret på www.garnstudio.com © 1982-2026 DROPS Design A/S. Alla rättigheter är reserverade. Detta dokument med tillhörande underdokument har copyright. Läs mer om vad du kan göra med våra mönster längst ner på vår hemsida. |
|


Med över 40 år i stick- och virkbranschen erbjuder DROPS Design en av de mest omfattande samlingarna av gratis mönster på internet - översatt till 17 språk. Per idag har vi 324 kataloger och 12290 mönster på och alla är översatta till Svenska.
Vi arbetar hårt för att kunna erbjuda det bästa inom stickning och virkning, inspiration och goda råd, men också kvalitetsgarn till fantastiska priser! Vill du använda våra mönster till annat än personligt användande? Du kan läsa om vilka regler som gäller i texten Copyright längst ner på sidan på alla våra mönster. Lycka till!
Kommentera mönster DROPS 9-18
Vi vill gärna ha din åsikt om denna modell!
Om du har en fråga kring den, kom ihåg att välja rätt kategori i menyn under, så får du snabbare svar! Obligatoriska fält är markerade med *.