
Beliebte Kategorien
Suchen Sie nach einem Garn?


Kommentare / Fragen (23)
![]() Leeanne hat geschrieben:
Leeanne hat geschrieben:
Addtnl. info for my last comments: I was confused by the first sentence in the short rows instructions stating to do 6 rows over all stitches. I thought that was part of the directions and the piece started with 6 rows before starting the short row repeat cycle but that is incorrect. This sentence is just telling you that there are 6 rows included in the short row instruction cycle that are not, in fact, short rows – 6 full rows and 2 short rows (not in that order) are listed in the row cycle.
06.09.2025 - 15:15
![]() Leeanne hat geschrieben:
Leeanne hat geschrieben:
(Cont. from previous two comments) next row starts with R3 and finishes with L3 and last row starts with L4 and finishes with R4. Then you start the cycle again with the first short row. So yes, the short row cycle is short row, full row, short row, full row, full row, full row, full row, full row as the pattern states (1 SR followed by 1 full row followed by 1 SR followed by 5 full rows). There are no edges in which you are not doing a picot edge instruction which allows for an even 8 row cycle
06.09.2025 - 15:08
![]() Leeanne hat geschrieben:
Leeanne hat geschrieben:
(continued from my previous comment) work the L2 row to the first marker and turn to work back to the “beginning” of the left side row, ending with L3, turn and start a new row with L4, working all the way across, ending with R4, (all the remaining rows in the cycle go all the way across – no more short rows) next row begins with R1 and goes all the way across to the last 4 stitches, ending in L1, turn and start with L2 and go all the way across to finish with R2, (cont. in next comment)
06.09.2025 - 15:03
![]() Leeanne hat geschrieben:
Leeanne hat geschrieben:
For anyone that needs it, here is the cycle of rows, combining picot edge with short rows instructions (it helps to draw this out on paper): start with right side 1 (R1) and work a short row (to first marker only, not all the way across), turn and work back to the beginning and knit the last four with R2, turn to start next row beginning with R3 and knit all the way across, ending this row with L1, then start the second short row with L2, (continued in next comment)
06.09.2025 - 14:58
![]() Leeanne hat geschrieben:
Leeanne hat geschrieben:
I figured it out! It is definitely not too complicated but they could have written this pattern differently so it wouldn’t take weeks or trial and error to figure out how to work the short rows in with the picot edge. Maybe we were just making it too complicated. I don’t have enough room to write the pattern in this comment so I’ll start a new one. It is easier to draw your lines and mark each end with the picot line number but I’ll try to write it here in my next comment.
06.09.2025 - 14:55
![]() Leeanne hat geschrieben:
Leeanne hat geschrieben:
I think I get it! I will test it in the morning and comment again trying to explain it for others if I have it right. My last two comments are wrong for sure. It helps to draw the rows as a picture on paper and mark the ends with the line number.
06.09.2025 - 05:10
![]() Leeanne hat geschrieben:
Leeanne hat geschrieben:
Revising my last comment: I now have it written as: short row, R1 &L1 on the same row, short row, R2 & L2, short row, R3 & L3, short row, R4 & L4. But this adds up to 8 rows on the sides and only 4 rows in the middle, not 6. Also not sure why the short rows directions refers to the middle stitches as being 70 (for the second size) when it’s only 30 (if excluding 25 on each end) or 72 (if excluding only the outermost 4 on each end).
06.09.2025 - 04:26
![]() Leanne hat geschrieben:
Leanne hat geschrieben:
The directions for the short rows are difficult to figure out. I’ve been working at this for a few weeks with my MIL, have restarted my project 7 times and we still don’t have it right. So we are alternating between right and left rows 1, 2, etc. when doing full rows? We are not doing any picot edge instructions when doing short rows, correct? To incoorporate the short rows, does it go: left row 1, right row 1, short row, left row 2, right row 2, short row, etc. through all four edge rows?
06.09.2025 - 02:40
![]() Leeanne hat geschrieben:
Leeanne hat geschrieben:
In addition to my last comment, I’m also confused because it says for garter stitch to knit two rows. The main directions says start with the right Picot edge, then knit the directions for garter stitch for the rest of the row, except for the last four and then knit the directions for the left edge on the last four. How do you knit two rows for the garter stitch directions in between doing the right and left edges?
14.07.2025 - 19:22DROPS Design hat geantwortet:
Dear Leeanne, the garter stitch structure is 2 knit rows. So whenever most of the stitches in the row are knitted, both from the right side and the wrong side, the resulting texture will be garter stitch. In the picot edges we are already using garter stitch, since all other stitches except for the 4 stitches on each side for the picot are knitted from the right side and the wrong side. So you just need to work as indicated; the edges will have the picot texture while the remaining stitches are knitted. Happy knitting!
19.07.2025 - 17:47
![]() Leeanne hat geschrieben:
Leeanne hat geschrieben:
A video of the actual pattern, please! This is so confusing. I’ve now learned how to do picot edges and short rows, but I can’t understand how to do both at the same time. How do you know which row of the picot edge you’re on if you’ve turned around and gone the other direction halfway through a row? And then when you start the next row do you count as if half the row is row 5 and half is row 6 or just continue with the next direction for that edge in sequence, ignoring row numbers?
14.07.2025 - 19:18DROPS Design hat geantwortet:
Dear Leeanne, please remember to mark your comments as questions so that we can see them and answer sooner. When you are combining the short rows and the picot edges, count only the rows where you reach the edges; those rows where you turn before reaching the edges are not taken into account for the picot edges on that side. Happy knitting!
19.07.2025 - 17:48
|
|
Berry Kiss#berrykissvest |
|
 |
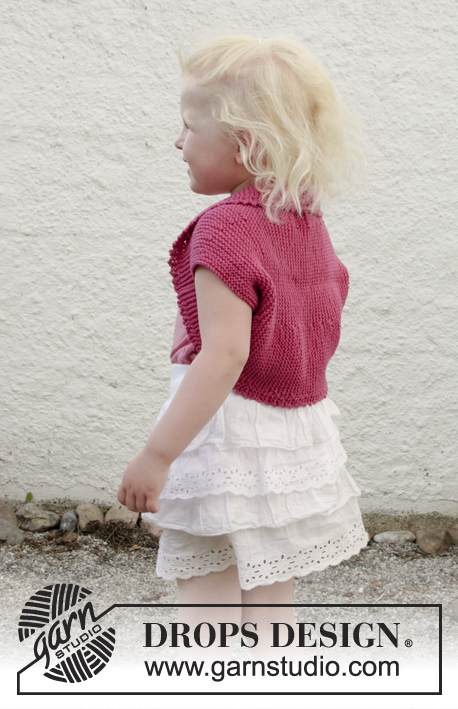 |
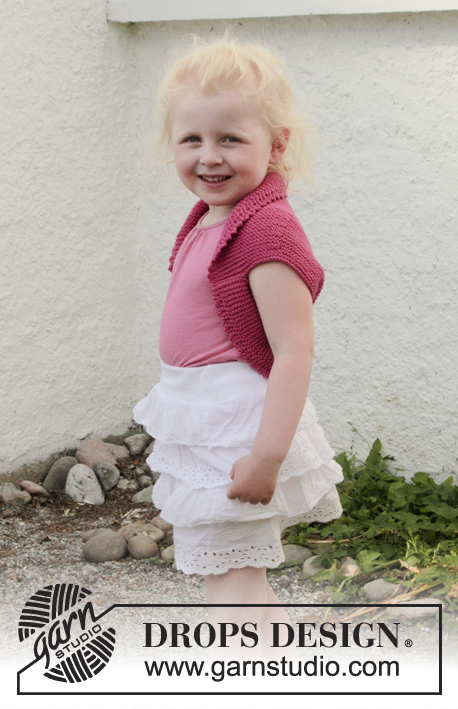
Gestrickter Bolero mit verkürzten Reihen, Picotrand und Krausrippen in DROPS Cotton Merino. Größe 3 – 12 Jahre.
DROPS Children 28-7 |
|
|
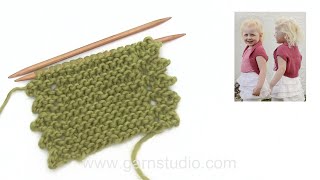
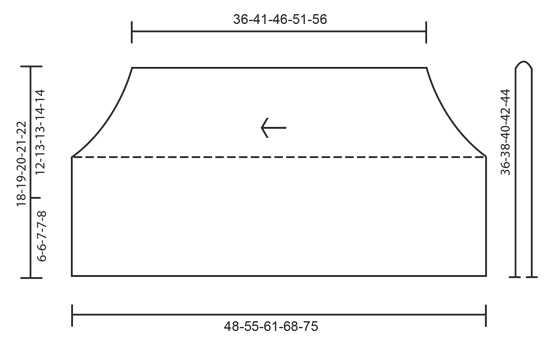
KRAUSRIPPEN (in Hin- und Rück-Reihen): 1 kraus rechts = 2 Reihen rechts. PICOTRAND (in Hin- und Rück-Reihen): RECHTE SEITE: 1. REIHE (= Hin-Reihe): rechts stricken. 2. REIHE (= Rück-Reihe): rechts stricken bis noch 4 Maschen übrig sind, diese wie folgt stricken: 2 Maschen rechts zusammenstricken, 1 Umschlag, aus den 2 letzten Maschen je 2 Maschen herausstricken (d.h. 1 x in das vordere und 1 x in das hintere Maschenglied einstechen, = 2 Maschen zugenommen bei den letzten 2 Maschen) 3. REIHE (= Hin-Reihe): Die 1. Masche wie zum Rechtsstricken abheben, 1 Masche rechts, die abgehobene Masche überziehen, 1 Masche rechts, die hintere Masche der rechten Nadel über die vordere ziehen (es wurden nun 2 Maschen abgenommen), dann die Reihe rechts zu Ende stricken. 4. REIHE (= Rück-Reihe): rechts stricken. Die 1. bis 4. Reihe wiederholen. LINKE SEITE: 1. REIHE (= Hin-Reihe): rechts stricken bis noch 4 Maschen übrig sind, diese wie folgt stricken: 2 Maschen rechts zusammenstricken, 1 Umschlag, aus den 2 letzten Maschen je 2 Maschen herausstricken (d.h. 1 x in das vordere und 1 x in das hintere Maschenglied einstechen, = 2 Maschen zugenommen bei den letzten 2 Maschen) 2. REIHE (= Rück-Reihe): Die 1. Masche wie zum Rechtsstricken abheben, 1 Masche rechts, die abgehobene Masche überziehen, 1 Masche rechts, die hintere Masche der rechten Nadel über die vordere ziehen (es wurden nun 2 Maschen abgenommen), dann die Reihe rechts zu Ende stricken. 3. REIHE (= Hin-Reihe): rechts stricken. 4. REIHE (= Rück-Reihe): rechts stricken. Die 1. bis 4. Reihe wiederholen. VERKÜRZTE REIHEN: 6 Reihen über alle Maschen, * 24-25-26-27-28 Maschen stricken (bis zum ersten Markierer), wenden, den Faden anziehen und die Reihe zu Ende stricken. 1 Reihe über alle Maschen stricken, wenden, 24-25-26-27-28 Maschen stricken (bis zum zweiten Markierer), wenden, den Faden anziehen und die Reihe zu Ende stricken. 5 Reihen über alle Maschen stricken *, von *-* wiederholen. D.h. es werden 6 Reihen (= 3 Krausrippen) über die mittleren 66-70-72-80-86 Maschen gestrickt und 8 Reihen (= 4 Krausrippen) über die Maschen beidseitig in jedem Rapport. -------------------------------------------------------- BOLERO: Die Arbeit wird quer auf der Rundnadel ab dem einen Armausschnitt bis zum anderen Armausschnitt gestrickt. Dann wird der Bolero doppelt gelegt und die Seitennähte werden geschlossen. 76-80-84-88-92 Maschen mit Cotton Merino auf Rundnadel Nr. 4 anschlagen. Nach den ersten und vor den letzten je 24-25-26-27-28 Maschen je 1 Markierer anbringen (= 28-30-32-34-36 Maschen zwischen den Markierern). Wie folgt stricken – ab der Hin-Reihe: PICOTRAND RECHTE SEITE, KRAUSRIPPEN – siehe oben – über die nächsten 68-72-76-80-84 Maschen, PICOTRAND LINKE SEOTE über die letzten 4 Maschen. MASCHENPROBE BEACHTEN! Die äußersten je 4 Maschen beidseitig weiter in Krausrippen und im Picotrand stricken, GLEICHZEITIG VERKÜRZTE REIHEN stricken – siehe oben! Bei einer Länge von ca. 36-41-46-51-56 cm (an der kürzesten Stelle gemessen) locker abketten. FERTIGSTELLEN: Den Bolero doppelt legen – die Maßskizze zeigt, wie der Bolero gefaltet wird. Die untersten je 6-6-7-7-8 cm Kante an Kante an beiden Seiten schließen (= je 12-13-13-14-14 cm für die Armausschnitte). |
|
 |
|
Haben Sie diese Anleitung nachgearbeitet?Dann taggen Sie Ihre Fotos mit #dropspattern #berrykissvest oder schicken Sie sie an die #dropsfan Galerie Brauchen Sie Hilfe bei dieser Anleitung?Sie finden 18 Videotutorials, einen Kommentar/Fragen-Bereich und vieles mehr, wenn sie die Anleitung bei garnstudio.com aufrufen. © 1982-2026 DROPS Design A/S. Wir besitzen alle Rechte. Dieses Dokument, einschließlich aller Untersektionen, hat Urheberrechte. Mehr dazu, was Sie mit unseren Anleitungen machen können, finden Sie ganz unten auf der Seite zu jeder Anleitung. |
|


Mit über 40 Jahren Tätigkeit im Entwerfen von Strick- und Häkelmustern bietet Ihnen DROPS Design eine der umfangreichsten Sammlungen von kostenlosen Anleitungen im Internet - in 17 Sprachen übersetzt. Zum jetzigen Zeitpunkt haben wir insgesamt 324 Handarbeitshefte und 12290 Anleitungen auf Deutsch. 12202
Unser Ziel ist es, Ihnen die besten Angebote zum Stricken und Häkeln, Inspirationen und Ratschläge sowie qualitativ hochstehende Garne zu unglaublichen Preisen zu bieten! Möchten Sie unsere Anleitungen nicht nur für den persönlichen Gebrauch nutzen? Unsere Copyright Bedingungen finden Sie bei allen unseren Anleitungen ganz unten auf der jeweiligen Seite. Viel Spaß beim Handarbeiten!
Kommentieren Sie die Anleitung DROPS Children 28-7
Wir würden gerne Ihre Meinung zu diesem Modell erfahren!
Wenn Sie eine Frage stellen möchten, prüfen Sie bitte, dass Sie die richtige Kategorie im unten stehenden Formular gewählt haben - so bekommen Sie schneller eine Antwort. Die obligatorischen Felder sind mit einem * gekennzeichnet.