
Beliebte Kategorien
Suchen Sie nach einem Garn?


Kommentare / Fragen (137)
![]() Vicki hat geschrieben:
Vicki hat geschrieben:
My question is on the neck and armhole shaping on the left front piece. I am making the "s" size. My numbers are not adding up. I start with 58 stitches, I decrease 18 + 4 times on the neck shaping and at the same time decrease 8 times for the arm hole. 58-18-4-8=28. I need to decrease 4 more stiches. What am I missing? Also does the arm hole shaping start at 35 cm?
12.01.2021 - 19:05DROPS Design hat geantwortet:
Dear Vicki, you decrease and increase = 58 sts again, then decrease for neck 18 + 4 sts and cast off for armhole 5 + 7 sts = 58- (18+4) - (5+7) = 24 sts. Happy knitting
13.01.2021 - 06:55
![]() Minna hat geschrieben:
Minna hat geschrieben:
Hihan ohjeessa on virhe, lisäykset tehdään kierroksen välein, ei cm:ien. kLisää nyt 1 s kummassakin reunassa 15-16-16-18-19-20 x 8-7-7-6-5-5 cm:n välein = 76-80-84-90-96-100 s.
20.10.2020 - 09:55
![]() Rhonda🇺🇸 hat geschrieben:
Rhonda🇺🇸 hat geschrieben:
I am knitting a size xl and not understanding the instructions. I have just cast off 10 stitches on each side for the arm holes. I don’t understand decreasing tip 2. Do you mean to decrease the first stitch on each end for every other row for 13 times? Then not understanding the next set of instructions-to knit 4 rows over the center 56 stitches. What is meant by continuing to knit other stitches as before? The instructions are difficult to understand.
08.09.2020 - 02:22DROPS Design hat geantwortet:
Hi Rhondaus, After you have cast off for the armholes the continued decreases are inside the 3 edge stitches on both armholes, slipping and passing over at the beginning of the row (after the edge stitches) and knitting 2 tog. bat the end of the row (before the edge stitches). Both decreases are worked on each row from the right side 13 times. Then you work the neck (later) by working 4 rows of garter stitch over the middle stitches, then casting them off. Hope this helps and happy knitting!
08.09.2020 - 07:07
![]() Judi Buschlen hat geschrieben:
Judi Buschlen hat geschrieben:
Please clarify the last decreases for the sleeve cap where it says -continue to cast off 2 sts each side until the piece measures 57 cm, then cast off 3 sts 1 time each side. Bind off remaining sts.... Meaning to dec or bind off every 2nd row still?? Knitters online have also found the instructions unclear and have lengthened the sleeve cap. I\\\'m not so brave. But I\\\'d like to how to shape the sleeve cap correctly. :)Thanks , Judi
11.07.2020 - 08:11DROPS Design hat geantwortet:
Dear Judi, for the sleeve you will cast off 2 sts at the beg of every row both from RS and from WS (= on each side - make sure you cast off the same number of sts on each side) until sleeve measures 57 cm (the number of remaining sts will depend on your tension in height) then cast off 3 sts at the beg of next 2 rows and cast off the remaining sts. Happy knitting!
13.07.2020 - 09:39
![]() Paula hat geschrieben:
Paula hat geschrieben:
Please disregard my comment above, I understand those decreasing instructions only apply to the side panels, not the back panel (aside from the decreasing at both edges). Thanks!
03.11.2019 - 20:57
![]() Paula hat geschrieben:
Paula hat geschrieben:
I don't understand Decreasing Tip-2, specifically for the back piece. I'm not sure what is meant by "dec. inside 3 edge sts at the armhole and inside 12 sts of garter sts for the neck side". I assume for the back you mean inside the 3 edge Sts at the armhole and inside (52 Sts for extra small) of garter Sts. Is this correct?
03.11.2019 - 20:47DROPS Design hat geantwortet:
Dear Paula, after you have worked 2 rows in garter stitch over the middle 52 stitches, you cast off on next row the middle 28 sts for neck = 24 sts remain for each shoulder. Continue working each shoulder separately with the remaining 12 sts in garter stitch towards neck as before and decrease 1 st every other row 2 times inside these 12 sts in garter stitch = 22 sts remain. Happy knitting!
05.11.2019 - 08:02
![]() Rosita Gyllenhammar hat geschrieben:
Rosita Gyllenhammar hat geschrieben:
Efter ökning på bakstycket har jag 104 maskor. St s Vi 35 cm avmaskar jag 5 maskor varje sida och minskar totalt 10 maskor(en i varje sida 5ggr) det bli 20 maskor mindre. I beskrivning står det art det ska vara 80 maskor kvar? 104-20 = 84 ?
09.03.2019 - 23:54DROPS Design hat geantwortet:
Hej. Det var lite otydligt skrivet i den svenska översättningen, men du ska minska först 5 maskor i varje sida och sedan 1 maska i varje sida 7 gånger. 104-(5x2)-(7x2)= 80 m.
14.03.2019 - 10:40
![]() Robin Rockwell hat geschrieben:
Robin Rockwell hat geschrieben:
There are several comments about problems (mistakes?) with the armhole/sleeve directions not being correct. Are those problems corrected in the directions? I'm not an improvisational knitter so I hope the current online pattern is correct. Thanks!
17.02.2019 - 16:36DROPS Design hat geantwortet:
Dear Mrs Rockwell, pattern is correct just make sure you get and keep correct tension. should you have any question you are welcome to ask them here. Happy knitting!
18.02.2019 - 10:11
![]() Triste Longcore hat geschrieben:
Triste Longcore hat geschrieben:
I don’t understand the instruction “dec for the neck shape INSIDE the 12 band stitches” I’m guessing you mean decrease 3 stitches BEFORE the band...?
08.01.2019 - 17:00DROPS Design hat geantwortet:
Dear Mrs Longcore, you decrease for neck before the 12 front band stitches worked in garter stitch (on left front piece = from RS): work the RS row until 14 sts remain, K2 tog, K12 (= front band sts. Dec after the 12 front band sts (on right front piece, from RS): work the RS row as follows: 12 sts in garter st, slip 1 as if to K, K1, psso. For armholes, you will dec after the 3 sts (left front piece) and before the 3 sts (right front piece). Happy knitting!
09.01.2019 - 08:02
![]() Margaret McDermott hat geschrieben:
Margaret McDermott hat geschrieben:
What does K the first row from the WS mean?
06.11.2017 - 19:12DROPS Design hat geantwortet:
Dear Mrs McDermott, after the cast on row, knit 1 row, this first row will be knitted and will be wrong side of piece, ie row 2 on piece will be worked from right side. Happy knitting!
07.11.2017 - 08:35
|
|
Swing |
|
|
|
|
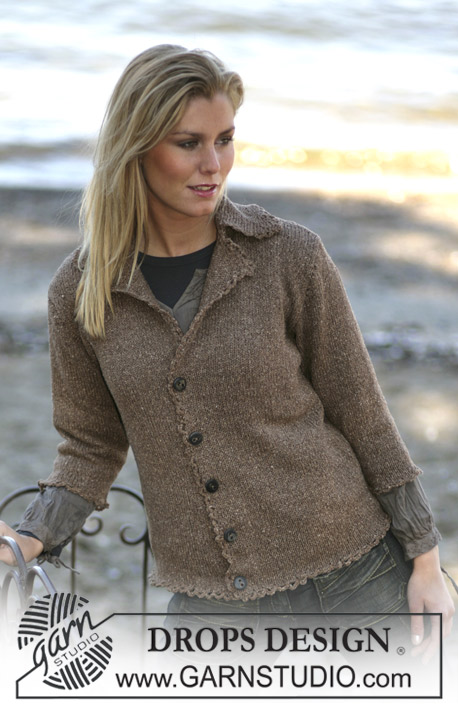
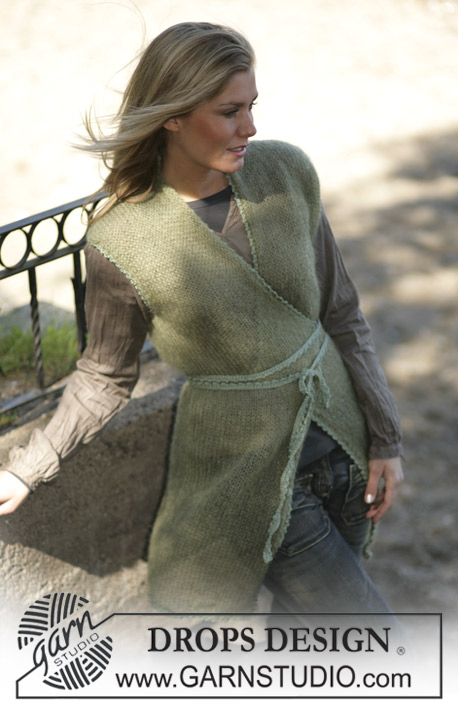
Jacke in „Alpaca“
DROPS 97-18 |
|
|
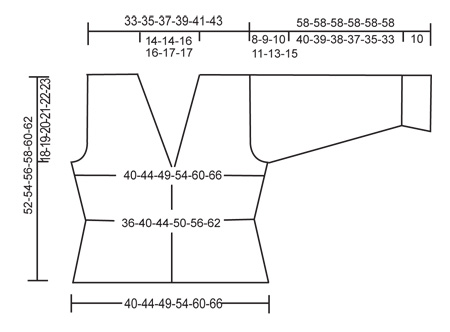
Maschenprobe: Achtung, die Nadelnummer (Ndl) ist nur ein Vorschlag! 23 M. x 30 R. auf Ndl. Nr. 3,5 und glatt gestrickt = 10 x 10 cm. Krausrippe (hin und zurück): 1 Krausrippe = 2 R. re. Tipp zum Abnehmen-1 (für die Taille): Alle Abnahmen erfolgen in Hin-R. Nach dem Markierungsfaden: 2 re. zusammen. Vor dem Markierungsfaden: 1 M. re. abheben, 1 re., die abgehobene über die gestrickte ziehen. Tipp zum Abnehmen-2: (betonte Abnahmen, gilt für das Armloch und den Halsausschnitt): Alle Abnahmen erfolgen in Hin-R. Neben 3 M. glatt re am Armloch und neben den 12 M. Krausrippe am Hals. Vor den 3 bzw. 12 M.: 2 re. zusammenstricken. Nach den 3 bzw. 12 M.: 1 M. re. abheben, 1 M. re., die abgehobene M. über die gestrickte ziehen. Tipp zum Aufnehmen: 1 M. aufnehmen, indem man 1 M. aus dem Querfaden der vorherigen R. strickt. Rückenteil: Auf Ndl. Nr. 3,5, 94-104-114-126-140-154 M. anschlagen (Inkl. 1 Randm. auf beiden Seiten). 1 Rück-R re stricken und danach glatt re weiterstricken. Nach den ersten und vor den letzten 24-26-29-32-35-39 M. einen Markierungsfaden einziehen (= 46-52-56-62-70-76 M. zwischen den Markierungsfäden). Nach 6-7-8-9-10-11 cm für die Taillierung 1 M. nach dem 1. Markierungsfaden und 1 M. vor dem 2. Markierungsfaden abnehmen – siehe Tipp zum Abnehmen-1, wie folgt: bei jeder 6. R. total 5 Mal = 84-94-104-116-130-144 M. Nach 17-18-19-20-21-22 cm nach dem 1. Markierungsfaden und vor dem 2. Markierungsfaden je 1 M aufnehmen – siehe Tipp zum Aufnehmen, wie folgt: bei jeder 6. R. total 5 Mal = 94-104-114-126-140-154 M. Nach 34-35-36-37-38-39 cm beidseitig je 4-5-6-8-10-12 M. für das Armloch abketten. Dann in jeder 2. R beidseitig wie folgt abnehmen – siehe Tipp zum Abnehmen-2: 1 M. 5-7-8-10-13-15 Mal = 76-80-86-90-94-100 M. Nach 48-50-52-54-56-58 cm 2 Krausrippen über die mittleren 52-52-56-56-60-60 M. stricken (die restlichen M. wie gehabt stricken), danach die mittleren 28-28-32-32-36-36 M. für den Halsausschnitt abketten. Dann in jeder 2. Reihe neben 12 kraus rechts gestrickten M. am Halsrand wie folgt abnehmen – siehe Tipp zum Abnehmen-2: 1 M. 2 Mal = 22-24-25-27-27-30 M. pro Schulter übrig. Nach 52-54-56-58-60-62 cm abketten. Linkes Vorderteil: Auf Ndl. Nr. 3,5, 53-58-63-69-76-83 M. anschlagen (inkl 1 Randm auf der Seite und 12 M für die vordere Blende). 1 Rück-R re stricken. Dann glatt re weiterstr, mit 12 Blenden-M kraus rechts. Nach 24-26-29-32-35-39 M. ab der Seite der Jacke 1 Markierungsfaden einziehen. Nach 6-7-8-9-10-11 cm vor dem Markierungsfaden für die Taillierung abnehmen – siehe Tipp zum Abnehmen-1, wie folgt: 1 M. alle 6. R. total 5 Mal = 48-53-58-64-71-78 M. Nach 17-18-19-20-21-22 cm vor dem Markierungsfaden aufnehmen – siehe Tipp zum Aufnehmen, wie folgt: 1 M. alle 6. R. total 5 Mal = 53-58-63-69-76-83 M. Lesen Sie die ganze Anleitung, bevor Sie weiterstricken! Halsausschnitt: Nach 29-30-31-32-33-34 cm neben 12 kraus rechts gestrickten M. für den Halsausschnitt abnehmen – siehe Tipp zum Abnehmen-2, wie folgt: bei jeder 2. R.: 1 M. total 18 Mal und danach bei jeder 4. R.: 1 M. total 4-4-6-6-8-8 Mal. Armloch: Gleichzeitig nach 34-35-36-37-38-39 cm wie beim Rückenteil für das Armloch abketten. Nach dem Abnahmen für das Armloch und den Halsausschnitt sind noch 22-24-25-27-27-30 M. übrig. Nach 52-54-56-58-60-62 cm abketten. Rechtes Vorderteil: Wie das linke Vorderteil anschlagen und stricken jedoch spiegelverkehrt, d.h. es wird nach dem Markierungsfaden aufgenommen und abgenommen. Zusätzlich werden 3 Knopflöcher eingestrickt. 1 Knopfloch = die 5. und 6. M. ab dem vorderen Rand abketten und bei der nächsten R. über diese 2 M. 2 neue M. anschlagen. Die Knopflöcher wie folgt anbringen: Grösse XS: 21, 24 und 27 cm. Grösse S: 20, 24 und 28 cm. Grösse M: 21, 25 und 29 cm. Grösse L: 22, 26 und 30 cm. Grösse XL: 21, 26 und 31 cm. Grösse XXL: 22, 27 und 32 cm. Ärmel: Mit Ndl. Nr. 3,5, 56-58-62-64-68-70 M. anschlagen (inkl. 1 Randm. beidseitig). 1 Rück-R re stricken und glatt reweiterstricken. Nach 10 cm gleichmässig verteilt 10 M. abnehmen = 46-48-52-54-58-60 M. Weiter auf beiden Seiten je 1 M. aufnehmen, dies alle 8-7-7-6-5-5 R. insgesamt 15-16-16-18-19-20 Mal arbeiten = 76-80-84-90-96-100 M. Nach 50-49-48-47-45-43 cm am Anfang jeder Reihe, d.h. beidseitig, wie folgt für die Armkugel abketten: je 4 M. 1 Mal, je 3 M. 1 Mal, je 2 M. 2 Mal, je 1 M. 5-6-8-9-12-15 Mal, danach je 2 M. beidseitig abketten, bis die Arbeit 57 cm misst, danach je 3 M. 1 Mal beidseitihg abketten. Die restlichen M. nach ca. 58 cm abketten. Zusammennähen: Die Schulternaht zusammennähen, die Ärmel einnähen und Ärmel- und Seitennaht in einem innerhalb 1 Randm zusammennähen. Köpfe annähen. |
|
 |
|
Haben Sie diese Anleitung nachgearbeitet?Dann taggen Sie Ihre Fotos mit #dropspattern oder schicken Sie sie an die #dropsfan Galerie Brauchen Sie Hilfe bei dieser Anleitung?Sie finden 19 Videotutorials, einen Kommentar/Fragen-Bereich und vieles mehr, wenn sie die Anleitung bei garnstudio.com aufrufen. © 1982-2026 DROPS Design A/S. Wir besitzen alle Rechte. Dieses Dokument, einschließlich aller Untersektionen, hat Urheberrechte. Mehr dazu, was Sie mit unseren Anleitungen machen können, finden Sie ganz unten auf der Seite zu jeder Anleitung. |


Mit über 40 Jahren Tätigkeit im Entwerfen von Strick- und Häkelmustern bietet Ihnen DROPS Design eine der umfangreichsten Sammlungen von kostenlosen Anleitungen im Internet - in 17 Sprachen übersetzt. Zum jetzigen Zeitpunkt haben wir insgesamt 324 Handarbeitshefte und 12284 Anleitungen auf Deutsch. 12196
Unser Ziel ist es, Ihnen die besten Angebote zum Stricken und Häkeln, Inspirationen und Ratschläge sowie qualitativ hochstehende Garne zu unglaublichen Preisen zu bieten! Möchten Sie unsere Anleitungen nicht nur für den persönlichen Gebrauch nutzen? Unsere Copyright Bedingungen finden Sie bei allen unseren Anleitungen ganz unten auf der jeweiligen Seite. Viel Spaß beim Handarbeiten!
Kommentieren Sie die Anleitung DROPS 97-18
Wir würden gerne Ihre Meinung zu diesem Modell erfahren!
Wenn Sie eine Frage stellen möchten, prüfen Sie bitte, dass Sie die richtige Kategorie im unten stehenden Formular gewählt haben - so bekommen Sie schneller eine Antwort. Die obligatorischen Felder sind mit einem * gekennzeichnet.