
Beliebte Kategorien
Suchen Sie nach einem Garn?


Kommentare / Fragen (15)
![]() Amelie hat geschrieben:
Amelie hat geschrieben:
Bonjour, est-il possible de remplacer le point de riz par un autre point ( endroit ou envers par exemple ) ?
27.09.2025 - 09:27DROPS Design hat geantwortet:
Bonjour Amelie, c'est possible. Tricotez un echantillon pour voir comment ca ce presente. Bon tricot!
28.09.2025 - 11:00
![]() Harriet Bazley hat geschrieben:
Harriet Bazley hat geschrieben:
For the women's small size, the pattern tells you to knit the main body on 112 stitches, and then to cast off 40 stitches for the neck and 38 for each shoulder. Presumably the figure of 38 should read 36, since 40 from 112 leaves only 72 stitches remaining to divide between the shoulders...
16.03.2025 - 21:55DROPS Design hat geantwortet:
Dear Harriet, yes, there seems to be a mistake in the pattern; it should be 36 stitches for each shoulder, both in the front piece and the back piece. We will correct it as soon as possible. Happy knitting!
16.03.2025 - 22:27
![]() Catharina hat geschrieben:
Catharina hat geschrieben:
Hello! Im wondering if you knit the arms back and forth or in circles? I started back and forth because the pattern says that you should sew the arm and side seam countinously. Is this correct? It seems easier to knit in circles. Thank you!
03.12.2024 - 22:32DROPS Design hat geantwortet:
Dear Catharina, the sleeves are worked in the round; you can see in the second sentence of the Sleeves: "work 1 round stocking st, at the same time inc 18-16 (14-14) sts evenly on round = 54-54 (52-54) sts." You sew the shoulder seams (so you join the front and back piece at the top of the shoulders. Then you sew the side seams (to join the lower part of the front and back pieces) and sew the sleeves to the body. Happy knitting!
08.12.2024 - 00:24
![]() De Smet Dominique hat geschrieben:
De Smet Dominique hat geschrieben:
Bonjour, Quand vous dites faire 2 augmentations simultanément sous la manche, comment les relevez vous en intercalaire ou autrement, j’ai essayé mais cela ne fait pas très net. Merci de m’expliquer
26.12.2022 - 22:44DROPS Design hat geantwortet:
Bonjour Mme De Smet, comme les mailles de part et d'autre du milieu sous la manche se tricotent au point de riz, vous pouvez faire les augmentations en tricotant 2 fois la dernière maille du tour + 2 fois la 1ère maille du tour - ou toute autre technique que vous préfèrerez. Bon tricot!
02.01.2023 - 09:34
![]() Mme De Smet Dominique hat geschrieben:
Mme De Smet Dominique hat geschrieben:
Bonjour, Combien de mailles faut-il pour le dos et le devant pour une taille L, Les corrections indiquées ne s'affichent pas Merci
22.10.2022 - 20:38DROPS Design hat geantwortet:
Bonjour Mme De Smet, les corrections s'appliquent uniquement si vous aviez imprimé les explications avant la date de cette correction, sinon, les nombres indiqués sont justes. Bon tricot!
24.10.2022 - 08:23
![]() Andrea hat geschrieben:
Andrea hat geschrieben:
Hi. After you increase to 116 stitches (Man's size S/M), the pattern indicates the wrong number of stitches; 12-15 (13-16), that 13 should be 14, to get the right total of stitches in the row ! Please correct it.
12.09.2021 - 11:31
![]() Sara hat geschrieben:
Sara hat geschrieben:
Hoii, bij de achterpand staat dat je een totaal van 120 steken moet hebben bij een maat L. Bij 67 cm moet je de middelste 42 steken afkanten. Als je 120/3 = 40 steken. Dit betekent dat je 39 steken aan beide kanten overhoudt. In het patroon staat dat je 41 steken afkant bij een hoogte van 68. Moet dit niet 39 steken afkanten zijn.
02.07.2021 - 18:26
![]() MOUGRICHETTE hat geschrieben:
MOUGRICHETTE hat geschrieben:
Bonjour c'est encore moi. Est ce que le diagramme ne représente que les rangs à l'endroit ? En effet, si je tricote en suivant le diagramme avec rang endroit (rang 1), rang envers (rang 2 du dessin) etc.... je n'arrive pas au même résultat que sur la photo. Merci pour votre réponse.
10.05.2016 - 07:50DROPS Design hat geantwortet:
Bonjour Mougrichette, je viens de faire un échantillon du diagramme et le motif donne le même que sur la photo. Assurez-vous de bien commencer le diagramme en bas à droite, lisez de droite à gauche sur l'endroit et de gauche à droite sur l'envers. 1 case = 1 m x 1 rang. Les cases blanches = mailles en jersey endroit, celles avec un rond noir = jersey envers (= à tricoter à l'env sur l'endroit, à l'end sur l'env). Bon tricot!
10.05.2016 - 10:14
![]() MOUGRICHETTE hat geschrieben:
MOUGRICHETTE hat geschrieben:
Bonjour, je ne comprends pas la torsade du milieu. Si je me réfère à la légende du diagramme, il s'agit simplement d'une petite torsade. En effet, il est demandé de Glisser 2 m sur l'aiguille auxiliaire derrière l'ouvrage, 2 m end, reprendre les 2 m en attente et les tricoter à l'end. Or sur l'image, il me semble que la torsade est plus grande. Je compte sur vous pour m'apporter une réponse car j'ai craqué sur ce pull. Merci d'avance.
08.05.2016 - 13:35DROPS Design hat geantwortet:
Bonjour Mougrichette, une erreur s'était glissée dans la légende de cette torsade, il fallait lire: "Glisser 2 m sur l'aiguille auxiliaire derrière l'ouvrage, 2 m end, reprendre les 2 m en attente et les tricoter à 'end, glisser 2 m sur l'aiguille auxiliaire devant l'ouvrage, 2 m end, reprendre les 2 m en attente et les tricoter à l'end". Bon tricot!
09.05.2016 - 10:47
![]() Amelia hat geschrieben:
Amelia hat geschrieben:
The diagram doesn't seem to be accurate. My small cables either side of the central one do not twist tightly, instead there is a ten row elongated gap. Why is there no written reference? From the limited picture, there should be two smaller cable twists besides the larger central cable. However, the diagram doesn't indicate this at all. Please can you correct this, or provide a written pattern?
17.02.2016 - 17:05DROPS Design hat geantwortet:
Dear Amelia, in cable diagram, you have 1 small cable on each side of the larger one. You cross sts for all cables a total of 2 times, then only the 2 smaller one the last time. Happy knitting!
17.02.2016 - 17:13
|
|||||||||||||
DROPS 12-8 |
|||||||||||||
|
|
|||||||||||||
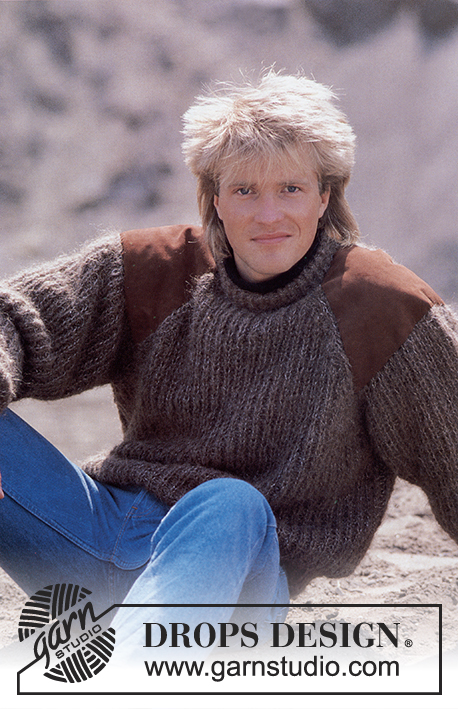
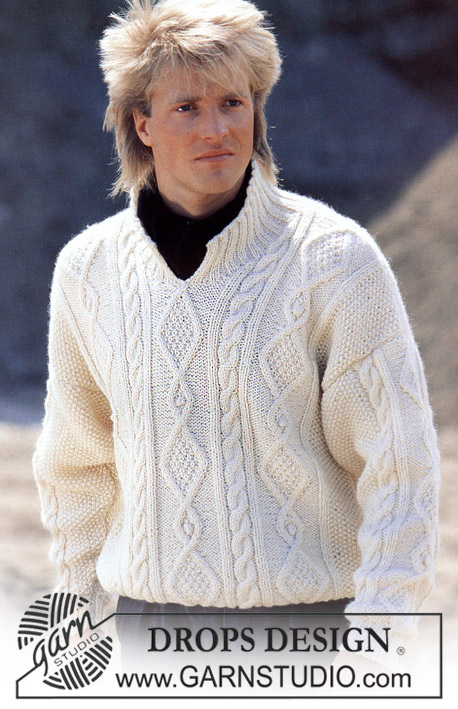
DROPS Pulli mit Aranmuster aus Alaska.
DROPS 12-8 |
|||||||||||||
|
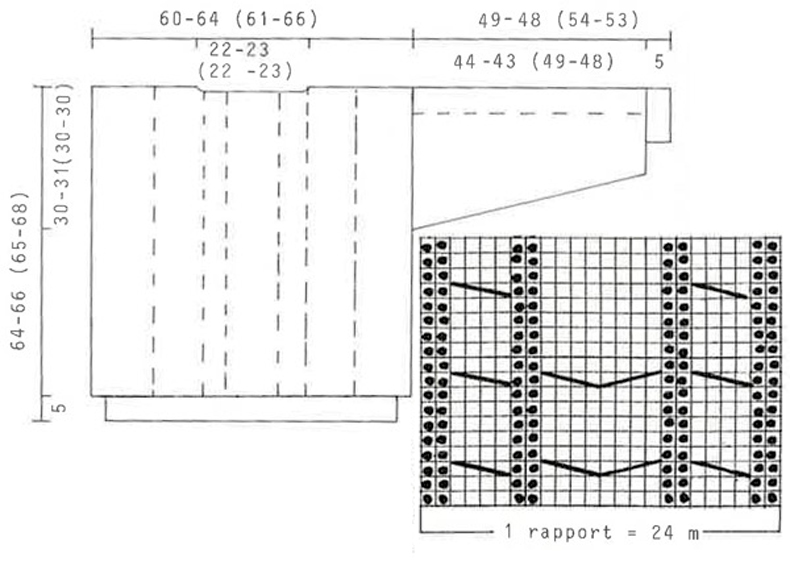
Maschenprobe: 10 x 10 cm im Perlmuster = 14 M x 24 R. auf Nadel 5,5. 1 Zopf auf 24 M = 10,5 cm breit. Bündchenmuster: 2 re, 2 li Perlmuster: 1. Reihe: 1 re, 1 li. 2.Reihe: li M über die re M. und re M. über die li M. RÜCKENTEIL: 84-86 (86-90) M auf Nadel 3,5 aufnehmen und 5 cm Bündchen stricken. Zu Nadel 5,5 wechseln und in der ersten R. gleichmässig verteilt 28-32 (30-30) M aufnehmen = 112-118 (116-120) M. Das Muster wie folgt stricken: 12-15 (14-16) M Perlmuster, 24 M Zopf, 8 M Perlmuster, 24 M Zopf, 8 M Perlmuster, 24 M Zopf, 12-15 (14-16) M Perlmuster. In dieser Musterfolge fortfahren. Achten Sie auf die Maschenprobe. Nach 63-65 (64-67) cm die mittleren 40-42 (40-42) M. abketten. Die restlichen 38-40 (38-41) M bis zu einer Höhe von 64-66 (65-68) cm stricken. VORDERTEIL: Wie das Rückenteil stricken, aber bereits nach 60-62 (60-63) cm die mittleren 22-24 (22-24) M für den Halsausschnitt abketten. Dann beidseitig in jeder 2. R. 4 M x 1, 2 M x 2, 1 M x 1 abketten. Die restlichen 38-40 (39-41) M nach 64-66 (65-68) cm abketten ÄRMEL: 36-38 (38-40) M auf Nadel 3,5 anschlagen und 5 cm Bündchen stricken. Zu Nadel 5,5 wechseln und in der ersten Reihe gleichmässig verteilt 18-16 (14-14) M aufnehmen = 54-54 (52-54) M. Das Muster wie folgt stricken: 15-15 (14-15) M Perlmuster, 24 M Zopf, 15-15 (14-15) M Perlmuster. Weiter beidseitig 20-21 (21-20) x 1 M aufnehmen. Beim Damenmodell in Grösse S in jeder 5. Reihe, beim Herrenmodell S/M+M/L abwechselnd in jeder 5. und 6. Reihe und beim Damenmodell in Grösse M/L abwechselnd in jeder 4. und 5.Reihe = 94-96 (94-94) M. Nach 49-48 cm abketten FERTIGSTELLEN: Die Schulternaht schliessen. Rund um den Halsausschnitt auf Rundnadel 3,5 ca. 90 Maschen aufnehmen und 9 cm Bündchen stricken, umschlagen und innen anheften. Nähte schliessen und Ärmel einsetzen. Für ein echtes Retromodell Schulterpolster einsetzen. |
|||||||||||||
Erklärungen zum Diagramm |
|||||||||||||
|
|||||||||||||
 |
|||||||||||||
Haben Sie diese Anleitung nachgearbeitet?Dann taggen Sie Ihre Fotos mit #dropspattern oder schicken Sie sie an die #dropsfan Galerie Brauchen Sie Hilfe bei dieser Anleitung?Sie finden 21 Videotutorials, einen Kommentar/Fragen-Bereich und vieles mehr, wenn sie die Anleitung bei garnstudio.com aufrufen. © 1982-2026 DROPS Design A/S. Wir besitzen alle Rechte. Dieses Dokument, einschließlich aller Untersektionen, hat Urheberrechte. Mehr dazu, was Sie mit unseren Anleitungen machen können, finden Sie ganz unten auf der Seite zu jeder Anleitung. |
|||||||||||||


Mit über 40 Jahren Tätigkeit im Entwerfen von Strick- und Häkelmustern bietet Ihnen DROPS Design eine der umfangreichsten Sammlungen von kostenlosen Anleitungen im Internet - in 17 Sprachen übersetzt. Zum jetzigen Zeitpunkt haben wir insgesamt 324 Handarbeitshefte und 12290 Anleitungen auf Deutsch. 12202
Unser Ziel ist es, Ihnen die besten Angebote zum Stricken und Häkeln, Inspirationen und Ratschläge sowie qualitativ hochstehende Garne zu unglaublichen Preisen zu bieten! Möchten Sie unsere Anleitungen nicht nur für den persönlichen Gebrauch nutzen? Unsere Copyright Bedingungen finden Sie bei allen unseren Anleitungen ganz unten auf der jeweiligen Seite. Viel Spaß beim Handarbeiten!
Kommentieren Sie die Anleitung DROPS 12-8
Wir würden gerne Ihre Meinung zu diesem Modell erfahren!
Wenn Sie eine Frage stellen möchten, prüfen Sie bitte, dass Sie die richtige Kategorie im unten stehenden Formular gewählt haben - so bekommen Sie schneller eine Antwort. Die obligatorischen Felder sind mit einem * gekennzeichnet.