
Beliebte Kategorien
Suchen Sie nach einem Garn?


Kommentare / Fragen (34)
![]() Joana hat geschrieben:
Joana hat geschrieben:
Hi! I can’t understand this part: Continuing bind off for armhole on every other row: 3 sts 1 (1-2) times, 2 sts 2 (2-2) times, 1 st 1 (2-3) times = 56 (59-59) sts. I work only with the two pieces of front side? How? Sorry and thank you so much for your answers
21.04.2019 - 14:16DROPS Design hat geantwortet:
Hi Joanna, You are working each front piece separately and at the armhole end of every second row on each front piece bind off as follows, depending on the size you are working; so for example in size S you bind off 3 stitches one time, then 2 stitches 2 times and 1 stitch 1 time with a row between each bind-off row where you do not bind off. Hope this helps and happy knitting!
21.04.2019 - 15:04
![]() Joana Dinis hat geschrieben:
Joana Dinis hat geschrieben:
When you said : work the first 64 (68-72) sts, bind off the next 4 sts, it means a decrease? in the 4 sts? like knitting 2 sts together? for four times? thank uu
12.04.2019 - 23:35DROPS Design hat geantwortet:
Dear Joana, you have to cast off these 4 sts for the armhole, so you have to work them not as a decrease but as when you finish the work. Happy knitting!
13.04.2019 - 09:12
![]() Joana Dinis hat geschrieben:
Joana Dinis hat geschrieben:
Sorry i cant understand this part, 64 (68-72) sts front piece, bind off 4 sts for armhole, 126 (134-142) sts back piece, bind off 4 sts for armhole, 64 (68-72) sts front piece.
31.03.2019 - 13:15DROPS Design hat geantwortet:
Dear Mrs Dinis, on this row you will bind off the stitches for armhole dividing front and back pieces: work the first 64 (68-72) sts, bind off the next 4 sts for armhole, work the next 126 (134-142) sts for back piece, bind off the next 4 sts for armhole = 64 (68-72) sts remain for 2nd front piece, work these stitches and continue now each piece separately. Happy knitting!
01.04.2019 - 13:08
![]() Joana Dinis hat geschrieben:
Joana Dinis hat geschrieben:
When i need to do the hole for the buttons? and im starting with 262 sts, and its look like the whole body (front and back) is it right? i dont understand because you divide each part, and my work with 262 points looks like the whole body except the sleeves...
27.03.2019 - 23:03DROPS Design hat geantwortet:
Dear Mrs Dinis, buttonholes will be created when you will work the right front edge - see Assembly at the bottom of the pattern. You are right, you are first working whole body (= front pieces + back piece) in one piece until armholes, then you will divide and work each front piece and back piece separately. Happy knitting!
01.04.2019 - 09:14
![]() Joana Dinis hat geschrieben:
Joana Dinis hat geschrieben:
But what means 1 edge stitch? how i work an edge stich? sorry im begginer
11.03.2019 - 20:02DROPS Design hat geantwortet:
Dear Mrs Dinis, you can work the edge stitches in stocking stitch or in garter stitch. Happy knitting!
12.03.2019 - 09:41
![]() Joana Dinis hat geschrieben:
Joana Dinis hat geschrieben:
Which means this: (...) and continue knitting pattern with 1 edge sts on each side mid front ?
05.03.2019 - 16:43DROPS Design hat geantwortet:
Dear Mrs Dinis, you work as follows: 1 edge stitch, *K4, P4*, repeat from *-* until 1 stitch remains, 1 edge stitch. Happy knitting!
06.03.2019 - 08:47
![]() Heather hat geschrieben:
Heather hat geschrieben:
I am using the recommended Safron Cotton yarn but am struggling with the ribbing. It\'s not stretchy or springing closed. I know this can be an issue with cotton vs animal fibers but mine so far doesn\'t look nearly as tight as even the photo in the pattern. I\'ve even gone down a needle size (using #3 vs #4 in order to get gauge) yet my ribbing still looks flat. Do you have any tips to fix this....or know how the person who knitted the sweater in the photo achieved this tighter rib?
20.05.2018 - 05:46
![]() Micheline Girarad hat geschrieben:
Micheline Girarad hat geschrieben:
What does MID UNDER ARM mean? I do not understand that term. Thanks
03.04.2018 - 16:40DROPS Design hat geantwortet:
Dear Mrs Girarad, this is the place where there should be a seam when working sleeve back and forth, and that's the transition of round when working in the round. Happy knitting!
03.04.2018 - 17:08
![]() Micheliine Girard hat geschrieben:
Micheliine Girard hat geschrieben:
I have trouble understand the term NCREASE MID UNDER ARM . Also, 2 sts 33 times alternating on every 3rd and 4th round. Does that mean on both sides of the needle?
03.04.2018 - 01:25DROPS Design hat geantwortet:
Dear Mrs Girard, see increase mid under arm in previous answer - increase 33 times alternately on every 3rd and 4th round as follows: work 1 round with inc, *2 rounds without inc, 1 round with inc, 3 rounds without inc, 1 round with inc*, and repeat from *-* until you have inc a total of 33 times and you get 116 sts. Happy knitting!
03.04.2018 - 10:10
![]() Micheline Girard hat geschrieben:
Micheline Girard hat geschrieben:
Need help understanding the term in the Sleeve pattern: ''at the same time, inc. MID UNDER ARM. What does that mean exactly? I wait till I am half way to the end of the sleeve or what? Also, do I increase both sides of the sleeve, when it says 2 sts. 33 times alternating on every 3rd and 4th round.
03.04.2018 - 01:23DROPS Design hat geantwortet:
Dear Mrs Girard, you will increase mid under arm by working until 1 st remain before beg of round, inc 1 st, work last st on round, (marker beg of round), work 1 st and inc 1 st = you have inc 2 sts mid under arm (ie on each side of beg of round). Happy knitting!
03.04.2018 - 10:09
|
|
Sandy Beach |
|
 |
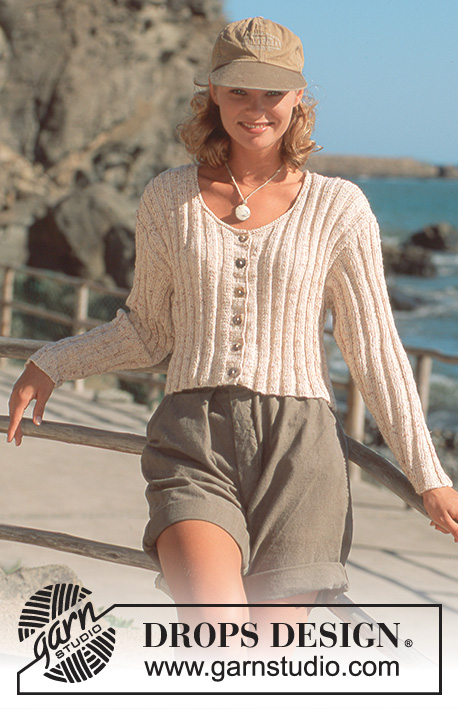 |
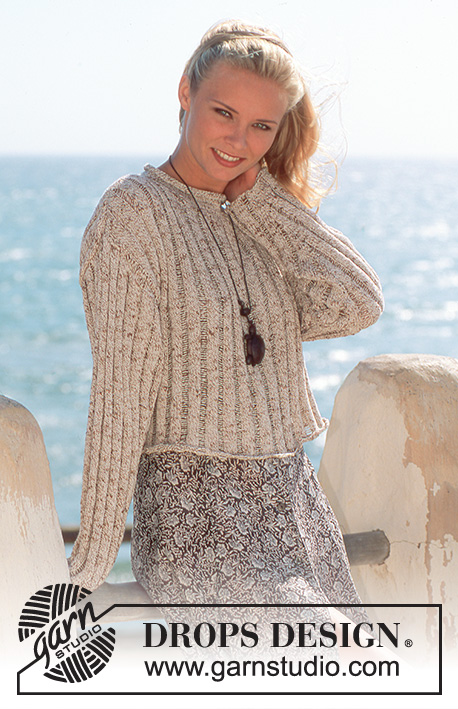
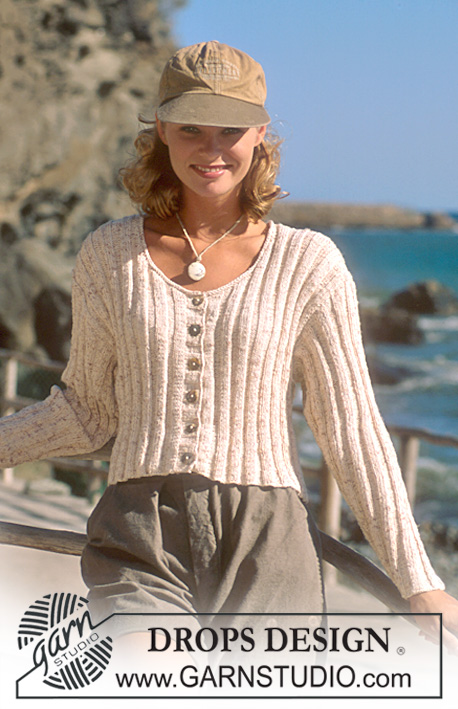
Gestrickte Jacke mit Rippenmuster in DROPS Safran. Größe S-L.
DROPS 41-23 |
|
|
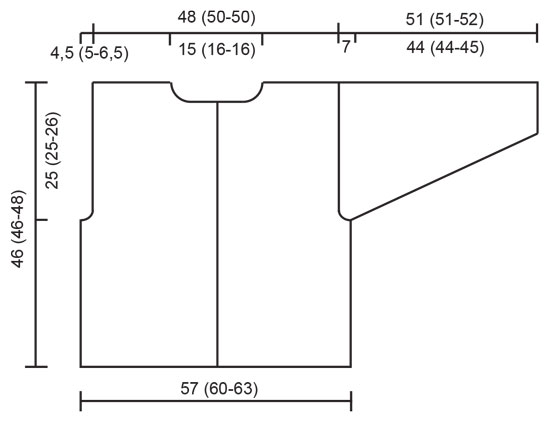
--------------------------- HINWEISE ZUR ANLEITUNG --------------------------- Rippenmuster: * 4 re., 4 li. *, von *-* wiederholen. ------------------------------- DIE ARBEIT BEGINNT HIER ------------------------------- Jacke - Kurzbeschreibung der Arbeit Das Rumpfteil wird auf einer Rundstr. Ndl. hin und zurück gestrickt. Ab den Armausschnitten werden die Vorderteile und das Rückenteil einzeln weitergestrickt. Die Ärmel werden in Runden gestrickt. Die vorderen Blenden und die Halsblende werden zuletzt angestrickt. Rumpfteil: Mit natur meliert auf Rundstr. Nr. 3,5 262 (278-294) M. anschlagen und im Rippenmuster (siehe oben) stricken, mit je 1 Rand-M beidseitig. Nach 21 (21-22) cm die nächste R. wie folgt stricken: 64 (68-72) M. im Muster wie zuvor für das Vorderteil stricken, 4 M. für den Armausschnitt abketten, 126 (134-142) M. für das Rückenteil wie zuvor stricken, 4 M. für den Armausschnitt abketten, 64 (68-72) M. für das Vorderteil stricken. Jeder Teil wird jetzt für sich fertig gestrickt. Vorderteil: = 64 (68-72) M. An Anfang jeder R, die am Armausschnitt beginnt, wie folgt abketten: 3 M. 1 (1-2) x, dann 2 M. 2 (2-2) x, dann 1 M. 1 (2-3) x = 56 (59-59) M. Nach 29 (29-31) cm am Anfang jeder R, die am Halsrand beginnt, wie folgt für den Halsausschnitt abketten: 2 M. 7 x, und danach am Anfang jeder 2. R, die am Halsrand beginnt: 1 M. 4 (5-5) x. Die Arbeit nach 46 (46-48) cm abk. Das andere Vorderteil gegengleich stricken. Rückenteil: = 126 (134-142) M. Wie beim Vorderteil für die Armausschnitte abk. = 110 (116-116) M. Nach 44 (44-46) cm die mittleren 30 (32-32) M. für den Halsausschnitt abketten und jede Seite einzeln weiterstricken, dabei am Anfang der nächsten R, die am Halsrand beginnt, 2 M abketten. Die Arbeit nach 46 (46-48) cm abk. Ärmel: Die Ärmel werden in Runden gestrickt. Mit natur meliert auf Nadelspiel Nr. 3,5 (50-50) M. anschlagen und in Runden im Rippenmuster stricken (es sind 4 M. re. in der Mitte des Ärmels). Gleichzeitig an der unteren Ärmelmitte wie folgt zunehmen: 2 M. 33 (33-35) x abwechselnd in jeder 3. und 4. Rd. = 116 (116-120) M. Nach 44 (44-45) cm die mittleren 6 M. unter dem Ärmel abk. und hin und zurück fertig stricken, dabei am Anfang jeder R, d.h. beidseitig, wie folgt für die Armkugel abketten: 4 M. je 9 x beidseitig, danach abketten. Die Arbeit misst jetzt ca. 51 (51-52) cm. Zusammennähen: Die Schulternähte zusammennähen. Für die vordere Blende am linken Vorderteil mit natur meliert auf einer Rundstr. Nr. 3 ca. 84 M. auffassen (teilbar durch 8 + 4) und 3 cm im Rippenmuster stricken. Am rechten Vorderteil wiederholen, jedoch nach 1 cm gleichmäßig verteilt 6 Knopflöcher einstricken - 1 Knopfloch = 3 M. abk. und bei der nächsten R. über den angeketteten M. 3 neue M. anschlagen. Für die Halsblende aus dem ganzen Halsausschnitt mit natur auf Rundstr. Nr. 3 ca. 110-120 M. auffassen und 1 Krausrippe (= 2 R kraus re) stricken, danach abk. Die Ärmel einnähen und die Knöpfe annähen. |
|
 |
|
Haben Sie diese Anleitung nachgearbeitet?Dann taggen Sie Ihre Fotos mit #dropspattern oder schicken Sie sie an die #dropsfan Galerie Brauchen Sie Hilfe bei dieser Anleitung?Sie finden 17 Videotutorials, einen Kommentar/Fragen-Bereich und vieles mehr, wenn sie die Anleitung bei garnstudio.com aufrufen. © 1982-2026 DROPS Design A/S. Wir besitzen alle Rechte. Dieses Dokument, einschließlich aller Untersektionen, hat Urheberrechte. Mehr dazu, was Sie mit unseren Anleitungen machen können, finden Sie ganz unten auf der Seite zu jeder Anleitung. |
|


Mit über 40 Jahren Tätigkeit im Entwerfen von Strick- und Häkelmustern bietet Ihnen DROPS Design eine der umfangreichsten Sammlungen von kostenlosen Anleitungen im Internet - in 17 Sprachen übersetzt. Zum jetzigen Zeitpunkt haben wir insgesamt 324 Handarbeitshefte und 12290 Anleitungen auf Deutsch. 12202
Unser Ziel ist es, Ihnen die besten Angebote zum Stricken und Häkeln, Inspirationen und Ratschläge sowie qualitativ hochstehende Garne zu unglaublichen Preisen zu bieten! Möchten Sie unsere Anleitungen nicht nur für den persönlichen Gebrauch nutzen? Unsere Copyright Bedingungen finden Sie bei allen unseren Anleitungen ganz unten auf der jeweiligen Seite. Viel Spaß beim Handarbeiten!
Kommentieren Sie die Anleitung DROPS 41-23
Wir würden gerne Ihre Meinung zu diesem Modell erfahren!
Wenn Sie eine Frage stellen möchten, prüfen Sie bitte, dass Sie die richtige Kategorie im unten stehenden Formular gewählt haben - so bekommen Sie schneller eine Antwort. Die obligatorischen Felder sind mit einem * gekennzeichnet.