
Populære kategorier
Ser du etter et garn?















Kommentarer / Spørsmål (50)
 Isabel skrev:
Bonjour, Commet puis-je trouver le patron écrit en anglais et non pas le diagramme? Merci!
10.08.2026 - 16:59DROPS Design answered:
Bonjour Isabel, nous n'avons que des diagrammes pour ce modèle, dans toutes les langues. Retrouvez ici comment lire un diagramme; et si vous préférez lire les explications en anglais, cliquez sur le menu déroulant pour changer de langue. Bon tricot!
11.08.2026 - 09:46
 Melanie skrev:
Wenn ich die 3. Reihe von A.2.a, b + c arbeite: Im Übergang von a zu b liegt ein zusammenstricken 2er Maschen plus ein Überschlag = 3 Maschen. Bei b ist es das gleiche, dann komme ich auf meine 10 Maschen, aber bei c fehlt mir dann eine Masche, oder muss ich dann einfach noch eine daran stricken? Ich stehe total aufm Schlauch. Ist jetzt mein 10ter Versuch und langsam bin ich ziemlich genervt.
30.06.2026 - 09:44DROPS Design answered:
Liebe Melanie, bei der 3. Reihe stricken Sie die letzte Masche A. zusammen mit der 1. Masche B (- diese Abnahme ist jetzt die letzte Masche A und der Umschlag ist jetzt die erste Masche B); genauso stricken Sie am Ende B: die letzte Masche B stricken Sie zusammen mit der 1 Masche vom nächsten B und dann C. Viel Spaß beim Stricken!
01.07.2026 - 07:06
 Gitte skrev:
Jeg kan ikke finde video på opskrift 176-25 Strikkes der på vangpinden uden mønster og bare rat?
06.04.2026 - 21:49DROPS Design answered:
Hei Gitte. Har dessverre ingen video. Når det strikkes fra vrangen (blank firkant i diagrammet) strikkes disse vrang (fra vrangen). mvh DROPS Design
07.04.2026 - 13:21
 Laura skrev:
Quanti gr di filato sono necessari per la taglia S/M ? grazie
09.02.2025 - 10:59DROPS Design answered:
Buongiorno Laura, può trovare la quantità di filato necessaria per i modelli DROPS di fianco alla foto. Per questo modello nella taglia S/M sono necessari 350 g di Bomull-Lin. Buon lavoro!
09.02.2025 - 11:08
 Sussie Rosberg skrev:
Vet inte vad jag gör för fel,jag har dragit upp arbetet 8 ggr nu. Rad 3,5,9,11 det är alltid på dessa rader det blir fel när halva ihoptagningen är mellan A o B Eller/och B och C Jag får bara inte ihop det oavsett om jag skjuter på mönstret eller stickar som det är där sista och första ihoptagningen blir en maska när jag repeterar B. Provar en gång till sen lägger jag ner.
20.02.2024 - 13:31DROPS Design answered:
Hej Sussie, hvis du prøver at tænke på hele rækken, så på pind 3 har du altid 3 r imellem hver hulmønster. På pind 5 har du 2 hulm, 1rm, 2hulm, 1rm, 2hulm, 2r osv...
23.02.2024 - 13:11
 Susan Hoff skrev:
Hello! I am new to chart reading and am having trouble deciphering how to properly do the A.2 B repeat on rows 3,7,11, and 15. There are "knit 2 tog" stitches between A.2 A and A.2 B. Where do I start and end the repeat? Thank you so much for your time. Susan H.
27.10.2023 - 19:09DROPS Design answered:
Dear Mrs Hoff, on row 3 for ex, work the last st in A.together with the first stitch B = this is now the new last st in A and the yarn over is now the first st in B; at the end of B, work tog the last st B with the first st next B / C; this is now the new last stitch B and the yarn over is the new first st next B/C. Same for all these row where the sts are worked together with the next stitch. Happy knitting!
28.10.2023 - 08:55
 Vanessa skrev:
This is my first ever chart! Why is A.1 shorter than A.2..? The shortness is making me so confused as the pattern instructions include A.1 from the beginning but comparing the charts makes it looks like it doesn't start until row 9, as that is where it lines up with A.2! Thank you 😊
26.10.2023 - 08:25DROPS Design answered:
Dear Vanessa, different charts may have different lengths because the pattern is shorter. So A.1 is a 12-row pattern, which will start over after every 12th row. Meanwhile, A.2 is a 16-row pattern, which will be repeated vertically/ start over after every 16th row. They don't need to be aligned between themselves; A.1 are the edges of the piece and A.2 the rest of the poncho. Happy knitting!
29.10.2023 - 19:46
Sheila skrev:
Hi. I’ve been working on this and I am almost halfway and still am confused on how to make the side piece that connects to the front. The diagram is showing it as an “L” shape but the directions tell me to make it as just a “l” shape. This would mean that the back goes straight across and not down to a point as the front goes. Am I missing something? Is there a view of the back once assembled? Do I make a separate piece and attach it ?
21.09.2023 - 15:59DROPS Design answered:
Dear Sheila, in this video we are showing how to sew this kind of poncho, ie you work a long band then one of the short side is sewn along the side of the long side. Hope it will help you. Happy knitting!
21.09.2023 - 16:58
Sharon Hunt skrev:
Hello! I am knitting the 7th of 8 balls of yarn and the length is 96 cm. Will this be enough to get to the length stayed in the pattern? Am a chubby, short girl would that affect how long to make this? I would really hate to have to rip this our since everything else is going ok. I am also still confuse as to how this is supposed to be sewn.
26.04.2023 - 17:29DROPS Design answered:
Dear Mrs Hunt, did you get correct tension in both width (17 sts = 10 cm) and height (22 rows = 10 cm)? If you need more rows for 10 cm, you might require more yarn. In this video, we show how to assembly such a poncho, this might help you. Happy knitting!
27.04.2023 - 08:06
Sharon Hunt skrev:
Hi started making this poncho and bought 8 balls of yarn for the project. Am still making the largest size but the length of the small size. The yarn is still not enough. I have used up 5 and half balls and the length is 33.5 inches. This is really strange. Disappointing that yarn bought for the large is not enough for the small. Are measurements before or after blocking? Seems like I have to order more yarn to finish this. Am knitting to gauge. Ladies at the drops store is confused too
22.04.2023 - 15:57DROPS Design answered:
Dear Sharon, if the gauge matches the one in the pattern, then the quantities should be correct. The measurements are from before assembling. That is, it's the final measument of the rectangle right before you start to sew it. In any case, if you have 5.5/8 balls used and you are 3/4 of the garment done, you should have enough to finish. Happy knitting!
23.04.2023 - 18:29
|
|||||||||||||||||||
Inayah#inayahponcho |
|||||||||||||||||||
|
|
|||||||||||||||||||
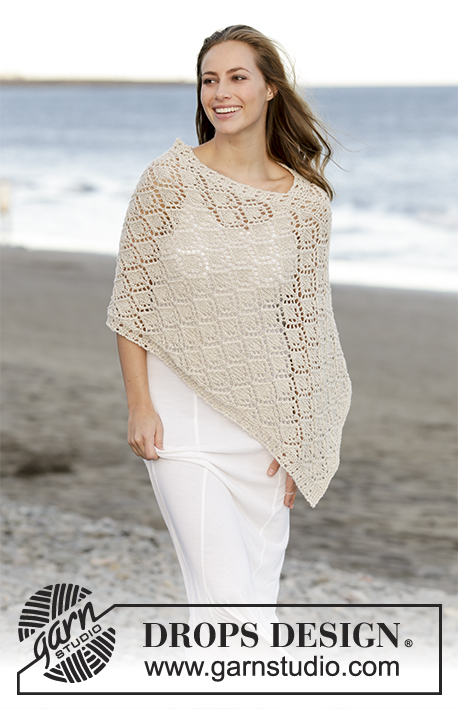
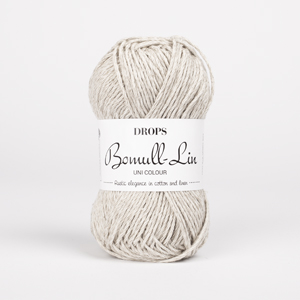
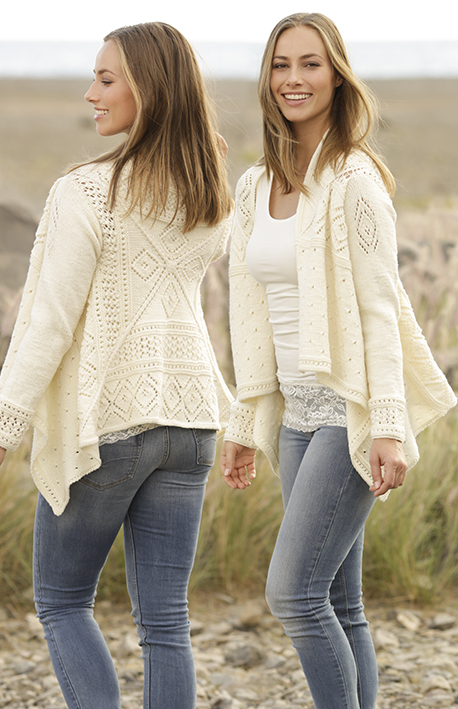
Strikket poncho med hullmønster i DROPS Bomull-Lin. Størrelse S - XXXL
DROPS 176-25 |
|||||||||||||||||||
|
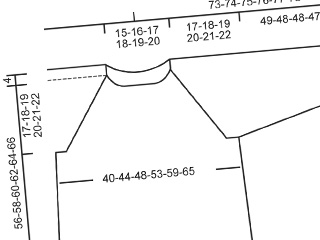
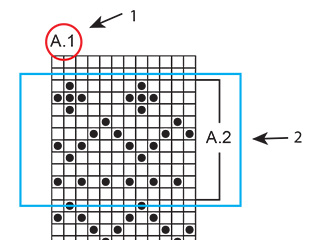
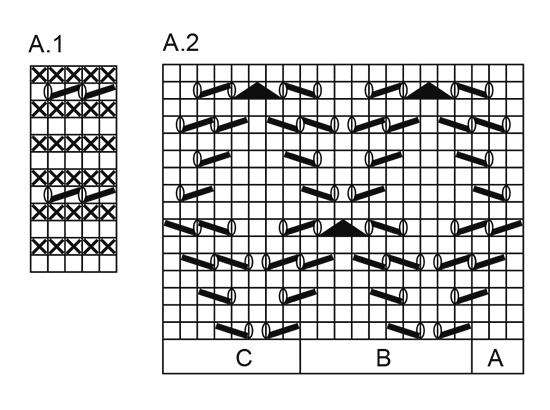
RILLE (strikkes frem og tilbake): 1 rille = Strikk 2 pinner rett. MØNSTER: Se diagram A.1 og A.2. Diagrammene viser alle pinnene i mønsteret sett fra retten. ---------------------------------------------------------- PONCHO: Arbeidet strikkes frem og tilbake som et skjerf og sys sammen til en poncho til slutt. Legg opp 71-81-91 masker på rundpinne 5 med Bomull-Lin. Strikk 2 RILLER – se forklaring over, deretter strikkes det slik – fra retten: A.1 (= 5 masker), A.2 A (= 3 masker), A.2 B over de neste 50-60-70 maskene, A.2 C (= 8 masker), avslutt med A.1. HUSK PÅ STRIKKEFASTHETEN! Gjenta mønsteret i høyden. Fortsett slik til arbeidet måler 43-49-55 cm. Sett 1 merke i siden av arbeidet, avfellingskanten skal sys fast herfra senere. Strikk videre med mønster som før til arbeidet måler 112-121-130 cm. Fell av. MONTERING: Sy kortsiden (= avfellingskanten) sammen med langsiden, fra merket og ned til oppleggskanten. Sy i ytterste ledd av ytterste maske. Motsatt langside danner nå en spiss midt foran. |
|||||||||||||||||||
Diagramforklaring |
|||||||||||||||||||
|
|||||||||||||||||||
 |
|||||||||||||||||||
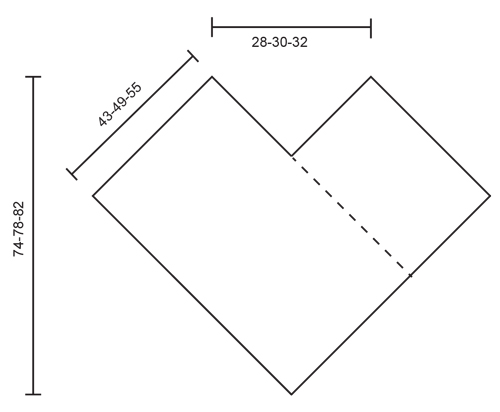 |
|||||||||||||||||||
Har du fullført dette mønsteret?Tagg bildene dine med #dropspattern #inayahponcho eller send dem til #dropsfan-galleriet. Trenger du hjelp med denne oppskriften?Du finner 10 instruksjonsvideoer, kommentarer/spørsmål og mer i oppskriften på www.garnstudio.com © 1982-2026 DROPS Design A/S. Alle rettigheter er reservert. Dette dokumentet med sine underdokumenter har copyright. Les mer om hva du er tillatt å gjøre med våre oppskrifter nederst i alle våre oppskrifter på vår nettside. |
|||||||||||||||||||

Med over 40 år i strikke- og heklebransjen, tilbyr DROPS Design en av de mest omfattende samlingene av gratis oppskrifter på internett - oversatt til 17 språk. Per i dag har vi 333 kataloger og 12536 oppskrifter på Norsk.
Vi jobber hardt for å tilby det beste innen strikking og hekling, inspirasjon og gode råd, men også kvalitetsgarn til fantastiske priser! Vil du bruke våre oppskrifter til annet enn personlig bruk? Du kan lese om hvilke regler som gjelder i teksten Copyright nederst på siden i alle våre oppskrifter. God fornøyelse!
Kommenter oppskrift DROPS 176-25
Vi vil gjerne høre din mening om denne modellen!
Hvis du ønsker å stille et spørsmål, husk å velge riktig kategori i menyen under - det vil sørge for at du får svar raskere. Obligatoriske felt er markert med *.