
Looking for a yarn?


|
||||||||||||||||||||||
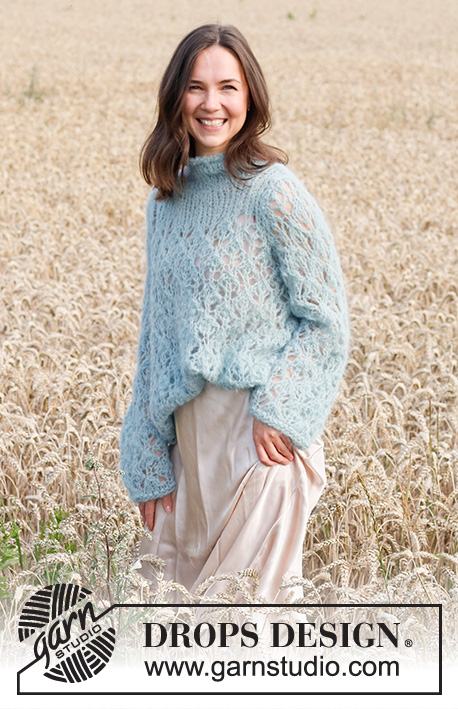
Cloud Cover |
||||||||||||||||||||||
 |
 |
|||||||||||||||||||||
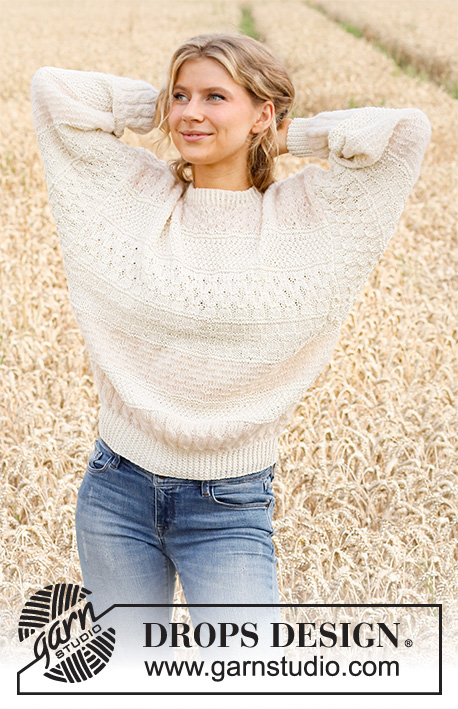
Knitted jumper with popcorn and bobbles in DROPS Melody. Size XS–XXL.
DROPS 220-9 |
||||||||||||||||||||||
|
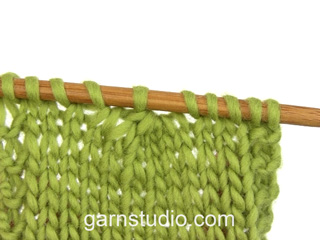
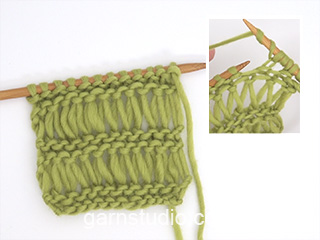
------------------------------------------------------- EXPLANATION FOR THE PATTERN: ------------------------------------------------------- GARTER STITCH (back and forth): Knit all rows. 1 ridge vertically = knit 2 rows. PATTERN: See diagrams A.1 and A.2. Diagrams show all rows in pattern seen from the right side. CAST-OFF TIP: To avoid a tight cast-off edge you may use a larger needle size. If this also is too tight, work a 1 yarn over after approx. every 4th stitch while casting off (cast off yarn overs as regular stitches). ------------------------------------------------------- START THE PIECE HERE: ------------------------------------------------------- JUMPER - SHORT OVERVIEW OF THE PIECE: Work back and front piece back and forth on circular needle separately, bottom up. Sew piece together on the shoulders. Then pick up stitches along armholes. Sleeves are worked back and forth on circular needle, top down. Sew piece together as explained in pattern. Work a neck edge in garter stitch at the end. BACK PIECE: Place circular needle size 7 and 8 mm together and cast on 54-60-66-72-78-84 stitches over both these circular needles with Melody – this is done to avoid a tight cast-on edge. Pull out circular needle size 8 mm from the stitches, and work in GARTER STITCH back and forth on circular needle size 7 mm - read explanation above. When piece measures 6 cm, switch to circular needle size 8 mm. Work next row as follows from right side: Work A.1 (= 3 stitches), work A.2 over the next 48-54-60-66-72-78 stitches (= 8-9-10-11-12-13 repetitions of 6 stitches), and finish with A.1 (= 3 stitches). Continue pattern back and forth like this. REMEMBER THE KNITTING TENSION! When piece measures 46-46-48-47-49-49 cm, cast off 2-2-2-8-8-8 stitches for armholes at the beginning of the next 2 rows = 50-56-62-56-62-68 stitches. Continue pattern as before but work A.1 over only 1 stitch in each side When piece measures approx. 47-49-51-52-54-56 cm – finish after one whole repetition, vertically work in garter stitch back and forth over all stitches. When piece measures 52-54-56-58-60-62 cm, cast off the middle 16-18-18-20-20-22 stitches for neck and finish each shoulder separately. Continue with garter stitch and cast off 1 stitch on next row from neck = 16-18-21-17-20-22 stitches remain on shoulder. Continue to work until piece measures 54-56-58-60-62-64 cm. Cast off by knitting from right side - read CAST-OFF TIP! Work the other shoulder the same way. FRONT PIECE: Cast on the same number of stitches as on back piece and work be the same way as back piece until piece measures 49-51-53-54-56-58 cm. Now slip the middle 12-14-14-16-16-18 stitches on a stitch holder for neck, and finish each shoulder separately. Continue with garter stitch and cast off for neck at the beginning of every row from neck as follows: Cast off 2 stitches 1 time and 1 stitch 1 time = 16-18-21-17-20-22 stitches remain on shoulder. Continue to work until piece measures 54-56-58-60-62-64 cm. Cast off by knitting from right side - read CAST-OFF TIP! Work the other shoulder the same way. ASSEMBLY-1: Sew shoulder seams inside cast-off edge. SLEEVES: Now pick up stitches along the armhole as explained below, i.e. From bottom of armhole and up to shoulder, and from shoulder and down to armhole on the other side - work sleeves top down. Pick up from right side approx. 42-48-48-54-54-60 stitches inside 1 edge stitch on circular needle size 8 mm with Melody. Knit 1 row from wrong side. Work next row as follows from right side: Work A.1 (= 3 stitches), work A.2 over the next 36-42-42-48-48-54 stitches (= 6-7-7-8-8-9 repetitions of 6 stitches), and finish with A.1 (= 3 stitches). Continue pattern back and forth like this. When sleeve measures 2-2-2-7-7-7 cm from where stitches were picked up, insert 1 marker in each side. Markers mark where sleeves are sewn to the bottom of armhole. NOW MEASURE PIECE FROM HERE! Continue back and forth as before. When sleeve measures 4 cm from markers, decrease 1 stitch at the beginning of row by knitting 2 together. When piece measures 8 cm, decrease 1 stitch at the end of row by knitting 2 twisted together = 40-46-46-52-52-58 stitches. Repeat decrease in size L, XL and XXL at the beginning of row when sleeve measures 12 cm from marker, and at the end of row when sleeve measures 16 cm from markers = 40-46-46-50-50-56 stitches. Continue pattern as before but work A.1 over only the outermost 2-2-2-1-1-1 stitch in each side Work until sleeve measures approx. 46-45-44-42-41-39 cm from marker – finish after one whole repetition vertically. Switch to circular needle size 7 mm. Work in garter stitch back and forth until sleeve measures 48-47-46-44-43-41 cm from markers, or desired length. Cast off by knitting from right side - remember CAST-OFF TIP! ASSEMBLY-2: Sew sleeves to bottom of armhole – markers on sleeve should fit side on front piece/back piece Sew underarm seams and side seams in one - begin at the bottom of sleeve and sew seam up to armhole (in outer loops of edge stitches to avoid a chunky seam), then continue seam from armhole and down along front/back piece. Repeat in the other side of piece. NECK EDGE: Begin at one shoulder and pick up from right side approx. 46 to 60 stitches around the neck (including stitches on stitch holders at the front) on circular needle size 7 mm with Melody. Purl 1 round, knit 1 round and purl 1 round. Cast off by knitting– remember CAST-OFF TIP! |
||||||||||||||||||||||
Diagram explanations |
||||||||||||||||||||||
|
||||||||||||||||||||||

|
||||||||||||||||||||||
|
Have you made this or any other of our designs? Tag your pictures in social media with #dropsdesign so we can see them! Do you need help with this pattern?You'll find tutorial videos, a Comments/Questions area and more by visiting the pattern on garnstudio.com. © 1982-2024 DROPS Design A/S. We reserve all rights. This document, including all its sub-sections, has copyrights. Read more about what you can do with our patterns at the bottom of each pattern on our site. |
||||||||||||||||||||||


With over 40 years in knitting and crochet design, DROPS Design offers one of the most extensive collections of free patterns on the internet - translated to 17 languages. As of today we count 309 catalogues and 11518 patterns translated into English (UK/cm).
We work hard to bring you the best knitting and crochet have to offer, inspiration and advice as well as great quality yarns at incredible prices! Would you like to use our patterns for other than personal use? You can read what you are allowed to do in the Copyright text at the bottom of all our patterns. Happy crafting!
Comments / Questions (22)
Hej! Den här tröjan va rolig att sticka Jag är jättenöjd med den . Om jag vill lägga ut en bild på den. Hur gör jag då?
25.11.2022 - 12:57Buongiorno, che taglia indossa la modella in foto? Grazie
23.11.2022 - 01:09DROPS Design answered:
Buongiorno Ida, solitamente le modelle nelle foto indossano la taglia M. Buon lavoro!
24.11.2022 - 19:52Jeg har svært ved at finde den korrekte størrelse. Hvor finder jeg jeres størrelsesskema? Har søgt på nøgleord, men der kommer ikke noget frem.
30.10.2022 - 09:35DROPS Design answered:
Hei Lisbeth. Måleskissen finner du nederst under hver oppskrift. Den inneholder målene på de størrelser vi har i oppskriften. Hvis du følger oppskriften og overholder strikkefastheten får ditt plagg samme mål som i skissen. Hvis du syns det er vanskelig å bestemme deg for hvilken størrelse du skal lage, så kan det være en god ide å måle en genser du har og liker størrelsen på. Velg deretter størrelse ut fra målene som på målskissen tilsvarer dette. Hvis din genser har en lengde på 58 cm, en brystvidde / vidde nederst på genseren på 55 cm, så tilsvarer dette str M på denne målskissen. Omkretsen nederst = 55 cm x 2 = 110 cm hele veien rundt! mvh DROPS Design
31.10.2022 - 12:46Hei! Har dere en video som viser hvordan man kan gjøre om oppskriften slik at man kan strikke rundt på rundpinne, istedenfor frem og tilbake? Eller er det noen praktisk grunn til at genseren strikkes frem og tilbake? M h Kira
05.08.2022 - 10:54DROPS Design answered:
Hej Kira, det har vi desværre ikke, men prøv bare hvis du hellere vil strikke rundt :)
05.08.2022 - 12:18Ik zou graag willen weten hoe ik het aan elkaar moet naaien met het oog op de lange steken. Als je het met een maassteek doet is er iedere keer een stukje niet dichtgenaaid
11.09.2021 - 17:22DROPS Design answered:
Dag Anne-Marie,
Op de plekken waar j e lange steken hebt kun je ook de maassteken lang maken. Op die manier loopt het patroon a.h.w. door in de naad.
17.09.2021 - 10:49Please photograph the model standing up in order to show the drape of the garment. Thank you:)
09.08.2021 - 03:48Hej Kan I oplyse hvilken type sting man skal sy trøjen sammen med? Der må være noget forkert med målene i opskriften: Når jeg ser på målskitsen er ærmegabet 18 cm i str.S, men når jeg læser instruktionen er det kun 8 cm ( der lukkes af til ærmegab ved 46 cm og bagstykket lukkes af ved 54 cm). For størrelse XL angives længde på ærmegabet at være 25 cm, der lukkes af til ærmegab ved 49 cm og til skuldre ved 64 cm, altså kun 15 cm.
19.07.2021 - 21:24Kan det passe at man ikke skal have et kantmaske for sammensyning.? Tænker det måske er svært at sy dette mønster sammen uden. Hvis ikke hvordan syr man så trøjen sammen?
29.06.2021 - 09:26DROPS Design answered:
Hej Elisabet. Under MONTERING-2 kan du läsa hur du syr trøjen sammen. Mvh DROPS Design
29.06.2021 - 11:21Hei. Takk for fine oppskrifter. Strikker størrelse L. Har ikke strikket ermene ovenfra og ned tidligere. Lurer på følgende: «plukk opp masker fra BUNNEN av ermehullet». Menes det da at de 8 maskene som er felt på hver side av bolen ikke tas med? Forstår det slik at de 7 cm som er strikket før merket på armen, skal syes sammen med disse maskene som er felt på bolen. Blir dette riktig? Med vennlig hilsen Kirsti
11.05.2021 - 11:50DROPS Design answered:
Hej Kirsti, du strikker masker op fra bunden af ærmegabet, det vil siger derfra hvor du lukkede masker af til ærmehul. God fornøjelse!
14.05.2021 - 08:42Dear Garnstudio-Team, Will you please tell if it is possible to knit the jumper in the round up to the armholes. Thank you so much!
25.03.2021 - 22:06DROPS Design answered:
Dear Elena, this might be possible - you would have to adjust the way of working the diagram/pattern - this video below might help you. Happy knitting!
26.03.2021 - 07:15