DROPS Air
DROPS Air
65% Alpaca, 28% Polyamide, 7% Wool
from 6.45 $ /50g
Get the yarn to make this pattern from 58.05$.

The yarn cost is calculated from the pattern’s smallest size and the yarn’s cheapest product type. Looking for an even better price? You might find it on the DROPS Deals!

DROPS SS24

Team Winter

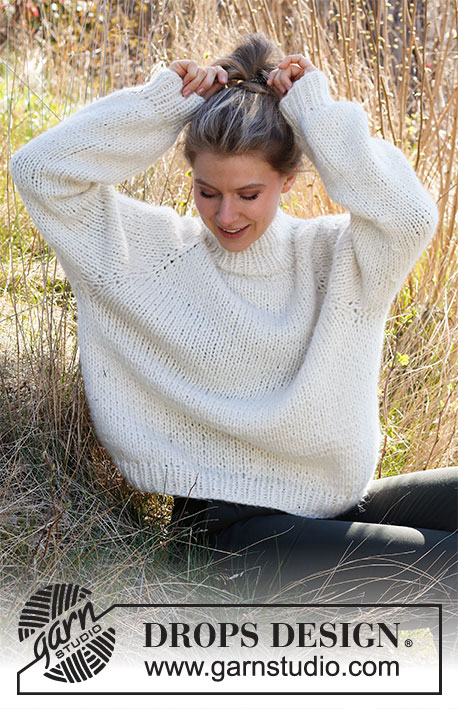
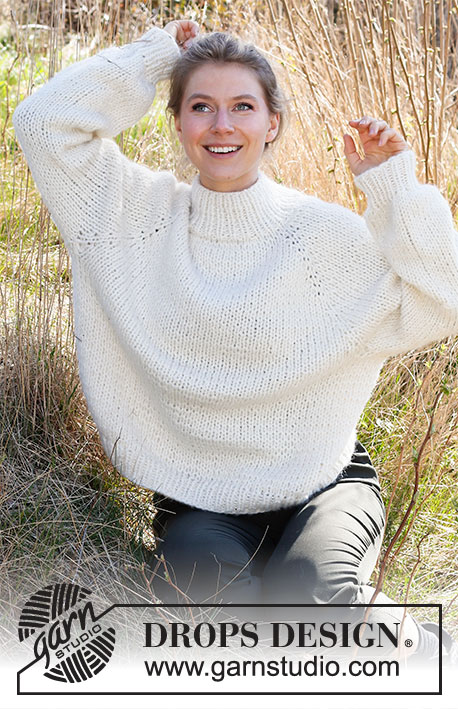
Knitted sweater with raglan in 2 strands DROPS Air or 1 strand DROPS Wish. The piece is worked top down with raglan. Size: S - XXXL

DROPS 216-23
DROPS design: Pattern ai-273
Yarn group C + C or E
-------------------------------------------------------

SIZE:
S - M - L - XL - XXL – XXXL

Finished measurements:
Chest measurements: 100-108-116-128-140-152 cm = 39⅜"-42½"-45¾"-50⅜"-55"-59¾"
Full length: 52-54-56-58-60-62 cm = 20½"-21¼"-22"-22¾"-23⅝"-24⅜"

All measurements in charts are in cm.

MATERIALS:
DROPS AIR from Garnstudio (belongs to yarn group C)
450-500-550-600-650-700 g color 01, off white

Or use:
DROPS WISH from Garnstudio (belongs to yarn group E)
500-550-600-650-700-750 g color 01, off white

KNITTING GAUGE:
10 stitches in width and 14 rows vertically in stockinette stitch and 2 strands = 10 x 10 cm = 4" x 4".

NEEDLES:
DROPS DOUBLE POINTED NEEDLES SIZE 9 mm = US 13
DROPS CIRCULAR NEEDLE SIZE 9 mm = US 13: Length 40 = 16" and 60 = 24" or 80 cm = 32" for stockinette stitch.
DROPS DOUBLE POINTED NEEDLES SIZE 7 mm = US 10,75 for rib
DROPS CIRCULAR NEEDLE SIZE 7 mm = US 10,75 : Length 80 cm = 32" for rib.
Needle size is only a suggestion! If you have too many stitches on 10 cm = 4" switch to a larger needle size. If you have too few stitches on 10 cm = 4" switch to a smaller needle size.

-------------------------------------------------------

Alternative Yarn – See how to change yarns here
Yarn Groups A to F – Use the same pattern and change the yarn here
Yarn usage using an alternative yarn – Use our yarn converter here

-------------------------------------------------------

DROPS Air
DROPS Air
65% Alpaca, 28% Polyamide, 7% Wool
from 6.45 $ /50g
Get the yarn to make this pattern from 58.05$.

The yarn cost is calculated from the pattern’s smallest size and the yarn’s cheapest product type. Looking for an even better price? You might find it on the DROPS Deals!

Pattern instructions

NOTE: This pattern is written in American English. All measurements in charts are in cm. For conversion from inches to cm - click here. There are different terms for crocheting in American and British English. If this pattern includes crochet, click for "crochet terms" here. For this pattern in British English, please click here.
-------------------------------------------------------

EXPLANATION FOR THE PATTERN:

-------------------------------------------------------

INCREASE/DECREASE TIP (evenly spaced):
To calculate how to increase/decrease evenly , use the total number of round on round (e.g. 60 stitches) , and divide stitches by number of increases/decreases to be done (e.g. 4) = 15. In this example increase by making 1 yarn over after every 15th stitch. On next round work yarn overs twisted to avoid holes.
To decrease in this example knit every 14th and 15th stitch together.

RAGLAN:
Increase 1 stitch on each side of every marker as follows: Work until stitch with marker, make 1 yarn over, work 1 stitch in stockinette stitch (marker is in this stitch), make 1 yarn over. On next round knit yarn overs twisted to avoid holes.

DECREASE TIP (applies to sleeve):
Work until 2 stitches before stitch with marker, slip 1 stitch, knit 1 and pass slipped stitch over, knit 1 (stitch with marker), knit 2 together.

-------------------------------------------------------

START THE PIECE HERE:

-------------------------------------------------------

SWEATER - SHORT OVERVIEW OF THE PIECE:
Neck edge and yoke are worked in the round, top down. When piece is divided for body and sleeves, work body in the round on circular needle. Work sleeves in the round on a short circular needle, switch to double pointed needles when needed. Work the entire piece in 2 strands.

NECK EDGE:
Cast on 60-60-60-64-64-64 stitches with 2 strands Air or 1 strand Wish on circular needle size 7 mm = US 10,75. Work rib in the round (knit 1/purl 1) until piece measures approx. 10 cm = 4" in all sizes.
Switch to circular needle size 9 mm = US 13. Knit 1 round while increasing 4 stitches evenly in all sizes - read INCREASE/DECREASE TIP in explanation above = 64-64-64-68-68-68 stitches. Knit 1 round.

YOKE:
Insert 1 marker thread at beginning of this round = mid back. Leave marker thread in piece here, to measure from here. Insert 4 marker in piece without working - insert markers in stitch from beginning of round as follows: Insert 1st marker in the 12th-12th-12th-13th-13th-13th stitch, insert 2nd marker in the 22nd-22nd-22nd-23rd-23rd-23rd stitch, insert 3rd marker in the 44th-44th-44th-47th-47th-47th stitch, and insert 4th marker in the 54th-54th-54th-57th-57th-57th stitch. There are now 9 stitches on each sleeve, and 21-21-21-23-23-23 stitches on front and back piece.
Work stockinette stitch in the round and increase for RAGLAN - read explanation above - on each side of every marker every other round 6-8-11-14-19-23 times in total, and then increase on every 4th round 5-5-4-3-1-0 times in total = 152-168-184-204-228-252 stitches.
REMEMBER THE KNITTING GAUGE!
Work until piece measures 23-26-27-29-30-33 cm = 9"-10¼"-10⅝"-11⅜"-11¾"-13" from marker thread.
Now divide the piece for sleeves and body as follows: Work the first 22-24-26-29-32-35 stitches (= half back piece), slip the next 33-37-41-45-51-57 stitches on a stitch holder (= sleeve), cast on 7 new stitches on the under side of sleeve, work the next 43-47-51-57-63-69 stitches (= front piece), slip the next 33-37-41-45-51-57 stitches on a stitch holder (= sleeve), cast on 7 new stitches on under side under sleeve, work the remaining 21-23-25-28-31-34 stitches (= half back piece). Then finish sleeves and body separately.

BODY:
= 100-108-116-128-140-152 stitches. Now measure piece from here!
Work in stockinette stitch in the round until piece measures approx. 48-50-52-54-56-58 cm = 19"-19¾"-20½"-21¼"-22"-22¾" from shoulder and down. Switch to circular needle size 7 mm = US 10,75. Work rib in the round (knit 1/purl 1) until rib measures approx. 4 cm = 1½" in all sizes. Sweater measures approx. 52-54-56-58-60-62 cm = 20½"-21¼"-22"-22¾"-23⅝"-24⅜" from shoulder and down. Loosely bind off.

SLEEVES:
Slip the 33-37-41-45-51-57 stitches from stitch holder in one side back on a circular needle size 9 mm = US 13. Pick up 1 stitch in each of the 7 stitches cast on on the under side of sleeve = 40-44-48-52-58-64 stitches. Insert 1 marker in the middle of the new stitches under the sleeve. Work in stockinette stitch in the round. When sleeve measures 4 cm = 1½", begin decrease on the under side of sleeve – read DECREASE TIP in explanation above! Repeat decrease every 6½-6-5-4-4-3 cm = 2½"-2⅜"-2"-1½"-1½"-1⅛" 4-4-4-5-7-9 times in total = 32-36-40-42-44-46 stitches. Work until sleeve measures 35-33-33-32-32-30 cm = 13¾"-13"-13"-12½"-12½"-11¾". Switch to double pointed needles size 7 mm = US 10,75, work 1 round in stockinette stitch while decreasing 6-8-12-12-12-14 stitches evenly = 26-28-28-30-32-32 stitches.
Work rib (knit 1/purl 1) in the round until rib measures approx. 6 cm = 2⅜". Loosely bind off stitches with knit over knit and purl over purl. Work the other sleeve the same way.

This pattern has been corrected.

Updated online: 22.12.2020
Correction: Measurements for yoke and body + measurement sketch updated.

Diagram

All measurements in charts are in cm.

diagram measurements

Each of our patterns has specific tutorial videos to help you.

Do you have a question? See a list of frequently asked questions (FAQ)

Knitting tension is what determines the final measurements of your work, and is usually measured per 10 x 10 cm. It is provided like so: number of stitches in width x number of rows in height - eg: 19 stitches x 26 rows = 10 x 10 cm.

The knitting tension is very individual; some people knit/crochet loosely while others work tightly. You adjust the knitting tension with the needle size, which is why the suggested needle size only serve as a guide! You need to adjust this (up or down) to ensure that YOUR knitting tension matches the knitting tension provided in the pattern. If you work with a different knitting tension than provided you will have a different yarn consumption, and your work will have different measurements than what the pattern suggests.

The knitting tension also determines which yarns can replace each other. As long as you achieve the same knitting tension you can replace one yarn with another.

See DROPS lesson: How to measure your tension/gauge

See DROPS video: How to make a gauge tension swatch

The required amount of yarn is provided in grams, eg: 450 g. To calculate how many balls you’ll need you first need to know how many grams are in 1 ball (25g, 50g or 100g). This information is available if you click on the individual yarn quality on our pages. Divide the amount required with the amount of each ball. For example, if each ball is 50g (the most common amount), the calculation will be as follows: 450 / 50 = 9 balls.

The important thing when changing from one yarn to another is that the knitting/crochet tension remains the same. This is so that the measurements of the finished piece will be the same as on the sketch provided. It is easier to achieve the same knitting tension using yarns from the same yarn group. It is also possible to work with multiple strands of a thinner yarn to achieve the knitting tension of a thicker one. Please try our yarn converter. We recommend you to always work a test swatch.

Please NOTE: when changing yarn the garment might have a different look and feel to the garment in the photo, due to individual properties and qualities of each yarn.

See DROPS lesson: Can I use a different yarn than the one mentioned in the pattern?

All our yarns are categorised into yarn groups (from A to F) according to thickness and knitting tension – group A contains the thinnest yarns and group F the thickest. This makes it easier for you to find alternative yarns to our patterns, should you wish to switch yarn. All yarns within the same group have a similar knitting tension and can easily replace each other. However, different yarn qualities have different structures and properties which will give the finished work a unique look and feel.

Click here for an overview of the yarns in each yarn group

At the top of all our patterns you’ll find a link to our yarn converter, which is a helpful tool should you wish to use a different yarn than suggested. By filling in the yarn quality you wish to replace, the amount (in your size) and number of strands, the converter will present good alternative yarns with the same knitting tension. Additionally it will tell you how much you’ll require in the new qualities and whether you’ll need to work with multiple strands. Most skeins are 50g (some are 25g or 100g).

If the pattern is worked with multiple colours, every colour will have to be converted separately. Similarly, if the pattern is worked with several strands of different yarns (for example 1 strand Alpaca and 1 strand Kid-Silk) you will have to find alternatives for each, individually.

Click here to see our yarn converter

Since different yarns have different qualities and textures we have chosen to keep the original yarn in our patterns. However, you can easily find options among our available qualities by using our yarn converter, or simply pick a yarn from the same yarn group.

It is possible that some retailers still have discontinued yarns in stock, or that someone has a few skeins at home that they would like to find patterns for.

The yarn converter will provide both alternative yarn as well as required amount in the new quality.

If you think it's hard to decide what size to make, it can be a good idea to measure a garment you own already and like the size of. Then you can pick the size by comparing those measures with the ones available in the pattern's size chart.

You'll find the size chart at the bottom of the pattern.

See DROPS lesson: How to read size chart

The needle size provided in the pattern serves only as a guide, the important thing is to follow the knitting tension. And since knitting tension is very individual, you will have to adjust the needle size to ensure that YOUR tension is the same as in the pattern – maybe you’ll have to adjust 1, or even 2 needle sizes, up or down to achieve the correct tension. For this, we recommend that you work test swatches.

Should you work with a different knitting tension than the one provided, the measurements of the finished garment might deviate from the measurement sketch.

See DROPS lesson: How to measure your tension/gauge

See DROPS video: How to make a gauge tension swatch

Working a garment top-down provides more flexibility and room for personal adjustment. For example it is easier to try the garment on while working, as well as making adjustments to length of yoke and shoulder caps.

The instructions are carefully explaining every step, in the correct order. Diagrams are adjusted to the knitting direction and are worked as usual.

The diagram depicts all rows/rounds, and every stitch seen from the right side. It is read from bottom to top, from right to left. 1 square = 1 stitch.

When working back and forth, every other row is worked from the right side and every other row is worked from the wrong side. When working from the wrong side, the diagram will have to be worked reversed: from left to right, knit stitches are purled, purl stitches are knit etc.

When working in the round every round is worked from the right side and the diagram are worked from right to left on all rounds.

See DROPS lesson: How to read knitting diagrams

The diagram depicts all rows/rounds, and every stitch seen from the right side. It is worked from bottom to top, from right to left.

When working back and forth every other row is worked from the right side: from right to left and every other row is worked from the wrong side: from left to right.

When working in the round, every row in the diagram are worked from the right side, from right to left.

When working a circular diagram you start in the middle and work your way outwards, counter clockwise, row by row.

The rows usually start with a given number of chain stitches (equivalent to the height of the following stitch), this will either be depicted in the diagram or explained in the pattern.

See DROPS lesson: How to read crochet diagrams

Instructions for working several diagrams after each other on the same row/round, will often be written like so: “work A.1, A.2, A.3 a total of 0-0-2-3-4 times". This means you work A.1 once, then A.2 is worked once, and A.3 is repeated (in width) the number of times provided for your size – in this case like so: S = 0 times, M = 0 times, L=2 times, XL= 3 times and XXL = 4 times.

The diagrams are worked as usual: begin with the first row in A.1, then work the first row in A.2 etc.

See DROPS lesson: How to read knitting diagrams

See DROPS lesson: How to read crochet diagrams

The total width of the garment (from wrist-to-wrist) will be larger in the larger sizes, despite the actual sleeves being shorter. The larger sizes have longer sleeve caps and wider shoulders, so there will be a good fit in all sizes.

The measurement sketch/schematic drawing provides information regarding the full length of the garment. If it’s a jumper or a jacket the length is measured from the highest point on the shoulder (usually closest to the neckline), and straight down to the bottom of the garment. It is NOT measured from the tip of shoulder. Similarly, the length of yoke is measured from the highest point on the shoulder and down to where yoke is split into body and sleeves.

See DROPS lesson: How to read a schematic drawing

Diagrams are often repeated on the round or in height. 1 repeat is the diagram the way it appears in the pattern. If it says to work 5 repeats of A.1 in the round, then you work A.1 a total of 5 times after/next to each other in the round. If it says to work 2 repeats of A.1 vertically/in height you work the entire diagram once, then begin again at the start and work the entire diagram one more time.

Chain stitches are slightly narrower than other stitches and to avoid working the cast-on edge too tight, we simply chain more stitches to begin with. The stitch count will be adjusted on the following row to fit the pattern and measurement sketch.

The rib edge is more elastic and will contract slightly compared to, for example, stocking stitch. By increasing before the rib edge, you avoid a visible difference in width between the rib edge and the rest of the body.

It’s very easy to cast off too tightly, and by making yarn overs while casting off (and simultaneously casting these off) you avoid a too tight cast off edge.

See DROPS video: How to bind off with yarn overs (yo)

To achieve an even increase (or decrease) you can increase on, for example: every 3rd and 4th row alternately, like so: work 2 rows and increase on the 3rd row, work 3 rows and increase on the 4th. Repeat this until the increase is complete.

See DROPS lesson: Increase or decrease 1 st on every 3rd and 4th row alternately

Should you prefer to work in the round instead of back and forth, you may of course adjust the pattern. You’ll need to add steeks mid-front (usually 5 stitches), and follow the instructions. When you would normally turn and work from the wrong side, simply work across the steek and continue in the round. At the end you’ll cut the piece open, pick up stitches to work bands, and cover the cut edges.

See DROPS video: How to knit steeks and cut open

Should you prefer to work back and forth instead of in the round, you may of course adjust the pattern so you work the pieces separately and then assemble them at the end. Divide the stitches for the body in 2, add 1 edge stitch in each side (for sewing) and work the front and back pieces separately.

See DROPS lesson: Can I adapt a pattern for circular needles into straight needles?

Pattern repeats can vary slightly in the different sizes, in order to get the correct proportions. If you’re not working the exact same size as the garment in the photo, yours might deviate slightly. This has been carefully developed and adjusted so that the complete impression of the garment is the same in all sizes.

Make sure to follow instructions and diagrams for your size!

If you have found a pattern you like which is available in women’s size it’s not very difficult to convert it to men’s size. The biggest difference will be the length of sleeves and body. Start working on the women size that you think would fit across the chest. The additional length will be worked right before you cast off for the armhole/sleeve cap. If the pattern is worked top-down you can add the length right after the armhole or before the first decrease on sleeve.

Regarding additional yarn amount, this will depend on how much length you add, but it is better with a skein too many than too few.

All yarns will have excess fibres (from production) that might come off as lint or shedding. Brushed yarns (ie hairier yarns) have more of these loose, excess fibres, causing more shedding.

Shedding also depends on what is worn under or over the garment, and whether this pulls at the yarn fibres. It’s therefore not possible to guarantee that there will be no shedding

Below are some tips on how to get the best result when working with hairier yarns:

1. When the garment is finished (before you wash it) shake it vigorously so the looser hairs come off. NOTE: do NOT use a lint roller, brush or any method that pulls at the yarn.

2. Place the garment in a plastic bag and put it in your freezer - the temperature will cause the fibres to become less attached to each other, and excess fibres will come off easier.

3. Leave in the freezer for a few hours before taking it out and shaking it again.

4. Wash the garment according to the instructions on the yarn label.

Pilling is a natural process that happens to even the most exclusive of fibers. It's a natural sign of wear and tear that is hard to avoid, and that is most visible in high friction areas of your garment like a sweater's arms and cuffs.

You can make your garment look as new by removing the pilling, using a fabric comb or a pill/lint remover.

Still can't find the answer you need? Then scroll down and leave your question so one of our experts can try to help you. This will be done normally within 5 to 10 working days.
In the meantime, you can read the questions and answers that others have left to this pattern or join the DROPS Workshop on Facebook to get help from fellow knitters/crocheters!

You might also like...

Post a comment to pattern DROPS 216-23

We would love to hear what you have to say about this pattern!

If you want to leave a question, please make sure you select the correct category in the form below, to speed up the answering process. Required fields are marked *.

Comments / Questions (48)

country flag Amanda wrote:

Hej! Vilken storlek är tröjan som modellen bär stickad i?

07.05.2021 - 09:01

DROPS Design answered:

Hej Amanda, den er nok en ca størrelse M. MEN find størrelsen med de mål som passer dig i måleskitsen nederst i opskriften.

07.05.2021 - 14:34

country flag Louise Mary Teresa Hall wrote:

In the 'Body' instruction it says "measure piece from here" but in the next sentence it says "measure from shoulder and down". Which is it?

09.04.2021 - 21:47

DROPS Design answered:

Dear Louise, since the whole sweater is 52-54-56-58-60-62 cm long, and you knit 4 cm of ribbing, the measurements are fitting n with the schematic drawings, if you make them from the shoulder. But it is best, if you try the sweater on, and knit it as long as it suits your taste. Happy Knitting!

10.04.2021 - 01:13

country flag Juliette wrote:

Ik maak maat XL en heb aan 600g wol niet genoeg. Ik heb minimaal 650g nodig. Helaas is de wol nu overal uitverkocht!

06.04.2021 - 15:35

country flag Marie wrote:

Bonjour, je réalise ce tricot en L. La hauteur de 56 cm me semble insuffisante (pull trop court). N’y aurait il pas un problème de longueur du tricot ? Merci pour votre retour.

04.04.2021 - 23:01

DROPS Design answered:

Bonjour Marie, la longueur est correcte mais libre à vous de rallonger le pull si vous le souhaitez. Bon tricot!

06.04.2021 - 14:08

country flag Louise Hall wrote:

Hello, can you please advise me on the sizes. I’m making this for my daughter, bust size 96cm. What overall size should I use?

10.03.2021 - 13:32

DROPS Design answered:

Dear Mrs Hall, measure a similar garment she has and like the shape and compare these measurements to the ones in the chart, that's the best way to find out the matching size. Read more here. Happy knitting!

10.03.2021 - 13:45

country flag Malene Pedersen wrote:

Ved denne opskrift har jeg fundet boget der virker mærkeligt, der hvor jeg skal lave halskant skal jeg slå 64 masker op på en rundpind 7 og hvis man læser i indhold om pinde så skal det være på en 80 cm til rib og det kan på ingen måde hænge sammen så vil høre om jeg forstår det helt forkert eller hvad jeg skal gøre der????

27.02.2021 - 09:59

DROPS Design answered:

Hei Malene. Rundpinne 80 cm er nok tenkt til vrangborden nederst på genseren. Du kan bruke settpinnene (str. 7) om du ikke har en kortere rundpinne. mvh DROPS design

03.03.2021 - 13:31

country flag Małgorzata wrote:

Witam, rozumiem, że kupując 450g włóczki drops air wystarczy na swetr w rozmiarze S przerabiając 2 nitkami , dziękuje Małgorzata

11.02.2021 - 12:32

DROPS Design answered:

Dokładnie tak Małgosiu! Piękny sweter, jak zrobisz koniecznie zamieść go na naszej stronie w galerii dropsfan albo na facebooku w grupie DROPS Workshop. Pozdrawiamy!

11.02.2021 - 14:08

country flag Cinzia wrote:

Scusate, nel raglan la maglia con il marker in mezzo ai due gettati deve esser lavorata a diritto a rovescio? (Si parla di maglia rasata, ma la maglia rasata è l'insieme di un ferro a diritto a uno a rovescio in sequenza). Grazie.

01.02.2021 - 07:33

DROPS Design answered:

Buonasera Cinzia, lavorando in tondo la maglia rasata si lavora sempre a diritto. Buon lavoro!

01.02.2021 - 19:21

country flag Anna wrote:

Witam, chciałabym wykonać ten wzór z nowej wloczki 'wish', jaką ilość powinnam zakupić na rozmiar M? Dziękuję za pomoc i pozdrawiam.

19.01.2021 - 17:38

DROPS Design answered:

Witaj Aniu, musisz przewidzieć ok. 550 g włóczki Wish na ten sweter w rozmiarze M. Oczywiście przerabiać będziesz tylko 1 nitką. Pozdrawiamy!

20.01.2021 - 14:41

country flag Eileen wrote:

Hvorfor er ermene lenger jo mindre størrelse du strikker? Minste størrelsen skal måle 41 cm, mens den største er 36.

27.12.2020 - 03:59

DROPS Design answered:

Hei Eileen, Det er kortere mål i større plag pga av videre skuldre og lengre bærestykke. God fornøyelse!

28.12.2020 - 07:49