
Popular categories
Looking for a yarn?


Comments / Questions (21)
![]() Irene wrote:
Irene wrote:
Salve, avete un bellissimo sito! Vorrei sapere per questo modello, dopo aver fatto la parte superiore, è proseguo con le maglie senza aumenti, da dove devo misurare i 18/19 cm da voi indicati? Grazie mille Irene
04.09.2024 - 08:13DROPS Design answered:
Buonasera Irene, le misure vengono prese dalla cima del lavoro come indicato. Buon lavoro!
06.09.2024 - 23:34
![]() Carol Besdansky wrote:
Carol Besdansky wrote:
I am working off a version of this pattern on Pinterest. It says to single crochet. On this pattern it says double crochet. It would be so helpful to know which is correct since I have already tried this pattern three times to no avail. Thank you
15.02.2024 - 23:00DROPS Design answered:
Dear Mrs Bedansky, make sure to follow the appropriate English as UK and US have different terminology by clicking on the scroll down menu below pictures. ie 1 dc (Uk-English) is 1sc (US-English). Happy crocheting!
16.02.2024 - 07:56
![]() Liz wrote:
Liz wrote:
Bonjour, j ai bien suivi les explications, mais au lieu d avoir un bord droit, cela "rebique" je le retrouve avec le chapeau de Robin des Bois 😭🤣, je tente de faire des rangs d augmentations sans alterner avec les rangés sans, on verra. Qu en pensez vous? Merci de vos conseils
26.08.2023 - 21:35DROPS Design answered:
Bonjour Liz, les bords de notre chapeau remontent, comme on peut le voir sur la photo, mais vous pouvez ajuster les tours d'augmentations si vous les voulez plus droit. Bon crochet!
28.08.2023 - 14:03
![]() Chris52 wrote:
Chris52 wrote:
Bonjour, Je suis à ma deuxième tentative, la première avec la taille la plus grande car j'ai un tour de tête de 58, résultat beaucoup trop grand , deuxième essai avec la plus petite taille c'est toujours trop grand...j'avais pourtant crocheté l'échantillon qui correspondait bien. je vais faire un troisième essai en enlevant encore des mailles...
05.08.2023 - 14:42DROPS Design answered:
Bonjour Chris52, avez-vous bien la bonne tension? Vous devez avoir ici 16 mailles serrées = 10 cm de large, autrement dit, dans la 2ème taille, vous avez 90 mailles quand vos augmentations sont terminées, soit 56.25 cm exactement, un peu plus serré que les 58 cm de tour de tête pour que le chapeau tienne bien. Adaptez la taille de votre crochet si besoin pour que votre échantillon soit juste et ainsi obtenir les bonnes mesures finales. Bon crochet!
07.08.2023 - 11:26
![]() Mervi wrote:
Mervi wrote:
Ohje lenkeistä on aivan käsittämätön minulle. Olen lukenut sen kymmeniä kertoja enkä vain ymmärrä. Kiinnitin lenkit omalla tavallani.
13.07.2022 - 19:32
![]() Mascha wrote:
Mascha wrote:
90 Maschen sind etwa 55 cm - ist das nicht zu eng für Größe 56/58?
11.05.2022 - 00:13DROPS Design answered:
Liebe Mascha, damit der Hut schön auf dem Kopf sitzt, muss er etwas küzer als der Kopfumgang sein. Viel Spaß beim häkeln!
11.05.2022 - 08:39
![]() Mascha wrote:
Mascha wrote:
Der Hut gefällt mir! :-) Morgen fange ich mit Häkeln an. :-) Sehe ich es richtig, dass die Enden der Kordel nachher lose herunterhängen?
08.05.2022 - 22:14DROPS Design answered:
Liebe Mascha, ja genau, so ist es auch richtig. Viel Spaß beim häkeln!
09.05.2022 - 08:38
![]() Sonia Mursia wrote:
Sonia Mursia wrote:
Buona sera ho difficolta' ad aumentare il bordo del cappello dal 6 giro ,potreste dirmi come fare quando scrivete GIRI 5-12: Lavorare a maglie basse e proseguire aumentando ogni 2 giri, lavorando ogni volta 1 maglia in più tra gli aumenti.
18.11.2021 - 17:59DROPS Design answered:
Buongiorno Sonia, in quei giri deve lavorare una maglia in più prima prima di lavorare gli aumenti, rispetto ai giri precedenti, perciò al 5° giro deve lavorare 1 maglia bassa nella prime 12 maglie e poi lavorare gli aumenti. Buon lavoro!
20.11.2021 - 11:50
![]() Maria wrote:
Maria wrote:
Quando deve misurare il cappello dall'inizio per fare gli avmenti del bordo e come aumentare?
30.09.2021 - 19:44DROPS Design answered:
Buonasera Maria, gli aumenti iniziano sul 2° giro: a quale punto del lavoro sta facendo riferimento? Buon lavoro!
07.10.2021 - 00:18
![]() Lotta wrote:
Lotta wrote:
Förstår inte hur man skall sätta dit snodd och öglorna
10.04.2021 - 09:52DROPS Design answered:
Hej Lotta, du kanske kan titta på en video med öglor: ögla
12.04.2021 - 14:39
|
|
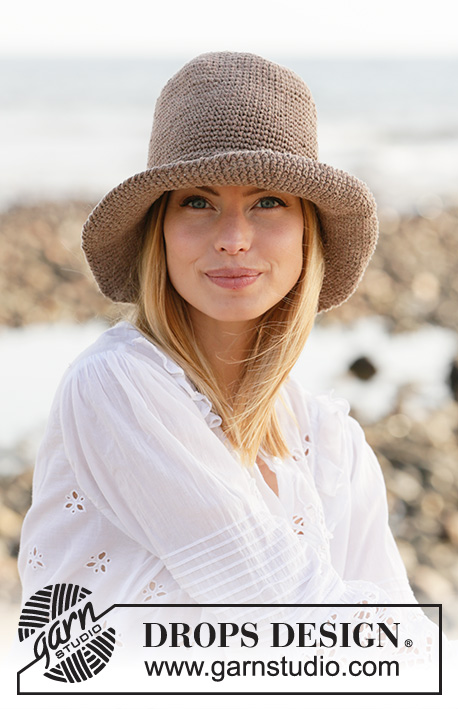
Garden Girl#gardengirlhat |
|
 |
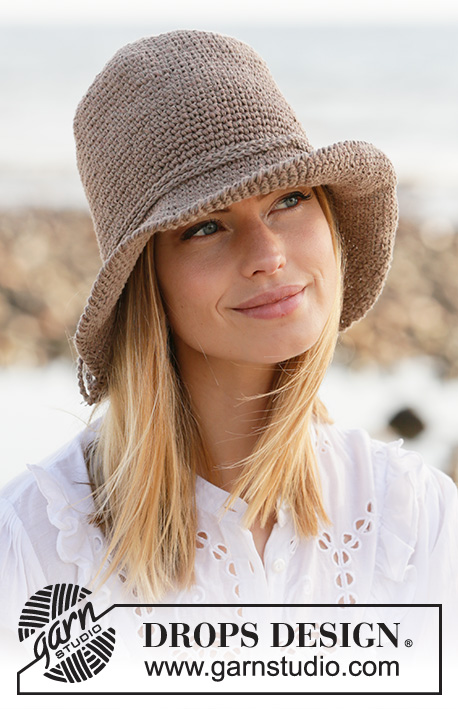 |
Crocheted hat in DROPS Bomull-Lin or DROPS Paris. Piece is crocheted top down with double crochets.
DROPS 209-8 |
|
|
---------------------------------------------------------- EXPLANATION FOR THE PATTERN: ---------------------------------------------------------- CROCHET INFORMATION: At beginning of every round with double crochet work 1 chain stitch, this chain stitch does not replace 1st double crochet. Finish round with 1 slip stitch in first double crochet on round INCREASE/DECREASE TIP (evenly): To calculate how to increase/decrease evenly, use the total number of stitches on row (e.g. 84 stitches) , and divide stitches by number of increases/decreases to be done (e.g. 4) = 21. In this example increase by working 2 double crochets in every 21st stitch. If decrease is done work every 20th and 21st double crochet together as follows: * Insert hook in next stitch, get yarn *, work from *-* 2 times in total, make 1 yarn over and pull yarn through all 3 loops on hook (= 1 stitch decreased). ---------------------------------------------------------- START THE PIECE HERE: ---------------------------------------------------------- HAT: The piece is worked top down. Work 4 chain stitches on hook size 4.5 mm with Bomull-Lin or Paris and form a ring with 1 slip stitch in first chain stitch worked on round. ROUND 1: Work 6 double crochets in ring – READ CROCHET INFORMATION. ROUND 2: Work 2 double crochets in every double crochet = 12 double crochets. ROUND 3: * 1 double crochet in first double crochet, 2 double crochets in next double crochet *, work from *-* the entire round = 18 double crochets. ROUND 4: * 1 double crochet in each of the first 2 double crochets, 2 double crochets in next double crochet *, work from *-* the entire round = 24 double crochets. ROUND 5: * 1 double crochet in the first 3 double crochets, 2 double crochets in next double crochet *, work from *-* the entire round = 30 double crochets. ROUND 6: * 1 double crochet in the first 4 double crochets, 2 double crochets in next double crochet *, work from *-* the entire round = 36 double crochets. REMEMBER THE CROCHET TENSION! ROUNDS 7 - 14: Work double crochets and continue increase the same way. I.e. there is 1 more stitch between increases for every round worked. When 14th round has been worked, there are 84 double crochets on round. Increase in size S/M is now done. Then work as explained below. In size M/L work 1 more round with increase the same way (= 6 stitches increased) = 90 stitches. BOTH SIZES: Work 1 double crochet in every double crochet the entire round until piece measures 18-19 cm from the top. BRIM: ROUND 1: Work 1 round with double crochets where number of stitches is adjusted to 88 stitches in both sizes - read INCREASE/DECREASE TIP. I.e. In size S/M increase 4 stitches and in size M/L decrease 2 stitches. ROUND 2: Work* 1 double crochet in the first 10 double crochets, 2 double crochets in next stitch *, work from *-* the entire round = 96 double crochets. ROUND 3: Work 1 double crochet in every double crochet. ROUND 4: Work* 1 double crochet in the first 11 double crochets, 2 double crochets in next stitch *, work from *-* the entire round = 104 double crochets. ROUNDS 5 - 12: Work double crochets and continue increase on every other round, so get 1 more stitch between increases for every increase. When 12th round has been worked, there are 136 double crochets on round. ROUND 13: Work 1 double crochet in every double crochet. Turn piece and work an edge from wrong side around the brim with reverse double crochet (= reverse double crochet = work double crochets from left to right). Fasten off. TIE AND LOOPS: Work chain stitches with Bomull-Lin or Paris on hook size 4.5 mm until chain row measures approx. 150 cm. Make a knot in each end and fasten the strand. Place the tie 2 times around the hat and make a knot. Now work 2 loops that the tie runs through. Work chain stitches with Bomull-Lin or Paris on hook size 4,5 until the chain row measures approx. 2 cm. Cut the strand, leaving a strand in each end to fasten the loop with. Work another loop the same way. Place the loops on each side of the back of the hat so that they are approx. 14 cm apart. They should be placed vertically over the tie so that they hold the tie in place. Fasten the strands on each end of the loop on the inside of the hat. |
|
Have you finished this pattern?Tag your pictures with #dropspattern #gardengirlhat or submit them to the #dropsfan gallery. Do you need help with this pattern?You'll find 8 tutorial videos, a Comments/Questions area and more by visiting the pattern on garnstudio.com. © 1982-2025 DROPS Design A/S. We reserve all rights. This document, including all its sub-sections, has copyrights. Read more about what you can do with our patterns at the bottom of each pattern on our site. |
|


With over 40 years in knitting and crochet design, DROPS Design offers one of the most extensive collections of free patterns on the internet - translated to 17 languages. As of today we count 314 catalogues and 11821 patterns translated into English (UK/cm).
We work hard to bring you the best knitting and crochet have to offer, inspiration and advice as well as great quality yarns at incredible prices! Would you like to use our patterns for other than personal use? You can read what you are allowed to do in the Copyright text at the bottom of all our patterns. Happy crafting!
Post a comment to pattern DROPS 209-8
We would love to hear what you have to say about this pattern!
If you want to leave a question, please make sure you select the correct category in the form below, to speed up the answering process. Required fields are marked *.