
Popular categories
Looking for a yarn?


|
|||||||||||||||||||
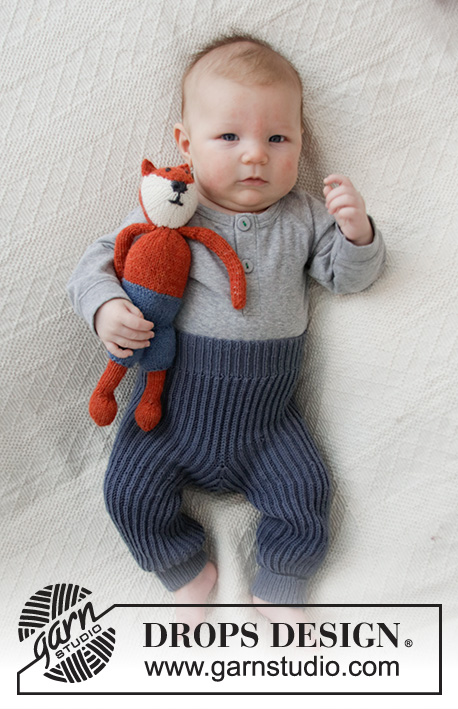
Early Nap Pants |
|||||||||||||||||||
 |
 |
||||||||||||||||||
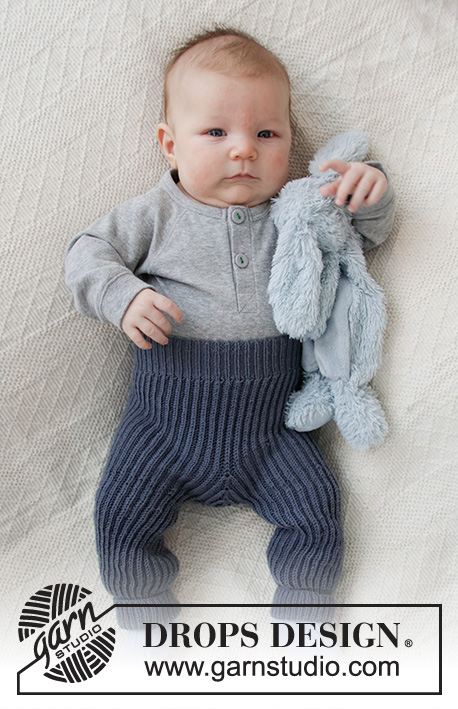
Knitted trousers for babies in DROPS Baby Merino. The piece is worked top down with English ribs. Sizes: Premature – 4 years.
DROPS Baby 36-5 |
|||||||||||||||||||
|
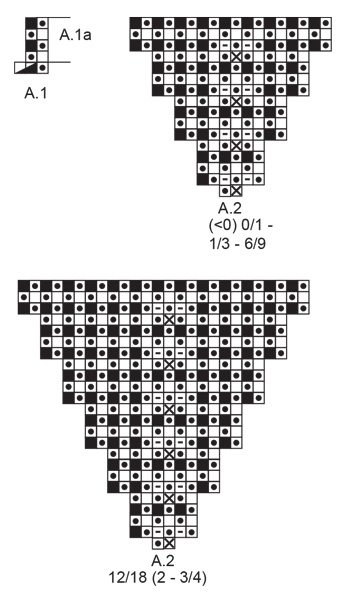
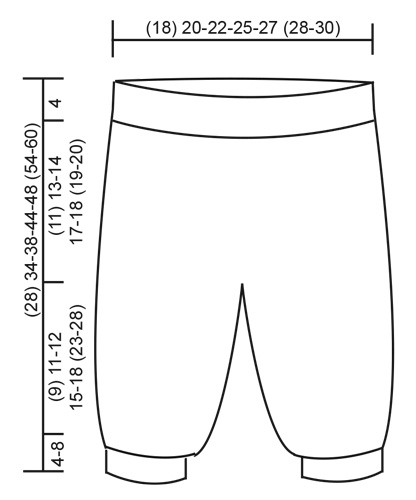
------------------------------------------------------- EXPLANATIONS FOR THE PATTERN: ------------------------------------------------------- PATTERN: See diagrams A.1 and A.2. Choose diagram for your size (applies to A.2). CASTING-OFF TIP: To avoid the cast-off edge being tight you can cast off with a larger size needle. If the edge is still tight, make 1 yarn over after approx. each 4th stitch at the same time as casting off and the yarn overs are cast off as normal stitches. ------------------------------------------------------- START THE PIECE HERE: ------------------------------------------------------- TROUSERS – SHORT OVERVIEW OF THE PIECE: The piece is worked in the round with circular needle/double pointed needles, top down. The round starts mid-back. TROUSERS: Cast on (132) 144-156-180-192 (204-216) stitches with circular needle size 2 mm and Baby Merino. Work rib (= knit 1, purl 2) in the round for 4 cm, then work an elevation at the back as follows: Work (32) 35-38-44-47 (50-53) stitches in rib, turn, tighten the strand and work (64) 70-76-88-94 (100-106) stitches back in rib, turn, tighten the strand and work (58) 64-70-82-88 (94-100) stitches in rib, turn, tighten the strand and work (52) 58-64-76-82 (88-94) stitches back in rib. Continue like this, working 6 stitches less every time you turn and until you have worked over a total of (28) 34-40-40-46 (52-58) stitches. Now continue in the round as follows from the right side: Change to circular needle size 2.5 mm and work A.1 over all stitches. When the first round has been worked there are (88) 96-104-120-128 (136-144) stitches on the needle. Continue in the round with English rib according to A.1a. REMEMBER THE KNITTING TENSION! When the piece measures approx. (12) 14-15-16-17 (18-19) cm mid-front (adjust so the next round is knitted), work as follows: Work A.2 (= 2 stitches), A.1a over the next (42) 46-50-58-62 (66-70) stitches as before, A.2 over 2 stitches (= mid-front), A.1a over the last (42) 46-50-58-62 (66-70) stitches as before. When A.2 has been worked 1 time in height there are (120) 128-136-152-176 (184-192) stitches on the needle. When the piece measures (15) 17-18-21-22 (23-24) cm (increases should have finished), cast off (12) 12-12-12-16 (16-16) stitches mid-front and mid-back. Each leg is finished separately; place the stitches for the one leg on 1 thread. LEG: = (48) 52-56-64-72 (76-80) stitches. Divide the stitches onto 4 double pointed needles size 2.5 mm and continue A.1a in the round. When the leg measures approx. (9) 11-12-15-18 (23-28) cm (or to desired length; there are (4) 6-8-8-8 (8-8) cm left), change to double pointed needles size 2 mm and continue in the round with rib, with knit over knit and purl over purl (on the first round work the yarn-overs together with their stitches). When the leg measures (13) 17-20-23-26 (31-36) cm from the division, cast off loosely with knit over knit and purl over purl – read CASTING-OFF TIP. Place the stitches from the thread back on double pointed needles size 2.5 mm and work in the same way as the first leg. ASSEMBLY: Sew together the (12) 12-12-12-16 (16-16) stitches cast off front and back between the legs. |
|||||||||||||||||||
Diagram explanations |
|||||||||||||||||||
|
|||||||||||||||||||
|
|||||||||||||||||||
|
|||||||||||||||||||
|
Have you made this or any other of our designs? Tag your pictures in social media with #dropsdesign so we can see them! Do you need help with this pattern?You'll find tutorial videos, a Comments/Questions area and more by visiting the pattern on garnstudio.com. © 1982-2024 DROPS Design A/S. We reserve all rights. This document, including all its sub-sections, has copyrights. Read more about what you can do with our patterns at the bottom of each pattern on our site. |
|||||||||||||||||||


With over 40 years in knitting and crochet design, DROPS Design offers one of the most extensive collections of free patterns on the internet - translated to 17 languages. As of today we count 304 catalogues and 11422 patterns - 11422 of which are translated into English (UK/cm).
We work hard to bring you the best knitting and crochet have to offer, inspiration and advice as well as great quality yarns at incredible prices! Would you like to use our patterns for other than personal use? You can read what you are allowed to do in the Copyright text at the bottom of all our patterns. Happy crafting!
Comments / Questions (57)
En ymmärrä, miten silkukoiden määrän pitäisi vähentyä kun tehdään mallineuletta A.1 tai sen jälkeisellä rivillä. Ohjeen mukaan kaksi silmukkaa neulotaan yhteen, mutta mallissa myös tehdään langankierto eli luodaan silmukka. Sillä ohjeella silmukkojen määrä ei vähene. Olenko ymmärtänyt jotain väärin?
20.12.2020 - 04:57DROPS Design answered:
Silmukat vähenevät koska seuraavalla kerroksella langankierto ja nostettu silmukka neulotaan yhteen.
22.03.2021 - 16:58Jeg skal nu strikke A1 - her slår man om, løfter maske løst af og strikker så 2 masker vrang sammen! Efter sådan en omgang er der i mit hoved nøjagtig det samme antal masker, som jeg startede med (156), men i opskriften står der, at jeg nu har 104 masker??? Det forstår jeg ikke?? Hvor er det reduktionen kommer fra? Og hvad er meningen med at reducere maskeantallet? De skal jo også tages ud igen eller??
12.12.2020 - 12:56DROPS Design answered:
Hei Susanne. Kastet som gjøres ved 1. ikon i diagram A.1 er ikke en økning, men tilhører patentmasken, slik at når du følger 1. rad i diagrammet strikker du 2. og 3. maske sammen (= minsker masker på 1. omgang i A.1). Når arbeidet måler 15 cm økes det ved å strikke A.2. God Fornøyelse!
16.12.2020 - 14:26Merci pour votre réponse je fais souvent vos modèles avec vos laines , je vais réessayer avec vos explications Merci
23.11.2020 - 20:53Bonjour , je ne comprends comment je dois avoir 44 mailles après avoir fait les tours pour la réhausse car je le retrouve avec 132 mailles ( pour la première taille ) . En faisant A1 j’ai beaucoup trop de mailles ?? Merci Florence
22.11.2020 - 23:04DROPS Design answered:
Bonjour Florence, je ne comprend pas votre question je suis navrée; dans la 1ère taille, vous avez 132 mailles et tricotez la réhausse à partir du milieu dos: 32 mailles sur l'endroit, 64 m sur l'envers, 58 m sur l'endroit, 52 m sur l'envers et continuez ainsi en tricotant 6 mailles en moins tous les rangs jusqu'à ce que vous ayez tricoté 28 m. Tricotez ensuite A.1 (= vous diminuez 1 m toutes les 2 m) = il reste 88 m après le 1er tour de A.1 (les jetés des mailles glissés ne comptent pas comme des mailles). J'espère que ces informations complémentaires pourront vous aider; n'hésitez pas à reposer votre question si ce n'est pas le cas. Bon tricot!
23.11.2020 - 10:08Hallo, ich komme gerade an die Stelle "A.2 (= 2 Maschen), A.1 über die nächsten (42) 46-50-58-62 (66-70) Maschen wie zuvor, A.2 über 2 Maschen (= vordere Mitte), A.1 über die letzten (42) 46-50-58-62 (66-70) Maschen wie zuvor." Hier müsste korrekterweise A1a stehen, oder übersehe ich etwas?
20.10.2020 - 23:20DROPS Design answered:
Liebe Frau Wallburg, ja genau, hier stricken Sie wie zuvor A.1a (die 1. Reihe in A.1 wird nur einmal gestrickt) . Viel Spaß beim stricken!
21.10.2020 - 08:13Hallo! Ik heb een vraag: als ik begin met de meerdering volgens A.2 en dan 46 steken (bij maat 0/1 maanden) verder tel voor de tweede Needering (middenvoor) kom ik uit bij een overslag en niet bij een steek die recht samen gebreid moet worden. De meerdering kan alleen worden gemaakt bij een steek die recht samen gebreid moet worden, toch? Zo ja, moet ik dan in de voorgaande (na 45 steken) of de volgende (47 steken) de meerdering maken?Alvast bedankt!
05.09.2020 - 14:29DROPS Design answered:
Dag Noelle,
Als het goed is moet je meerderen boven het symbool waar je op de vorige naald 1 omslag maakte en 1 averechte steek op de rechter naald zette (dus het bovenste symbool). Nu ga je 5 steken meerderen in de stee en de omslag zoals beschreven bij de symbool uitleg.
11.09.2020 - 13:36I’m not sure I quite understand how a yarn over, a slipped stitch and a purl 2 together will equal any kind of decrease in A.1. Can you please clarify how this decrease works? If you’re continually adding a yo, won’t that negate the decrease that a p2tog creates? I don’t understand.
30.08.2020 - 20:29DROPS Design answered:
Dear Mrs Tjemsland, yarn overs worked over slipped stitches do not increase the number of stitches, these yarn overs belong the the stitches they are worked over, this means yarn over, slip 1 as if to P = 1 stitch - P2 tog = from 2 sts only 1 stitch remain. Hope this will help. Happy knitting!
31.08.2020 - 10:00Hallo! Ik kom eigenlijk direct in de problemen na het breien van A.1. Ik maak maat 1-3 maanden en heb dus 156 steken. Na A. 1 1 naald gebreid te hebben zou ik er 104 over moeten houden. Hoe dan? Je bereidt er 2 averecht samen, maar je maakt ook een omslag. Per saldo blijkt het aantal steken dus gelijk. Zelf als je de overslag en de afgehaalde steek samen telt klopt het niet. Hoe kan dit? Alvast bedankt!
20.08.2020 - 20:48DROPS Design answered:
Dag Noelle,
Op de eerste naald in A.1 maak je 1 omslag op de rechter naald en je haalt 1 steek averecht af, dan brei je 2 averecht samen. Dit herhaal je steeds. Bij het tellen van de steken tellen de omslag en de afgehaalde steek samen als 1 steek, waardoor je in totaal 104 steken op de naald hebt.
21.08.2020 - 10:44Do you have a video of how to knit the front gusset as I don’t understand your chart.
17.08.2020 - 04:09DROPS Design answered:
Dear Linda, you will find how to read a diagram here - you will decrease in A.1 1 stitch by purling together every 2nd and 3rd stitch and increase 4 sts in A.2 (see here how to work 5 sts in same st in English rib). Happy knititng!
17.08.2020 - 09:37Es gibt einen Fehler in der cm Angabe bei der Grösse 6/9 Monate. Und zwar hier: Bei einer Länge von (12) 14-15-18-17 (18-19) cm, gemessen an der vorderen Mitte - daran angepasst, dass die nächste Runde eine Runde mit Rechtsmaschen ist... Ich nehme an es sollte hier 16 cm heissen für Grösse 6/9 Monate!? Ansonsten tolle Anleitung! Danke! Liebe Grüsse aus Basel
01.08.2020 - 14:56