
Popular categories
Looking for a yarn?


|
|||||||||||||||||||
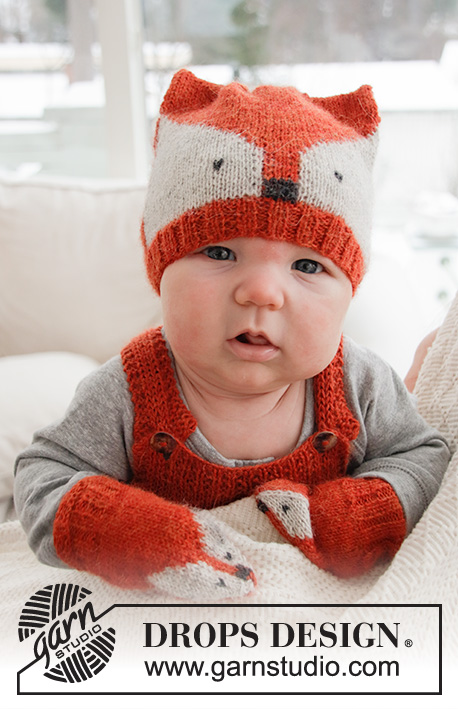
Baby Fox Onesie |
|||||||||||||||||||
 |
 |
||||||||||||||||||
Knitted body for babies in DROPS Alpaca. The piece is worked with a fox-pattern, with straps and pocket. Sizes: Premature – 4 years.
DROPS Baby 36-2 |
|||||||||||||||||||
|
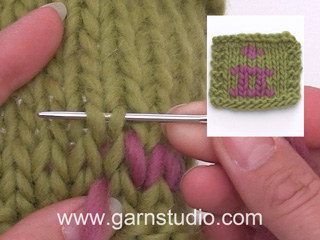
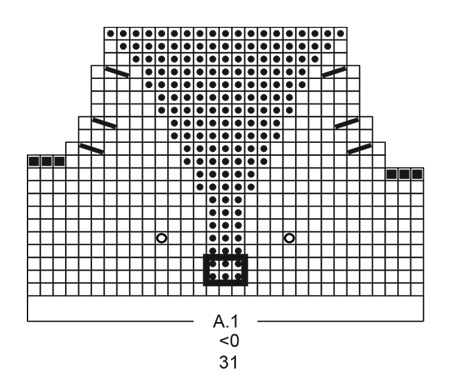
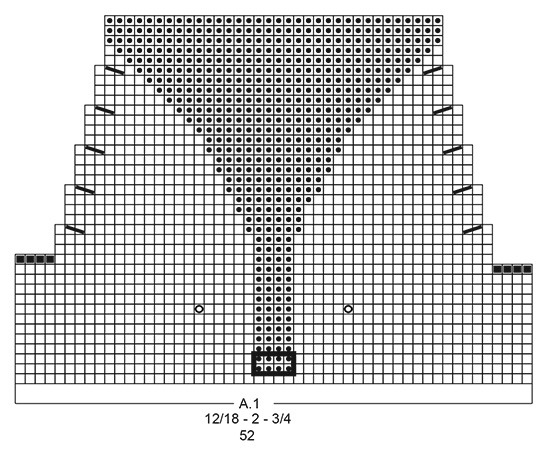
------------------------------------------------------- EXPLANATIONS FOR THE PATTERN: ------------------------------------------------------- RIDGE/GARTER STITCH (worked in the round): 1 ridge in height = 2 rounds; Knit 1 round and purl 1 round. RIDGE/GARTER STITCH (worked back and forth): Knit all rows. 1 ridge in height = Knit 2 rows. DECREASE TIP: Work 3 stitches in garter stitch, slip 1 stitch as if to knit, knit 1 and pass the slipped stitch over the knitted stitch (= 1 stitch decreased), work until there are 5 stitches left, knit 2 together (= 1 stitch decreased) and work 3 stitches in garter stitch. PATTERN: Diagram A.1 – choose diagram for your size. The whole diagram is worked in stocking stitch. All rows in the diagram are shown from the right side. When working with 2 colours, work using the strand from both the outside and inside of the ball of light pearl grey to avoid long strands on the wrong side; i.e. work with1 strand light pearl grey, 1 strand rust and 1 strand light pearl grey. NOTE: To avoid holes when changing colours, twist the 2 strands together. The thick square around the stitches on the first 2 rows mark where you work duplicate stitches for the fox’s nose. CASTING-OFF TIP: To avoid the cast-off edge being tight you can cast off with a larger size needle. If the edge is still tight, make 1 yarn over after approx. each 4th stitch at the same time as casting off and the yarn overs are cast off as normal stitches. ------------------------------------------------------- START THE PIECE HERE: ------------------------------------------------------- BODY – SHORT OVERVIEW OF THE PIECE: The piece is worked in 2 sections, back and forth before being put on the same short circular needle and continued in the round. The piece is divided for the front and back pieces and they are finished separately back and forth. An edge is knitted up around each leg. Then a loose pocket is worked with fox-pattern, which is sewn on to the body. BACK PIECE: Cast on (8) 10-10-12-12 (14-14) stitches with circular needle size 3 mm and rust. Work 1 edge stitch in GARTER STITCH – read description above, work (6) 8-8-10-10 (12-12) stitches in stocking stitch and 1 edge stitch in garter stitch. REMEMBER THE KNITTING TENSION! When the piece measures (1) 1-2-2-2 (3-3) cm, cast on 2 stitches at the end of each row a total of (5) 6-7-7-8 (8-9) times on each side, then cast on (5) 5-5-6-7 (8-9) stitches at the end of the next 2 rows = (38) 44-48-52-58 (62-68) stitches. Lay the piece to one side and work the front piece. FRONT PIECE: Cast on (8) 10-10-12-12 (14-14) stitches with circular needle size 3 mm and rust. Work 1 edge stitch in garter stitch, (6) 8-8-10-10 (12-12) stitches in stocking stitch and 1 edge stitch in garter stitch. When the piece measures (3) 4-5-6-7 (8-10) cm, cast on 2 stitches at the end of each row a total of 3 times on each side, then cast on (9) 11-13-14-17 (18-21) stitches at the end of the next 2 rows = (38) 44-48-52-58 (62-68) stitches. BODY: Place the stitches from the back and front pieces on the same short circular needle size 3 mm = (76) 88-96-104-116 (124-136) stitches. Insert 1 marker between each piece. The markers will be used when casting off stitches for the armholes. Work stocking stitch in the round. When the piece measures (9) 12-16-17-19 (21-23) cm from the markers, work 2 RIDGES – read description above – over 4 stitches on each side of both markers (= a total of 8 garter stitches on each side). On the next round cast off 3 stitches for the armholes on each side of both markers (= 6 stitches cast off on each side of the piece); front and back pieces are finished separately. FRONT PIECE: = (32) 38-42-46-52 (56-62) stitches. The piece is continued back and forth with 3 stitches in garter stitch on each side of the piece. On the first row from the right side decrease 1 stitch on each side of the piece – read DECREASE TIP! Decrease like this on each row from the right side a total of (4) 4-6-6-7 (6-7) times = (24) 30-30-34-38 (44-48) stitches. Continue with stocking stitch and 3 stitches in garter stitch on each side until the piece measures (4) 5-5-6-7 (8-10) cm from the division. On the next row from the wrong side decrease 1 stitch in the middle of the piece by purling 2 together = (23) 29-29-33-37 (43-47) stitches. On the next row from the right side work rib as follows: 3 stitches in garter stitch, * knit 1, 1 stitch in garter stitch *, work from *-* until there are 4 stitches left, finish with knit 1 and 3 stitches in garter stitch. When the piece measures (5) 6-6-7-8 (9-11) cm from the division, work 2 buttonholes on the next row from the right side as follows: Work 3 stitches in garter stitch, knit 1, 1 stitch in garter stitch, slip 1 stitch as if to knit, knit 1, pass the slipped stitch over the knitted stitch, 1 yarn over, work as before until there are 7 stitches left, 1 yarn over, knit 2 together, 1 stitch in garter stitch, knit 1 and 3 stitches in garter stitch. Cast off with knit when the piece measures (6) 7-7-8-9 (10-12) cm from the division. BACK PIECE: = (32) 38-42-46-52 (56-62) stitches. Work back and forth with 3 stitches in garter stitch in each side. On first row from right side decrease 1 stitch in each side of piece – read DECREASE TIP. Decrease like this on each row from right side a total of 4 times = (24) 30-34-38-44-(48-54) stitches. On the next row from the wrong side decrease 1 stitch in the middle of the piece by purling 2 together = (23) 29-33-37-43 (47-53) stitches. Continue back and forth in stocking stitch with 3 garter stitches in each side until piece measures (4) 5-5-6-7 (8-10) cm from division. On the next row from the right side work rib as follows: 3 stitches in garter stitch, * knit 1, 1 stitch in garter stitch *, work from *-* until there are 4 stitches left, finish with knit 1 and 3 stitches in garter stitch. Continue back and forth with rib until piece measures (6) 7-7-8-9 (10-12) cm from division. Now cast off stitches for the neck and work the straps from the right side as follows: Work 3 stitches in garter stitch, * knit 1, 1 stitch in garter stitch *, work from *-* a total of (2) 3-3-3-3 (3-3) times, 2 stitches in garter stitch (= (9) 11-11-11-11 (11-11) stitches for strap), cast off the next (5) 7-11-15-21 (25-31) stitches, work 3 stitches in garter stitch, * knit 1, 1 stitch in garter stitch *, work from *-* a total of (2) 3-3-3-3 (3-3) times and finish with 2 stitches in garter stitch (= (9) 11-11-11-11 (11-11) stitches for strap). Work back and forth with rib and garter stitch over the one strap; leave the other stitches on the needle. Continue with rib until the piece measures 8-14 cm from the division, work 2 ridges over all stitches, then cast off with knit. Work the other strap in the same way. POCKET: Cast on (33) 42-42-42-54 (54-54) stitches with circular needle size 3 mm and light pearl grey. Work 1 edge stitch in garter stitch, A.1 (= (31) 40-40-40-52 (52-52) stitches) and finish with 1 edge stitch in garter stitch. Continue this pattern. The whole of A.1 is worked with 1 edge stitch in garter stitch on each side. When A.1 has been worked 1 time in height there are (21) 28-28-28-36 (36-36) stitches on the needle. The piece is now finished with rust. The piece measures approx. (7) 10-10-10-12 (12-12) cm. On the next row from the right side work rib as follows: 1 edge stitch in garter stitch, * knit 1, 1 stitch in garter stitch *, work from*-* until there are 2 stitches left, at the same time decrease (0) 1-1-1-1 (1-1) stitch, finish with knit 1 and 1 edge stitch in garter stitch = (21) 27-27-27-35 (35-35) stitches. Work rib for 2 cm (or to desired length). Cast off with knit. Work 1 edge; from the (3) 4-4-4-4 (4-4) cast-off stitches on the pocket up to the cast-off edge as follows: Knit up 18-28 stitches inside the 1 edge stitch from the right side. Work rib starting from the wrong side as follows: * 1 stitch in garter stitch, purl 1 *, work from *-* over all stitches. Cast off with knit from the right side when the edge measures 1 cm – read CASTING-OFF TIP. Work a similar edge along the other side of the pocket. EDGE AROUND LEG: Knit up from the right side approx. 40 to 74 stitches along the one leg-opening with circular needle size 3 mm and rust; adjust so the number of stitches is divisible by 2 and the edge is loose. Work rib (= knit 1, 1 stitch in garter stitch) back and forth with 1 edge stitch in garter stitch on each side of the piece. When the edge measures 2-4 cm, cast off with knit from the right side. Repeat around the other leg. ASSEMBLY: Sew the opening between the legs. Sew 1 button on each strap. Sew the fox’s eyes on the pocket with 1 duplicate stitch using dark grey on each light pearl grey section – see circle in diagram. Sew the nose on the pocket with 1 duplicate stitch using dark grey in each of the (3) 4-4-4-4 (4-4) stitches on rows 2 and 3 at the bottom of the pocket – see marked square in diagram. Fasten the cast-on edge on the pocket, approx. 2-4 cm up from the last cast-on stitches on the front piece, using duplicate stitches and sew the cast-off edge to the body, so the pocket is flat. Sew the sides of the pocket to the body as far as the cast-off edge. |
|||||||||||||||||||
Diagram explanations |
|||||||||||||||||||
|
|||||||||||||||||||
|
|||||||||||||||||||

|
|||||||||||||||||||
|
|||||||||||||||||||

|
|||||||||||||||||||
|
Have you made this or any other of our designs? Tag your pictures in social media with #dropsdesign so we can see them! Do you need help with this pattern?You'll find tutorial videos, a Comments/Questions area and more by visiting the pattern on garnstudio.com. © 1982-2024 DROPS Design A/S. We reserve all rights. This document, including all its sub-sections, has copyrights. Read more about what you can do with our patterns at the bottom of each pattern on our site. |
|||||||||||||||||||


With over 40 years in knitting and crochet design, DROPS Design offers one of the most extensive collections of free patterns on the internet - translated to 17 languages. As of today we count 304 catalogues and 11422 patterns - 11422 of which are translated into English (UK/cm).
We work hard to bring you the best knitting and crochet have to offer, inspiration and advice as well as great quality yarns at incredible prices! Would you like to use our patterns for other than personal use? You can read what you are allowed to do in the Copyright text at the bottom of all our patterns. Happy crafting!
Comments / Questions (33)
Bonjour, Merci pour ce modèle ! Pourriez-vous me préciser la longueur des bretelles pour une taille 6-9 mois ? Vous indiquez 8/14cm après la séparation, mais je ne comprends pas... Je vous remercie !
23.01.2023 - 18:04DROPS Design answered:
Bonjour et merci Geo, vous devez tricoter les bretelles pendant 8 à 14 cm en fonction de la taille de l'enfant - basez-vous sur un modèle similaire que l'enfant porte, calculez un peu plus long pour que les boutons puissent être ajustés facilement au fur et à mesure que l'enfant va grandir. Bon tricot!
24.01.2023 - 12:19Kære Drops Design Jeg er ved forstykket og skal til at strikke kanten, der ser ud til at være i en form for ribstrik. Helt præcist heri opskriften: På næste pind fra retsiden strikkes der rib således: Strik 3 masker retstrik, * 1 ret, 1 maske retstrik *, strik fra *-* til der er 4 masker tilbage, afslut med 1 ret og 3 masker retstrik. Mit spørgsmål er, hvad er 1 maske retstrik? og skal alle maskerne på vrangsiden strikkes vrang, når der ikke er andet oplyst?
11.01.2023 - 12:14DROPS Design answered:
Hej Eva Maria, 1 maske ret (betyder ret fra retsiden og vrang fra vrangen = glatstrik) 1 maske retstrik (betyder ret fra retsiden og ret fra vrangen = rille) Det vil sige hver 2.maske glat og hver 2.maske rille :)
12.01.2023 - 15:31Hi, im the back piece where it says: When the piece measures (...), cast on 2 stitches at the end of each row a total of (5) 6-7-7-8 (8-9) times on each side. I'm making size 68/74. This means I need 7 times 2 extra stiches at each side, is in total 28 stitches. Does this mean I should cast on 4 extra stitches at end of each neelde of 7 needles, or does this mean I should cast on 2 extra stitches at the beginning and end the end of each needle of 14 needles? Thank you!! Best, Elma
17.10.2022 - 10:15DROPS Design answered:
Dear Mrs Lammers, you start with 12 sts, cast on 2 sts at the end of next 2 rows (after 2 cm) = 14 sts after the first of these 2 rows, and 16 sts at the end of 2nd row, work these 2 rows 6 more times (= you have increased 2 sts 7 times = 14 sts on each side = 40 sts on needle); then cast on 6 sts at the end of next 2 rows (46 sts at the end of the first of these 2 rows; 52 sts at the end of the 2nd row). Hope it can help. Happy knitting!
17.10.2022 - 10:32I have knitted this romper many times for my friends (it’s very popular!) I’ve knitted in 8ply using 3.75mm needles and I don’t do the fox on a pocket - I’ve just knitted it as part of the front. I have found that the finished sizes seem smaller than for suggested age group - so I knit the next size up.
27.04.2022 - 08:37Vielen Dank für die tolle Anleitung. Beim stricken der Tasche bin ich jedoch auf ein Problem gestoßen. Laut Strickschrift sollen in den Reihen 12, 14 und 18 jeweils beidseitig zwei Maschen in der Farbe orange zusammengestrickt werden. Alle umliegenden Machen werden aber in braumeliert gestrickt. Auf den Fotos sind aber keine einzelnen orangen Maschen auf der weißen Fläche zu sehen. Vielen Dank für die Hilfe!
19.02.2022 - 21:35DROPS Design answered:
Liebe Lina, ja stimmt, danke für den Hinweis, unsere Designteam wird sicher eine Korrektur dafür schreiben. Viel Spaß beim stricken!
21.02.2022 - 09:43Hej! Jag skulle uppskatta om ni kunde specificera hur långa hängslena ska stickas beroende på vilken storlek man stickar, samt exakt varifrån ni vill att man mäter den längden. Om det är från delningen i armhålan så känns det som att de blir oproportionerligt korta jämfört med exempelbildens hängslen.
16.02.2022 - 15:39Comment savoir si ce modèle est simple... compliqué... très compliqué...? Où est il écrit ce le niveau requis ...?
10.01.2022 - 15:17DROPS Design answered:
Bonjour Mme Lepoutre, lisez attentivement les explications, consultez les leçons et les vidéos si besoin et, si vous avez des questions, utilisez cet espace pour les poser. Bon tricot!
10.01.2022 - 16:18Hello. Could you please help clarify the diagram for the pocket? Are all rows shown in the diagram or only RS rows? Also when you come to the decrease rows the legend for the diagram says you decrease with rust when though that part of the fox is knitted with the pearl grey, can you please explain? Thank you
31.12.2021 - 09:29DROPS Design answered:
Dear Dori, the diagram shows all the rows in the pattern, seen from the RS. That is, you work the stitches in WS rows opposite to how they are shown in the diagram. The decreases are worked in pearl grey (=white square, as shown above). Happy knitting!
31.12.2021 - 19:58Hola, en la foto se ve como al empezar la parte superior estuviese hecha en punto elástico y luego se ve un cambio a punto jersey?
30.10.2021 - 16:10DROPS Design answered:
Hola Victoria, se trabaja de abajo arriba. Primero se comienza en punto jersey y se termina en punto elástico.
01.11.2021 - 13:08Hallo, ich komme beim Anfang bei Vorder-und Rückteil mit der angegebenen Strickschrift nicht auf die vorgegebenen Maschenanzahl. Kann mir das jemand erläutern? Danke
12.06.2021 - 22:21DROPS Design answered:
Liebe Jana, was meinen Sie hier? Können Sie uns bitte mehr sagen? Welche Größe stricken Sie? Stimmt Ihre Maschenprobe (= 24 Maschen x 32 Reihen glatt rechts = 10x10 cm)... Danke im voraus für Ihr Verständnis!
14.06.2021 - 08:48